Battery and Recharging Question(s)...
 07-13-2009, 05:02 PM
#21
Pro

Thread Starter
Yep, that's in series.
Ok, just wanted to be absolutely sure.
Was getting mixed up when you said clamp vs. lug. Tomato / Tomatoe
Ok, just wanted to be absolutely sure.
Was getting mixed up when you said clamp vs. lug. Tomato / Tomatoe
Last edited by DesertSpider; 07-13-2009 at 05:12 PM.
 07-13-2009, 08:13 PM
#22
Racer


Member Since: Apr 1999
Location: Las Vegas NV
Posts: 461
Likes: 0
Received 0 Likes
on
0 Posts

I go one step further than darguy... I install a knife switch between the negative cable and the negative battery terminal. I then restart the car, turn it off and hook up my multimeter jumping the knife switch. I now have my meter in place and can open the knife switch and search for the draw. My reasoning for this if I disconnect the battery it may at the same time disconnect a sticking diode or voltage reg, etc. never letting me find my problem. By opening the knife switch after I have hooked up the meter I have effectively never opened a circuit. Any draw should still be there.
07-13-2009, 11:26 PM
#23
Pro
Thread Starter
I go one step further than darguy... I install a knife switch between the negative cable and the negative battery terminal. I then restart the car, turn it off and hook up my multimeter jumping the knife switch. I now have my meter in place and can open the knife switch and search for the draw. My reasoning for this if I disconnect the battery it may at the same time disconnect a sticking diode or voltage reg, etc. never letting me find my problem. By opening the knife switch after I have hooked up the meter I have effectively never opened a circuit. Any draw should still be there.
07-13-2009, 11:45 PM
#24
Pro
Thread Starter
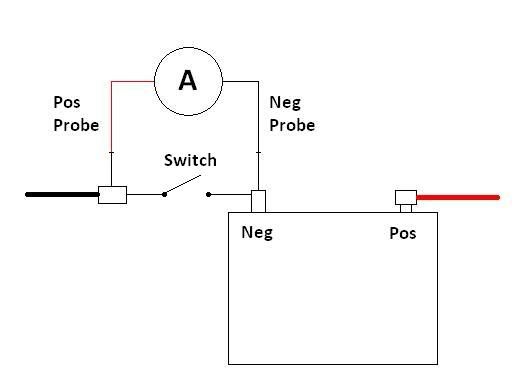
Here's the steps:
0. Ensure ignition is in 'lock' and all accessories and lights are off.
1. Disconnect neg cable from battery.
2. Set Multi-meter up to read current (probes and dial).
3. Put one probe on negative clamp, the other probe on negative terminal.
4. If the Multi-meter is not self-adjusting, adjust current setting down from highest range until the reading is in the middle of the range that you're set at, or you're at the lowest range and the reading is still zero (you may have to change the pos probe to a different port on the meter when you move from the highest current setting, depending on the meter).
Ideally, you shouldn't have any current reading. I had a 2A draw on my '64 internally in the alternator when I got it a couple of years ago.
DS
07-14-2009, 03:18 PM
#25
Drifting


Umm... I think I need to understand this better. You adjust the meter 'range' down until the reading that you're getting from your now attached wires is in the middle of the range shown on the meter ? I think the way I'm envisioning this process is that there are several different ranges and what you're trying to achieve is 'trapping' the reading in whatever range it falls in, and to do that it is ideal to select the range that puts the reading in the 'center' of the range selector. Is that about right ????
DS
DS
DS: Another way to achieve the same effect would be to attach the probes (alligator clip tips) to the clamp and terminal while the multi-meter was on and set to current measurement - and then turn the vehicle on/off as vetzs describes. It's not as elegent, but should yield the same results, as the current will have an uninterrupted path through the meter.
The idea with going from high to low on the current range settings is two-fold.
First, if the current draw is large and you have the meter set to a low range, you might blow the fuse in your meter. If you start high and work your way down, you should have no problems unless the draw is larger than the high end of your meter (usually 20 A, in which case you'd likely see a spark when you touch the neg clamp to the neg terminal - this is the 'quick and dirty' test for a large draw).
Second, as you decrease the current range setting your measurement accuracy increases. With this type of measurement that is probably not a big deal, but if you're looking for a small current it might be. The meters have an inherant accuracy in each range, usually described as a % of the reading. My meter has 2 decimal places, so on the 20 A setting the smallest current I can see is 0.01 A, or 10 mA. If the meter's error is +/- 0.1% of 20 A (0.02 A) it may not show anything on the display, or it may read higher than the actual current. The idea being that you want to take the measurement in a range that the error is significantly less than the measurement. And, as you don't know what the measurement is, that you work your way down from the top so's to not blow your meter.

Last edited by darguy; 07-14-2009 at 05:54 PM.