I might get lucky on this repair
 04-11-2009, 12:15 PM
#1
Melting Slicks

Thread Starter

I was turning a corner and giving a little throttle the other day in my 66, when I heard the unmistakable and indescribable sound of metal suddenly turning violent, in the vicinity of the right rear wheel. Uh oh. Then the engine revved freely and it was pretty clear power was not getting where it needed to go. Got it towed home by a guy in a surburban (who happened to be in my squadron a couple of years before I got there and happens to be the son of one of my neighbors...talk about coincidence). I finally got to take a peek at it today. Expecting a snapped axle shaft, or (more likely) a well-destroyed U-joint, I instead saw this:
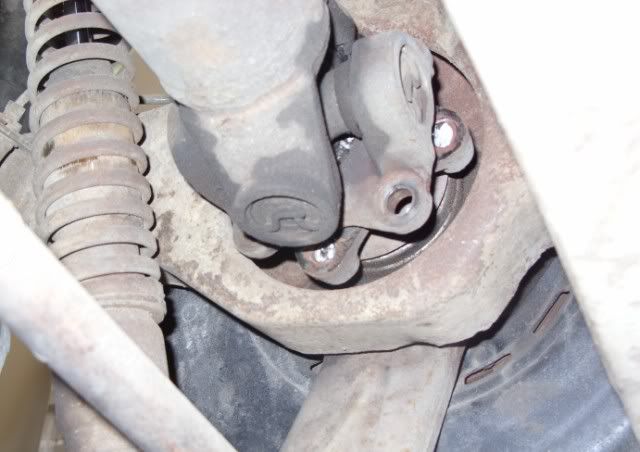
I've never been so happy to see sheared bolts. Now, to figure out how to get to the other side of them.
I've never been so happy to see sheared bolts. Now, to figure out how to get to the other side of them.
 04-11-2009, 12:35 PM
#2
Pro

That is an easy fix. move shaft out of way, by loosening the camber bolt, on the strut rod, after noting its position, and rotating the arm outward. Pull the cotter pin, lock the parking brake up, and remove the nut. The flange should slide right off. You can then remove the bolts, or replace the flange. Slide the flange back on, torque the nut to spec, ( and more, if needed to align the cotter pin hole), place shaft into postion, loosely install new PROPER bolts, and greased french locks, reposition camber bolt and tighten. Then tighten the flange bolts to spec.
Then go replace the bolts on the other side, with the proper bolts. Rich
Then go replace the bolts on the other side, with the proper bolts. Rich
Last edited by landshark 454; 04-11-2009 at 12:38 PM.
04-11-2009, 12:44 PM
#3
Race Director


Member Since: Jan 2002
Location: Close to DC
Posts: 14,559
Received 2,135 Likes
on
1,472 Posts
C2 of the Year Finalist - Modified 2020

Then go replace the bolts on the other side, with the proper bolts. Rich[/QUOTE]
 I believe that would be grade 8.
  Dennis
I believe that would be grade 8. Dennis
04-11-2009, 01:04 PM
#4
Melting Slicks

Also, once you get a clear shot at looking at the brpken bolts examine them. I suspect you will see hairline shinny spots across the broken stubs. This means that these bolts were failing for awhile. I've never seen this type failure under low load. Keep us posted, Al W.
04-11-2009, 01:19 PM
#5
Le Mans Master


Also, once you get a clear shot at looking at the brpken bolts examine them. I suspect you will see hairline shinny spots across the broken stubs. This means that these bolts were failing for awhile. I've never seen this type failure under low load. Keep us posted, Al W.
......must be the wrong grade bolts......


 04-12-2009, 06:23 PM
#9
Melting Slicks
Thread Starter
That is an easy fix. move shaft out of way, by loosening the camber bolt, on the strut rod, after noting its position, and rotating the arm outward. Pull the cotter pin, lock the parking brake up, and remove the nut. The flange should slide right off. You can then remove the bolts, or replace the flange. Slide the flange back on, torque the nut to spec, ( and more, if needed to align the cotter pin hole), place shaft into postion, loosely install new PROPER bolts, and greased french locks, reposition camber bolt and tighten. Then tighten the flange bolts to spec.
Then go replace the bolts on the other side, with the proper bolts. Rich
Then go replace the bolts on the other side, with the proper bolts. Rich
04-12-2009, 07:46 PM
#10
Race Director

After you get a chance to fix this let us know what bolts were installed (assuming the opposite side are the same) and if the others are tight. I think this is the first time I've seen that connection fail in waching this site for several years.
Dan
Last edited by DansYellow66; 04-12-2009 at 07:48 PM.
04-15-2009, 06:14 PM
#12
Melting Slicks
Thread Starter
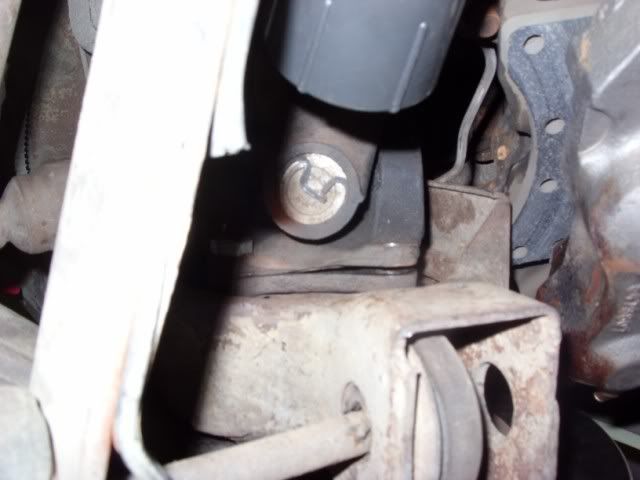
Well, this isn't going to help matters any.

Can't get the bolt out...it hits the "trunk" floorpan (back is on the left, front is on the right). Searching for tips, I found one post that confirmed my fear:
It seems like inserting the bolt the other way would just make it hit the spring? Does it actually clear the spring when its done right? In my AIM it actually looks like mine is installed correctly.
I gotta get this taken care of...there's a Hooters car show coming up.
Can't get the bolt out...it hits the "trunk" floorpan (back is on the left, front is on the right). Searching for tips, I found one post that confirmed my fear:
Originally Posted by Chuck Gongloff
When you put the camber bolts into the bracket mounted on the diff, make sure you put them in "back to front", NOT "front to back".
If you put them in "front to back" you can never get them out without dropping the bracket.
Check your AIM, and you'll see the correct way. The camber bolt and head faces the rear of the car. The nut faces the front. Chuck
If you put them in "front to back" you can never get them out without dropping the bracket.
Check your AIM, and you'll see the correct way. The camber bolt and head faces the rear of the car. The nut faces the front. Chuck
I gotta get this taken care of...there's a Hooters car show coming up.
Last edited by Godholio; 04-15-2009 at 06:17 PM.

 04-15-2009, 06:51 PM
#15
Melting Slicks
Thread Starter
04-15-2009, 10:22 PM
#17
Melting Slicks
Thread Starter
Good call...it took some "coaxing" with a rubber mallet and the floor jack, but I got it back in place and was able to rotate to where I could get to the flange nut. The cotter pin was kind of mangled and took a bit of work...now I can see that the threads exposed past the nut are pretty mangled also. My camera won't focus on it, but suffice it to say the threads are distorted and the nut is not going to come off without a fight. But first I'll have to pick up a 1" wrench, I think. So I'm done til tomorrow, I guess.
04-17-2009, 09:47 PM
#18
Melting Slicks
Thread Starter
UPDATE!
Got the flange out, you can clearly see what's left of two of the bolts. They came out pretty easily. The second one took a touch of PB Blaster, but I didn't have to drill either of them.


So, I got the bolts out, put the flange back, got the 1-1/16th nut and cotter pin back, reset the camber bolt (marking the strut bar itself saved me, my marks on the cam itself got rubbed away by the wrench), and started putting in the new bolts. It took a while to get the first one lined up, but I finally got it. Spent just as long trying to get the one at the opposite corner, but finally got it, too. That's when things went downhill quickly. At this point, both remaining holes should be lined up and ready for the bolts, right? Wrong.
You can see the gap between the u-joint and the flange. The bolt you see on the left is tight...when I realized what I was looking at I tightened both bolts just to be sure, then I took the pictures. The opposite corner has an almost identical gap. So much for getting out of this one easily.
Got the flange out, you can clearly see what's left of two of the bolts. They came out pretty easily. The second one took a touch of PB Blaster, but I didn't have to drill either of them.
So, I got the bolts out, put the flange back, got the 1-1/16th nut and cotter pin back, reset the camber bolt (marking the strut bar itself saved me, my marks on the cam itself got rubbed away by the wrench), and started putting in the new bolts. It took a while to get the first one lined up, but I finally got it. Spent just as long trying to get the one at the opposite corner, but finally got it, too. That's when things went downhill quickly. At this point, both remaining holes should be lined up and ready for the bolts, right? Wrong.
You can see the gap between the u-joint and the flange. The bolt you see on the left is tight...when I realized what I was looking at I tightened both bolts just to be sure, then I took the pictures. The opposite corner has an almost identical gap. So much for getting out of this one easily.
04-17-2009, 09:53 PM
#19
Le Mans Master

Either loosen the cam bolt and rotate it until the gap disappears, tighten the bolts and then reset the cam bolt to its original position OR jack the trailing arm up a bit to decrease the gap and then put the bolts in.
Jim
Jim