C1 Dash Pad Finally Out
 08-22-2008, 10:29 AM
#1
Team Owner


Thread Starter


What a hateful job; I won't do this one again -- I'd rather pull a motor. Just cleaning up and waiting on the new pad and replacement windshield to arrive now. Not fun working in a humid, hot garage listening to Hurricane Fay pound on the doors. Do those two brackets for the grab bar have to come out for the pad install ? The bolts are frozen fast and I think we're talking vice grip removal here.
Last edited by Frankie the Fink; 08-22-2008 at 10:31 AM.
 08-22-2008, 11:12 AM
#2

Don't use any glue until you have the dash pad where it belongs. Put the right side on first you can finagile it in past the two grab bar brackets.Don't cut anything till you are done. Good Luck!!!
08-22-2008, 11:32 AM
#3
Tech Contributor

And you only need glue on the edge of the pad where it goes under the windshield rubber, and the edges of the pad around the instrument cluster, kick panels, and radio console.
The mirror, speaker, defroster ducts, "CORVETTE" insert, and dash end caps all serve to hold the pad in place.
The mirror, speaker, defroster ducts, "CORVETTE" insert, and dash end caps all serve to hold the pad in place.
08-22-2008, 12:26 PM
#4
Race Director

The fun is just beginning. You may want to use this time to redo guages if needed, check wiring replace bulbs, etc. Good luck. The results will make you happy.
08-22-2008, 01:16 PM
#5
Race Director
Hmmmm.
Though it had been exactly 30 years since I changed mine, i seem to recall that removing the pad and scraping, etc was the easy part.
The hard part was getting the instrument cluster back in.
I will be doing this job again, in about 5 months after the new paint.
Doug
Though it had been exactly 30 years since I changed mine, i seem to recall that removing the pad and scraping, etc was the easy part.
The hard part was getting the instrument cluster back in.
I will be doing this job again, in about 5 months after the new paint.
Doug
08-22-2008, 02:11 PM
#6
Team Owner
Thread Starter
That's the bitch of it - I had the gauge cluster out, tach/speedo overhauled, new tach cable installed and the cluster painted about 3 months back.... Now, because the windshield got cracked I'm back into all this area again.
 08-22-2008, 08:52 PM
#8
Burning Brakes

Member Since: Mar 2004
Location: Grand Harbor in South Carolina
Posts: 940
Received 111 Likes
on
72 Posts

In doing mine just a few months back (and yes I'm glad it's over) I used the Al Knoch pad and had the install vidio. The recomendation was to remove the grab bar bracket ONLY on the right side. I left the left side bracket on the car and found that the dash went on a little easier. I don't believe it would hurt to leave both brackets on ,but be VERY careful not to let the bracket tear the dash pad while trying to install over them. One word of caution. While cutting the pad from around these brackets, BE VERY CAREFUL not to cut too much.If you cut more than needed the chrome end piece that goes over the ends of the grab bar will not cover the hole. Good luck
08-22-2008, 11:38 PM
#9
Burning Brakes
We can't repeat often enough how important it is to NOT cut to much material away. None of us wants to think about why we know this.
If I were to do it again, I would cut more foam away around the cluster and more foam away around the insert. I had a terrible time getting my insert in. I have never heard anyone say they were sorry they cut to much foam out. This is one of those "take your time and when you get frustrated, walk away" type jobs.
Larry
08-22-2008, 11:41 PM
#10
Tech Contributor
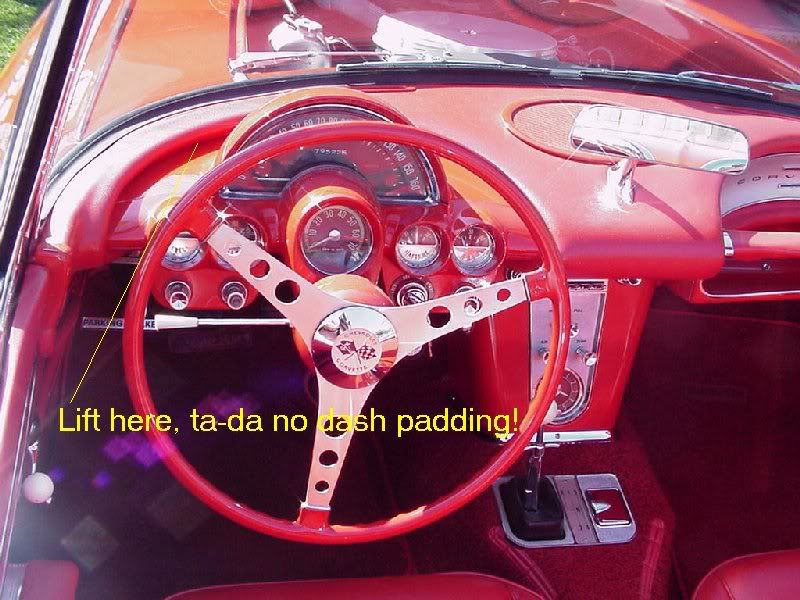
The trick I've used on 4 different 58-62 dash installs, is to remove plenty of material behind the cluster so that with the cluster installed, the new pad sits on TOP of the cluster, instead of the cluster being pushed into the tight and unforgiving vinyl.
In fact, with the car fully assembled you can lift the dash pad off of the top of the cluster at the back and see the dash skeleton underneath.
In fact, with the car fully assembled you can lift the dash pad off of the top of the cluster at the back and see the dash skeleton underneath.
08-22-2008, 11:48 PM
#11
Le Mans Master

Member Since: Sep 2003
Location: Norwalk ohio
Posts: 8,927
Received 640 Likes
on
358 Posts
2019 Corvette of the Year Winner
St. Jude Donor '15
yup, had to have Sharon sit where the soft top goes and push like hell with her feet on either side of the cluster to get it in place....once I had her do that it went easier.
the other thing I learned IMHO, is that you can't take off too much of the back foam padding, that crap just gets in the way where anything else might have to fit and clamp in place (dash insert area, cluster area, windshield area). If I was to ever do one again, I would get rid of a lot of that dash padding where those joints are because it just causes too much extra work and I can't tell the difference where it is and isn't near those areas.......you will come to hate the foam padding!
the other thing I learned IMHO, is that you can't take off too much of the back foam padding, that crap just gets in the way where anything else might have to fit and clamp in place (dash insert area, cluster area, windshield area). If I was to ever do one again, I would get rid of a lot of that dash padding where those joints are because it just causes too much extra work and I can't tell the difference where it is and isn't near those areas.......you will come to hate the foam padding!
08-23-2008, 09:40 AM
#12
Team Owner
Thread Starter
I get it...cut the foam...easy on the vinyl trimming...pretty much the same as the '60s Mustangs I've done. I just hope I'm getting a decent pad from CC - I thought they were all pretty much Al Knoch resellers but I'm told CC is 'Romeo Engineering' and at least one forum member had to send a pad back....its was like 1" short.
08-23-2008, 09:51 AM
#13
Race Director
Member Since: Jun 2006
Location: Inverness FL
Posts: 17,891
Received 728 Likes
on
622 Posts
St. Jude Donor '07

Frank
i bought carpet directly from Romeo and i'm pleased with it and i would be tempted to also try their other stuff, including the dash pad.
my only negative experience was that they were slower than molasses in January, had to call several times to remind them of my order.
Bill
i bought carpet directly from Romeo and i'm pleased with it and i would be tempted to also try their other stuff, including the dash pad.
my only negative experience was that they were slower than molasses in January, had to call several times to remind them of my order.
Bill
08-23-2008, 10:34 AM
#14
Drifting

I'm the guy with the pad problem. I bought it about 3 months ago from CC and it came from Romeo. I tried to install it about 3 weeks ago and just couldn't get it to fit. (God I hope it isn't me). I called CC and the got a return call from Dennis at Romeo. My replacement pad arrived yesterday. Whole process was 2 1/2 weeks. He was very cooperative. I'm going to "dry fit" the new pad soon.
When installing the pad, keep an eye on the insert side. I removed both brackets for dry fitting. Then took off the pad, installed the brackets, and put the pad on again.. ALWAYS keep and eye on those brackets. If something slips or you go to far when you push the pad in, you will rip/tear the vinyl and the chrome molding won't cover it. Also, make sure the speaker hole is dead nuts centered or nothing else will fit.
When installing the pad, keep an eye on the insert side. I removed both brackets for dry fitting. Then took off the pad, installed the brackets, and put the pad on again.. ALWAYS keep and eye on those brackets. If something slips or you go to far when you push the pad in, you will rip/tear the vinyl and the chrome molding won't cover it. Also, make sure the speaker hole is dead nuts centered or nothing else will fit.
08-26-2008, 10:39 AM
#15
Team Owner
Thread Starter
Got the windshield and frame back and they look pretty daggone good; even has the correct 'LOF' script on the windshield (1st pic). My glass guy found the chrome moldings all boogered up and twisted and did a lot of work cleaning out the 'channels', etc. - looks like a good job to me.
Fitted the rubber windshield frame-to-body rubber and added 4 (2 on each side) rubber pieces (2nd pic) to build up the ends of the channel to match the height of the long rubber piece (I guess thats the right thing to do - never saw anything in print about the best approach). Do I put sealant both on top and on the bottom of the long rubber strip or just on the bottom ?? It only had it on the bottom when I pulled the windshield. Waiting anxiously for the dash pad to arrive !
Fitted the rubber windshield frame-to-body rubber and added 4 (2 on each side) rubber pieces (2nd pic) to build up the ends of the channel to match the height of the long rubber piece (I guess thats the right thing to do - never saw anything in print about the best approach). Do I put sealant both on top and on the bottom of the long rubber strip or just on the bottom ?? It only had it on the bottom when I pulled the windshield. Waiting anxiously for the dash pad to arrive !
Last edited by Frankie the Fink; 08-26-2008 at 10:43 AM.
08-26-2008, 11:09 AM
#17
Team Owner
Thread Starter
I may have to buy you gas and beer for a trip down here (since you offered before) when I get ready to install the windshield. The wife has a weak right wrist and I don't trust her to lift it and my neighbors are not mechanically inclined - I mean NOT AT ALL.
The one that thinks he is couldn't find his own butt with night vision goggles and a GPS....
The one that thinks he is couldn't find his own butt with night vision goggles and a GPS....
Last edited by Frankie the Fink; 08-26-2008 at 11:15 AM.
08-26-2008, 12:52 PM
#18
Race Director
Member Since: Jun 2006
Location: Inverness FL
Posts: 17,891
Received 728 Likes
on
622 Posts
St. Jude Donor '07
I may have to buy you gas and beer for a trip down here (since you offered before) when I get ready to install the windshield. The wife has a weak right wrist and I don't trust her to lift it and my neighbors are not mechanically inclined - I mean NOT AT ALL.
The one that thinks he is couldn't find his own butt with night vision goggles and a GPS....
The one that thinks he is couldn't find his own butt with night vision goggles and a GPS....
Bill
08-26-2008, 03:33 PM
#19
Burning Brakes

Frank, thanks for the great photos. I am going to go thru this ordeal this upcoming winter and your photos have been a great assist in visualing how things are supposed to look. Keep the photos coming!!! Thanks again.
Mark
Mark
08-26-2008, 04:05 PM
#20
Team Owner
Thread Starter
Don't know if folks noticed in the first pic in this thread but I put two pieces of plywood on the floorboards where the seats go while working in the car. Prob not necessary but the bare floorboards sure do move and make funny noises when you walk around on them and I don't need more problems.