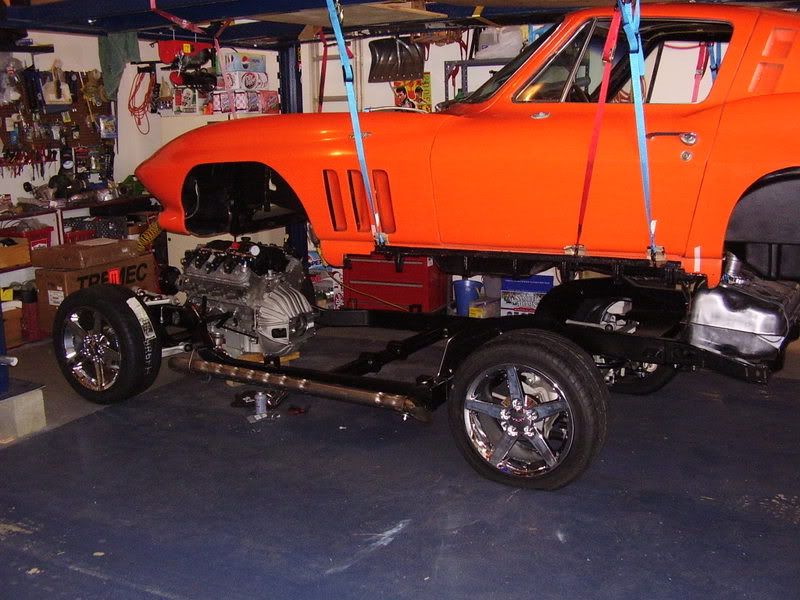
Follow along as I add a custom frame, LS2 engine & 5-speed to a '65 vette!
 01-28-2007, 10:07 AM
#41
Racer

Thread Starter
Member Since: Jun 2004
Location: freehold NJ
Posts: 384
Likes: 0
Received 0 Likes
on
0 Posts

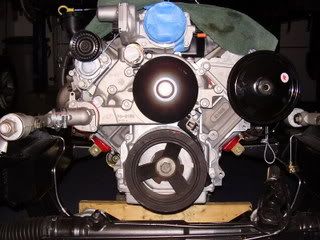
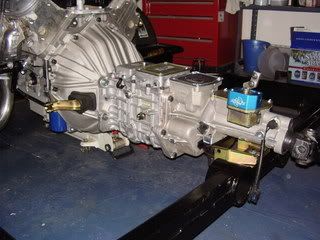
Here is another S&P drive setup that I like better than the high/wide setup. I used the high/wide drive on the LS1 in my 59, and did not like the way it took up so much room in the engine compartment, so I went with the close-in drive on the LS2 in my C2. With the close-in setup, the A/C compressor is almost completely hidden from sight under the engine.You do have to trim the Fuel rail covers a little to clear the Alt, but that is no big deal.
Regards, John McGraw
Regards, John McGraw
Colt
 02-02-2007, 10:28 PM
#42
Racer
Thread Starter
Member Since: Jun 2004
Location: freehold NJ
Posts: 384
Likes: 0
Received 0 Likes
on
0 Posts
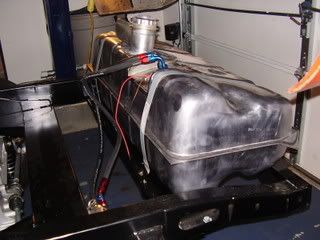
Well this week, I've managed to install the gas tank, and attach to the filter/regulator and fuel line. I had to buy a new tank support and straps and brackets.
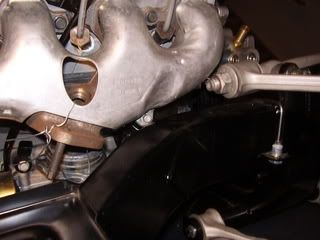
I lowered the engine in the car but came across new problems: the heater outlet bibs are too close to the frame and the exhaust manifold is too clost to the frame. Soooo, I'll have to spring for some new coated headers from S&P. They have to be side dump to connect to the side pipes.
Tranny still on order....
Yes, I'll have a brand new water pump, exhaust manifolds and T-stat housing to sell now as I've had to buy new or make mods. In the next week, I'll install side-pipes, painted calipers and the new awesome C6 5-spoke wheels with Eagle F1s!
02-02-2007, 10:35 PM
#43
Tech Contributor


Hi,
On that new tank - it does not look like the flanges where the straps are, are folded over enough. That will keep the filler neck of the new tank from being centered in the body when you lower the body on the frame (if it were a stock frame).
You might consider hammering the flanges over a little more where those straps are located. If I'm not making sense, I can mark up one of your photos for you.
Jeff
02-02-2007, 11:53 PM
#44
Racer
Thread Starter
Member Since: Jun 2004
Location: freehold NJ
Posts: 384
Likes: 0
Received 0 Likes
on
0 Posts
Hi,
On that new tank - it does not look like the flanges where the straps are, are folded over enough. That will keep the filler neck of the new tank from being centered in the body when you lower the body on the frame (if it were a stock frame).
You might consider hammering the flanges over a little more where those straps are located. If I'm not making sense, I can mark up one of your photos for you.
Jeff
On that new tank - it does not look like the flanges where the straps are, are folded over enough. That will keep the filler neck of the new tank from being centered in the body when you lower the body on the frame (if it were a stock frame).
You might consider hammering the flanges over a little more where those straps are located. If I'm not making sense, I can mark up one of your photos for you.
Jeff
02-02-2007, 11:57 PM
#45
Tech Contributor
The flange is the lip where the top and bottom halves of the tank are bonded. Fold this flange, or lip, over where the strap passes over it. The area in question is circled in orange in my modified version of your photo:

Without this update, the tank may not be properly centered as it can't move forward far enough.
Without this update, the tank may not be properly centered as it can't move forward far enough.
02-03-2007, 12:02 AM
#46
Racer
Thread Starter
Member Since: Jun 2004
Location: freehold NJ
Posts: 384
Likes: 0
Received 0 Likes
on
0 Posts
The flange is the lip where the top and bottom halves of the tank are bonded. Fold this flange, or lip, over where the strap passes over it. The area in question is circled in orange in my modified version of your photo:
Without this update, the tank may not be properly centered as it can't move forward far enough.
Without this update, the tank may not be properly centered as it can't move forward far enough.
02-11-2007, 02:32 PM
#47
Racer
Thread Starter
Member Since: Jun 2004
Location: freehold NJ
Posts: 384
Likes: 0
Received 0 Likes
on
0 Posts
This week I attached the side pipes to the rear frame bracket. Still waiting on the headers to arrive to attach up front.
I received the new wheels and Eagle F1 tires. As you can see in the pic, I had to get spacers because they had too much backspace.
Now I'm waiting on the caliper brackets to arrive as well before I can install the brakes.
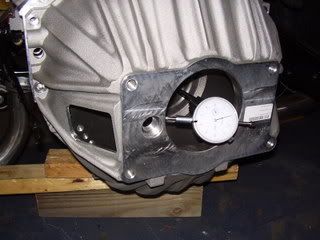
The transmission arrived so I'll be installing that in the coming week as well. I started measuring with a dial indicator the bell housing as you can see in the pic. (Of course I still need to install all the bell housing bolts and torque down before I can get an accurate reading)
I received the new wheels and Eagle F1 tires. As you can see in the pic, I had to get spacers because they had too much backspace.
Now I'm waiting on the caliper brackets to arrive as well before I can install the brakes.
The transmission arrived so I'll be installing that in the coming week as well. I started measuring with a dial indicator the bell housing as you can see in the pic. (Of course I still need to install all the bell housing bolts and torque down before I can get an accurate reading)
02-12-2007, 12:18 AM
#48
Safety Car


The heater hose nipples are just pressed into the pump. If you pull them out with a pair of vicegrips, you will find that they are the perfect size to tap with a 3/8" and 1/2" NPT tap. Then you can put some 90 degree swivel fittings in, and point the hoses up out of the way.
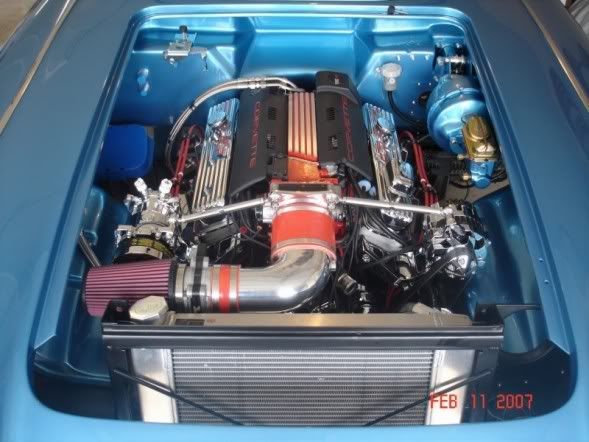
Which manifolds are those? I tried several different types of manifolds including the GTO, F-body, LS6 Corvette and LS2 Corvette. None would fir except the LS2 Corvette manifolds. I ceramic coated the manifolds and polished the stainless heat shields, and they look great, and I saved a bunch over buying the S&P shorties which really don't perform any better than a stock set of manifolds. My chasssis is different than yours, but just a thought.
Regards, John McGraw
02-12-2007, 01:46 AM
#49
Race Director

YOu are one heck of a brave guy to try doing this all in 2 months. You have my undivided attenton too. 
02-12-2007, 08:49 AM
#50
Racer
Thread Starter
Member Since: Jun 2004
Location: freehold NJ
Posts: 384
Likes: 0
Received 0 Likes
on
0 Posts
The heater hose nipples are just pressed into the pump. If you pull them out with a pair of vicegrips, you will find that they are the perfect size to tap with a 3/8" and 1/2" NPT tap. Then you can put some 90 degree swivel fittings in, and point the hoses up out of the way.
Which manifolds are those? I tried several different types of manifolds including the GTO, F-body, LS6 Corvette and LS2 Corvette. None would fir except the LS2 Corvette manifolds. I ceramic coated the manifolds and polished the stainless heat shields, and they look great, and I saved a bunch over buying the S&P shorties which really don't perform any better than a stock set of manifolds. My chasssis is different than yours, but just a thought.
Regards, John McGraw
02-13-2007, 10:18 PM
#51
Racer
Thread Starter
Member Since: Jun 2004
Location: freehold NJ
Posts: 384
Likes: 0
Received 0 Likes
on
0 Posts
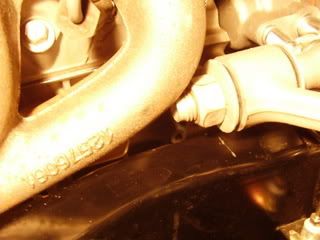
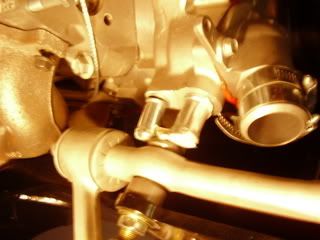
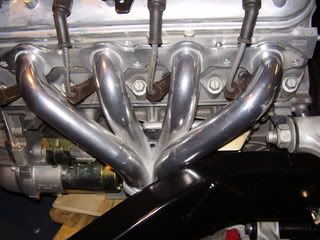
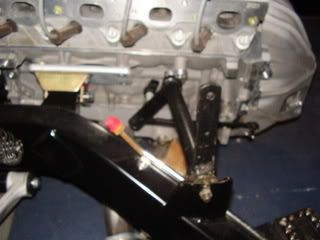
Well, looks like I'm set back again. The coated headers from S&P don't quite fit either. I couldn't quite get the bolt holes to line up. Actually the stock exhaust manifolds fit but they were just too close to the frame. Here is a pic of the headers and on the other side is a pic of the Z-bar to show how the engine is situated front to back. S&P sells a special motor mount adapter to move the motor back another inch. I may have to do that.
02-13-2007, 10:53 PM
#52
Intermediate

Member Since: Oct 2006
Location: Wheat Ridge Co
Posts: 38
Likes: 0
Received 0 Likes
on
0 Posts
Lookin' good, Colt. Thanks for doing all this. It's really good to see all the adaptations a swap like this requires and seeing you solve it. I agree with LouieM- you're a brave man. Your responders have been really helpful too.
I've had similar problems with mine- not necessarily the same ones but enough similar that your post makes me feel much better about the process. Keep up the good work.
Will
I've had similar problems with mine- not necessarily the same ones but enough similar that your post makes me feel much better about the process. Keep up the good work.
Will
02-13-2007, 11:39 PM
#53
Drifting

Please keep the pictures coming. I dream of doing the same thing to my 63 one day.
A good friend of mine is in the middle of doing the same to a 59. Link to additional pics http://s160.photobucket.com/albums/t...59%20Corvette/
Out with the old
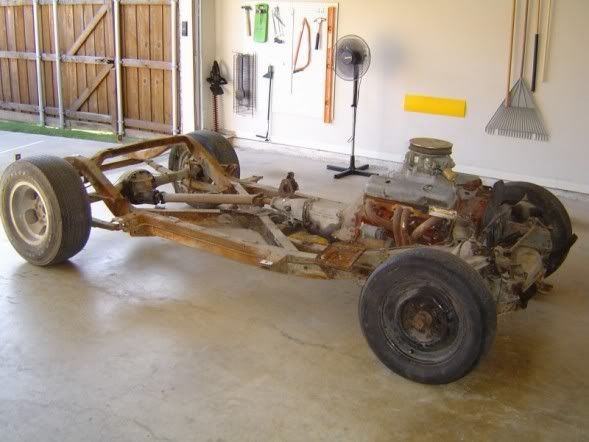
In with the new
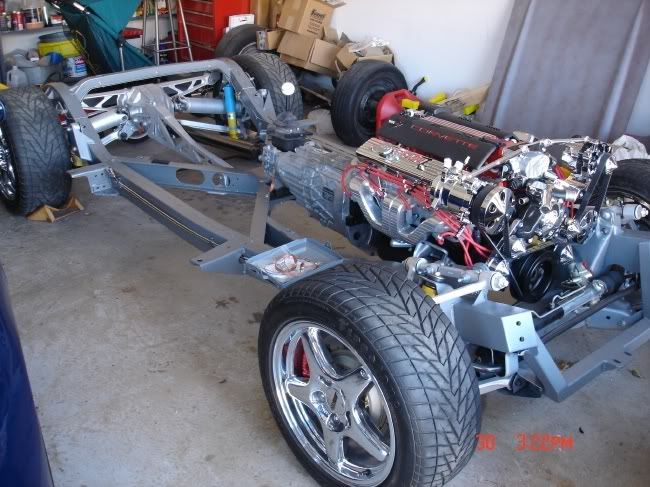
A good friend of mine is in the middle of doing the same to a 59. Link to additional pics http://s160.photobucket.com/albums/t...59%20Corvette/
Out with the old
In with the new
02-13-2007, 11:44 PM
#54
Safety Car
[QUOTE=90ZR1;1558949884]Well, looks like I'm set back again. The coated headers from S&P don't quite fit either. I couldn't quite get the bolt holes to line up. Actually the stock exhaust manifolds fit but they were just too close to the frame. Here is a pic of the headers and on the other side is a pic of the Z-bar to show how the engine is situated front to back. S&P sells a special motor mount adapter to move the motor back another inch. I may have to do that.
S&P have some street rod style headers that sweep back a little. I have used these headers on several cars, and they clear real well. Here is a pic of a set of them installed on a LSX engine in a C1 chassis.
http://img.villagephotos.com/p/2003-...3/P0000975.JPG
Regards, John McGraw
S&P have some street rod style headers that sweep back a little. I have used these headers on several cars, and they clear real well. Here is a pic of a set of them installed on a LSX engine in a C1 chassis.
http://img.villagephotos.com/p/2003-...3/P0000975.JPG
Regards, John McGraw
02-14-2007, 08:12 AM
#55
Racer
Thread Starter
Member Since: Jun 2004
Location: freehold NJ
Posts: 384
Likes: 0
Received 0 Likes
on
0 Posts
Thanks for the help and incouragement, guys. Since I'm waiting on parts half the time, it doesn't look like I'll make my original 2 month completion date, but will keep pluggin' along!
Colt
Colt
02-23-2007, 10:02 PM
#56
Racer
Thread Starter
Member Since: Jun 2004
Location: freehold NJ
Posts: 384
Likes: 0
Received 0 Likes
on
0 Posts
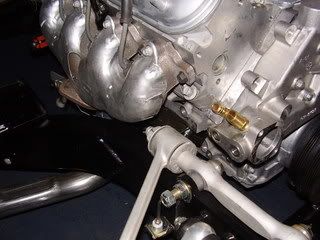
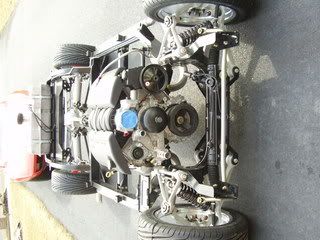
Well, I've had the water pump tapped and the heater hose outlets re-positioned to clear the A-frame.
I also bought the motor mount adapters from Streetshop so had to pull the engine this week and re-install and now the stock exhaust manifolds fit well w/o hitting the frame.
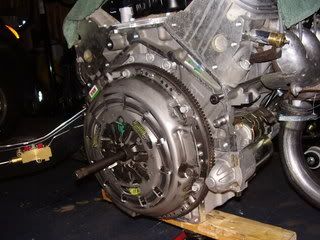
I'm moving on and have installed the clutch and pressure plate.
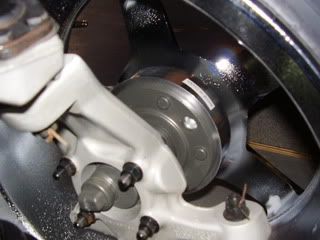
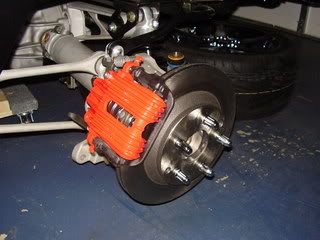
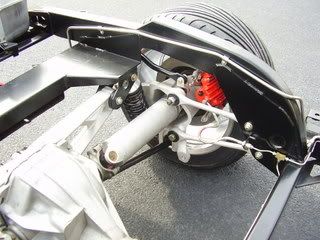
I've just begun installing the brand new calipers and rotors.
see 4 pics below:
I also bought the motor mount adapters from Streetshop so had to pull the engine this week and re-install and now the stock exhaust manifolds fit well w/o hitting the frame.
I'm moving on and have installed the clutch and pressure plate.
I've just begun installing the brand new calipers and rotors.
see 4 pics below:
Last edited by 90ZR1; 02-23-2007 at 10:19 PM.
02-23-2007, 11:08 PM
#57
Safety Car
Those are the same manifold that I used. There is one little issue with them that I have not fully resolved, and that is the connection between the head pipes and the manifolds. The LS2 manifolds have a recess in them and there is supposed to be a similar recess in the attaching flange. This recess is supposed to accept a special gasket that is a GM part. Nobody makes the special flange, and having custom flanges milled out will be some bucks! The gasket has a o-ring attached to the center of the gasket. I am considering Just cutting a thick Copper ring to fill the recess, and clamp a flat flange to it to crush out the ring.
Regards, John McGraw
Regards, John McGraw
02-24-2007, 11:21 AM
#58
Racer
Thread Starter
Member Since: Jun 2004
Location: freehold NJ
Posts: 384
Likes: 0
Received 0 Likes
on
0 Posts
John, I've started to wonder how I'm going to connect the stock C2 side pipes to the LS2 manifolds. Was hoping to just take it to a muffler shop and let them figure it out. Sounds more involved. Thanks a lot! 
02-24-2007, 10:23 PM
#59
Safety Car
Yea, that manifold still has me scratching my head! I can't for the life on me figure out why GM felt the need to introduce a new type of connection for the C6 that nodody else in the industry uses! The good news is that the flange is the same dimension as a standard 2 hole flange. All you should really need to do is fabricate a copper or dead-soft aluminum ring that will fit the recess, and then use an off-the-shelf
2 hole exhaust gasket. I think that that is the path that I am going to take. I am going to start bending some template pipes next week to send off and have mandrel-bent stainless pipes made from.
I guess if I had it to do over again, I would have removed the studs and milled the flange flat, and used a standard gasket. The only reason that I am not doing that now, is because I have already smoothed and ceramic coated the manifolds and don't want to barf up the coating job.
Regards, John McGraw
03-03-2007, 06:53 PM
#60
Racer
Thread Starter
Member Since: Jun 2004
Location: freehold NJ
Posts: 384
Likes: 0
Received 0 Likes
on
0 Posts
This week I completed the tranny install and am 1\2 way finished with the brakes. In the next week I'll install the harness and hopefully complete the front rotating assembly. I'll work on the above discussed manifold to side-pipe connection.
I rolled it outside to take these pics:
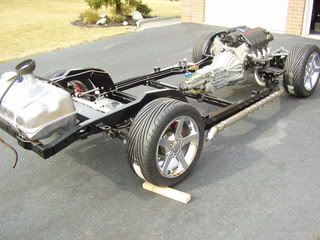
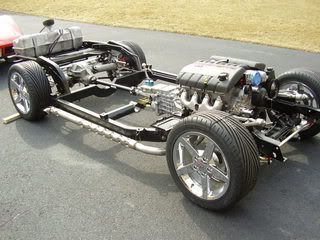
I rolled it outside to take these pics: