Steering box rebuild-how hard??
 07-25-2005, 08:47 PM
#1
Melting Slicks

Thread Starter

How hard is it to rebuild the steering box?? What special tools are involved? I would like to do it myself so that i can blast and clear coat the steering box then reasemble it.
 07-25-2005, 09:59 PM
#2
Safety Car

Member Since: Nov 2004
Location: going faster miles an hour...with the radio on in browns mills new jersey
Posts: 4,153
Likes: 0
Received 71 Likes
on
45 Posts

Mine was easy because I didn't have to replace the bushings. The only special tools were a dial indicator and a 100"/lb [max] torque wrench. You can also use a fish scale. If the bushings need replacing, you'll need to bang out the old ones and press in the new. Others who have replaced the bushings will no doubt chime in.
07-25-2005, 10:04 PM
#3
Racer

Member Since: Sep 2004
Location: Conroe TX
Posts: 327
Likes: 0
Received 0 Likes
on
0 Posts
07-25-2005, 10:21 PM
#4
Race Director


Not hard if you have the correct reference material. The Restorer (NCRS) has a great article by Duke W. and Bill B. that gives and overview but the manual is the best at supplementing this. A 0-30 "/lb torque wrench is better than a 0-100 "/lb in this situation as you are never measuring over 14 "/lbs. I did mine under the watchful eye of Bill B. and it turned out great. If you decide to complete this yourself call Corvette Steering and get the kit they offer, it's 225.00 and it includes all of the components to complete the restoration of the box.
Duke do you have an electronic version of the article that you and Bill wrote? I can't remember if in the past if you have in some of the other articles that you wrote together. Don't know either if there is a problem to post those or if the NCRS has the rights to the articles... Dave.
Duke do you have an electronic version of the article that you and Bill wrote? I can't remember if in the past if you have in some of the other articles that you wrote together. Don't know either if there is a problem to post those or if the NCRS has the rights to the articles... Dave.
07-25-2005, 11:52 PM
#5
Pro

Member Since: Dec 2001
Location: Rosamond Ca
Posts: 663
Likes: 0
Received 0 Likes
on
0 Posts

Originally Posted by Corbrastang
How hard is it to rebuild the steering box?? What special tools are involved? I would like to do it myself so that i can blast and clear coat the steering box then reasemble it.
I understand that you want to do it yourself (I'm the same way) but just for grins check out Van Steel's rebuilding services.


 07-26-2005, 12:09 AM
#7
Race Director

Member Since: May 2000
Location: Redondo Beach USA
Posts: 12,487
Received 1,973 Likes
on
1,188 Posts
Originally Posted by youwish2bme
Duke do you have an electronic version of the article that you and Bill wrote? I can't remember if in the past if you have in some of the other articles that you wrote together. Don't know either if there is a problem to post those or if the NCRS has the rights to the articles... Dave.
I always recommend that vintage Corvette owners join NCRS, which is a lot more than judging "bolt head markings." The Corvette Restorer is published four times a year and has a lot of very good articles, including detailed "how-to" write-ups that are excellent supplements to the procedures in the chassis and overhaul service manuals.
Duke
Last edited by SWCDuke; 07-26-2005 at 12:19 AM.
07-26-2005, 08:51 PM
#8
Melting Slicks

But I did it with a step by step instruction I received from DZAuto (i believe?).
I did not have the benefit of photographs, but...
...I am pleased to learn that after reading Dukes article, I did cover everything and it all came out great. I do wish I'd had the benefit of the photographs though.
Mike
I did not have the benefit of photographs, but...
...I am pleased to learn that after reading Dukes article, I did cover everything and it all came out great. I do wish I'd had the benefit of the photographs though.
Mike
07-26-2005, 10:46 PM
#9
Advanced

Member Since: Jun 2004
Location: Orem UT
Posts: 78
Likes: 0
Received 0 Likes
on
0 Posts
Aside from the rebuild kits available, does anyone know the fundamental part numbers of the bushings, seals and bearings for the steering box? For example, are the components produced by SKF or Timken or some other manufacturer? Also, is the C-2 steering box unique to Corvette, or is it identical to those used in other Chevrolet or GM vehicle models? Thanks in advance.
07-27-2005, 04:38 PM
#10
Tech Contributor
Hi Guys I blueprint these boxes for local and forum guys.
Here is how I do them, maybe it will help you out. I have a few kits left too for $65 + UPS. I don't build them for the correct NCRS appearence, I like a painted box with cover or polished aluminum cover(c3).
Gary
May 1, 2004
Revised February 14, 2005
1963-1982 Steering Box Rebuild Procedures
By: Gary Ramadei
General Information
The boxes are divided into two groups, early and late. The early boxes, 1963-1969 early and Late 1969 to 1982. The early boxes have a finer spline worm shaft, use a different rag joint, have a cast cover. The later boxes, mid 1969 to 1982 use a different worm shaft with a flat milled into it, a different rag joint with a mating flat, and an aluminum cover. There is debate exactly when the box change took place, some say the 1969 PS cars had the flat shafts and the 1969 manual cars still had the round shaft. It doesn�t really matter to me because it is only a car after all. Some guys spend more time worrying about numbers then they do driving the car! Some of the very late boxes use a smaller cover bushing. I�m not sure when this started, 1980?
Tools and Materials Required
1. 0-30 inch pound Dial Torque Wrench
2. Large Channel Lock Slip Joint Pliers
3. Pitman arm puller or HD 2 jaw puller
4. Basic hand tools
5. Parts cleaner
6. Micrometer or 6� dial caliper
7. 1� Dial Indicator and magnetic base
8. Bushing drivers or large sockets
9. Mobil 1 red automotive synthetic grease
10. Putty knife
11. GM Overhaul manual
12. Rebuild kit
Rebuild Procedures
1. Remove the box from the car. The box is held in by a connection to the �rag joint�(coupling), the pitman arm to the control valve (Power steering) or center link (manual steering) and 3 bolts through the frame. It will be in pretty dirty shape.
2. Clean the heavy soils off the box once you get it out of the car.
3. Reference mark the pitman arm to the pitman shaft so you remember the orientation it is in when you re-assemble it.
4. Remove the pitman arm nut. This requires a 1-5/16� wrench or socket. I bought a $40 �� drive socket set to use and it works very easily. If you�re going to work on your corvette then buy the tools, you�ll use them for other projects I guarantee it.
5. Remove the pitman arm using a suitable puller. I have several types and found the $7 imported fixed 2-jaw puller works the best with an impact wrench. If you don�t have an impact wrench then a �� drive breaker bar will do but you have to �work it� good. Ok, now you have the box in front of you cleaned, pitman arm off and ready to tear into it-Right??
6. Before taking it apart, get out that nice inch pound torque wrench you bought or borrowed. Mount the box in a sturdy bench vise by one of the mounting ears. Take a reading of the required torque going full CW and then CCW. Use the wrench lightly you don�t want to jerk it while you rotate it. Record it for future reference. It should start out low until you get about 2 full turns in and then you should feel it tightening up a bit. This is the on-center position with your wheel in the straight position. NOTE: I only use a dial inch pound torque wrench for this job. I can see the movement easily with this type of wrench. You can use a scale wrench but I never have so I can�t comment on using one. These wrenches run between $150-$250, so if you�re only going to use it once then see if you can borrow one. However, if you are going to rebuild your differential, as I outlined in another write-up, buy the wrench.
7. Now remove the three 9/16� head bolts from the cover. These are special lock type bolts, if you look at the threads they are not fully cut in a 60* v thread.
8. Don�t try and pry the cover off, it will only break. Use a long narrow screwdriver and unscrew the cover off the lash screw.
9. Put the cover aside but notice there is a bushing in it. I found that the later box covers had a cupped bushing in them with a smaller OD then the older box covers. The rebuild kits I have don�t have this �newer� bushing. The majority of the boxes have a straight through bushing with 1.250� OD. This bushing doesn�t wear as much as the two in the housing.
10. Remove the gasket under the cover
11. Use the large channel locks to loosen the lock nut on the rag joint end of the box. You don�t have to remove the lock nut now just back it off.
12. Center the pitman arm in the box by going to the end of travel and coming back approximately 2 full turns. In the muck that was once the box�s grease, you�ll see the pitman arm in the center of the worm nut. The worm nut looks like a rack gear.
13. Remove the Pitman shaft from the housing by pushing up from the bottom.
14. Now remove the worm adjusting nut and lock washer from the end of the box.
15. Slide out the worm assembly
16. Remove the pitman shaft seal from the bottom of the housing.
17. Use the putty knife to scrape out the old grease
18. Clean up all the parts in parts cleaner. If you don�t have a tank see if your local garage will clean them up for a small fee.
19. With everything clean lightly oil the pitman shaft and slide it back into the housing. Mount the housing horizontal in the bench vise and mount your 1� dial indicator against the end of the shaft at the end of the housing.
20. Move the shaft in/out and record the side play between the shaft and bushings, usually it�s around .007-. 010� The bushings in the kit will drop the side play down to around .005�. I like to get them between .001-. 002� maximum. I machine new bushing and hone them for this fit. However steering specialist like Corvette Steering may have under size bushing that you can hone yourself to get the tighter fit.
21. If I�m going to make a bushing set up then I do it at this stage. You will have to make that determination here.
22. To remove the old bushings I made a tool out off a couple of washers the same OD as the bushing-1.250� Bolt a couple of washer together and grind a flat on one side. You do this so you can get the �tool� inside the housing in between the bushings and flat against the bushing OD.
23. Use a long drift and hammer the old bushing out. Flip over the housing and drive out the other bushing.
24. Use the long drift to drive out the end plug and bearing from the housing.
25. Use a punch to drive out the bearing race from the adjusting nut and housing end.
26. The housing is now stripped of all the parts.
27. Now install the housing bushings, either the standard replacements, undersize, or custom made. I prefer the custom made ones, they can be fit the shaft after polishing it. I made a shaft up that is the size of the bushing ID and a shoulder the size of the OD. I can hammer or press them in without any distortion.
28. I use 660 bronze or oilite bronze for the custom bushings. Mostly 660 bronze, I cut a groove into the bushing after it is fit in the housing for grease to get down around the shaft. A rotary burr in a die grinder or Dremel tool works great for this. When installing the bushings they will compress slightly. I make the ID about .001� oversize then use a brake cylinder hone to fit the shaft for the fit I want.
29. At this point you can clean up the housing as needed for your purpose. Some were natural cast finish, others were painted black. I clean the housing and paint it.(I�m not a �numbers� guy so painting isn�t a problem)
30. I use POR15 Metal Ready and keep it wet on the housing, pitman arm, and adjusting nut for 20-30 minutes. Then wash it in water and dry. It should come out with a white film on it.
31. I then paint it with POR15 black and let dry.
32. When the POR15 is tacky I top coat it with cast blast and finally a couple of coats of Eastwoods satin clear.
33. I polish the aluminum cover on the late 69-82�s to bright shiny finish and topcoat with satin clear. The early boxes have a cast cover that I just finish the same as the housing.
34. To remove the bushing from the cover I use the Dremel and burr again to slot the old bushing and collapse it with a chisel. I�ve tired cape and pointed chisels but they didn�t work too well. Use emery cloth to clean up any burr you leave in the cover ID.
35. Remove the ball guide clamp from the worm nut and remove the ball guides. These are split so watch out for the ***** inside.
36. Unscrew the worm shaft from the worm ball nut. Catch the ***** as you do this. There should be a total of 54 ***** in the assembly. If you are using a rebuild kit then you�ll have new *****. If you are just cleaning and sealing the box then wash the ***** for reuse.
37. Wash the worm nut and shaft. Inspect for any pitting, rust, anything that might cause a problem. Most times it will be fine to reuse the parts. Inspect the worm nut teeth for and heavy pitting or wear. It�s ok if they have a pattern as long as it�s not a groove. Look at the pattern to see if it�s centered or toward the bottom of the teeth, the further �South� the pattern the more wear is on them.
38. I now like to �dry set� the box. I assemble back using all the cleaned moving parts. I set the bearing preload to 3-5 in/lbs. and then see what adjustment there is in the old pitman shaft/worm rack teeth. If they bind on center from just gravity pulling the pitman shaft down then they�re probably be ok to reuse. If the pitman shaft drops down to the bottom of the housing when on center then you have to decide if you want to spend about $200 for new gears.
Assembly of the Steering Box
1. Install the new bushing in the cover and put it aside.
2. You should have the new bushings in the housing, if not install them now.
3. Count out 27 ***** and place them in two groups. I use a spray can cover to hold them from rolling all over the place.
4. Grease the ID of the worm nut and lightly the worm shaft. You want to do this in a very clean area so you don�t pick up any dirt in the grease and wreck your rebuild.
5. Lay the ball guide on a clean, flat surface and lightly grease the guides. Add 8-9 ***** to the guides and place the second half of the guide on top to hold the ***** in place. Remove the ***** from each grouping you have so you don�t get confused where they came from.
6. The worm nut goes into the housing in a specific direction. The teeth of the nut are tapered so the pitman shaft can be adjusted. Looking at the worm nut teeth, the side with the widest part of the teeth should be pointing to the bottom of the housing. The pitman shaft rack is tapered to tighten as it travels down into the worm nut teeth. If you get this mixed up you will not be able to adjust the box or fully assemble it.
7. The worm nut has 2 circuits for the ***** to ride in. I start installing the new ***** in one circuit then do the second. You have to hold the shaft up as you first start the ***** in the nut. I use a small pocket screwdriver to punch them down and around the shaft in the nut. When you have all the ***** from the first group in place install the loaded ball guide into the holes. It should fit easily and all the way down. Now do the same to the second circuit and install the clamp and screws. It should rotate nice and smooth without any backlash or ***** falling out. If you did this correct the 54 ***** will be in place and the worm assembly is ready for installation in the housing.
8. Install a new bearing race in the housing plug end. Be sure the radius side of the race is facing the inside of the housing so the bearing with mate with it. I use a deep socket or bushing drive to tap the race in place.
9. Use some Permatex #2 on the plug counterbore. Use only a light coating, you don�t want it pushed inside the housing.
10. Place the new plug in the counterbore and hammer tap it into the bore. Wipe away any excess sealant.
11. Deform the plug to expand it into the counterbore to seal it in place. I use the ball end of a heavy ball peen hammer to do this. If you have a press and radius end shaft you can use that too.
12. Install new grease seal in the housing for the pitman shaft. Lightly grease the rubber seal.
13. Grease a new ball bearing and place it on the end of the worm shaft. This is just slip fit. Face the ***** toward the race you just installed. Place some grease on the race but not too much as it will not compress and it will push back the shaft when you install it.
14. Slide the worm assembly into the housing and seat the bearing.
15. Grease the second bearing and place it on the open end of the worm shaft.
16. Install a new bearing race in the adjusting nut cover, again the race must face the bearing on the shaft.
17. Install new grease seal in the nut. Grease the rubber seal so it doesn�t get damaged when installing the nut over the shaft.
18. Use some #2 on the adjusting nut threads and screw the nut into the housing over the shaft.
19. Snug the nut and move the shaft by hand from lock to lock. There should be no backlash, if there is check the bearing in the plug end to see if it moved.
20. Use the torque wrench to check the rotational drag moving the shaft. I use an old rag joint that I welded a �� nut to. I use a socket on the wrench to check the drag for the earlier boxes a 12-pt 11/16 socket will work.
21. Tighten the nut until you have 3-4 inch pounds and you will feel a slight drag on the bearings. This is the pre-load for the end bearings.
22. Install the lock nut and tighten it good, I don�t use a torque wrench just make it tight.
23. Recheck the drag to be sure it didn�t go beyond the 3-4 inch pounds you just set.
24. I add grease around the worm nut and housing now. Lightly grease the bushings too.
25. Check the gap of the lash screw between the screw bottom and the slot. It should be less then .002� Most times the gap is about .005-. 007� If using a rebuild kit there are shims to tighten this gap. You should be able to get it under .002�. I use a surface grinder to fit the gap to .001-. 0015� Use feeler gauges or shim stock to check the gap. I tighten the nut on the screw when checking the gap to get an accurate measurement. Try the feeler gauge in with the nut loose vs. snug and you�ll see what I mean.
26. Move the worm nut to the center of travel and slide the pitman shaft into the housing. The center of the shaft rack teeth must be on center of the worm nut teeth. There are not many teeth so don�t be too concerned, you�ll see what I�m talking about when you look at it.
27. Now finish greasing the box. You need to leave room for expansion when hot so don�t overfill it. 11 oz is the maximum amount of grease to use. I rotate the shaft full travel to check that it moves freely and add grease behind the gaps. With the cover off the shaft will slide down into the worm nut so you may have to hold it up when rotating it.
28. Use some #2 on the cover gasket and seal it to the housing.
29. Screw the cover on the lash screw until the cover seats in the housing bore, watch you don�t roll over the cover gasket.
30. Install the three 9/16� head bolts in the cover and tighten. You may have to bring the lash screw up to compensate for tightening the three screws.
31. Use the torque wrench to adjust the lash. You have to adjust through full travel. The center of travel, about 2 turns in from the end, should be tighter then the beginning or end of travel.
32. Set the lash torque to between 11-14 inch pounds, lock the nut down on the lash screw. The higher the drag the tighter it will be in the center. I set them for a slight drag and witness mark the position with paint. If I need to adjust on the car to fine-tune it, I now have a starting point. If unsure, then make a second paint mark using a different color of the max setting.
33. The box is now ready to go back in the car. Add the pitman arm, new rag joint, and clean up the three mounting bolts.
Final Notes:
Some of this work does not qualify for NCRS type of judging so you have to decide how to refinish the housing and cover. Most shops will not go to the trouble of machining new bushing so don�t expect a $150-$200 rebuild to cover this. Ask what will be done if you do have some else do the job.
Lastly, this is the way I rebuild these boxes. It pretty much follows the GM overhaul manual so it�s no secret but others may have different methods for this job. My aim is to help other corvette people maintain their cars either by themselves or by their mechanic.
Last edited by gtr1999; 07-27-2005 at 04:42 PM.
07-27-2005, 06:53 PM
#11
Race Director
Member Since: Feb 2005
Location: SF Bay Area California
Posts: 14,449
Likes: 0
Received 16 Likes
on
14 Posts
Great description of the rebuild process! Not to be greedy, but is there a similarly-indepth description for C1 steering boxes?
I've done the simple adjustment to take up slack in the box, but I can feel a modest amount of notchiness. At some point I'd like to rebuild it.
Thanks in advance, if anyone has anything.
I've done the simple adjustment to take up slack in the box, but I can feel a modest amount of notchiness. At some point I'd like to rebuild it.
Thanks in advance, if anyone has anything.
07-27-2005, 11:47 PM
#13
Melting Slicks
Thread Starter
You guys are great. Now i can dive in and attempt it myself. Main reason was b/c most of the rebuilt boxes come with a large amount of black paint on them. I want to powdercoat my box so I dont have to worry about it rusting immediately. Clear coat just doesnt hold up.
However, the rebuild kit price of 225.00 is a little high. You can exchange your steering box for 160 to volunteer and corvette central. What is the difference between the 225.00 kit and the 40.00 kit?? Must be a lot.
However, the rebuild kit price of 225.00 is a little high. You can exchange your steering box for 160 to volunteer and corvette central. What is the difference between the 225.00 kit and the 40.00 kit?? Must be a lot.
07-28-2005, 07:49 AM
#14
Race Director
Originally Posted by Corbrastang
However, the rebuild kit price of 225.00 is a little high. You can exchange your steering box for 160 to volunteer and corvette central. What is the difference between the 225.00 kit and the 40.00 kit?? Must be a lot.
07-28-2005, 09:51 AM
#15
Tech Contributor
Price on rebuilding these is something I get asked about a lot. The cost for a custom box runs between $265- $400 depending on the gears. Keep in mind if your gears are good a basic kit will give you a decent box but nothing you can buy will replace custom fitting the bushings to the shaft. It might not make a difference on a PS car but you will feel it on a manual steering car.
Here's good example:
I run technical classes for our club and one is on blueprinting these boxes. One guy came and said he just bought a $150 rebuilt box from XXXXX corvette parts, why should he buy one from me for $265?
BTW, this box could have been from any vendor-xxxxx doesn't mean anyplace in particular. I asked him if we could look at and compare it to one of mine. If it was as good or better I'd be the first to say. The boxes looked the same, they didn't put on the POR15 products or buff out the cover but it looked ok. The first thing I did was run it through the full range by hand and found no resistance on center,the lash was not anywhere near the correct settings.I put an indicator against the pitman shaft and had .007" sideplay. Removed the cover and found it over-full of grease, it still had the original bushings, and too much slop in the lash screw. Basically he got a box with grease and a paint job. It probably had about 1/2 labor into it-if that, for $150 and his old box. If I did that box it would have been $265 but would have all new parts and about 5-6 hours into it. He asked me to set it up after the class after looking it over and comparing it.
I don't know if boxes are commonly rebuilt by only a few sources but I've seen this several times. I know there are reputable vette shops that build these too, I just want to be sure you get the box you think you're getting.When I rebuild a box I return all the parts I replaced with a full report on the job.
The kits I have come with standard bushings and all the replacable parts,no gears. Gear sets run about $200 +/- depending where you buy them from.
I think I covered everything I can think of, so other then rebuilding it for you, you should be ready to go to it! Good Luck, remember no one will treat your car like you will.
Gary
Here's a couple of pictures that might help you out.

Here's machined bushing with a grease groove cut in

Finished

Here's good example:
I run technical classes for our club and one is on blueprinting these boxes. One guy came and said he just bought a $150 rebuilt box from XXXXX corvette parts, why should he buy one from me for $265?
BTW, this box could have been from any vendor-xxxxx doesn't mean anyplace in particular. I asked him if we could look at and compare it to one of mine. If it was as good or better I'd be the first to say. The boxes looked the same, they didn't put on the POR15 products or buff out the cover but it looked ok. The first thing I did was run it through the full range by hand and found no resistance on center,the lash was not anywhere near the correct settings.I put an indicator against the pitman shaft and had .007" sideplay. Removed the cover and found it over-full of grease, it still had the original bushings, and too much slop in the lash screw. Basically he got a box with grease and a paint job. It probably had about 1/2 labor into it-if that, for $150 and his old box. If I did that box it would have been $265 but would have all new parts and about 5-6 hours into it. He asked me to set it up after the class after looking it over and comparing it.
I don't know if boxes are commonly rebuilt by only a few sources but I've seen this several times. I know there are reputable vette shops that build these too, I just want to be sure you get the box you think you're getting.When I rebuild a box I return all the parts I replaced with a full report on the job.
The kits I have come with standard bushings and all the replacable parts,no gears. Gear sets run about $200 +/- depending where you buy them from.
I think I covered everything I can think of, so other then rebuilding it for you, you should be ready to go to it! Good Luck, remember no one will treat your car like you will.
Gary
Here's a couple of pictures that might help you out.
Here's machined bushing with a grease groove cut in
Finished
Last edited by gtr1999; 07-28-2005 at 12:24 PM.


 07-28-2005, 03:14 PM
#19
Race Director
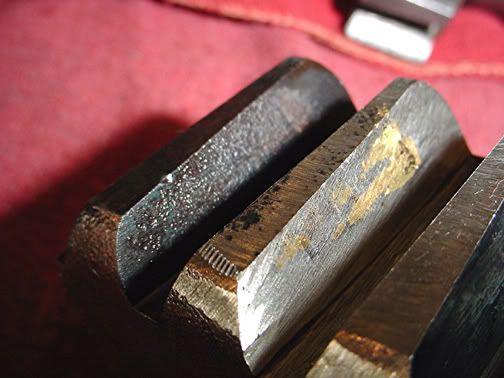
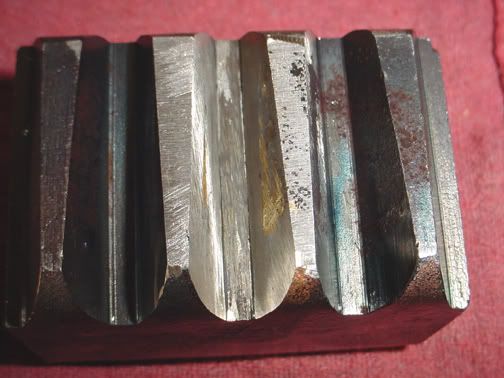
I forgot to add why those are so bad... See the gold portion... That's where there was significant wear and the person that rebuilt it just filled it in with what appears to be a brass product...
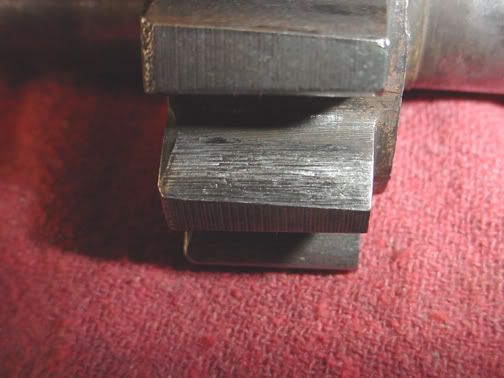
The third pic shows the excessive wear on the gear. Dave
The third pic shows the excessive wear on the gear. Dave
07-29-2005, 09:08 AM
#20
Tech Contributor
Dave,
That's an interesting trick to fill the wear on the teeth? You never know what you'll find working on a C2 or C3.
When I get in a box for inspection, one of the first things I do is to see what is left for adjustment in the lash screw. If the screw is just about bottomed out it's agood indication the teeth are worn. I've had boxes come in and the pitman shaft bottoms out and rotates without any binding on center- completely worn out. Sometimes only the pitman shaft is worn and the worm is still good. That will save the guy about $125 and still have a good box.
Gary