
Stock Control Arm Bushing Removal for Poly Bushing Install - With Pictures
 11-06-2011, 07:27 PM
#1
Burning Brakes

Thread Starter

Hey guys,
As some of you may know I recently made a thread asking how to remove the stock rubber bushings from my c5 control arms to install a set of Pfadt Poly bushings. For that thread and other searches I had done, I found answers that ranged from press, c-clamp, vise, burning them out, to its not possible just take them to a machine shop. Since some people made it seem so easy, and others so hard I figured I would post up how I actually did it with pictures so that those looking to do this in the future know what they are getting into.
If you don't want to read any further and just want the quick and dirty with the pictures, here it is. THIS JOB CAN EASILY BE DONE WITH JUST A 6" TABLE VISE AND SOME FREE AUTOZONE LOANER TOOLS!!!!!!!
When I say easy, I mean easy. I did this install by myself and even the first UCA took me only ~2 minutes to get the bushings out and ~5 minutes for the lower rear, including the shock bushing.
There is no reason to get intimidated by this install.
What you will need:
- Bench vise with 6" range or greater.
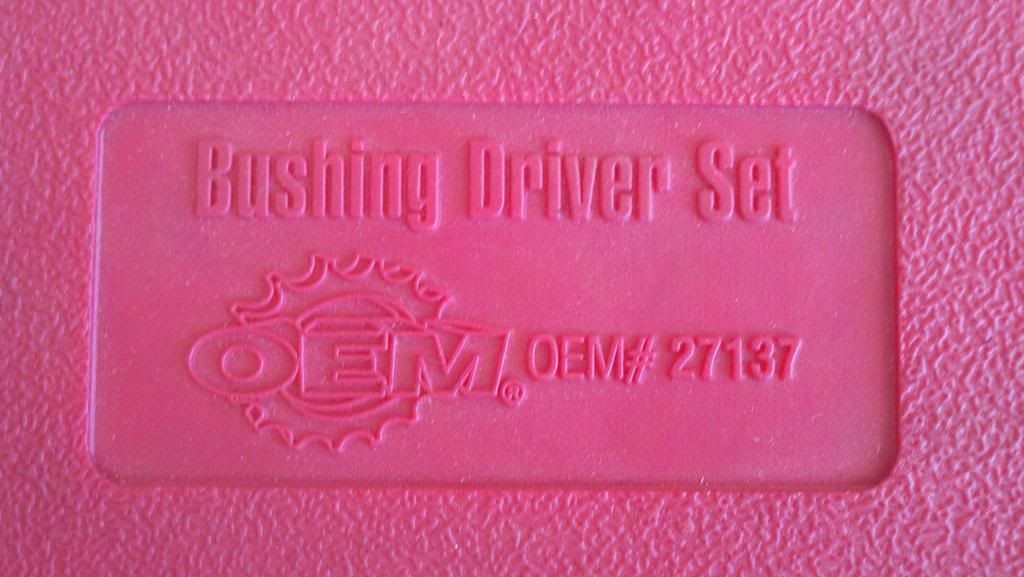
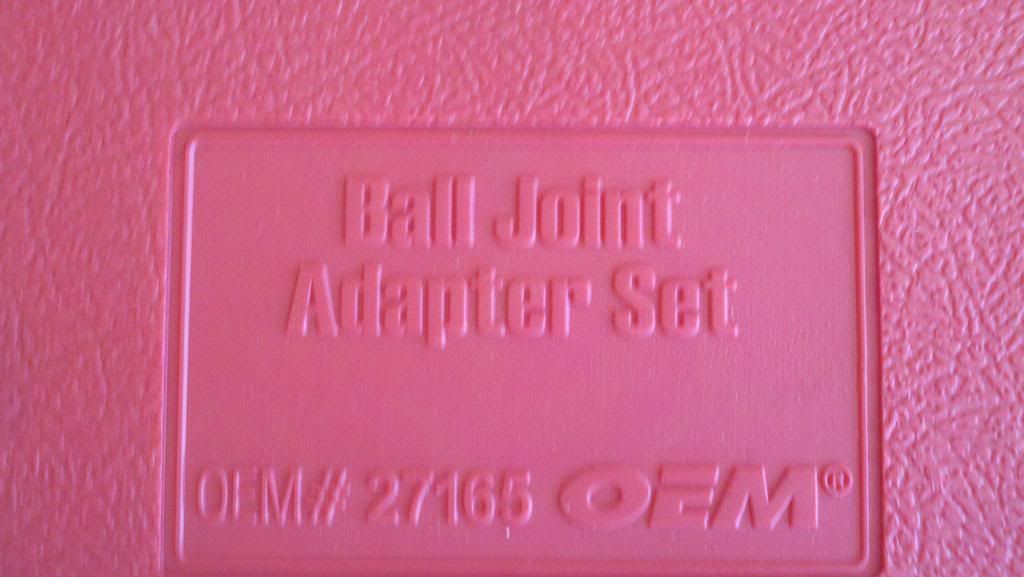
- Autozone Loaner Tools Part #'s 27137, 27165, 27166
- A 25mm or similar sized standard depth (not deep) socket. This may not be needed if you have a larger vise.
Step 1: Remove the Control Arms - This is covered in other threads and is pretty straight forward.
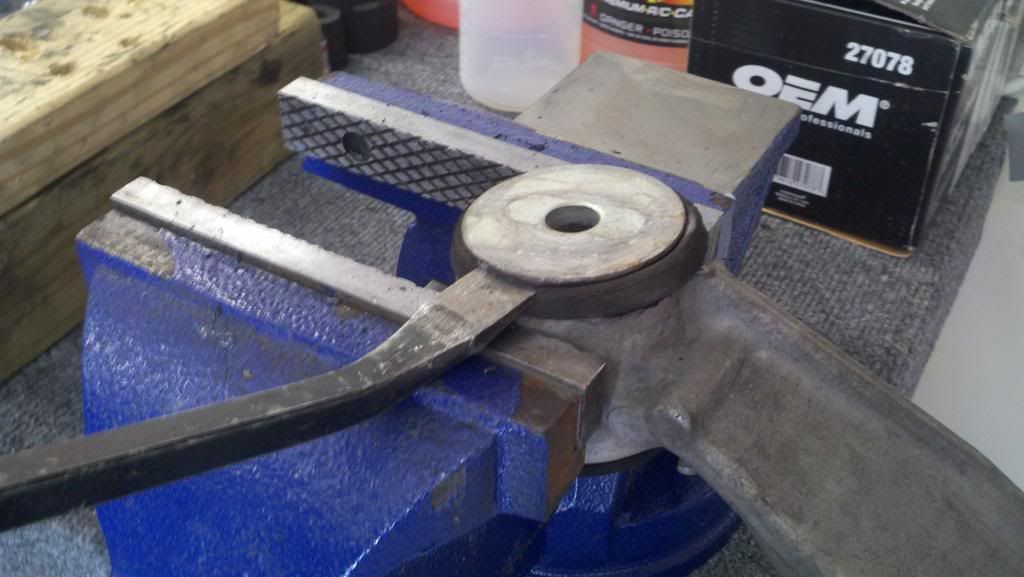
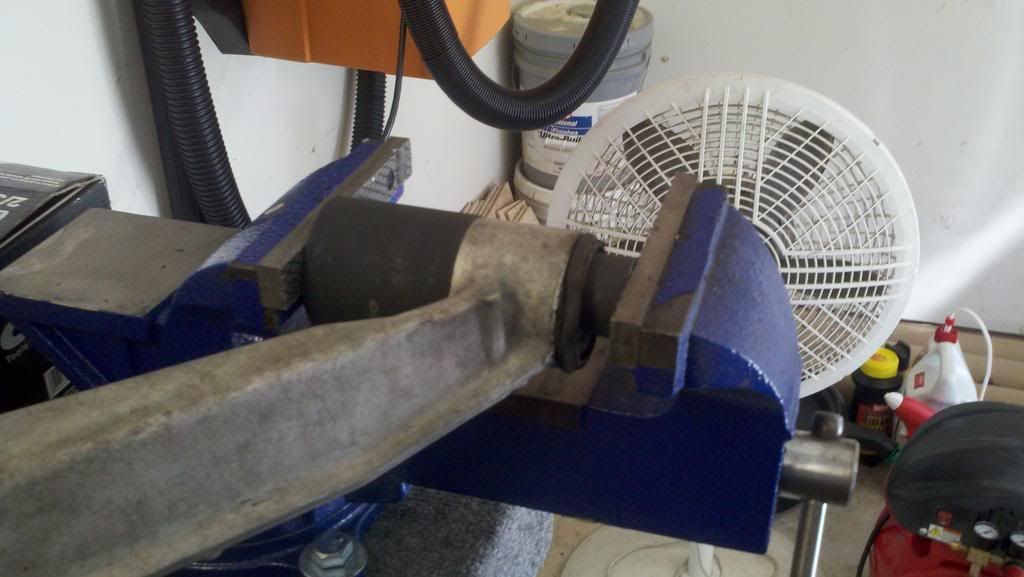
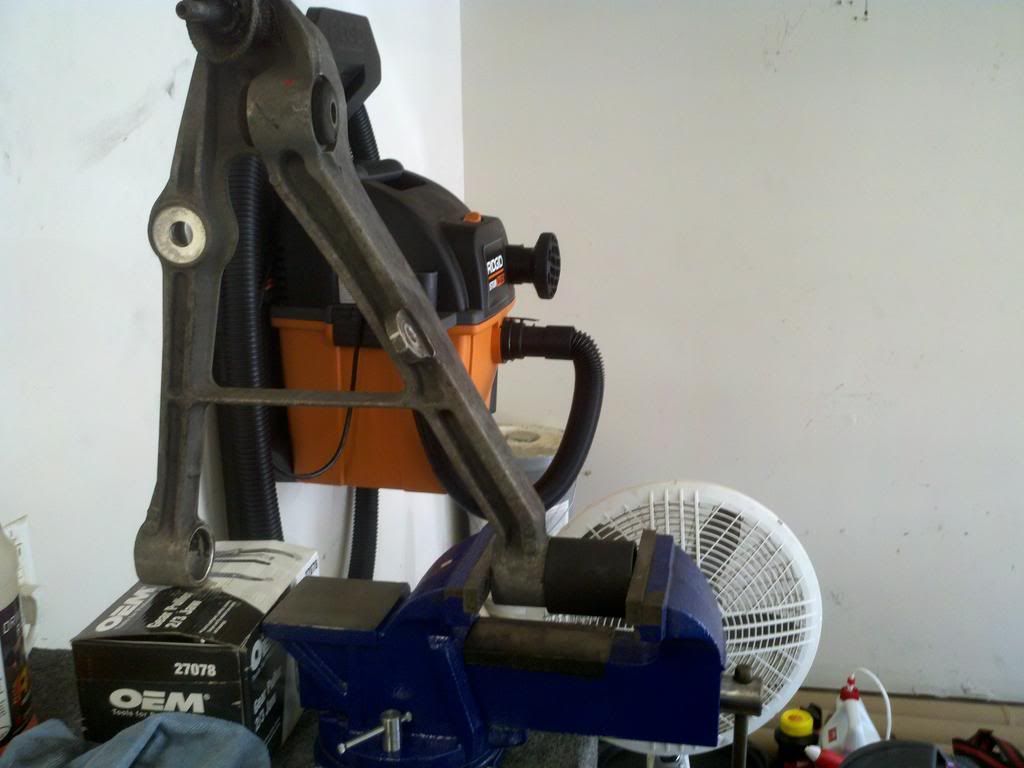
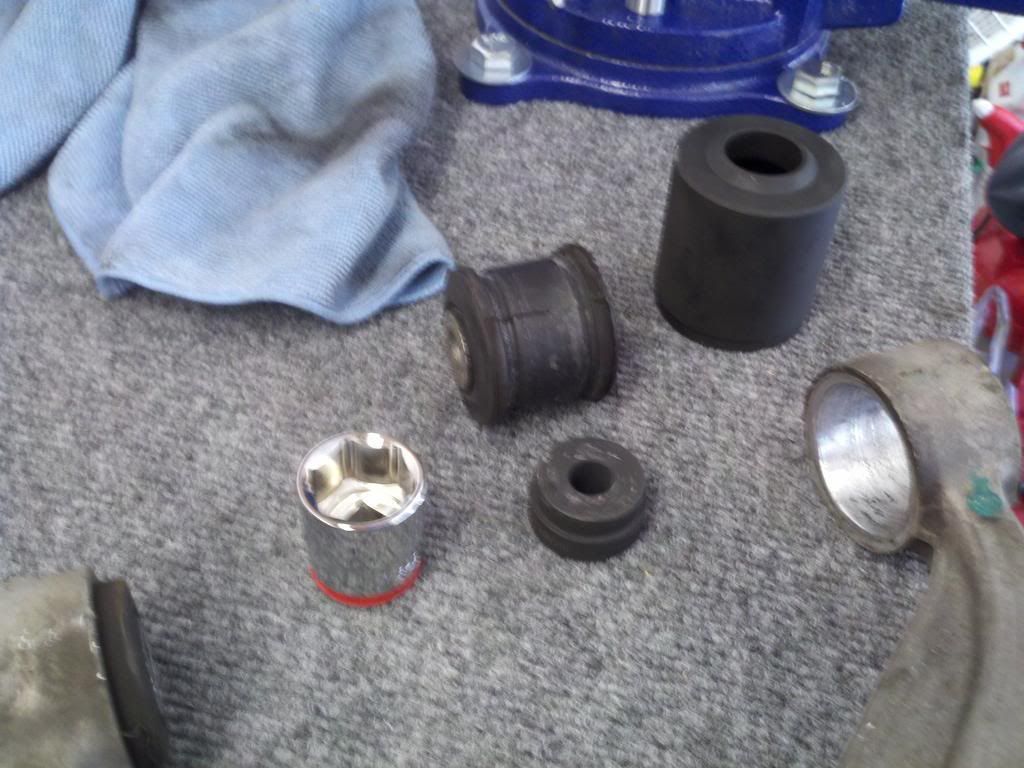
Step 2: Remove the stock rubber bushings. I used the following dies from the Autozone Kits above.
27166C, 27166E, 27166F, 27165B
I used Misc parts from the bushing driver kit to drive the bushings out. the two biggest ones worked best for me.
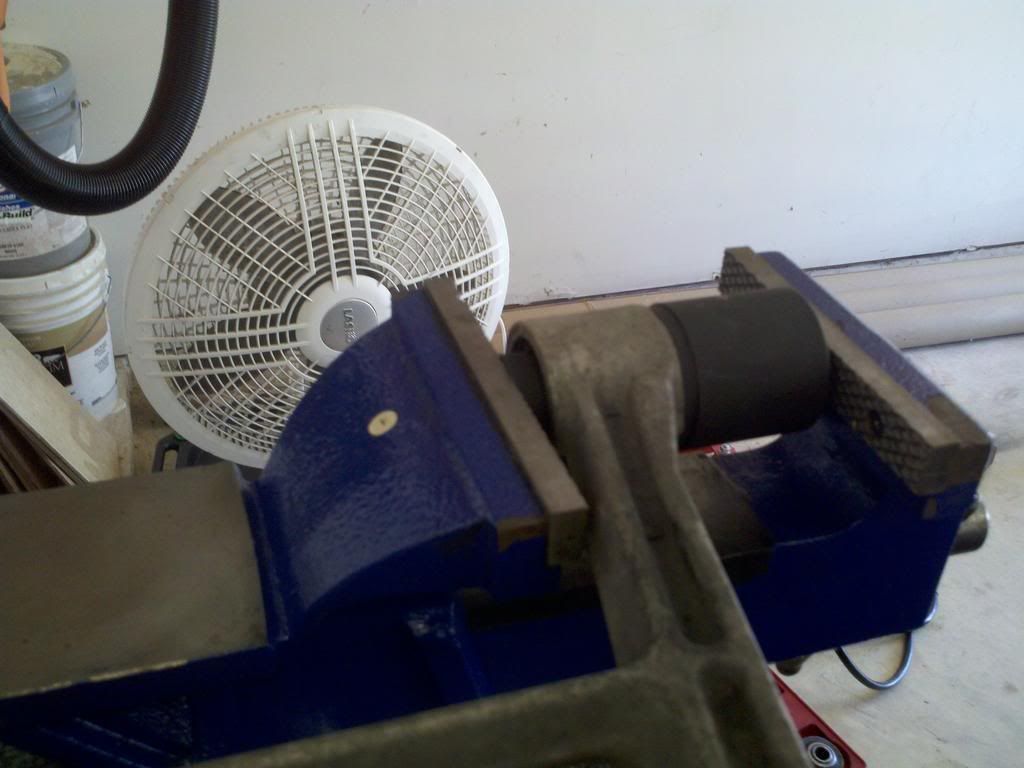
The concept is simple, basically you put the right sized die for the bushing (this is obvious once you are holding the control arm) and place it on the end of the bushing that is going to be pressed out. You then use the driver (or 25mm socket) on the other side. Sandwich the whole thing in the vise and turn. The bushing will easily press out.
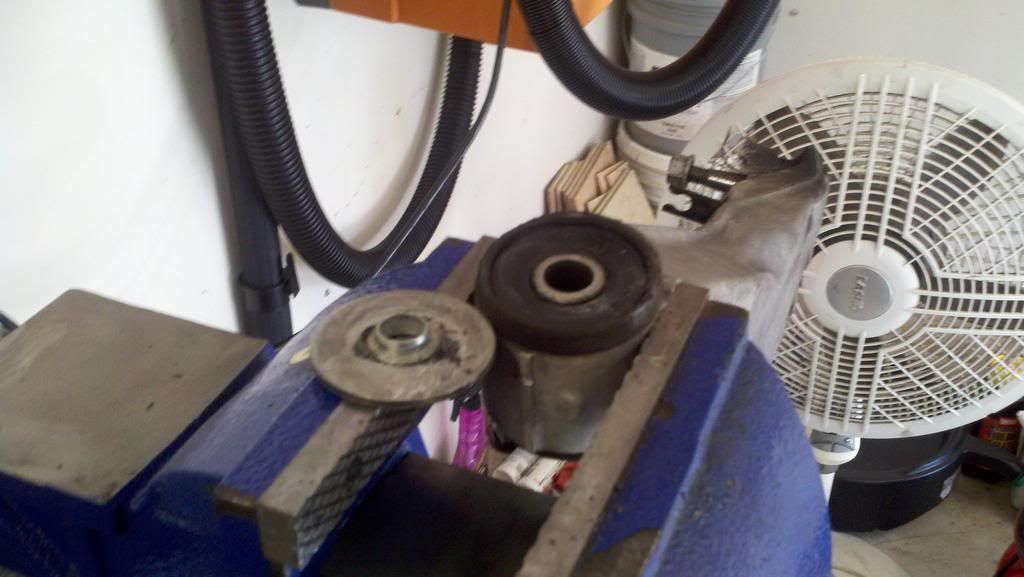
This works for almost all of the bushings. The only thing special I had to do was for the front UCA. Just stick one of the ears of the bushing in the vise jaws and twist/man handle it out. It is not that hard.
Also, on the front LCA rear bushing, I had to pry one the washer off one side in order to press the bushing out. This is also easy, just use a little muscle. There is a picture of this below.
The pictures should make this all pretty self explanatory, but I will try to answer any questions you may have. Keep in mind I was able to do this by myself, the hardest part was trying to hold everything and get it into the vise properly, an extra pair of hands would make this 100% cake.
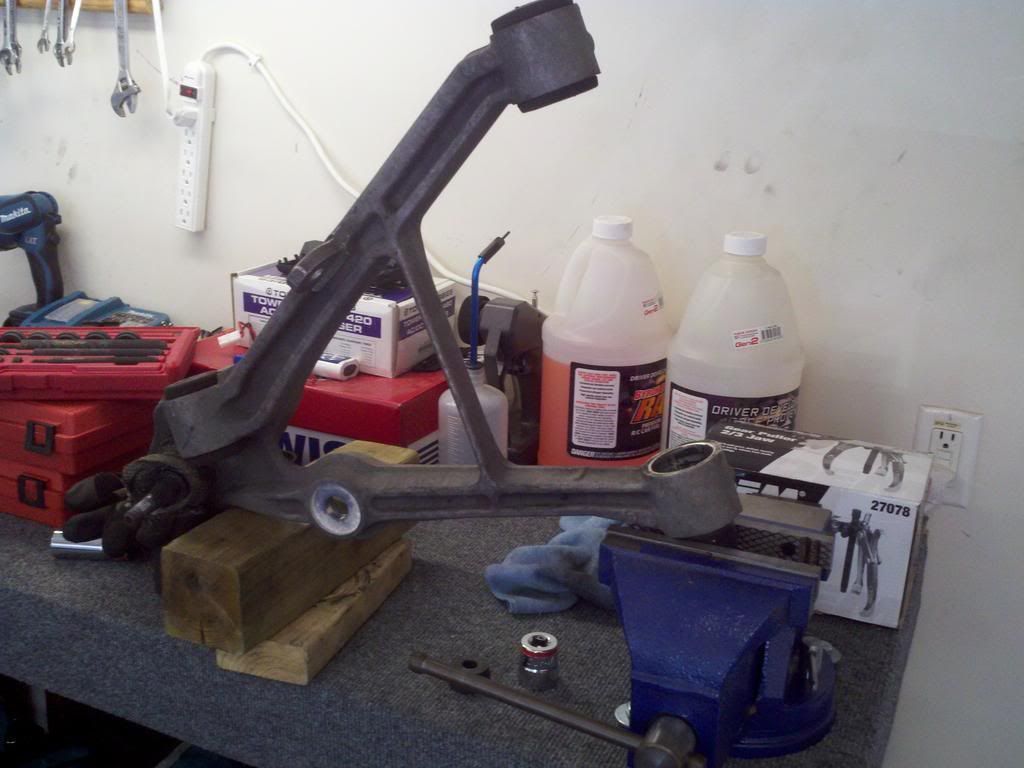
Step 3: Install the new bushings in the the control arm DRY, then lube the ID of the bushings. Most of the 2-piece bushings press in easily by hand. As mentioned in other threads, I cut my one piece poly's in half and shaved a bit off the ends to aid in installing them. I tried to press them in as a one piece, but it was just not gonna happen. Cutting them in half made the install easy. I also DID NOT have to grind my cradle like some people mention. With the slightly shaved rear LCA front bushings, the fit was snug, but the arm still could easily be moved by hand.
Also, have some brake cleaner and rags on standby, if your install goes anything like mine there will be lube everywhere. The slightest dab spread onto everything instantly and is crazy sticky.
Step 4: Lube and install metal sleeves and reinstall control arms.

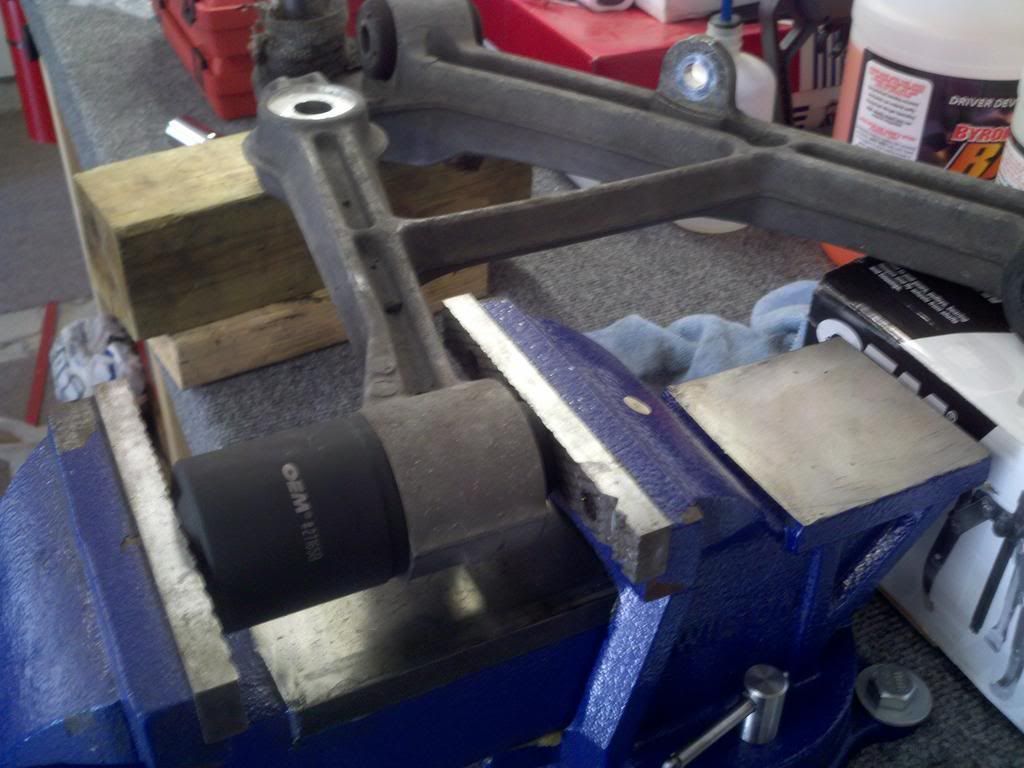
Front LCA Rear Bushing
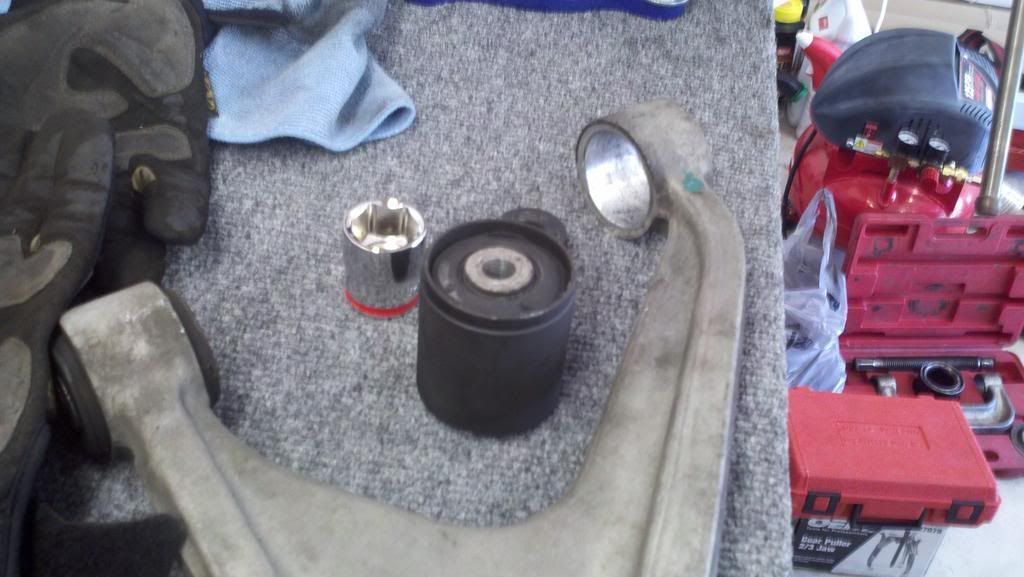
Front UCA

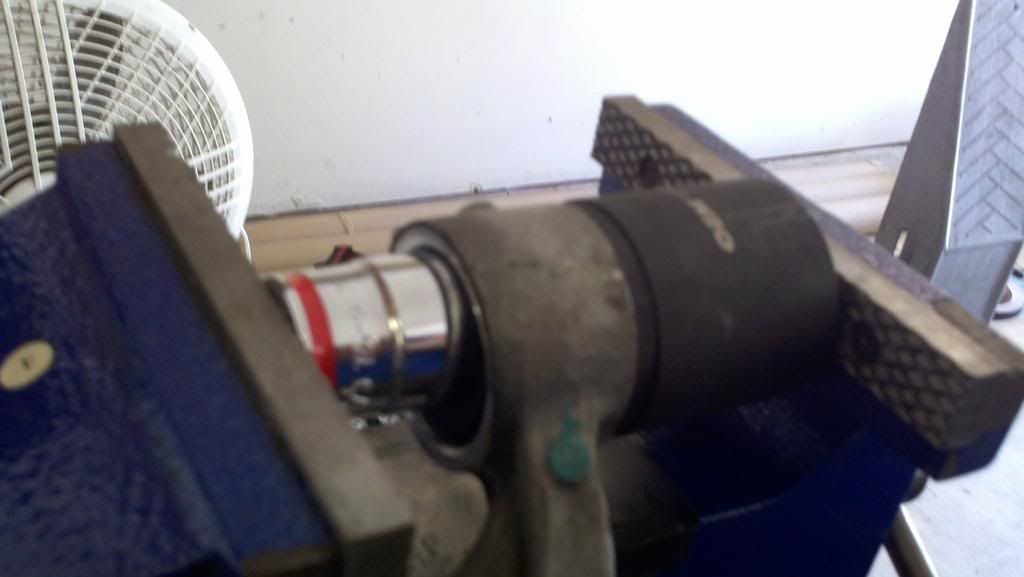
Rear LCA
The Die isn't deep enough to accept the whole bushing length so just get it out as far as you can, stick the bushing in the vise and pull the control arm off. Some are easy enough to pull out by hand.

General Setup and Use

And a Link to my photobucket album, lots of extra pictures, some blurry but hopefully useful.
http://s146.photobucket.com/albums/r...ing%20Install/
As some of you may know I recently made a thread asking how to remove the stock rubber bushings from my c5 control arms to install a set of Pfadt Poly bushings. For that thread and other searches I had done, I found answers that ranged from press, c-clamp, vise, burning them out, to its not possible just take them to a machine shop. Since some people made it seem so easy, and others so hard I figured I would post up how I actually did it with pictures so that those looking to do this in the future know what they are getting into.
If you don't want to read any further and just want the quick and dirty with the pictures, here it is. THIS JOB CAN EASILY BE DONE WITH JUST A 6" TABLE VISE AND SOME FREE AUTOZONE LOANER TOOLS!!!!!!!
When I say easy, I mean easy. I did this install by myself and even the first UCA took me only ~2 minutes to get the bushings out and ~5 minutes for the lower rear, including the shock bushing.
There is no reason to get intimidated by this install.
What you will need:
- Bench vise with 6" range or greater.
- Autozone Loaner Tools Part #'s 27137, 27165, 27166
- A 25mm or similar sized standard depth (not deep) socket. This may not be needed if you have a larger vise.
Step 1: Remove the Control Arms - This is covered in other threads and is pretty straight forward.
Step 2: Remove the stock rubber bushings. I used the following dies from the Autozone Kits above.
27166C, 27166E, 27166F, 27165B
I used Misc parts from the bushing driver kit to drive the bushings out. the two biggest ones worked best for me.
The concept is simple, basically you put the right sized die for the bushing (this is obvious once you are holding the control arm) and place it on the end of the bushing that is going to be pressed out. You then use the driver (or 25mm socket) on the other side. Sandwich the whole thing in the vise and turn. The bushing will easily press out.
This works for almost all of the bushings. The only thing special I had to do was for the front UCA. Just stick one of the ears of the bushing in the vise jaws and twist/man handle it out. It is not that hard.
Also, on the front LCA rear bushing, I had to pry one the washer off one side in order to press the bushing out. This is also easy, just use a little muscle. There is a picture of this below.
The pictures should make this all pretty self explanatory, but I will try to answer any questions you may have. Keep in mind I was able to do this by myself, the hardest part was trying to hold everything and get it into the vise properly, an extra pair of hands would make this 100% cake.
Step 3: Install the new bushings in the the control arm DRY, then lube the ID of the bushings. Most of the 2-piece bushings press in easily by hand. As mentioned in other threads, I cut my one piece poly's in half and shaved a bit off the ends to aid in installing them. I tried to press them in as a one piece, but it was just not gonna happen. Cutting them in half made the install easy. I also DID NOT have to grind my cradle like some people mention. With the slightly shaved rear LCA front bushings, the fit was snug, but the arm still could easily be moved by hand.
Also, have some brake cleaner and rags on standby, if your install goes anything like mine there will be lube everywhere. The slightest dab spread onto everything instantly and is crazy sticky.
Step 4: Lube and install metal sleeves and reinstall control arms.
Front LCA Rear Bushing
Front UCA
Rear LCA
The Die isn't deep enough to accept the whole bushing length so just get it out as far as you can, stick the bushing in the vise and pull the control arm off. Some are easy enough to pull out by hand.
General Setup and Use
And a Link to my photobucket album, lots of extra pictures, some blurry but hopefully useful.
http://s146.photobucket.com/albums/r...ing%20Install/
Last edited by stevensa; 11-07-2011 at 09:13 AM.
 11-07-2011, 12:47 AM
#2
Safety Car


I thought the Pfadt instructions say to mount them dry? You are only supposed to lube where the inner pins go?
And just to be clear about the cradle grinding (I had to do this) - it is just the outer sections that get ground (to widen the entry area into the area where the arm ultimately mounts) -- not the area that the bushings touch once fastened.
And just to be clear about the cradle grinding (I had to do this) - it is just the outer sections that get ground (to widen the entry area into the area where the arm ultimately mounts) -- not the area that the bushings touch once fastened.
11-07-2011, 09:20 AM
#3
Burning Brakes
Thread Starter
I thought the Pfadt instructions say to mount them dry? You are only supposed to lube where the inner pins go?
And just to be clear about the cradle grinding (I had to do this) - it is just the outer sections that get ground (to widen the entry area into the area where the arm ultimately mounts) -- not the area that the bushings touch once fastened.
And just to be clear about the cradle grinding (I had to do this) - it is just the outer sections that get ground (to widen the entry area into the area where the arm ultimately mounts) -- not the area that the bushings touch once fastened.
 11-07-2011, 11:42 AM
#5
Race Director


IIRC the Pfadt instructions, or one of the guys at the Pfadt shop, recommend soapy water applied to the OD of the bushings to make then slide in easier, lube inside hole (a lot).
Some grease will push out the first few miles, just wipe it up or it will attract "grit" forever.
This is pretty close to how I did mine, it's a puzzle to me that all these other "methods" still exist.
Good write up.

It might have been alcohol & water. Memory's shot.

Some grease will push out the first few miles, just wipe it up or it will attract "grit" forever.
This is pretty close to how I did mine, it's a puzzle to me that all these other "methods" still exist.
Good write up.
It might have been alcohol & water. Memory's shot.
Last edited by froggy47; 07-19-2015 at 08:13 PM.
11-07-2011, 11:58 AM
#6
Burning Brakes
Thread Starter
Not sure yet, I really don't like giving evaluations on products before I run them on the track.
I never realized how screwed up my stockers really were. I could barely move the front UCA with the stock bushings. The steering wheel is also a lot easier to move now with the new bushings. I also had a few vibrations in the car under certain loads that I could never really figure out. The replacement of the bushings seem to have fixed all of these. We will see how the work out on track, but so far if nothing else they seemed to have fixed a ton of little issues that the old stockers were causing.
Thanks!!!
I was prepared to do the alcohol/water on the outside if a bushing was stubborn, but I was able to do them all by hand (some easier than others).
I never realized how screwed up my stockers really were. I could barely move the front UCA with the stock bushings. The steering wheel is also a lot easier to move now with the new bushings. I also had a few vibrations in the car under certain loads that I could never really figure out. The replacement of the bushings seem to have fixed all of these. We will see how the work out on track, but so far if nothing else they seemed to have fixed a ton of little issues that the old stockers were causing.
IIRC the Pfadt instructions, or one of the guys at the Pfadt shop, recommend soapy water applied to the OD of the bushings to make then slide in easier, lube inside hole (a lot).
Some grease will push out the first few miles, just wipe it up or it will attract "grit" forever.
This is pretty close to how I did mine, it's a puzzle to me that all these other "methods" still exist.
Good write up.
Some grease will push out the first few miles, just wipe it up or it will attract "grit" forever.
This is pretty close to how I did mine, it's a puzzle to me that all these other "methods" still exist.
Good write up.
I was prepared to do the alcohol/water on the outside if a bushing was stubborn, but I was able to do them all by hand (some easier than others).
11-07-2011, 02:06 PM
#7

Great write up! The whole process really isn't rocket science, but can definitely be time consuming the first time you do it.
A couple more helpful hints - If you're having a hard time slipping the poly into the control arm bore you can use some readily available Isopropyl alcohol and water solution on the outside diameter of the poly to act as a temporary lubricant. Be sure to only use the supplied poly grease on the inside diameter of the poly bushing, and not between the inside diameter of the control arm and outside diameter of the poly bushing.
The front uppers can be a little tricky. The bushings are a 2 piece design. Be sure that they can be assembled into the control arm by hand, if it requires a vise or C Clamp to keep the front uppers assembled with the new poly it may be necessary to remove a little bushing material from the inside face where the 2 bushings make contact until they do assemble easily.
Other than that it's pretty straight forward with the right tools! Great post!
The following users liked this post:
Bk117 (04-02-2022)
 11-10-2011, 12:09 PM
#9
Safety Car

Pfadt - Any downside to cutting the one-piece ones in 1/2? It would make install much easier.
Sperkins - The one-piece ones in the rear were the biggest PITA for my install using my buddy's press. If you didn't have it lined up 100% perfectly they wouldn't take. Getting that lip to push through the control arm was tough. I eventually got them, but cutting them in 1/2 would make it a non issue.
Sperkins - The one-piece ones in the rear were the biggest PITA for my install using my buddy's press. If you didn't have it lined up 100% perfectly they wouldn't take. Getting that lip to push through the control arm was tough. I eventually got them, but cutting them in 1/2 would make it a non issue.
11-10-2011, 06:52 PM
#10
Pfadt - Any downside to cutting the one-piece ones in 1/2? It would make install much easier.
Sperkins - The one-piece ones in the rear were the biggest PITA for my install using my buddy's press. If you didn't have it lined up 100% perfectly they wouldn't take. Getting that lip to push through the control arm was tough. I eventually got them, but cutting them in 1/2 would make it a non issue.
Sperkins - The one-piece ones in the rear were the biggest PITA for my install using my buddy's press. If you didn't have it lined up 100% perfectly they wouldn't take. Getting that lip to push through the control arm was tough. I eventually got them, but cutting them in 1/2 would make it a non issue.
Will most of you who have cut them ever have that problem? Probably not. But we should be clear that we did not test them in that configuration and can not predict the results. Additionally the obvious implication is that that bushing is no longer under warranty etc.
Hope that helps! Still a good topic for discussion. Good stuff.
11-10-2011, 07:04 PM
#11
Safety Car
But on the rear control arms they're captured by the frame "ears" (for lack of a better word) on the uppers and by the cradle for the lowers. The control arms can't move longitudinally other than how much the poly "flange" will squish and I'm assuming that's a minimal amount. Am I missing something?
11-11-2011, 01:52 AM
#12
Safety Car
I couldn't get mine in so I cut them.
Zero problems (before I moved to delrin$).
There is really no room for the 2 piecer to wander.
Install is a snap as well.
Zero problems (before I moved to delrin$).
There is really no room for the 2 piecer to wander.
Install is a snap as well.
11-13-2011, 12:46 PM
#13
Former Vendor

I most highly recommend installing zerts while doing this. In my personal experience, the original design, not the newer version, after just 1k miles I started having squeaks, major ones. It was a great deal of work to pull them apart to relube them so I decided to install zerts and use marine grade grease. (I followed the directions very carefully during the original install, used the grease they came, with, etc)
I started at the upper front control arms, I could barely rotate the shaft in the bushing even using a screwdriver through the bolt hole. Then I pressed it out, cleaned it, put in marine grade grease and it went back in by hand and I could turn it with just my finger and thumb.
I used a diamond blade on my dremel and cut a grove around the inside of each bushing, centered on the whole I drilled for the zert, so grease can flow around the whole bushing.
22 bushings and zerts later, 10+ hours, I was done, including the sway bar bushings. First drive, I sought out all the worst bumps, not a peep out of any bushing, the car road and handled better as the suspension was far freer to articulate smoothly.
Now I can grease the whole suspension in 10 minutes or less when on the rack. 2k miles or so is all I got to drive this year, still working perfectly fine, I did one re lube just because it was on the lift but probably did not have to.
I love having the Pfadt bushings, sways, coilovers, DRM steering rack bushing, and a very very carefully dialed in alignment, it is not like driving the same car, so very much better in all ways, ride is even better
If I do one again, the zerts are going in the first time
Rick
11-13-2011, 12:52 PM
#14
Safety Car
The idea with greasing is to get grease around the inner pin, correct? Not the whole bushing. You will need to convert all the bushings to 2 piece (or at least provide a channel large enough from the zerk to the inner pin in case the bushing rotates) if you want the grease to reach the center pin. And then hope that the grease doesn't lube the bushing/control arm area.
 11-13-2011, 02:54 PM
#16
Former Vendor
I used zerts with long enough shanks to go past the bushing outer diameter but not too deep as to become and issue. I drilled into the center of the bushings and then cut a shallow groove into it around the inserts so the grease can flow all around it.
One thing I did not mention, when I took the upper control arm center pin out it was a pretty hard press to do so and it was showing signs of galling, the bushing material onto the pin in just a short time of use, dry, clear roads only.
-----------------
Not that likely to happen but since none of the bushings are off centered, I can see no reason of concern if a bit of grease ever did get between the bushing and control arm. It would rotate on the same access anyway. I have not seen any evidence of this on my car. But, I am not the expert here, just posting my observations, experiences, etc....
------------
I have only heard of a few issues with the original design, I have not heard of any with the new one, curious to see if anybody has? I have another Vette chassis in storage for a pro tour build and have a set of the original bushings I was going to use with zerts but would not mind using the new design instead if no problems known with them
Thanks
Rick
11-13-2011, 02:56 PM
#17
Safety Car
The revised Pfadt design has channels around the pin that keep the lube in place. I still had plenty of lube after 6mos, which included driving on salty roads.
11-13-2011, 03:00 PM
#18
Former Vendor
I will have to check them out
-------------
As for installing bushings:
I did the original install and then the zerts the zerts with the control arms on the car, having a lift, right tools, etc...not that tough but still very time consuming. I used a big C clamp style press and an air gun, I had to make a part or two to make it work, the hardest part of the whole process was taking them apart and then cleaning that super sticky original lube off, they went back together pretty easily.
I have used the bench vice method before I had nicer tools, lift, etc.....and mounted the C clamp press in the vice on another car bushing project.
The Clamp vice is part of a ball joint tool kit, mine was pretty costly years ago with a US company brand name on the box, now you can buy what appears to be the same thing at HF for 1/4 the amount.
Rick
12-06-2011, 03:03 AM
#19


Not sure yet, I really don't like giving evaluations on products before I run them on the track.
I never realized how screwed up my stockers really were. I could barely move the front UCA with the stock bushings. The steering wheel is also a lot easier to move now with the new bushings. I also had a few vibrations in the car under certain loads that I could never really figure out. The replacement of the bushings seem to have fixed all of these. We will see how the work out on track, but so far if nothing else they seemed to have fixed a ton of little issues that the old stockers were causing.
I never realized how screwed up my stockers really were. I could barely move the front UCA with the stock bushings. The steering wheel is also a lot easier to move now with the new bushings. I also had a few vibrations in the car under certain loads that I could never really figure out. The replacement of the bushings seem to have fixed all of these. We will see how the work out on track, but so far if nothing else they seemed to have fixed a ton of little issues that the old stockers were causing.
Sorry to re-ask the question, but how do you like them? And do you drive you car on the street at all?
I am debating OE rubber or these. I do 4-6 hpde track days a year and about 8000 street miles in my frc.
I have heard a few horror stories about people swapping to poly bushings and then no longer enjoying street driving.
I know this is VERY subjective, but just trying to get some more input.
Thanks
12-06-2011, 10:17 AM
#20
Former Vendor
I like my car much better on the street with them, lubed well, than I ever did on rubber bushings. The ride is stiffer from the coilovers, bushings, etc but my wife and I like it better as more controlled, less excess motion, she used to get a bit sea sick if I pushed it a bit hard, now far less.
Driving experience is just plain better in every way. The stock suspension, bushings, shocks springs, sways, even when I installed Bilstiens, better springs, bigger sways, wider wheels, better tires, I still did not like it much, poor feedback and not a great ride. Now with Phadt street coilovers, sways, bushings, and DRM steering rack bushing and a very well dialed in alignment, not like driving the same car.
It rides better, handles better, stops better, far better feedback, the only issue is now the car is so confidence inspiring it is to fast for public roads, being on the edge is fun, on the edge in my car is so far out there I can only do it on a track now without being an idiot on the street. And, I cannot go to the track until I build a roll bar, a proper one for my vert.
The car responds exceptionally well to a few good suspension mods, the bushings were one of the best.
Rick

