C6 Corvette sound system overhaul
 04-27-2014, 11:50 PM
#1


Hey all,
Warning: this thread is decently long and picture heavy. Sorry.
Just wanted to share a little project I've been working on for a while.
Before I even bought my car last July, I knew that no factory stereo system would satisfy me. I'd never done a true full system build, but I'd always wanted to.
I knew I'd want sound deadening and noise isolation material throughout the car. I wanted crisp, clear mids and highs that would be loud and distortion free. Without a doubt, I had to have hard-hitting, breathtaking bass. And above all, everything had to look good.
With these goals in mind, I embarked on a project that was, in many ways, a learning experience. I used a few threads on this forum for guidelines:
http://forums.corvetteforum.com/audi...p-by-step.html
http://forums.corvetteforum.com/audi...-write-up.html
http://forums.corvetteforum.com/audi...24-pinout.html
http://www.lazyassgeek.com/c6-stereo...-pac-add-gm24/
I also used countless other resources that I've forgotten to record. If I have time to locate them I will edit this post with them.
Before I get into the goods, here's the specs of the system (I'll also list forum vendors if applicable):
From Double D Mods:
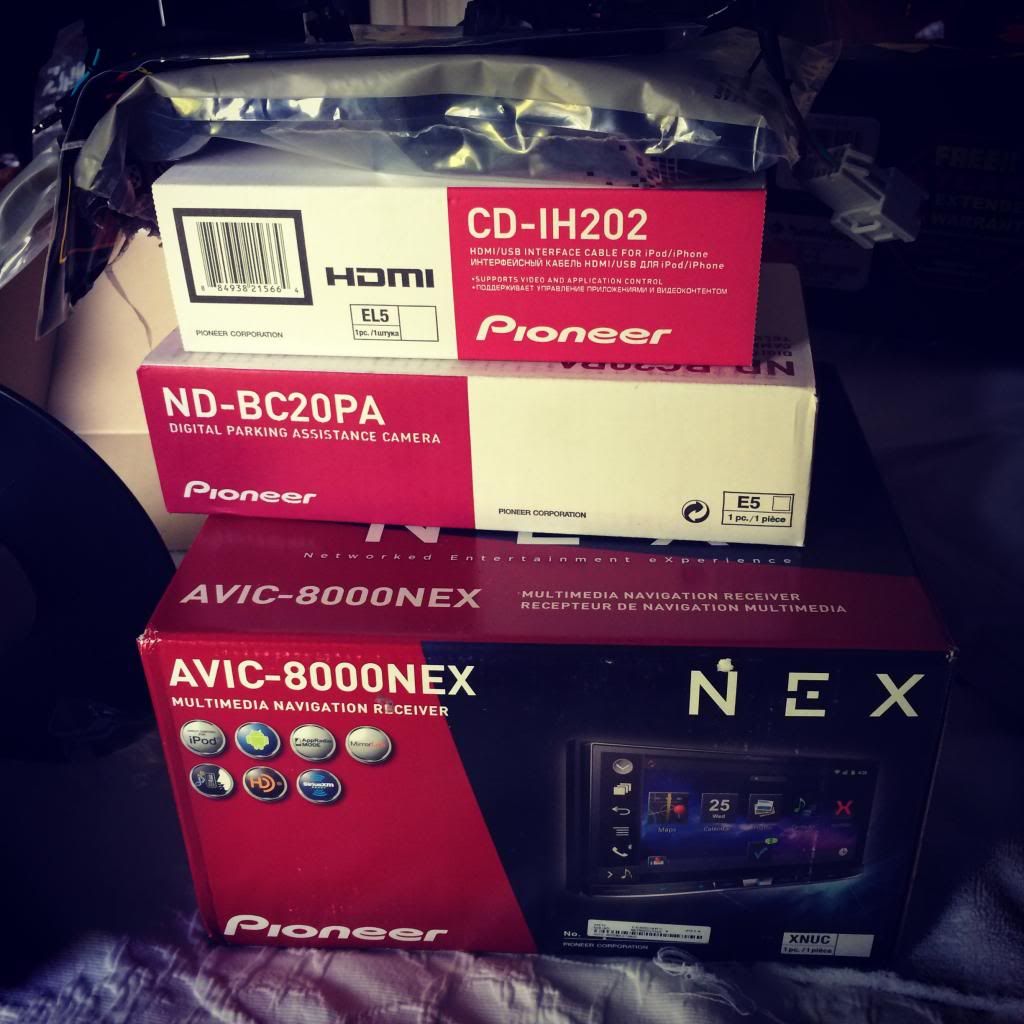
Pioneer AVIC-8000NEX
GMOS-04 integration module
Maestro SW steering wheel retention module
Pioneer ND-BC20PA backup camera
custom pre-wiring of all connections
dash bezel, antenna adapter, etc.
From VetteNuts:
2x JL Audio 10W3v3-4 subwoofers
Driver and Passenger subwoofer boxes
custom VetteBin style amp rack
Sourced elsewhere:
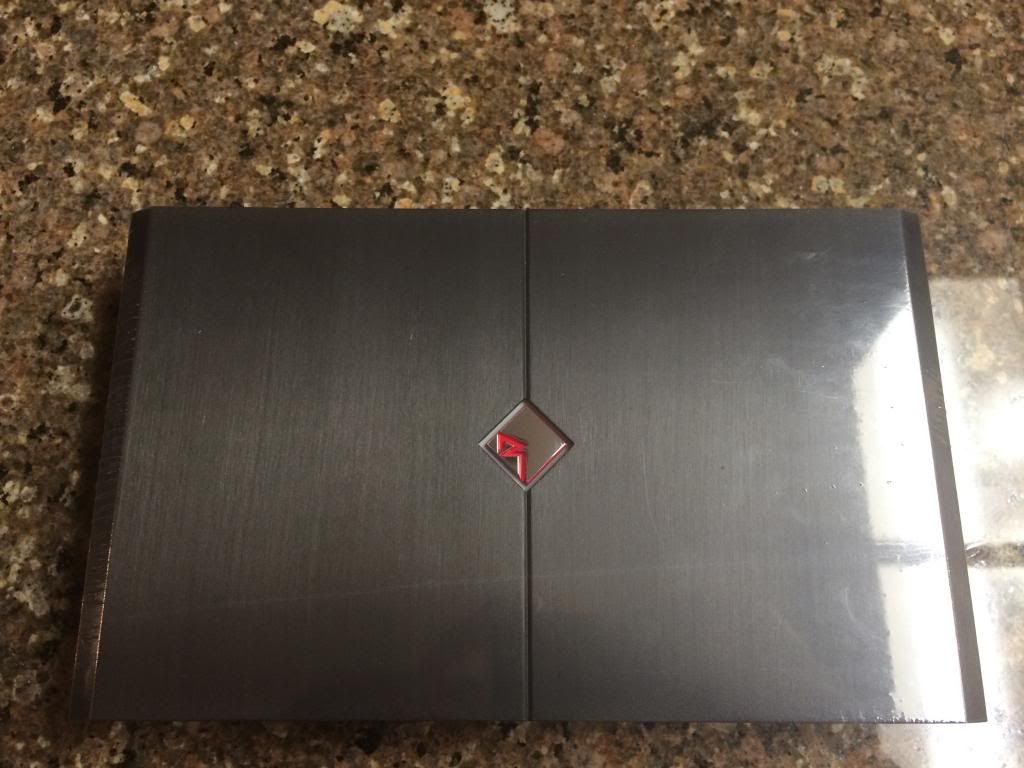
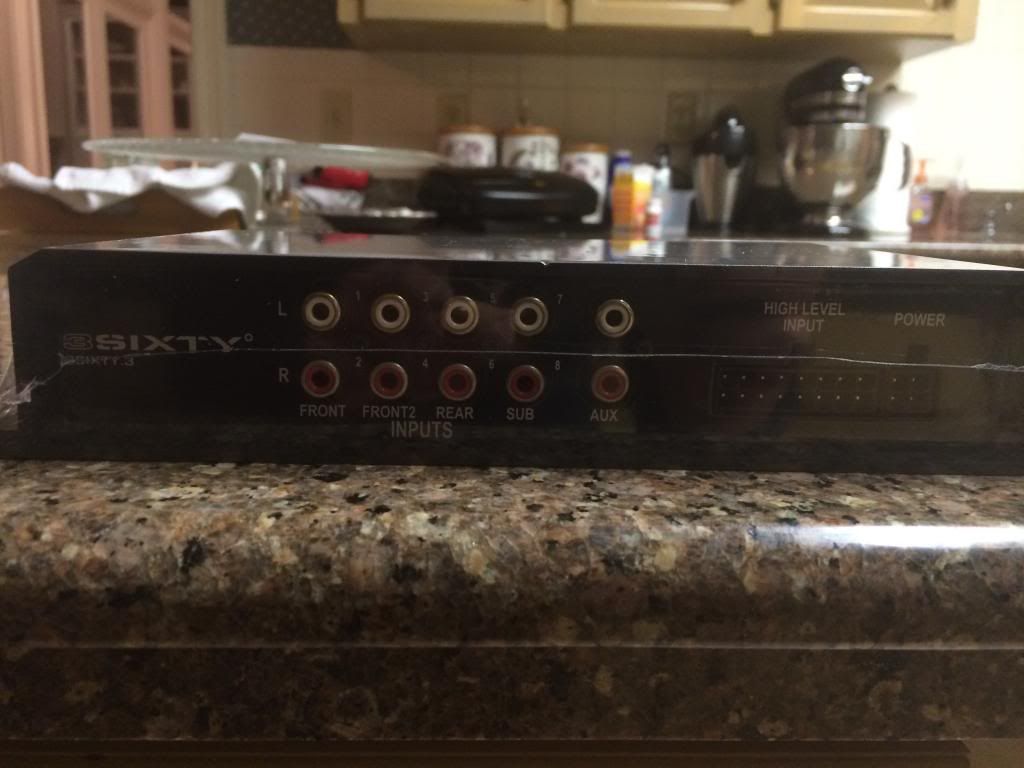
Rockford Fosgate 3Sixty.3 processor/eq/ta
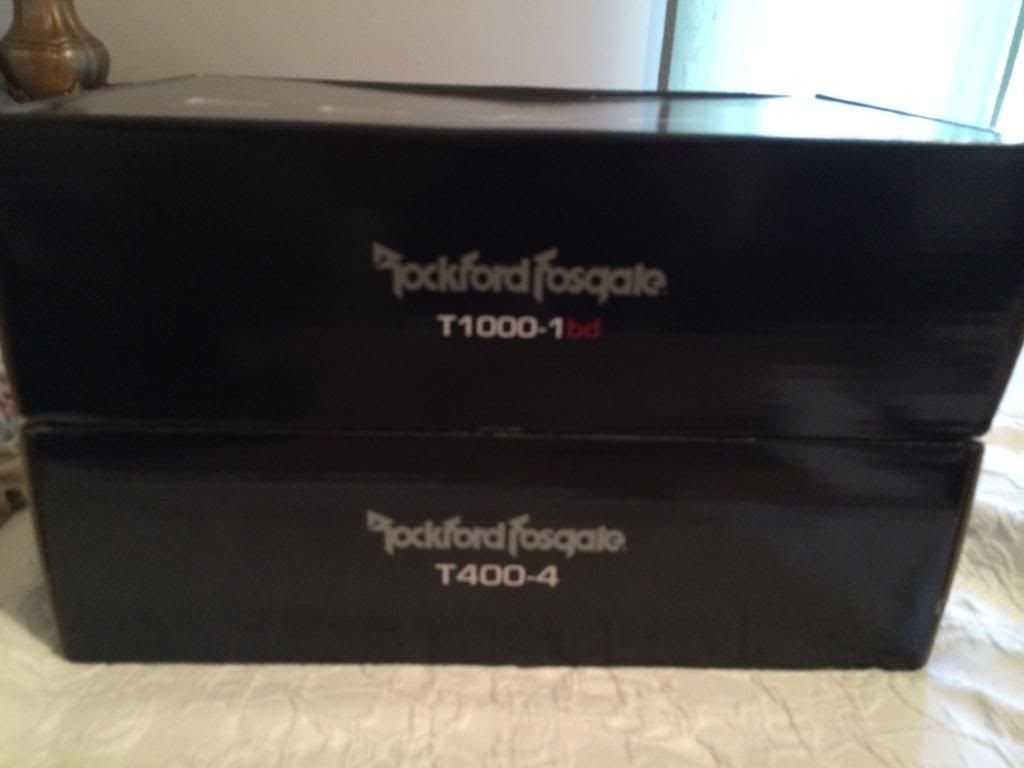
RF T400-4 mid/high amplifier
RF T1000-1bdCP subwoofer amplifier
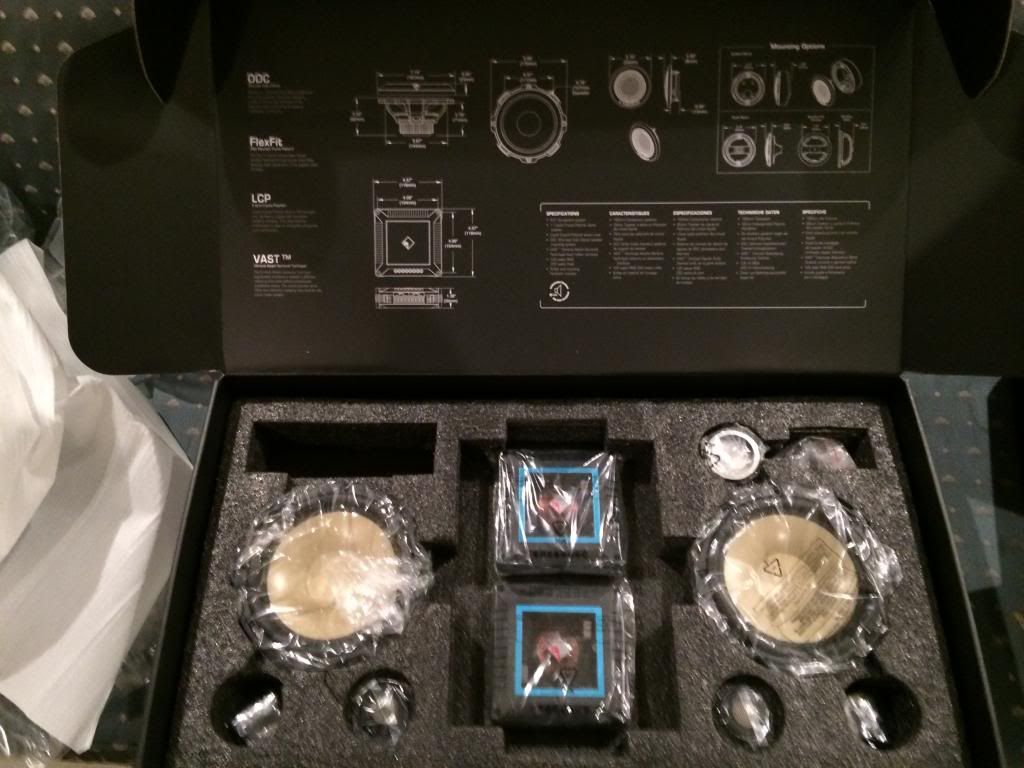
RF T3652-S 6.5" woofers/1" tweeters (front doors) (mounted in speaker baffles from a non-forum vendor)
RF T152 5.25" coaxial speakers (rear fill)
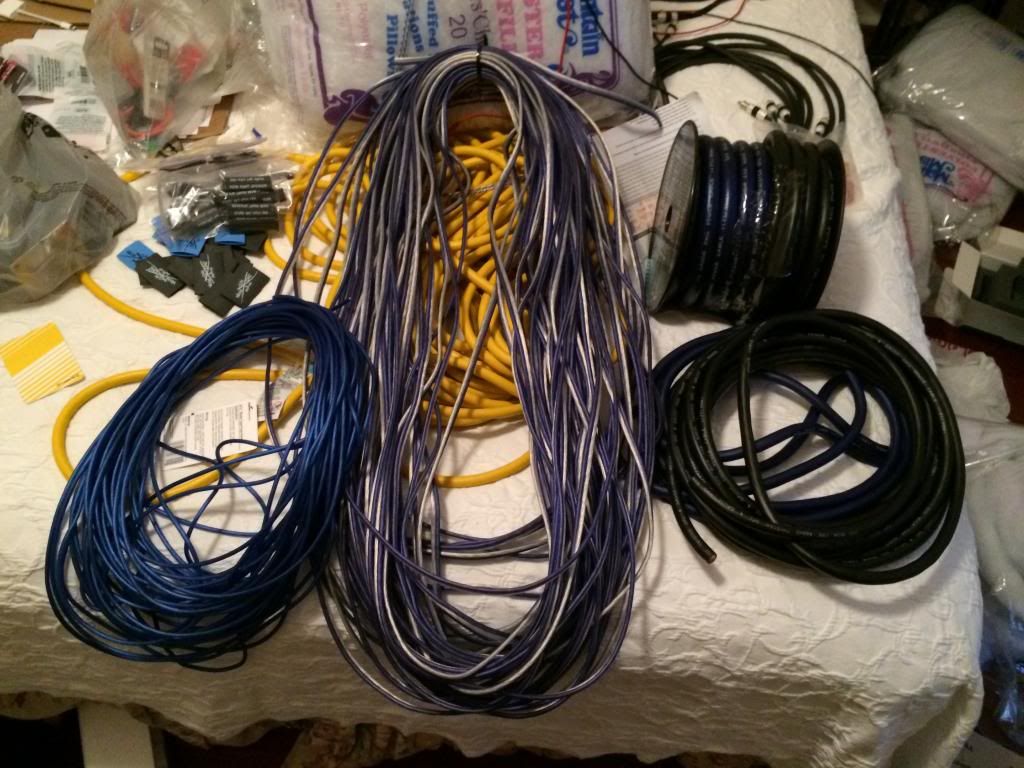
Sky High Car Audio 1/0, 4, 14 ga power wire (all OFC)
SHCA 14ga speaker wire (OFC)
SHCA wire heatshrinks
SHCA 1/0 full copper lugs
Techflex sleeving
KnuKonceptz main fuse and distribution blocks
Second Skin Audio Damplifier Pro and Luxury Liner Pro sound deadening/noise isolation
Stinger 8000 series RCA interconnects
XS Power D3400 AGM battery
XS Power iBar multiple terminal kit
Now that that's through...
I started all this in October, when I decided to upgrade my battery and charging cable.
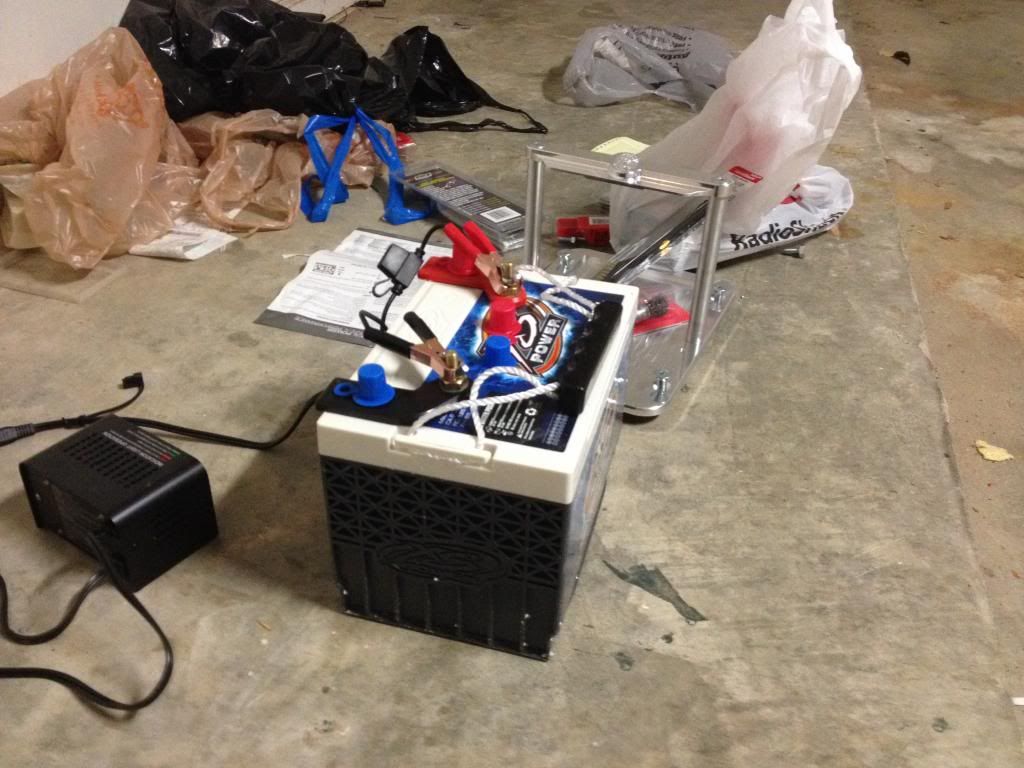
October 24: I went with an XS Power D3400 battery mostly because of a guy named Steve Meade. If you haven't heard of him, https://www.youtube.com/user/meade916.
The ability to add an extra set of terminals to these batteries is really neat, as I wanted to retain my factory wiring ends as well as add a few accessories....
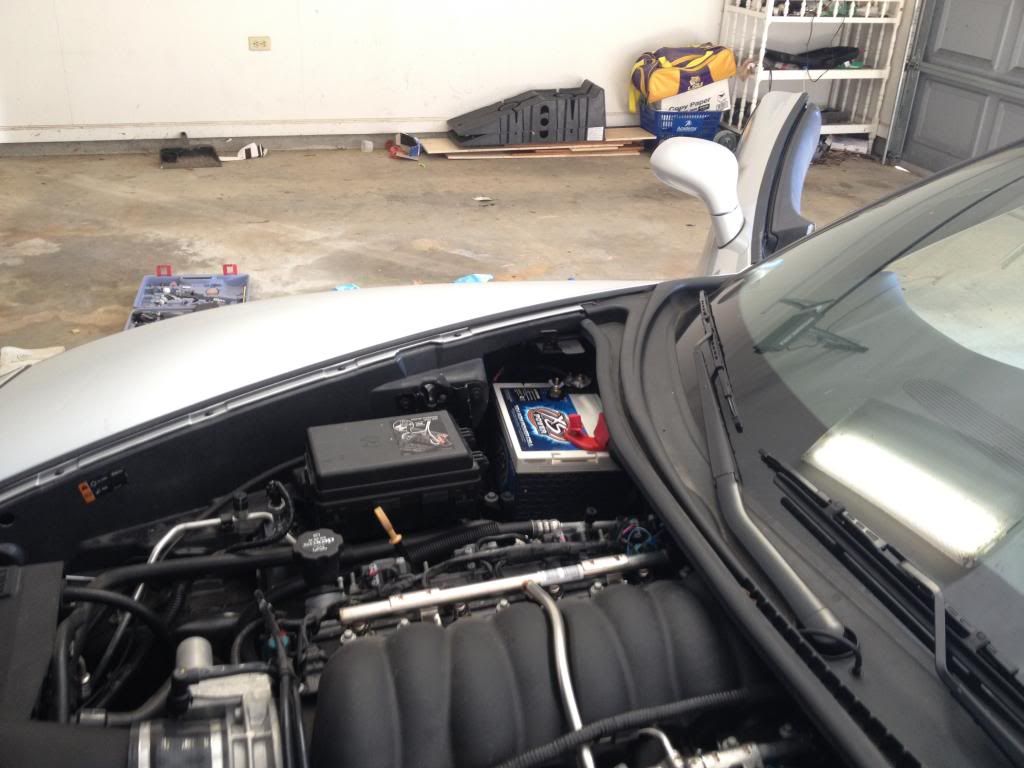
October 25: Here's a view of the battery installed in the car. I ended up installing it rotated 180 degrees from the factory direction due to factory cable lengths and terminal orientation. You can also see the extra terminals and wing nuts.
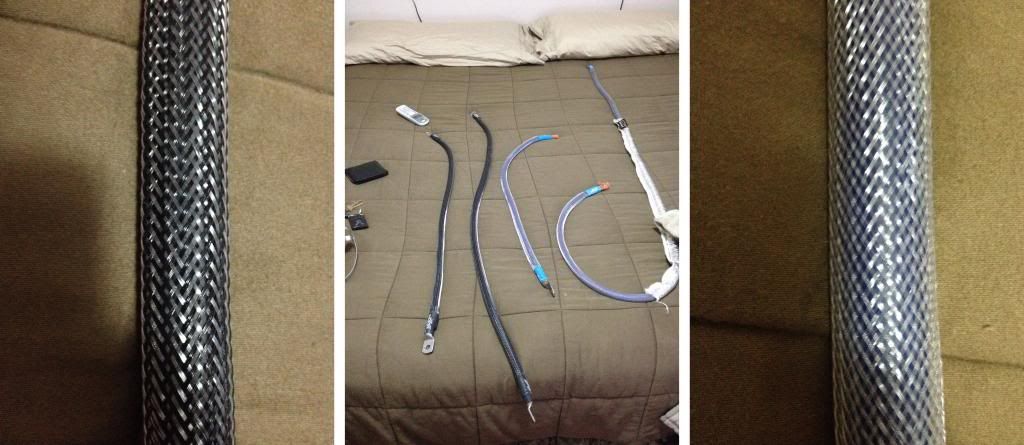
A couple weeks later, I added a custom big 3 kit to the car, complete with Sky High Car Audio 1/0 AWG pure OFC cable, an SHCA AGM fuse holder, Techflex sleeving, SHCA heatshrink ends, and SHCA 1/0 pure copper ring terminals.
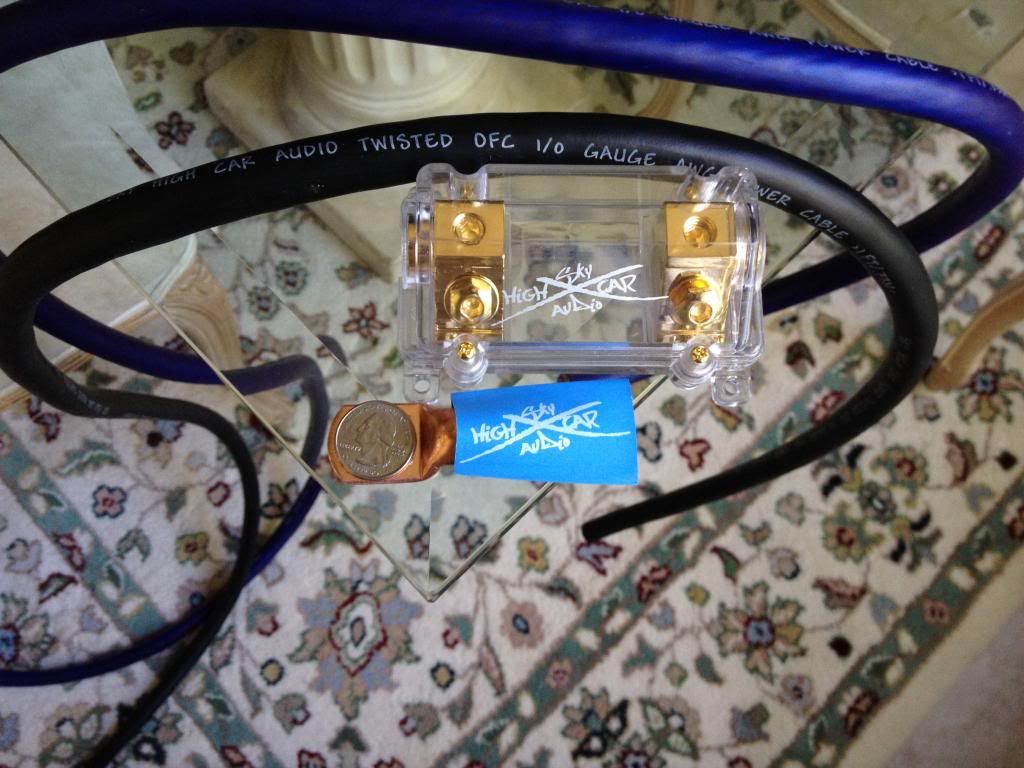
October 23: View of the unsleeved SHCA cable, fuse holder, terminal, heat shrink, and a quarter for size comparison.
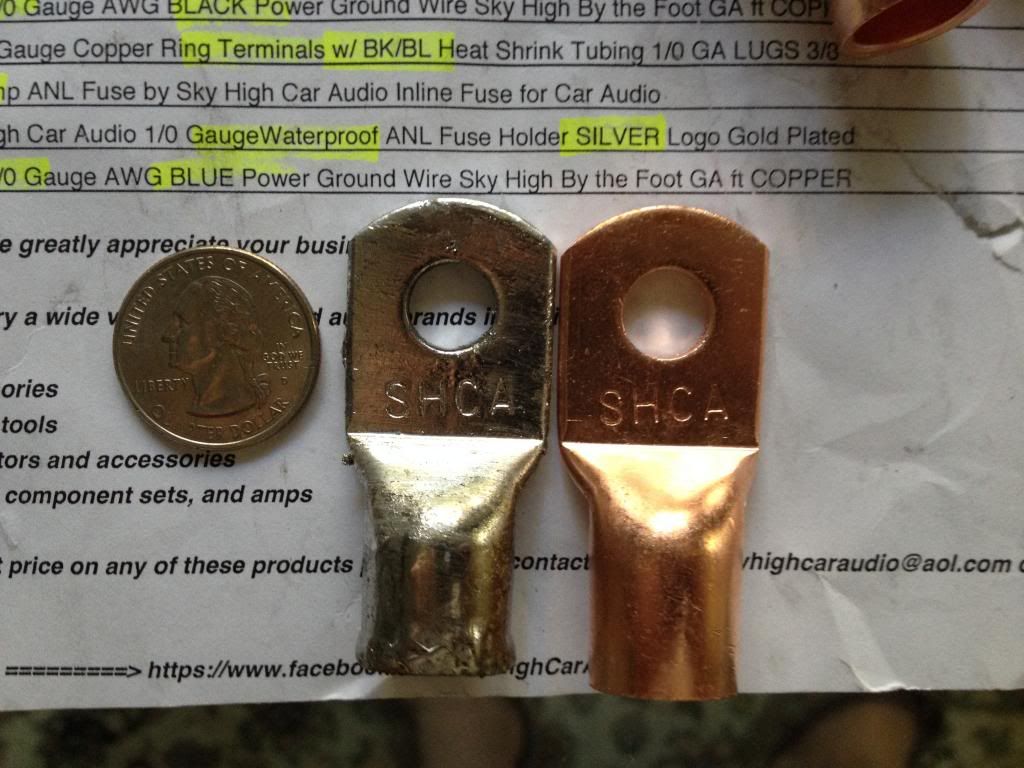
I decided to tin the SHCA ring terminals for optimal corrosion resistance. Here's a before/after view. They're not as pretty, but they may last longer.
October 23: The terminals were affixed to the wire with solder - first they were completely filled with molten solder, then the wire was inserted and allowed to cool. I don't have any photos of this process - sorry.
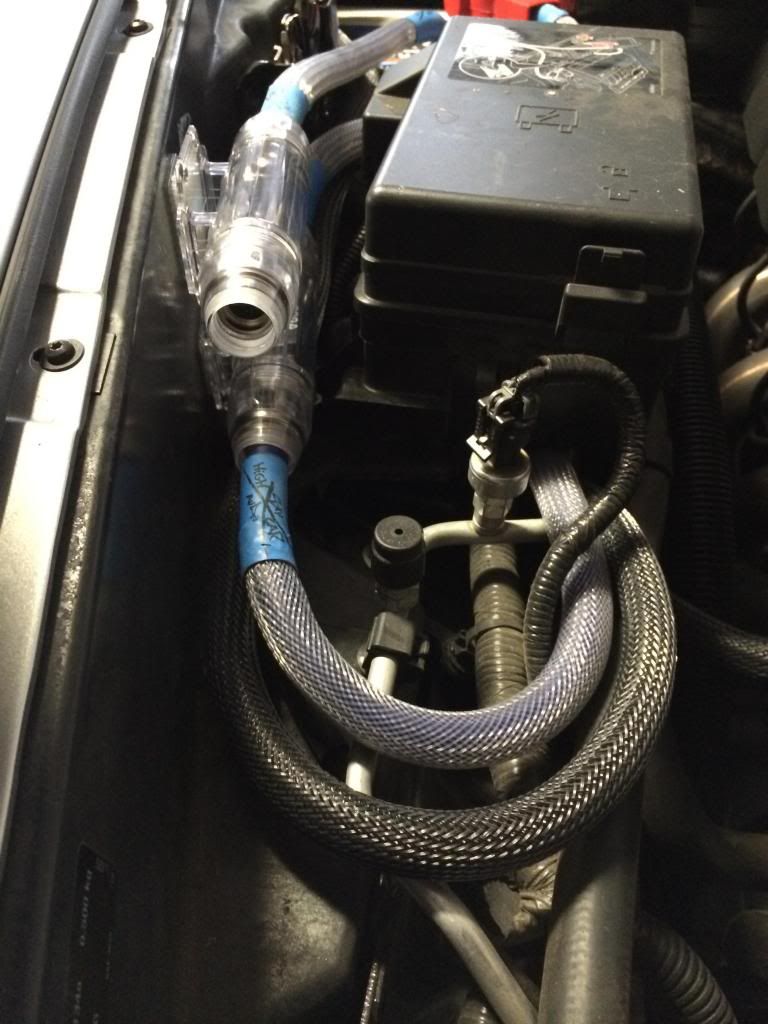
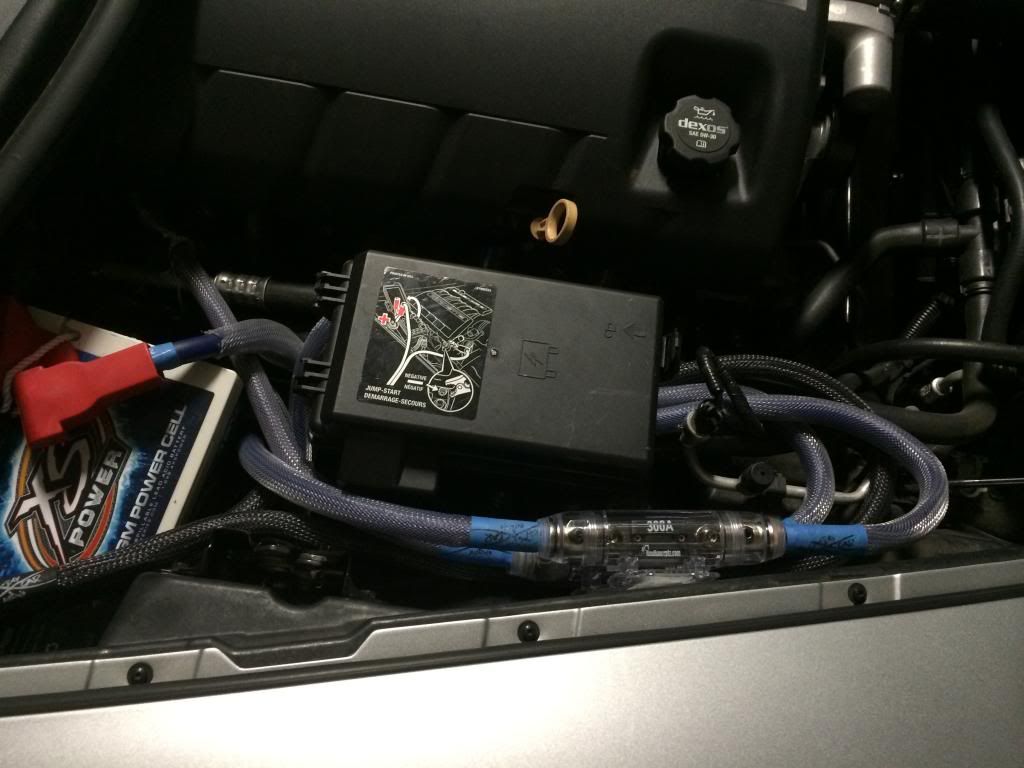
November 7: Detail view of the SHCA wiring with sleeving/heatshrink/tinned terminals. The long run of positive cable has additional heat shielding that I picked up at a local auto parts supply store. Don't recall the brand. Needed this due to close proximity to engine components.
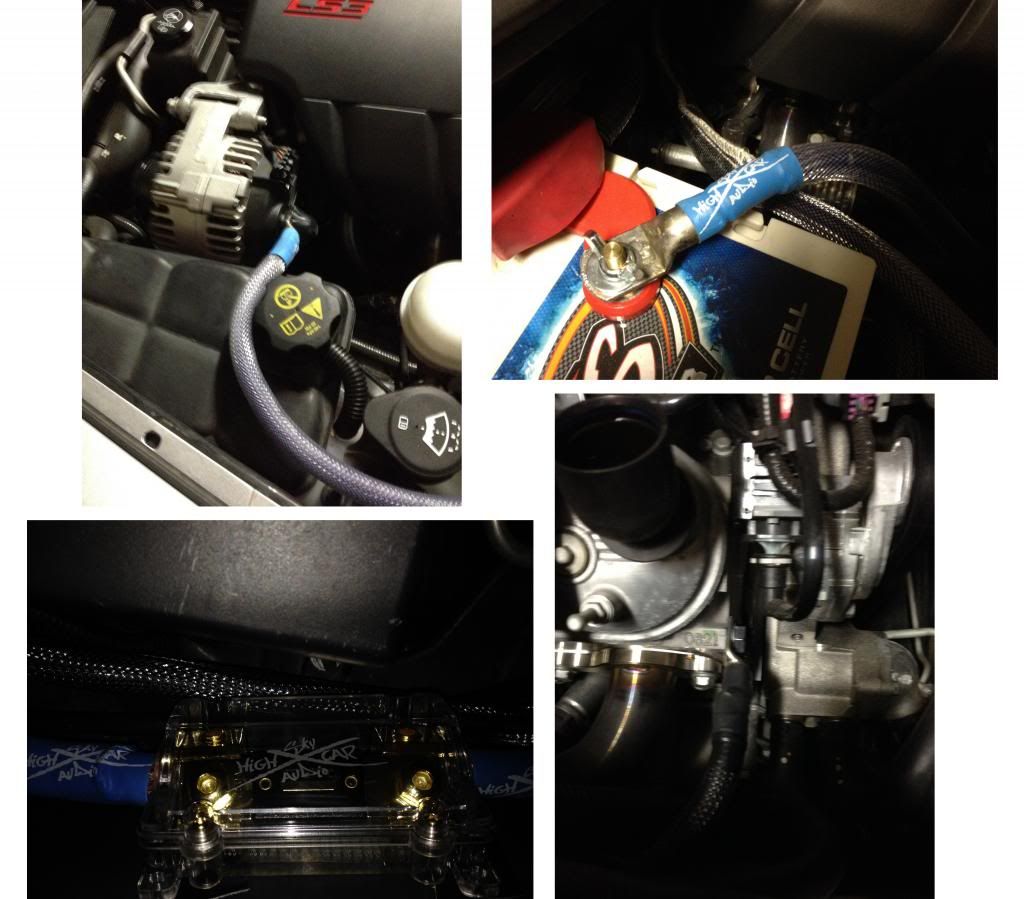
November 7: Here are some views of the big 3 installed. Clockwise from top left: +12V from alternator (factory wire still connected), +12V to battery from alternator, ground connection to engine block, SHCA fuse block (between alternator and battery, mounted to fender well next to fuse box).
Not shown is the ground connection that was added to an existing frame ground. I scuffed off some of the paint around the connection. Again, factory wiring at this point was left intact.
I based my big 3 install off of a guide I found somewhere on here. I apologize, I seem to have lost the link for it.
The car remained in this condition for a little less than 2 months while I planned and ordered the rest of the build. Toward the end of December, I had ordered everything, and had received most of the components, with the exception of the head unit which I knew would be delayed until Aprilish. Dennis at Double D was a pleasure to deal with RE: the head unit. I was also waiting on an amp rack, subs, and sub boxes from a non-forum vendor, but I figured that they would arrive before I was done with everything anyway.
From here on out, the dates probably aren't accurate, but I don't feel like going to my camera to find the exact ones. These are the dates from when they were uploaded to my facebook.
December 4: RF T400-4 amplifier. This will run the front/rear mids/highs.
December 5: RF T1000-1bdCP amplifier. This will run the subwoofers. Physically identical to the above amp as far as dimensions are concerned, which made amp rack design rather simple.
December 5: A shot of me testing out the RF T1000-1bdCP on my portable sound system. Normally, none of these wires would be visible, but this was my only real setup to test this out.
December 5: amplifier boxes.
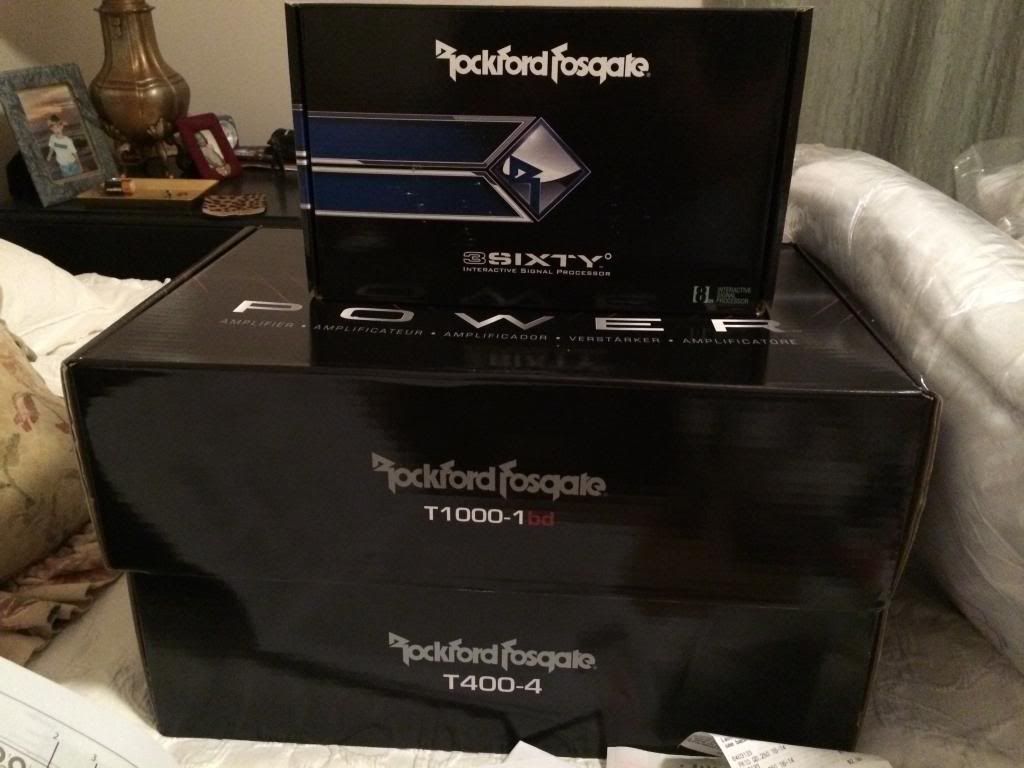
December 12: RF 3Sixty.3 processor arrives.

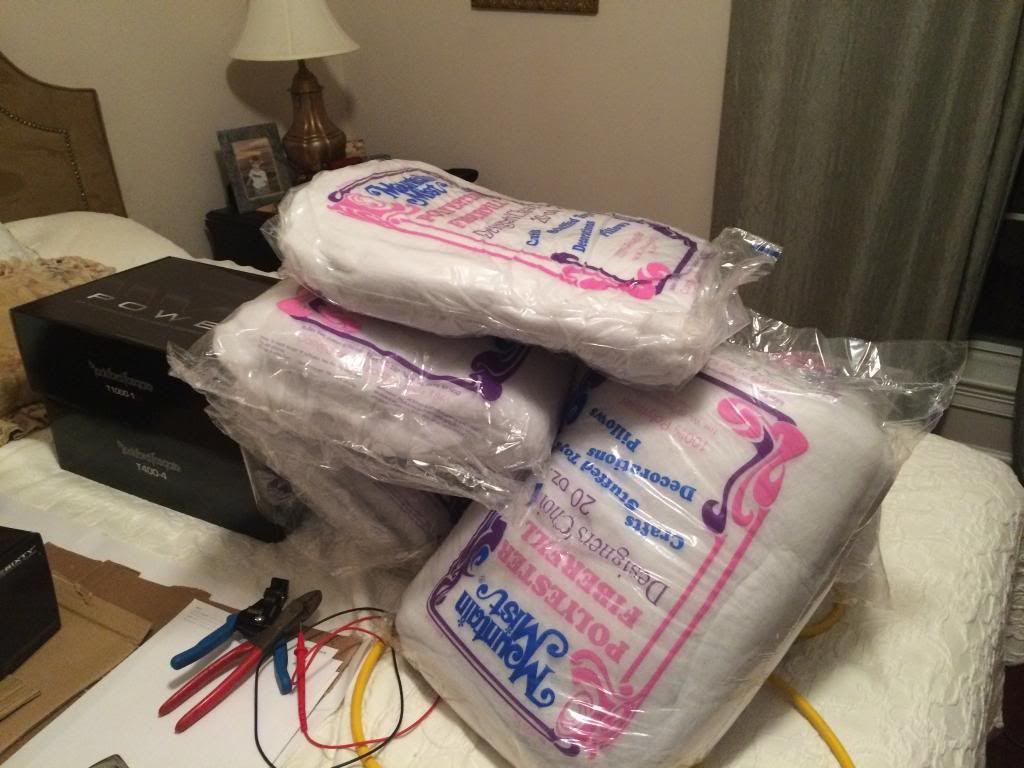
December 12: I seem to have ordered way too much polyfill... also the box for the 3Sixty.3 atop the amp boxes
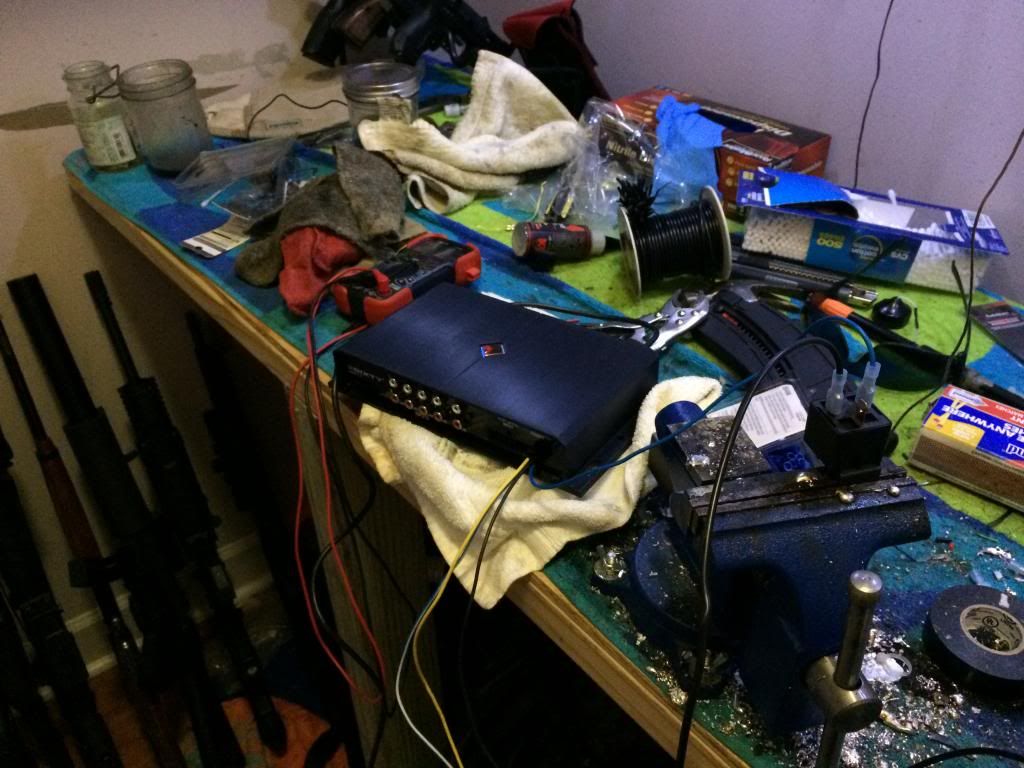
December 16: making sure the 3Sixty.3 powers up and connects to my laptop properly. Please excuse the background.....my workbench has multiple purposes, it seems.
December 19: care package from Sky High Car Audio arrives.
December 20: RF T3652-S woofers/tweeters arrive. Packaging is exquisite.
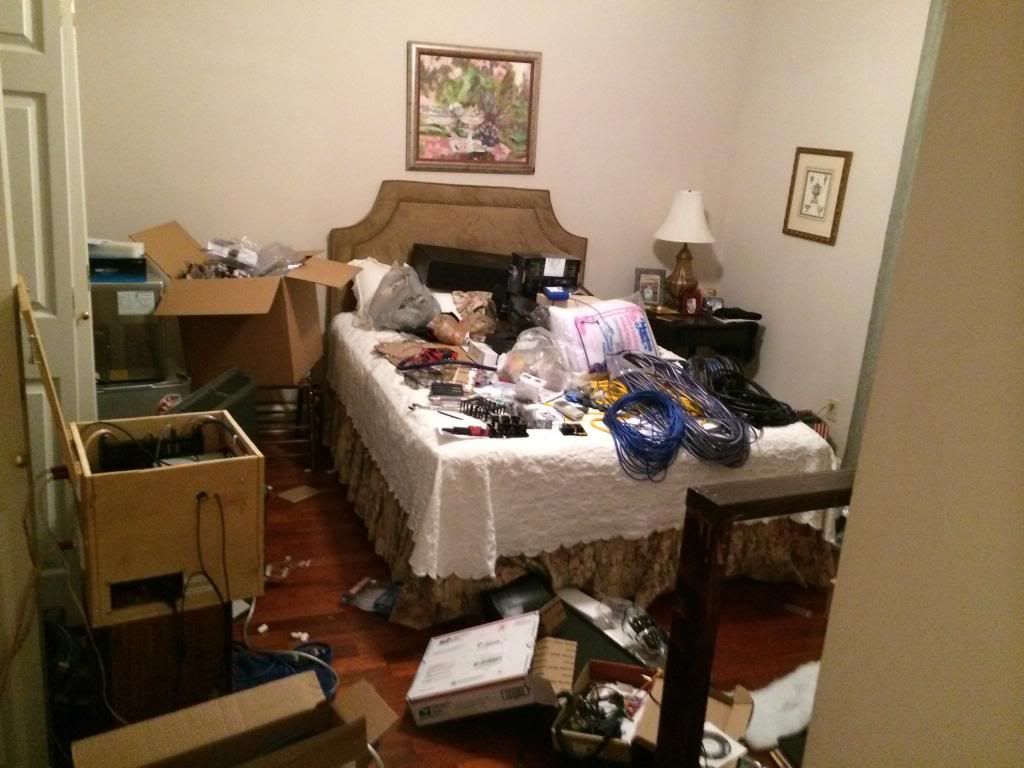
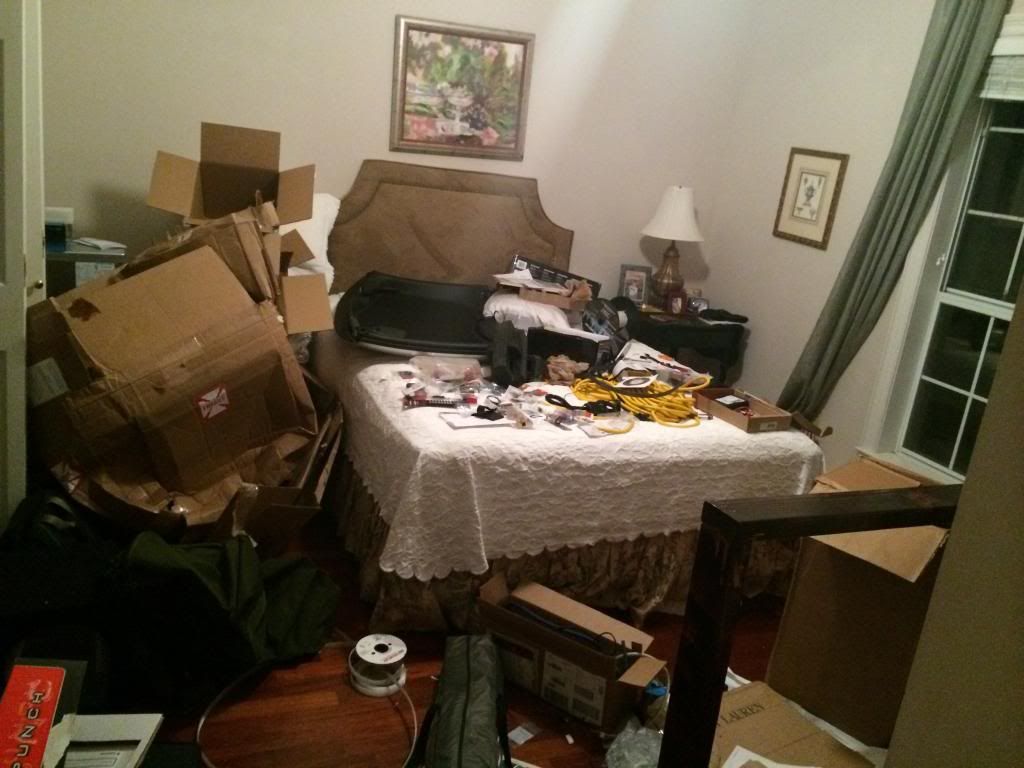
December 20: The guest bedroom is dubbed "The S**T Room" by my father.
December 28: view of new KnuKnoceptz main fuse blocks. The SHCA blocks were too large to fit two of them, so I decided to use two of the Knu blocks.
December 29:
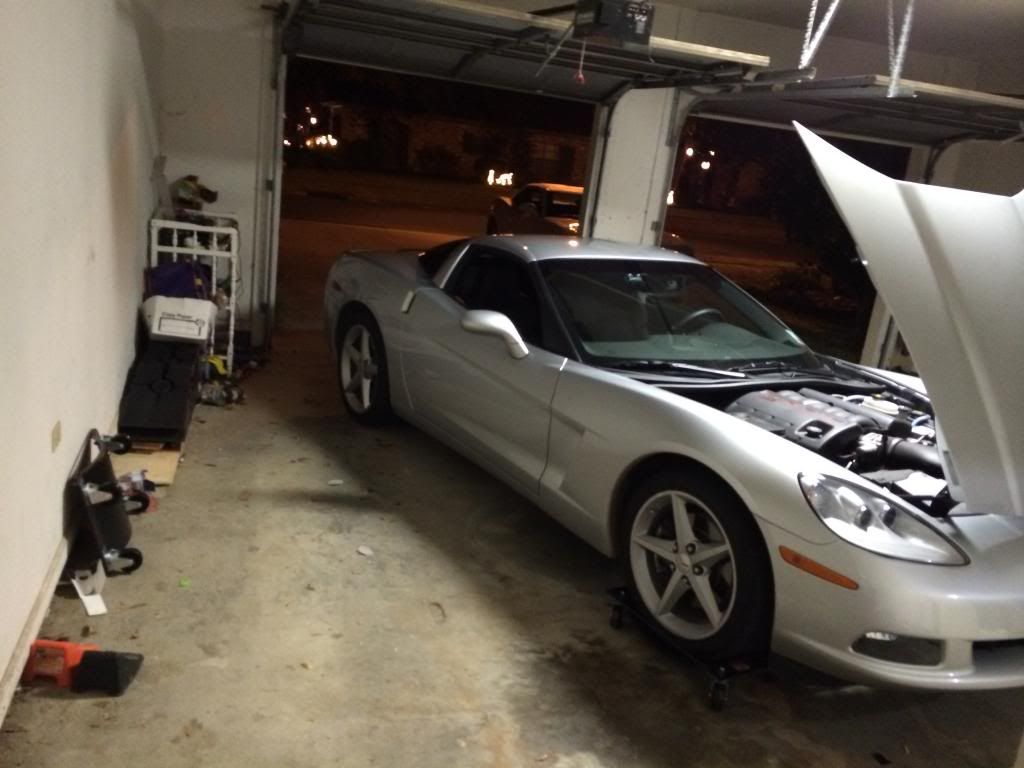
I started by pulling the car into the garage at an angle so that I could get the passenger seat out more easily. I had initially thought about turning the car 90 degrees with dollies, but that proved to be unnecessary.
December 30: seats out
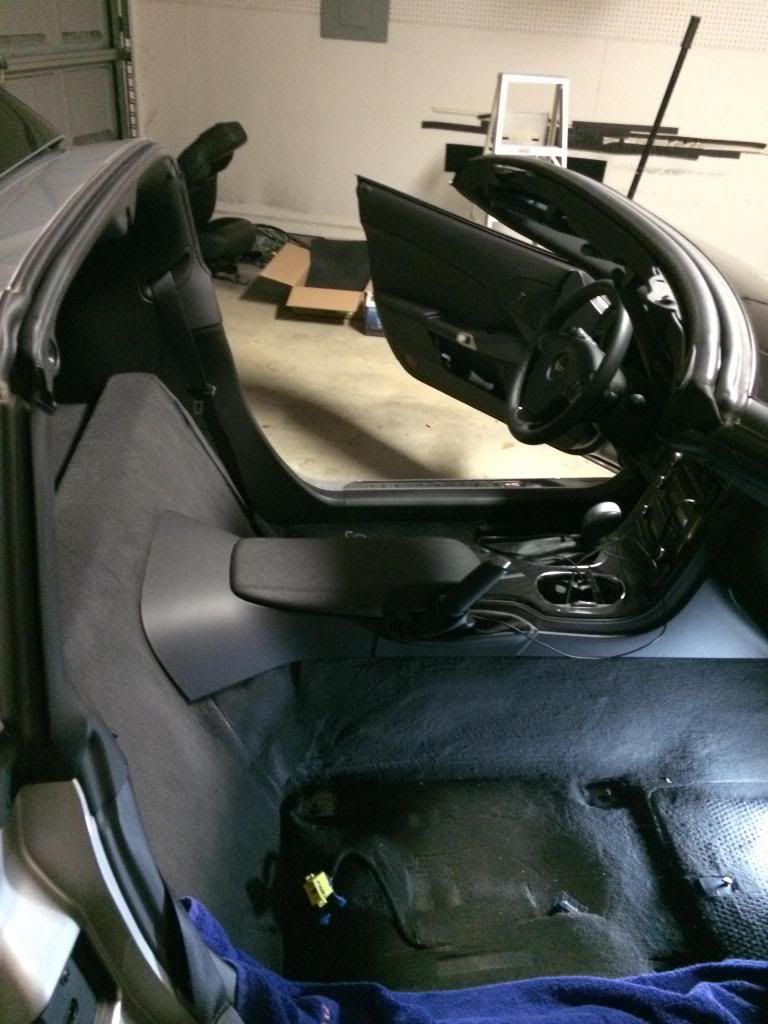
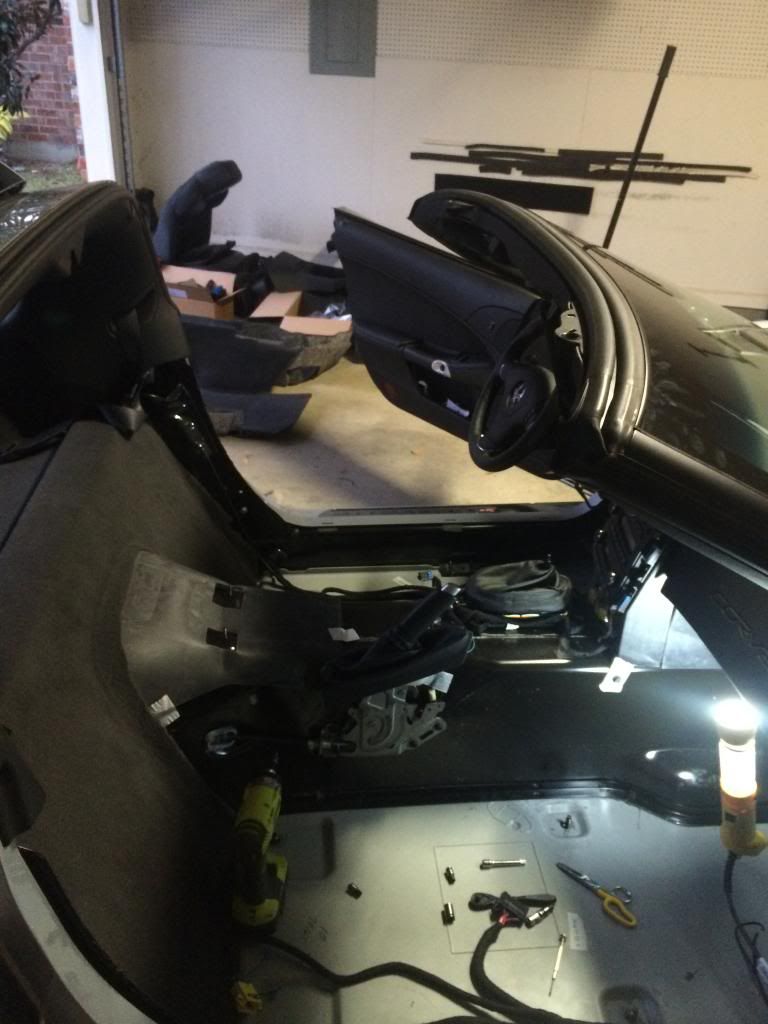
December 30: front carpet, center console, dash bezel removed
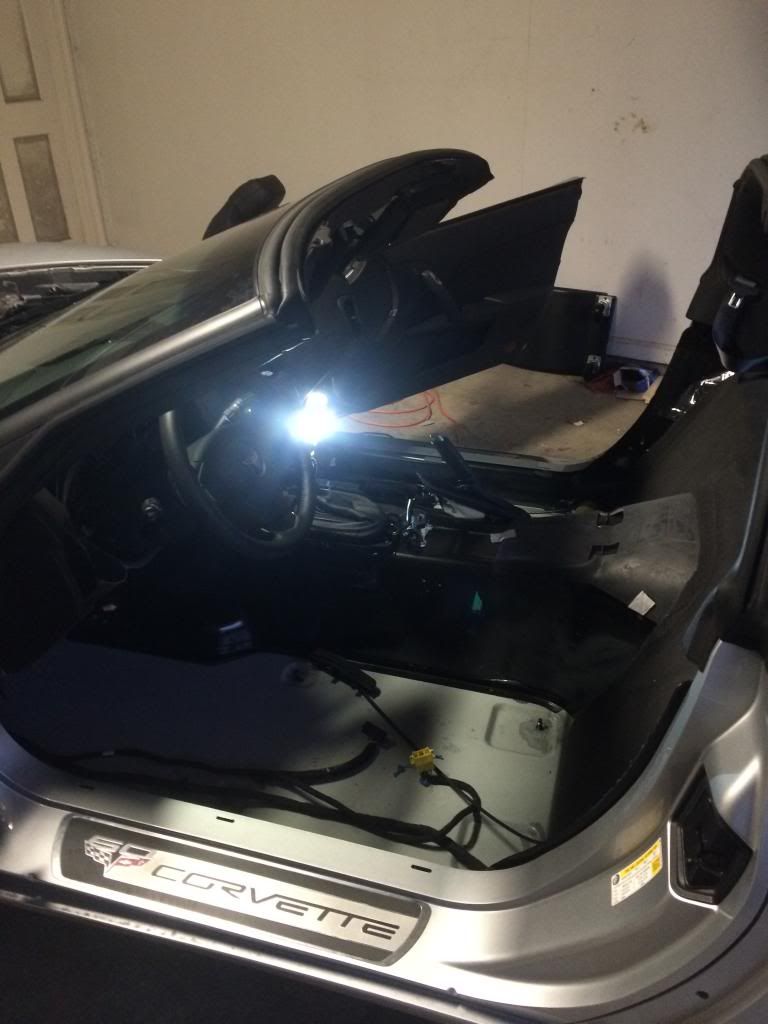
December 30: another view of the last picture
December 30:
For whatever reason, I didn't take any photos of the sound deadening process. It was rather boring, and really doesn't look all that different from stock. Sorry.
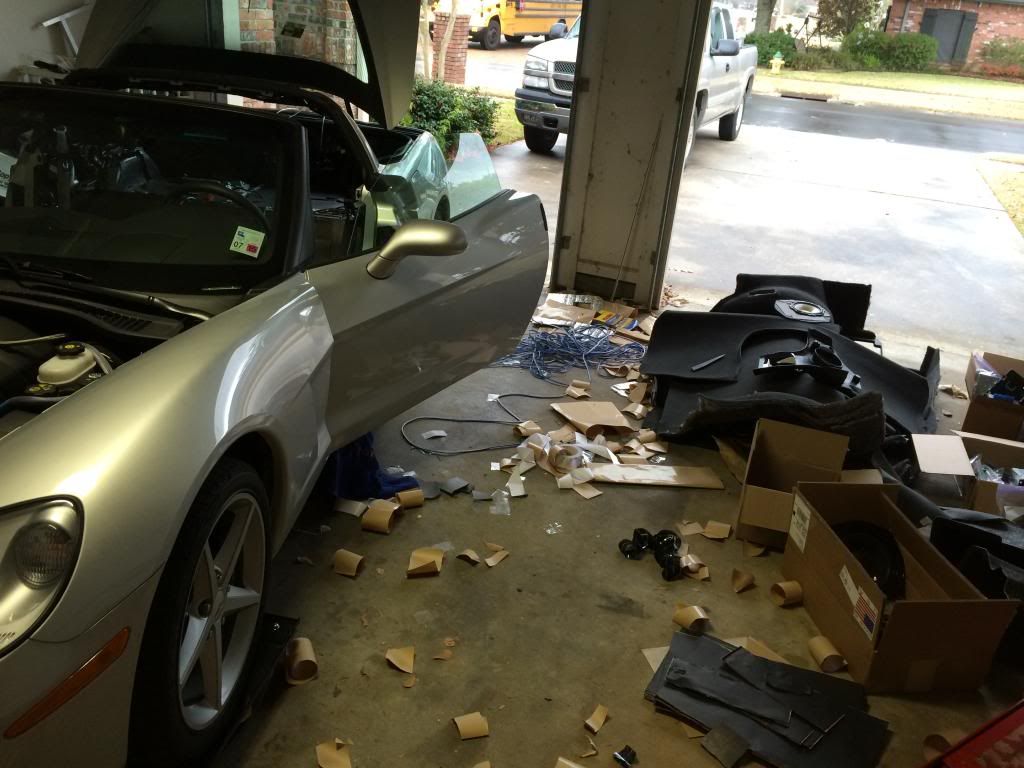
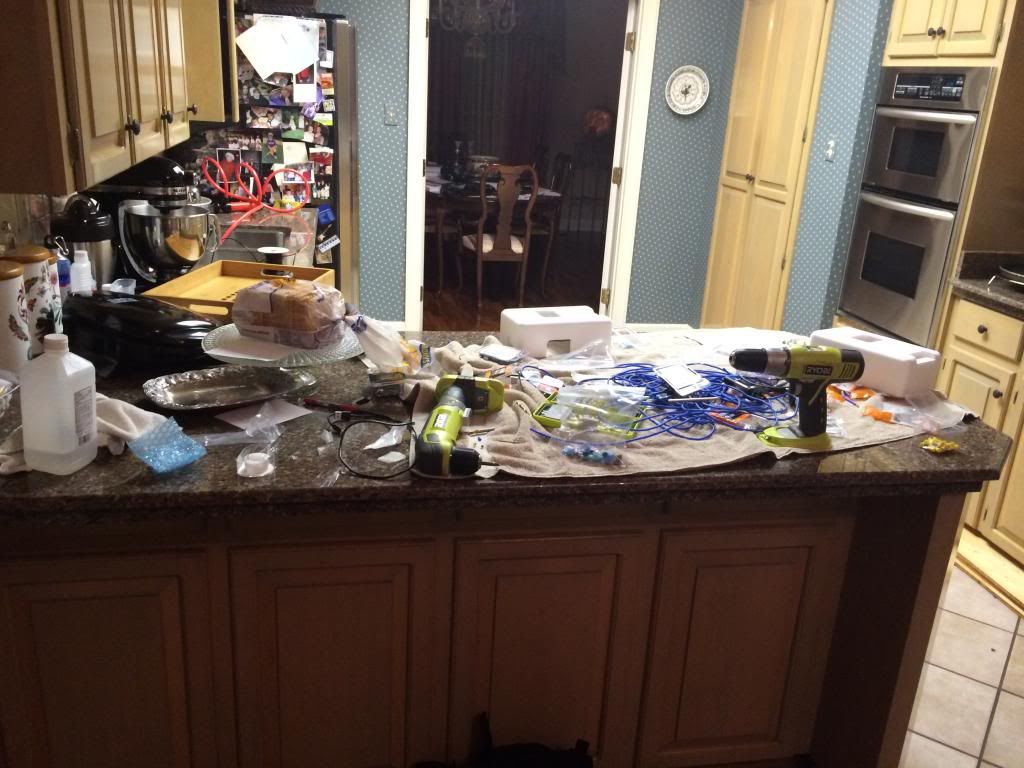
January 10: view of the mess that my garage had become at this point. much of it is trash from the sound deadening material's wax paper backing.
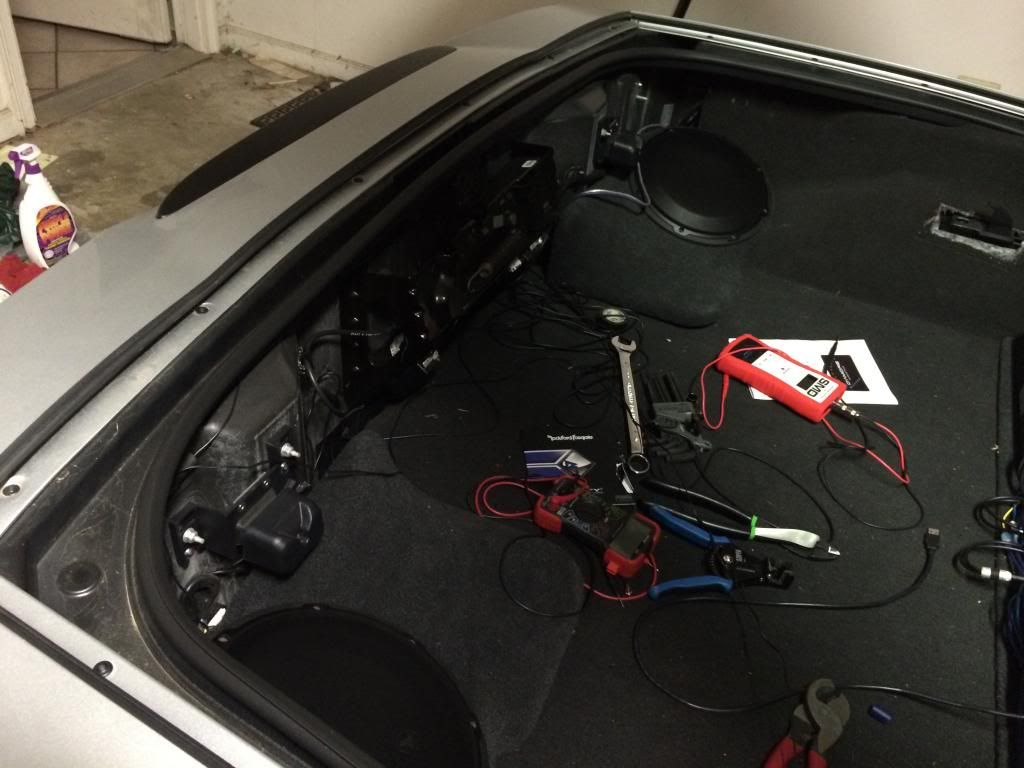
January 13: view of 3sixty.3 remote location
January 14: view of prototype locations/installations of primary power distribution block, secondary power and ground distribution, and primary ground distribution block. This is not the current configuration of the car, as you will see later.
January 14: view of the Rockford Fosgate 3Sixty.3 installed in its prototype location in the rear driver fender well. Ugly, but would be covered by carpet. This is not the current configuration.
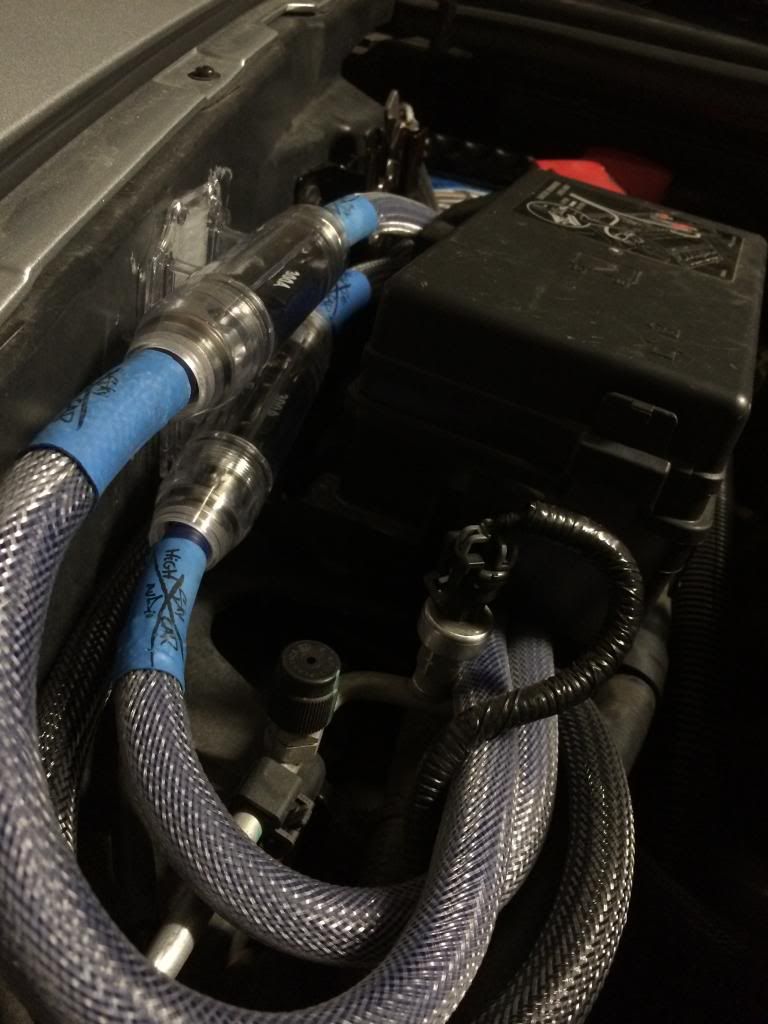
January 14: Another view of new KnuKnoceptz main fuse blocks. The SHCA blocks were too large to fit two of them, so I decided to use two of the Knu blocks. Here you can also see the amount of wiring added to the engine bay.
Excuse the torn sleeving; this has since been remedied.
January 14: Another view of above.
Door and rear fill speakers were also installed at this point. No clue why I don't have pictures of that; mostly uneventful but still would've been nice to look at. Sorry.
At this point, I replaced front carpeting, seats, factory head unit, etc. All I was waiting on to fully assemble the car was the sub boxes, subs, and amp rack. The head unit and related accessories could go in whenever Pioneer shipped the new models out.
Up until this point, I had been borrowing my uncle's truck for transportation. University was out of session for the winter, so I didn't have to worry about being anywhere. Dad's Stingray was in the shop for some collision repair (went into the shop before I started and didn't get out until last month...) so I couldn't drive his rental.
I drove around for a couple weeks with no radio, which sucked, but it gave me time to analyze the sound of my car's headers through the stock mufflers with the added sound deadening. I had a set of B&B PRT mufflers installed because of these 2 weeks. Just wasn't loud enough!
January 23: My grandfather was in the hospital out of town toward the end of January, and I realllly needed a stereo to make the 3 hour drive across the state. As my stuff was nowhere to be found, I resorted to this:
The car literally remained in this exact condition for almost 3 months. About 2 months in, I grew tired of the constant excuses and decided to cut my losses and pursue other options for sub boxes and an amp rack. I contacted Marc at VetteNuts and started throwing ideas around with him.
I scrapped my initial idea of an amp rack between the two sub boxes and settled on a rack that would go behind the seats, like a VetteBin. Literally less than 2 weeks after ordering from Marc, he had the products at my front door. THAT is customer service!
Not sure why I don't have any out-of-car photos of the amp rack. Sorry.
April 16: head unit and accessories arrive from Dennis at Double D Mods. Again, great customer service.
Could've sworn I took some pictures of me mocking things up inside the amp rack but I couldn't find any. sorry.
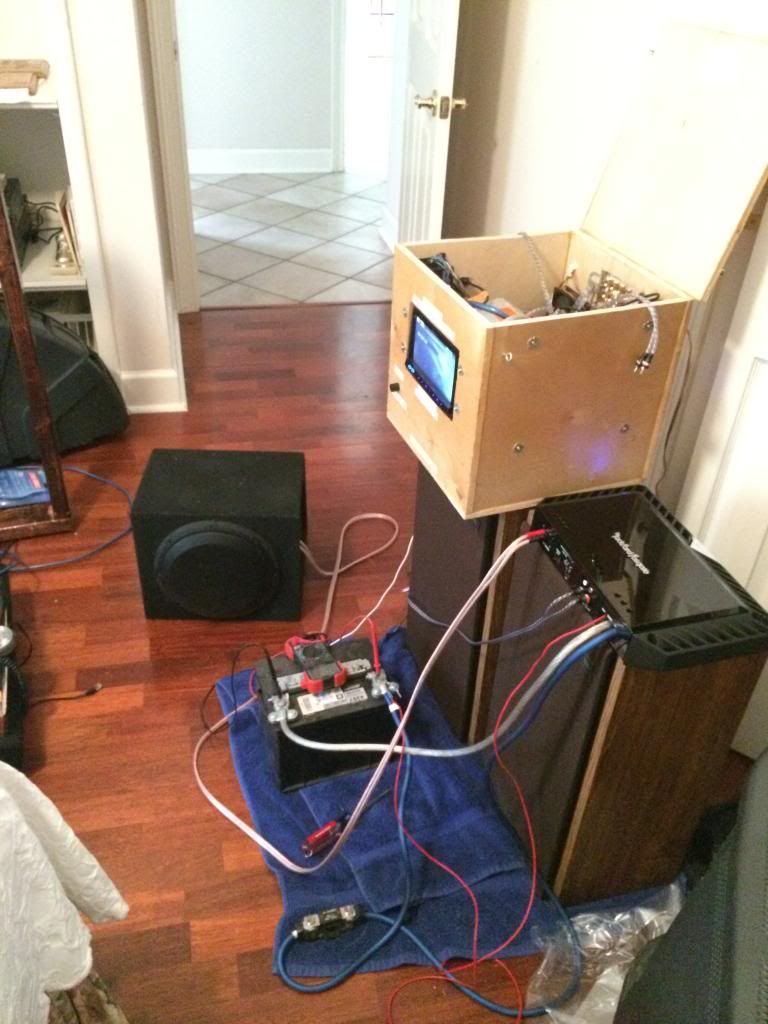
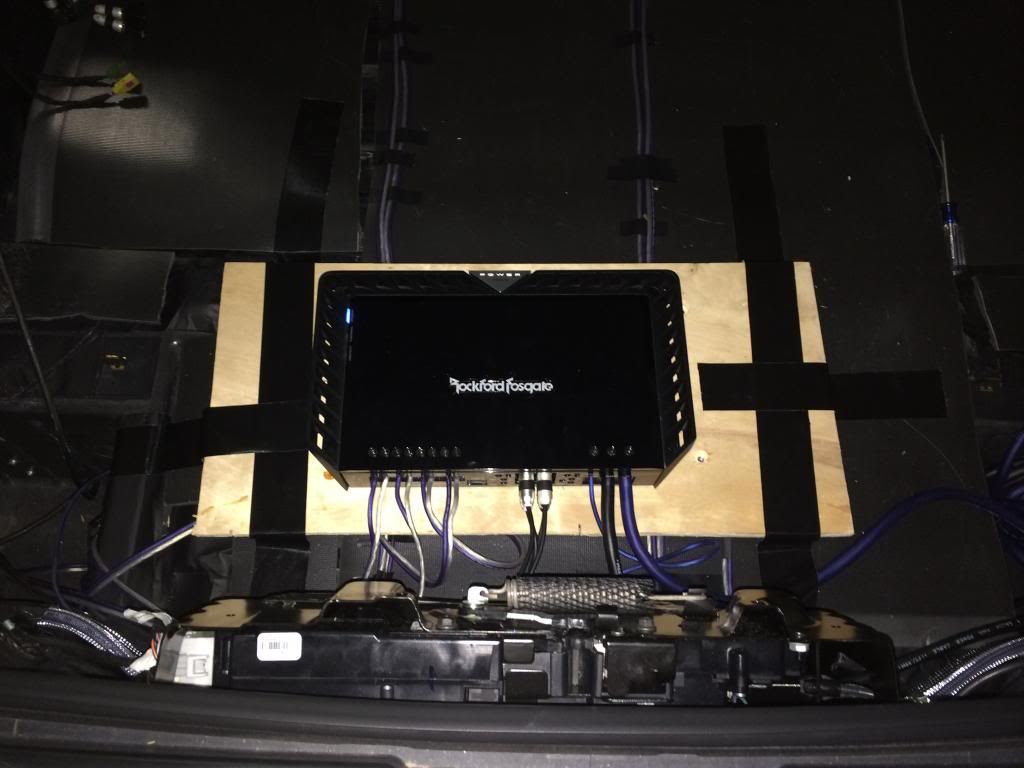
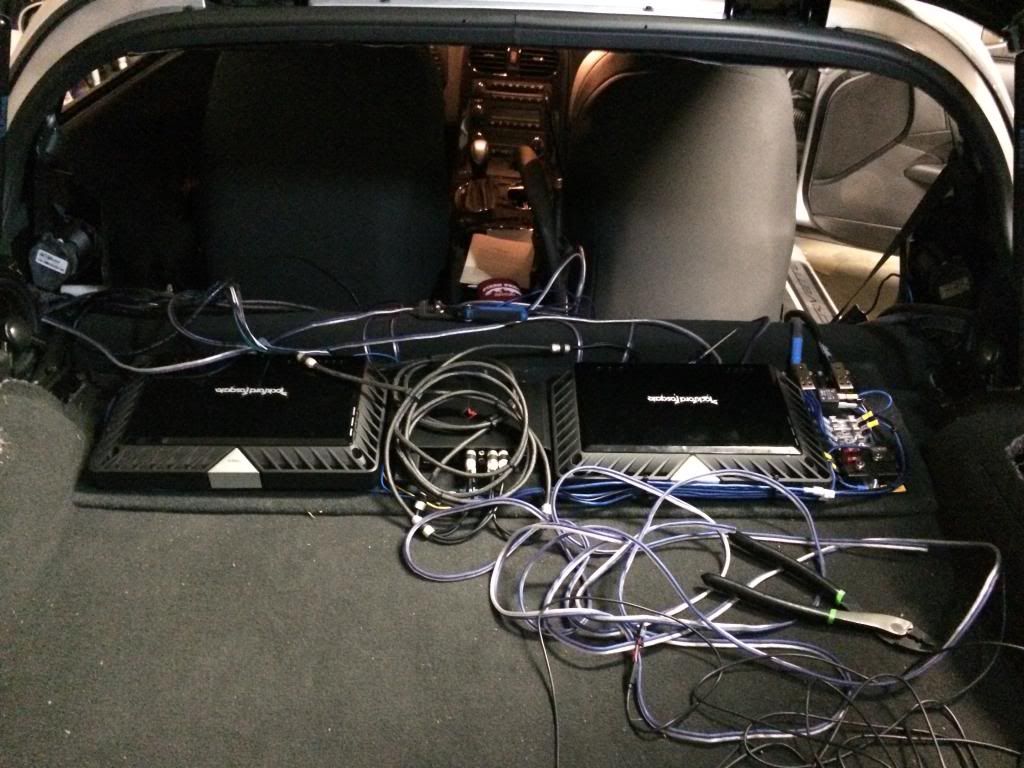
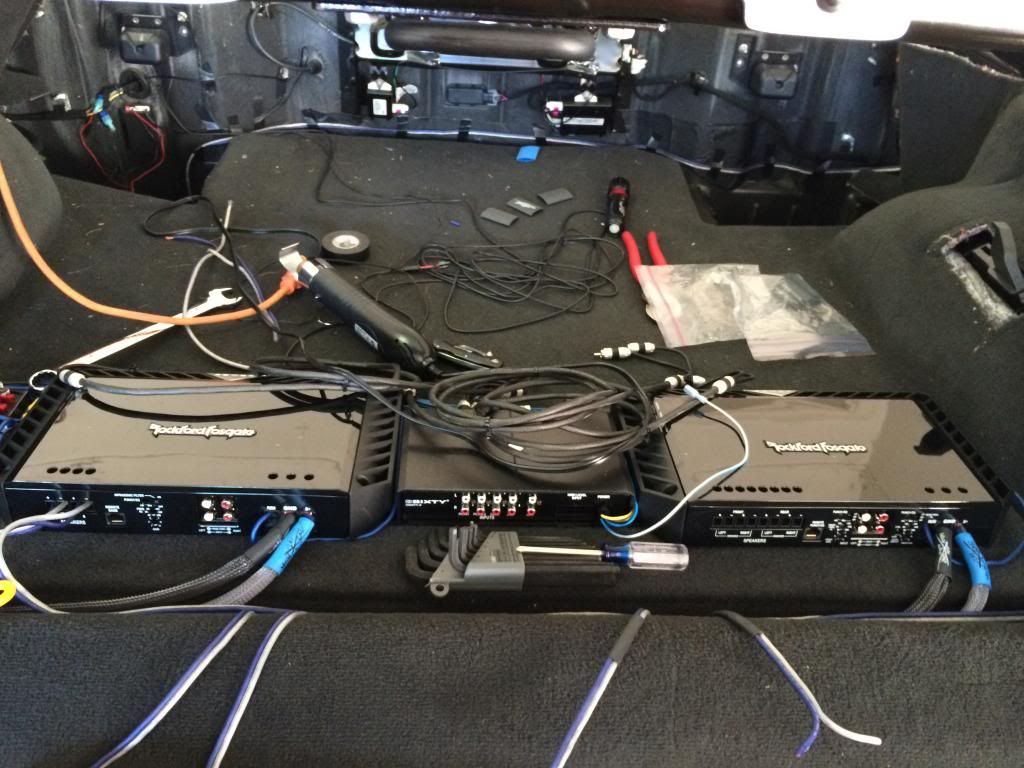
April 18: rear carpet re-installed. Amp rack base installed in car - components installed on base with t-nuts (amps, processor) and wood screws (power distribution/relay circuitry). wiring is a mess but it gets better.
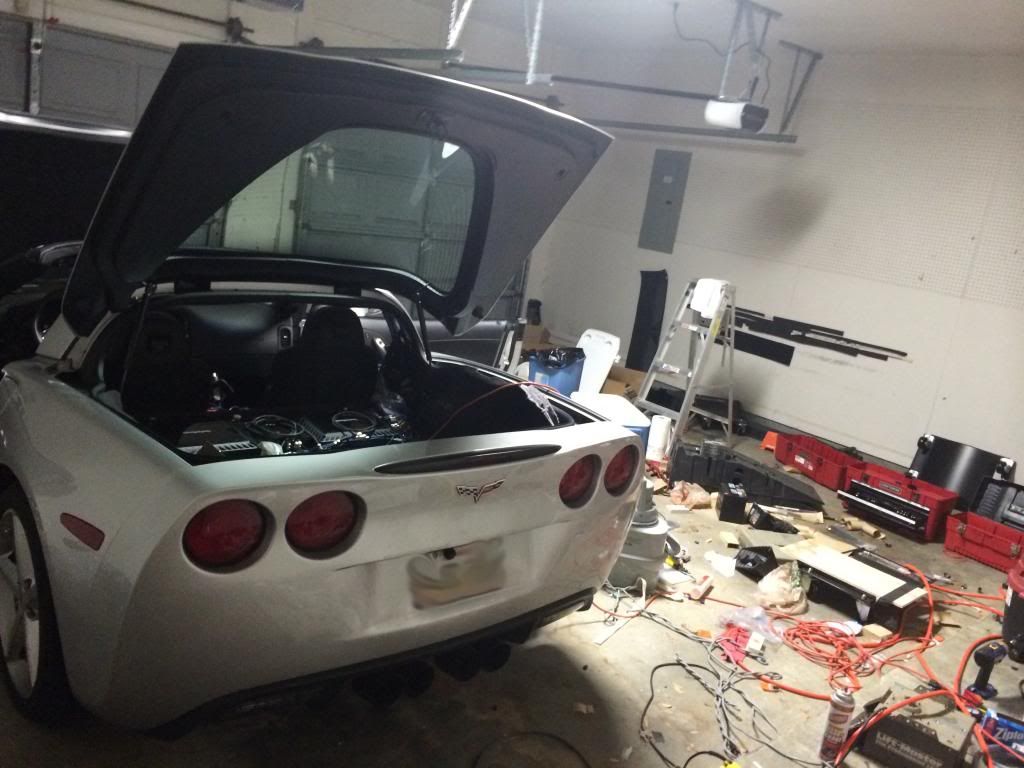
April 18: sub boxes/subs temporarily installed for wire length check.
April 18: another view of the amp rack, after a little wire management
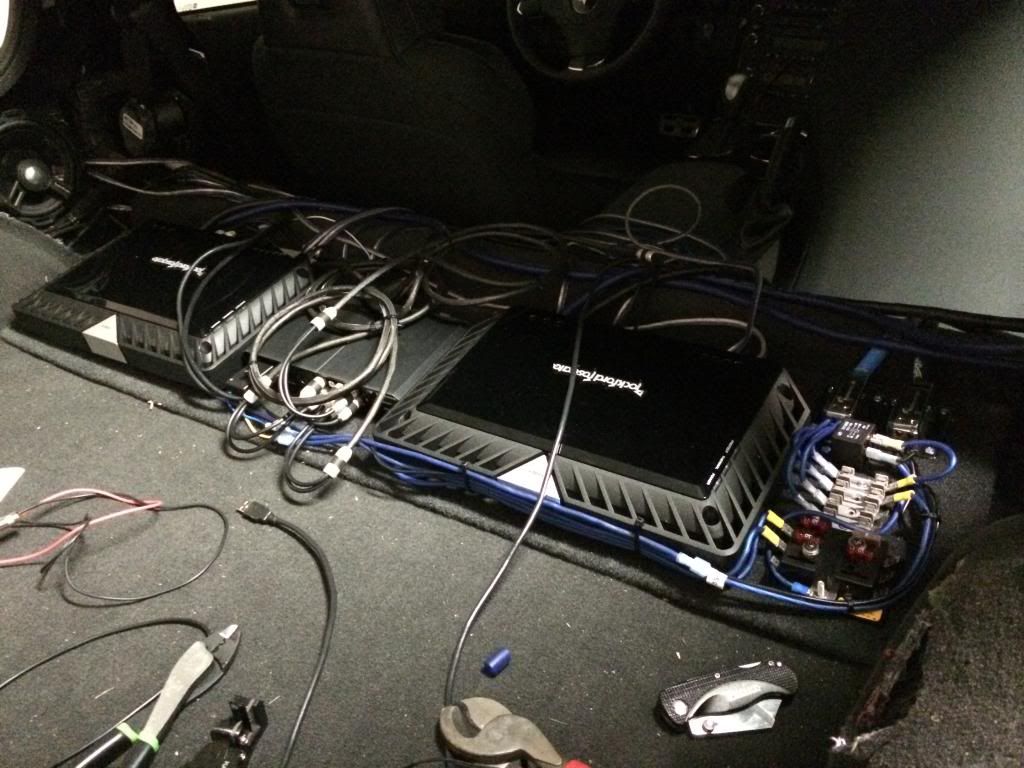
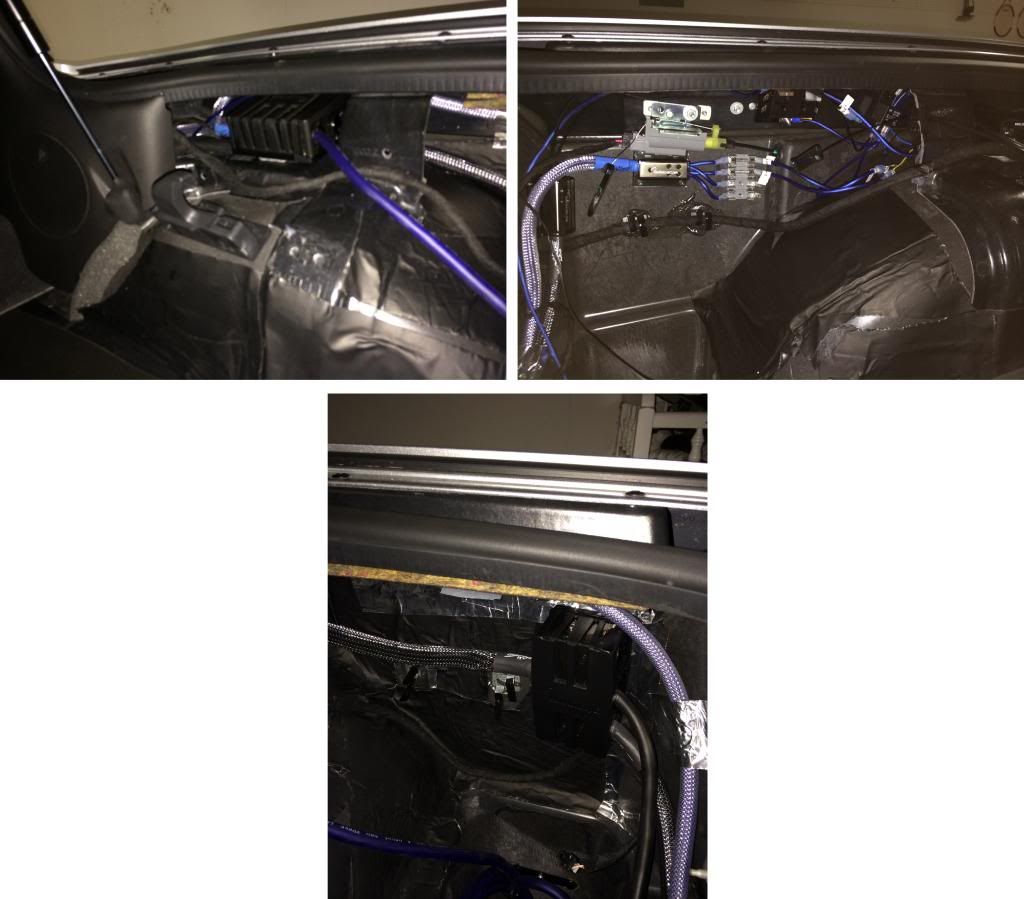
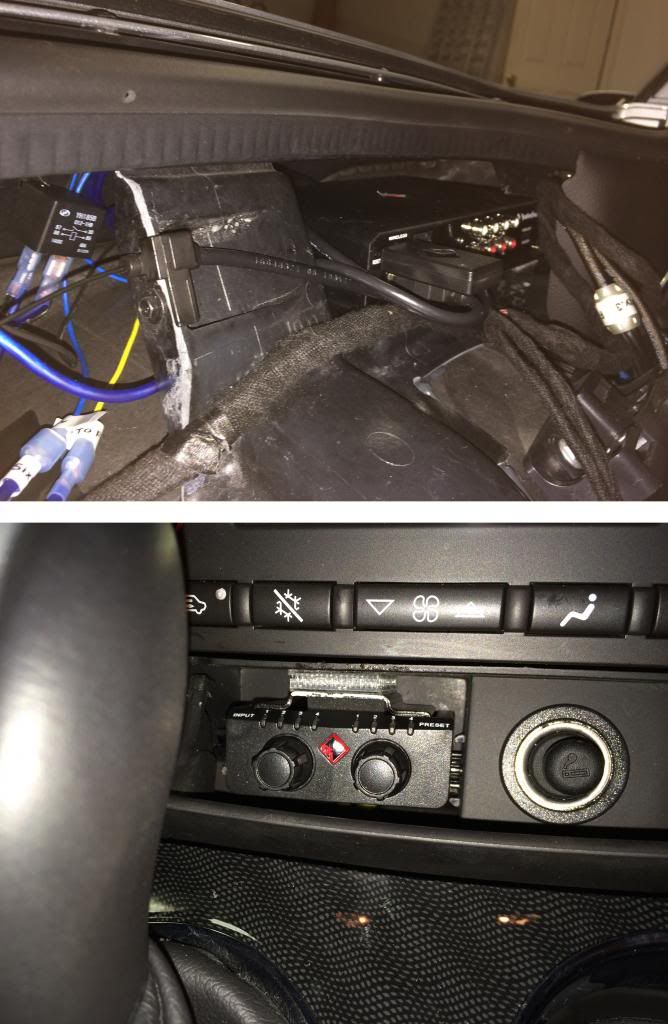
April 18: close up of low-amperage power distribution/relay circuitry
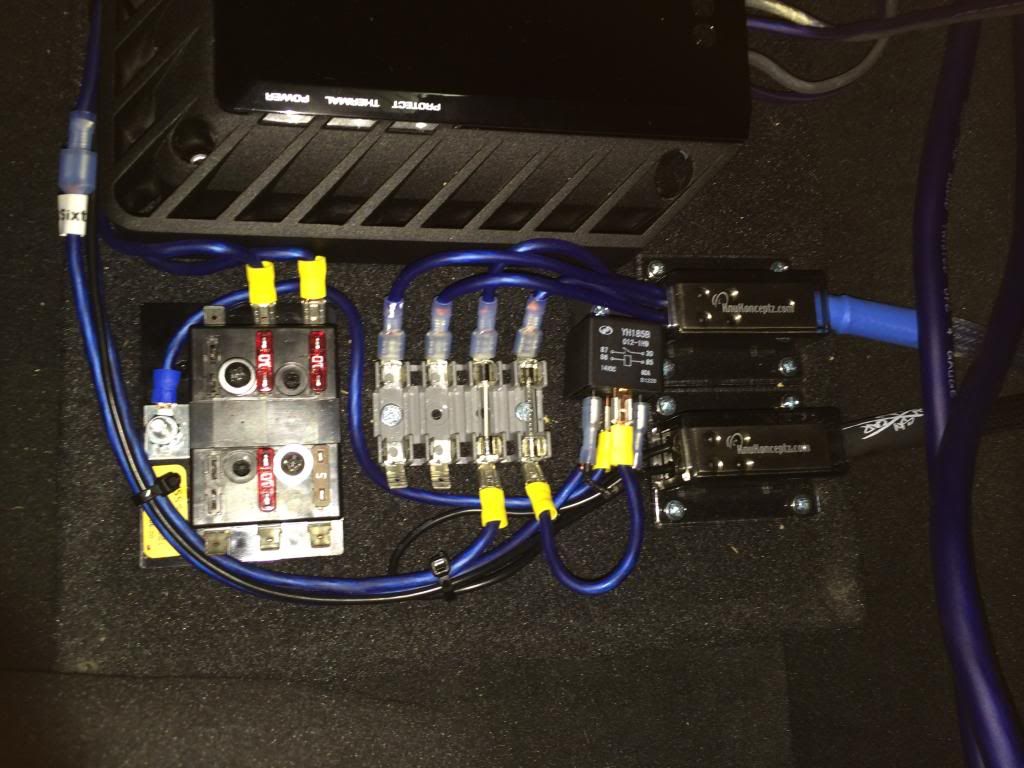
I'll break this down: power and ground connections come from primary distribution blocks (in passenger rear fender well behind carpet) and connect on the right side of image.
from here, power is split to 4 fused channels (grey fuse block in middle of image). 2 are unused. One channel feeds the 3Sixty.3, which needs a constant power source and is switched on by the head unit's accessory signal. The other channel feeds the relay.
when the head unit is on, the 3Sixty.3 energizes the relay, which sends power to 6 fused channels (2x amp turn ons, backup camera power, amp rack cooling fan, 2 spare) [black fuse block on left]
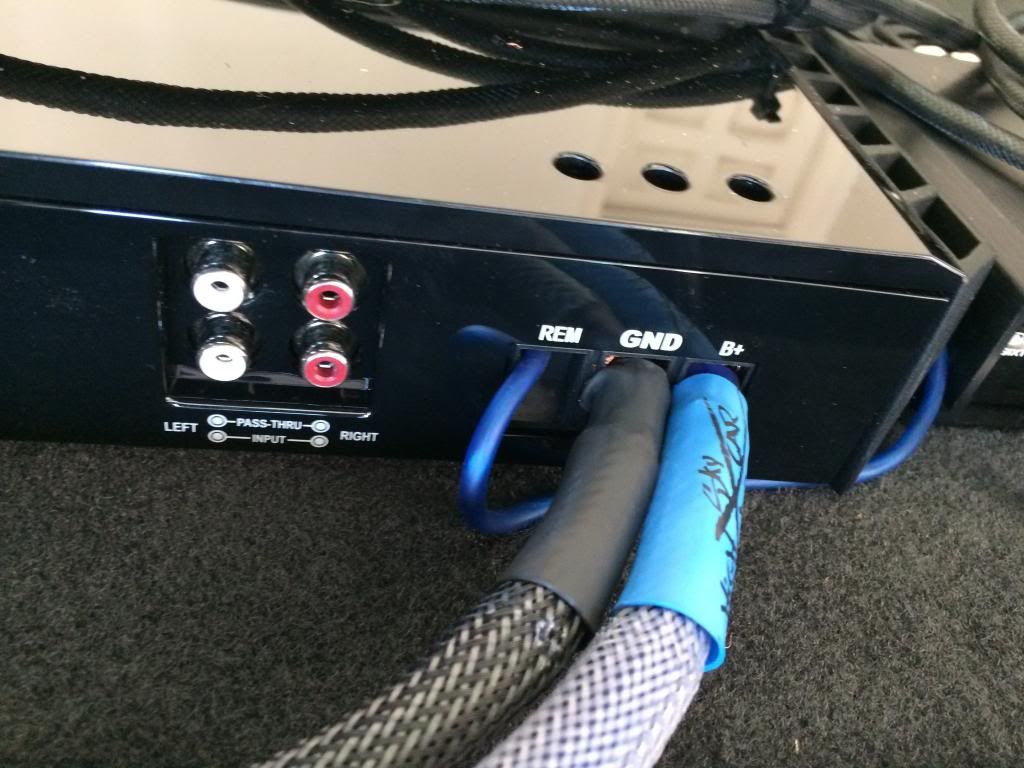
April 19: close up of sleeved/heatshrunk ends of SHCA 4ga OFC power cable entering RF T1000-1bdCP amplifier.
April 19: more wire management completed
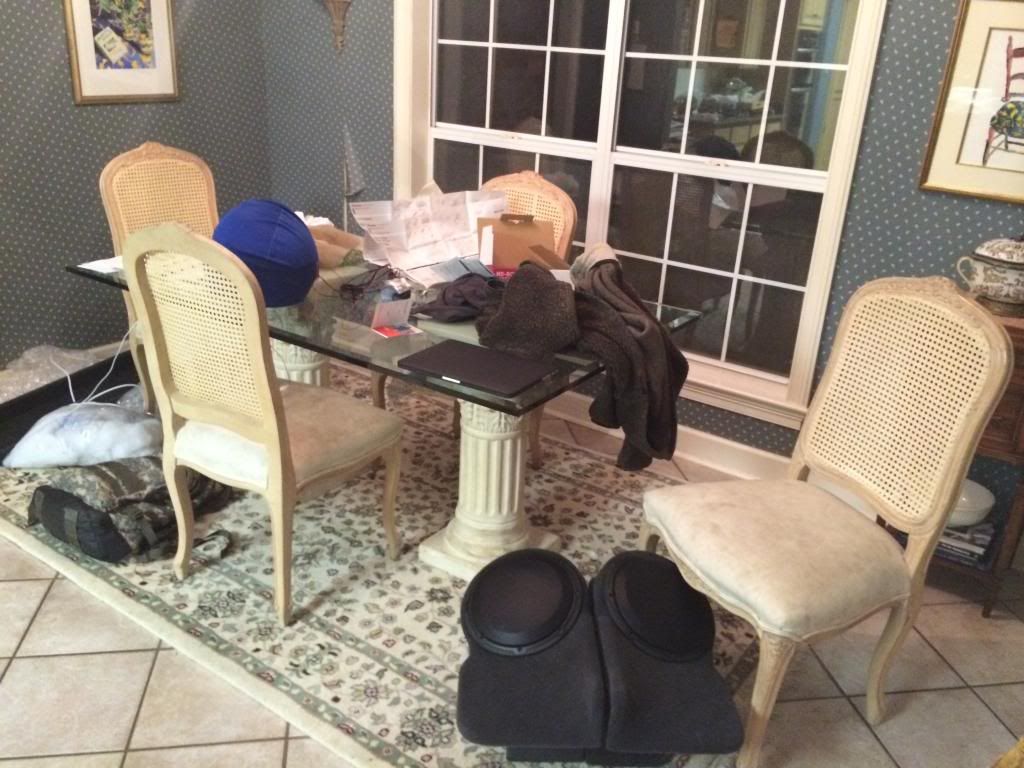
April 19: a view of the kitchen table. Helmet's from the race track (was there the morning of the 18th to drive a Mustang FR500S, which was incredible).
Sub boxes and subs are visible at lower right, amp rack is visible at far left (barely)
April 19: ran out of room everywhere else so I had to use the kitchen counter to mount the amps to the amp rack and run low-amperage wires for turn-ons, etc.
April 19: another view of "The S**T Room" (it still looks like this; I'll probably get to it next weekend)
April 19: garage is finally getting a little better now that most of the car is in the car
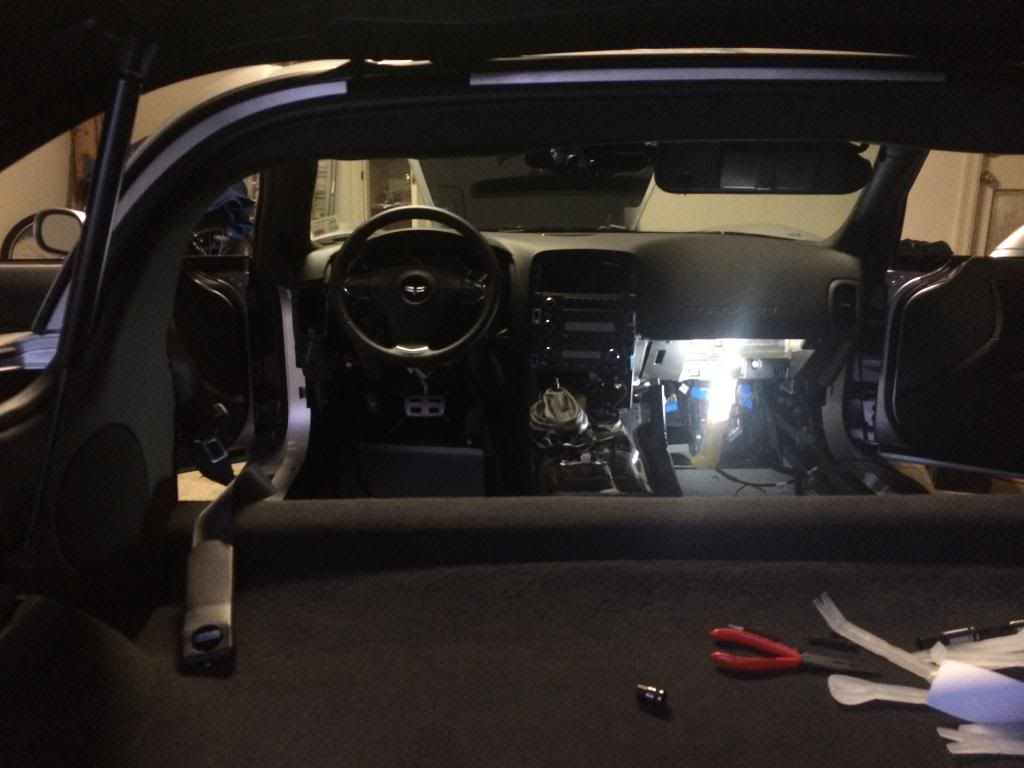
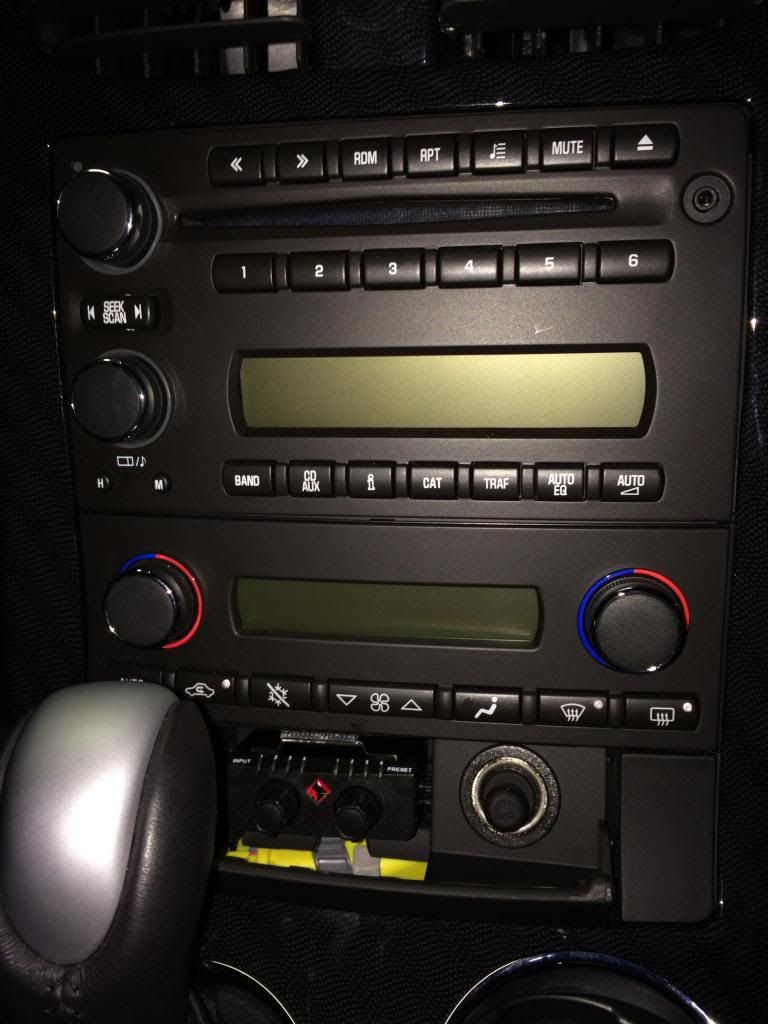
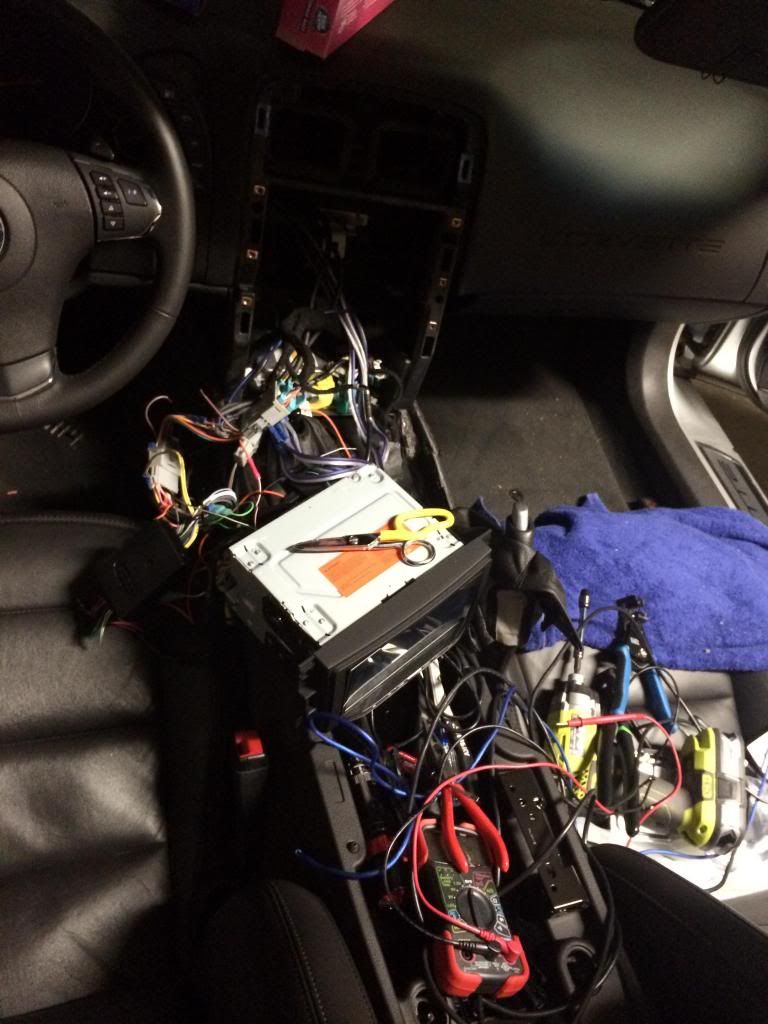
April 19: view of head unit installation. In a rush because I'm supposed to have Easter lunch 150 miles away less than 13 hours from when this photo was taken. Ended up not sleeping.
April 20: view of installed head unit. Looks incredible. Noticed problem with speed sense wire (says I'm doing 66 while stopped in my driveway). Fixed issue later in the week.

Insert family Easter lunch.
Insert impromptu visit to beach house in Pensacola, FL.
Insert even more impromptu spring break shenanigans in Destin, FL.
Insert pissed off 3 AM drive back to LA because of other stupid college kids, complete with awesome full throttle pull through the Mobile tunnel (boy that was loud).
April 24: back home, rear wall carpet installed.
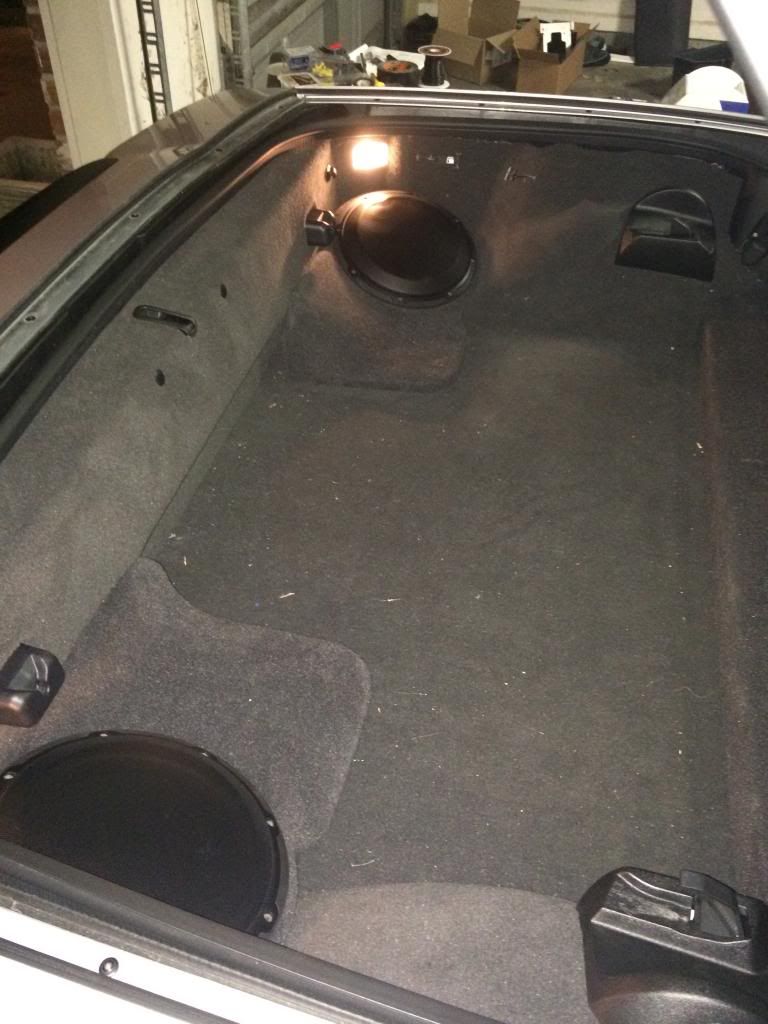
April 24: view of amp rack with cover in place. hidden fan located on passenger side.
Project "complete" (because nothing's ever really done when you start modding things...)
I haven't done any equilization or time alignment yet; I'll probably wait until exams are concluded. As it is, the system sounds incredible. There are a couple places that I'll be adding additional sound deadening to this summer.
So, what do y'all think? Leave a comment, criticism, etc. Thanks for stopping by!!!\
NJE
Warning: this thread is decently long and picture heavy. Sorry.
Just wanted to share a little project I've been working on for a while.
Before I even bought my car last July, I knew that no factory stereo system would satisfy me. I'd never done a true full system build, but I'd always wanted to.
I knew I'd want sound deadening and noise isolation material throughout the car. I wanted crisp, clear mids and highs that would be loud and distortion free. Without a doubt, I had to have hard-hitting, breathtaking bass. And above all, everything had to look good.
With these goals in mind, I embarked on a project that was, in many ways, a learning experience. I used a few threads on this forum for guidelines:
http://forums.corvetteforum.com/audi...p-by-step.html
http://forums.corvetteforum.com/audi...-write-up.html
http://forums.corvetteforum.com/audi...24-pinout.html
http://www.lazyassgeek.com/c6-stereo...-pac-add-gm24/
I also used countless other resources that I've forgotten to record. If I have time to locate them I will edit this post with them.
Before I get into the goods, here's the specs of the system (I'll also list forum vendors if applicable):
From Double D Mods:
Pioneer AVIC-8000NEX
GMOS-04 integration module
Maestro SW steering wheel retention module
Pioneer ND-BC20PA backup camera
custom pre-wiring of all connections
dash bezel, antenna adapter, etc.
From VetteNuts:
2x JL Audio 10W3v3-4 subwoofers
Driver and Passenger subwoofer boxes
custom VetteBin style amp rack
Sourced elsewhere:
Rockford Fosgate 3Sixty.3 processor/eq/ta
RF T400-4 mid/high amplifier
RF T1000-1bdCP subwoofer amplifier
RF T3652-S 6.5" woofers/1" tweeters (front doors) (mounted in speaker baffles from a non-forum vendor)
RF T152 5.25" coaxial speakers (rear fill)
Sky High Car Audio 1/0, 4, 14 ga power wire (all OFC)
SHCA 14ga speaker wire (OFC)
SHCA wire heatshrinks
SHCA 1/0 full copper lugs
Techflex sleeving
KnuKonceptz main fuse and distribution blocks
Second Skin Audio Damplifier Pro and Luxury Liner Pro sound deadening/noise isolation
Stinger 8000 series RCA interconnects
XS Power D3400 AGM battery
XS Power iBar multiple terminal kit
Now that that's through...
I started all this in October, when I decided to upgrade my battery and charging cable.

October 24: I went with an XS Power D3400 battery mostly because of a guy named Steve Meade. If you haven't heard of him, https://www.youtube.com/user/meade916.
The ability to add an extra set of terminals to these batteries is really neat, as I wanted to retain my factory wiring ends as well as add a few accessories....

October 25: Here's a view of the battery installed in the car. I ended up installing it rotated 180 degrees from the factory direction due to factory cable lengths and terminal orientation. You can also see the extra terminals and wing nuts.
A couple weeks later, I added a custom big 3 kit to the car, complete with Sky High Car Audio 1/0 AWG pure OFC cable, an SHCA AGM fuse holder, Techflex sleeving, SHCA heatshrink ends, and SHCA 1/0 pure copper ring terminals.

October 23: View of the unsleeved SHCA cable, fuse holder, terminal, heat shrink, and a quarter for size comparison.

I decided to tin the SHCA ring terminals for optimal corrosion resistance. Here's a before/after view. They're not as pretty, but they may last longer.
October 23: The terminals were affixed to the wire with solder - first they were completely filled with molten solder, then the wire was inserted and allowed to cool. I don't have any photos of this process - sorry.

November 7: Detail view of the SHCA wiring with sleeving/heatshrink/tinned terminals. The long run of positive cable has additional heat shielding that I picked up at a local auto parts supply store. Don't recall the brand. Needed this due to close proximity to engine components.

November 7: Here are some views of the big 3 installed. Clockwise from top left: +12V from alternator (factory wire still connected), +12V to battery from alternator, ground connection to engine block, SHCA fuse block (between alternator and battery, mounted to fender well next to fuse box).
Not shown is the ground connection that was added to an existing frame ground. I scuffed off some of the paint around the connection. Again, factory wiring at this point was left intact.
I based my big 3 install off of a guide I found somewhere on here. I apologize, I seem to have lost the link for it.
The car remained in this condition for a little less than 2 months while I planned and ordered the rest of the build. Toward the end of December, I had ordered everything, and had received most of the components, with the exception of the head unit which I knew would be delayed until Aprilish. Dennis at Double D was a pleasure to deal with RE: the head unit. I was also waiting on an amp rack, subs, and sub boxes from a non-forum vendor, but I figured that they would arrive before I was done with everything anyway.
From here on out, the dates probably aren't accurate, but I don't feel like going to my camera to find the exact ones. These are the dates from when they were uploaded to my facebook.
December 4: RF T400-4 amplifier. This will run the front/rear mids/highs.

December 5: RF T1000-1bdCP amplifier. This will run the subwoofers. Physically identical to the above amp as far as dimensions are concerned, which made amp rack design rather simple.

December 5: A shot of me testing out the RF T1000-1bdCP on my portable sound system. Normally, none of these wires would be visible, but this was my only real setup to test this out.

December 5: amplifier boxes.

December 12: RF 3Sixty.3 processor arrives.


December 12: I seem to have ordered way too much polyfill... also the box for the 3Sixty.3 atop the amp boxes


December 16: making sure the 3Sixty.3 powers up and connects to my laptop properly. Please excuse the background.....my workbench has multiple purposes, it seems.

December 19: care package from Sky High Car Audio arrives.

December 20: RF T3652-S woofers/tweeters arrive. Packaging is exquisite.

December 20: The guest bedroom is dubbed "The S**T Room" by my father.

December 28: view of new KnuKnoceptz main fuse blocks. The SHCA blocks were too large to fit two of them, so I decided to use two of the Knu blocks.

December 29:
I started by pulling the car into the garage at an angle so that I could get the passenger seat out more easily. I had initially thought about turning the car 90 degrees with dollies, but that proved to be unnecessary.

December 30: seats out

December 30: front carpet, center console, dash bezel removed

December 30: another view of the last picture

December 30:

For whatever reason, I didn't take any photos of the sound deadening process. It was rather boring, and really doesn't look all that different from stock. Sorry.
January 10: view of the mess that my garage had become at this point. much of it is trash from the sound deadening material's wax paper backing.

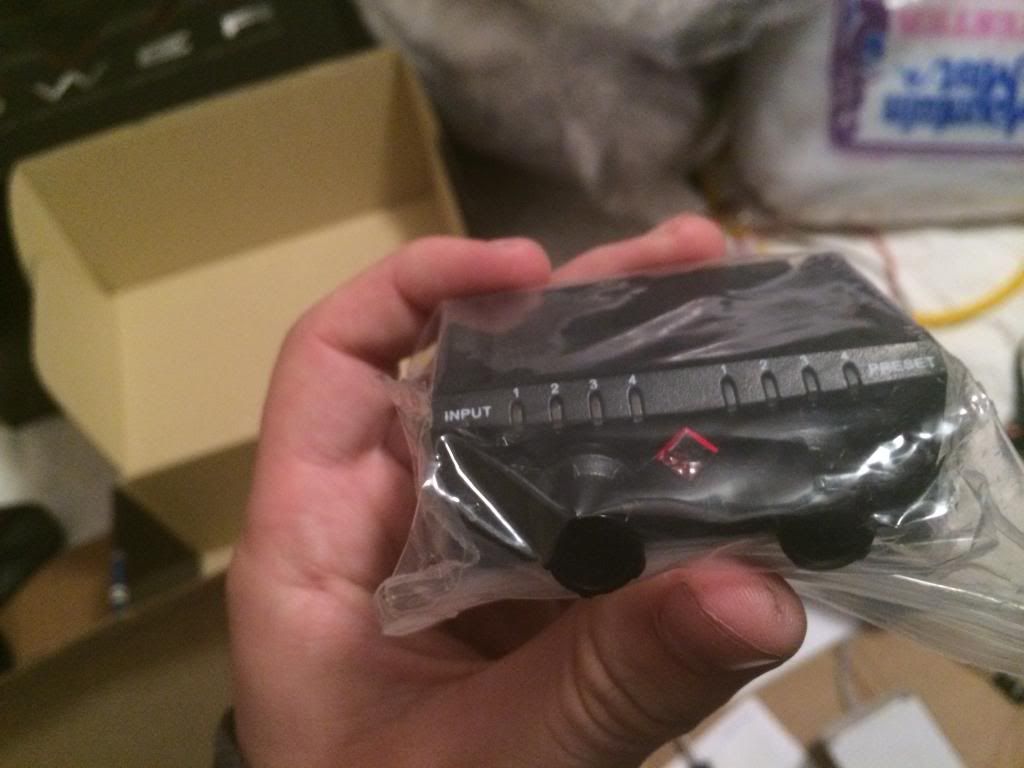
January 13: view of 3sixty.3 remote location

January 14: view of prototype locations/installations of primary power distribution block, secondary power and ground distribution, and primary ground distribution block. This is not the current configuration of the car, as you will see later.

January 14: view of the Rockford Fosgate 3Sixty.3 installed in its prototype location in the rear driver fender well. Ugly, but would be covered by carpet. This is not the current configuration.

January 14: Another view of new KnuKnoceptz main fuse blocks. The SHCA blocks were too large to fit two of them, so I decided to use two of the Knu blocks. Here you can also see the amount of wiring added to the engine bay.
Excuse the torn sleeving; this has since been remedied.

January 14: Another view of above.

Door and rear fill speakers were also installed at this point. No clue why I don't have pictures of that; mostly uneventful but still would've been nice to look at. Sorry.
At this point, I replaced front carpeting, seats, factory head unit, etc. All I was waiting on to fully assemble the car was the sub boxes, subs, and amp rack. The head unit and related accessories could go in whenever Pioneer shipped the new models out.
Up until this point, I had been borrowing my uncle's truck for transportation. University was out of session for the winter, so I didn't have to worry about being anywhere. Dad's Stingray was in the shop for some collision repair (went into the shop before I started and didn't get out until last month...) so I couldn't drive his rental.
I drove around for a couple weeks with no radio, which sucked, but it gave me time to analyze the sound of my car's headers through the stock mufflers with the added sound deadening. I had a set of B&B PRT mufflers installed because of these 2 weeks. Just wasn't loud enough!
January 23: My grandfather was in the hospital out of town toward the end of January, and I realllly needed a stereo to make the 3 hour drive across the state. As my stuff was nowhere to be found, I resorted to this:

The car literally remained in this exact condition for almost 3 months. About 2 months in, I grew tired of the constant excuses and decided to cut my losses and pursue other options for sub boxes and an amp rack. I contacted Marc at VetteNuts and started throwing ideas around with him.
I scrapped my initial idea of an amp rack between the two sub boxes and settled on a rack that would go behind the seats, like a VetteBin. Literally less than 2 weeks after ordering from Marc, he had the products at my front door. THAT is customer service!
Not sure why I don't have any out-of-car photos of the amp rack. Sorry.
April 16: head unit and accessories arrive from Dennis at Double D Mods. Again, great customer service.

Could've sworn I took some pictures of me mocking things up inside the amp rack but I couldn't find any. sorry.
April 18: rear carpet re-installed. Amp rack base installed in car - components installed on base with t-nuts (amps, processor) and wood screws (power distribution/relay circuitry). wiring is a mess but it gets better.

April 18: sub boxes/subs temporarily installed for wire length check.

April 18: another view of the amp rack, after a little wire management

April 18: close up of low-amperage power distribution/relay circuitry

I'll break this down: power and ground connections come from primary distribution blocks (in passenger rear fender well behind carpet) and connect on the right side of image.
from here, power is split to 4 fused channels (grey fuse block in middle of image). 2 are unused. One channel feeds the 3Sixty.3, which needs a constant power source and is switched on by the head unit's accessory signal. The other channel feeds the relay.
when the head unit is on, the 3Sixty.3 energizes the relay, which sends power to 6 fused channels (2x amp turn ons, backup camera power, amp rack cooling fan, 2 spare) [black fuse block on left]
April 19: close up of sleeved/heatshrunk ends of SHCA 4ga OFC power cable entering RF T1000-1bdCP amplifier.

April 19: more wire management completed

April 19: a view of the kitchen table. Helmet's from the race track (was there the morning of the 18th to drive a Mustang FR500S, which was incredible).
Sub boxes and subs are visible at lower right, amp rack is visible at far left (barely)

April 19: ran out of room everywhere else so I had to use the kitchen counter to mount the amps to the amp rack and run low-amperage wires for turn-ons, etc.

April 19: another view of "The S**T Room" (it still looks like this; I'll probably get to it next weekend)

April 19: garage is finally getting a little better now that most of the car is in the car

April 19: view of head unit installation. In a rush because I'm supposed to have Easter lunch 150 miles away less than 13 hours from when this photo was taken. Ended up not sleeping.

April 20: view of installed head unit. Looks incredible. Noticed problem with speed sense wire (says I'm doing 66 while stopped in my driveway). Fixed issue later in the week.

Insert family Easter lunch.
Insert impromptu visit to beach house in Pensacola, FL.
Insert even more impromptu spring break shenanigans in Destin, FL.
Insert pissed off 3 AM drive back to LA because of other stupid college kids, complete with awesome full throttle pull through the Mobile tunnel (boy that was loud).
April 24: back home, rear wall carpet installed.

April 24: view of amp rack with cover in place. hidden fan located on passenger side.

Project "complete" (because nothing's ever really done when you start modding things...)
I haven't done any equilization or time alignment yet; I'll probably wait until exams are concluded. As it is, the system sounds incredible. There are a couple places that I'll be adding additional sound deadening to this summer.
So, what do y'all think? Leave a comment, criticism, etc. Thanks for stopping by!!!\
NJE
Last edited by njedwardz; 04-28-2014 at 12:03 AM. Reason: fixed link
 04-28-2014, 01:08 AM
#3
 04-28-2014, 08:29 AM
#5
Team Owner


Member Since: May 2000
Location: Plantation Florida USAF(Retired) 1966-1990
Posts: 47,857
Received 4,499 Likes
on
3,586 Posts
U.S. Air Force
St. Jude Donor '05-'06-'07-'08-'09-'10-'11-'12-'13-'14-'15-'16-'17-'18-'19-'20-'21-'22-'23-'24
NCM Sinkhole Donor


 Nice job, enjoy the sounds.


 07-09-2014, 11:46 PM
#9
Intermediate


Great work with everything. How are you liking the pioneer AVIC 8000Nex? I recently got a 2007 c6, and am thinking of making the upgrade. Also how do you like the backup camera?
07-10-2014, 01:27 AM
#10
As far as the backup camera goes, it is most useful to make sure there isn't anything right behind your car (like a kid's skateboard or something), or for parking with more precision. I suppose it's because I'm used to looking behind me before I back up, or maybe because the mirrors on the vette are really quite good, but I don't look at the camera as much as I thought I would unless I'm backing into a space or something like that.
07-11-2014, 10:49 PM
#11
Race Director

Member Since: Apr 2007
Location: Henderson Nv-Rohnert Park/Sonoma C o. ca/born in NY Rockaway Beach.
Posts: 13,874
Received 544 Likes
on
384 Posts

OK .... What im more interested in are the rifles next to the work bench.....LOL
Looks real nice ..... Now can you come my way and install my setup...LOL
Looks real nice ..... Now can you come my way and install my setup...LOL
07-11-2014, 11:01 PM
#12
What all are you putting into your system? It was certainly a learning experience and I'd be happy to pass along some tips if you have any questions (although I'm certainly no expert)
07-11-2014, 11:12 PM
#13
Race Director
Member Since: Apr 2007
Location: Henderson Nv-Rohnert Park/Sonoma C o. ca/born in NY Rockaway Beach.
Posts: 13,874
Received 544 Likes
on
384 Posts
Haha yeah I don't have anywhere to work that's climate controlled besides the gun cleaning table. It's become more of an electronics work bench than a gunsmith bench as of late (electronics are cheaper and easier to come by than new rifles, it seems)
What all are you putting into your system? It was certainly a learning experience and I'd be happy to pass along some tips if you have any questions (although I'm certainly no expert)
What all are you putting into your system? It was certainly a learning experience and I'd be happy to pass along some tips if you have any questions (although I'm certainly no expert)
Should have everything together here in the next week or so.....
Thanks again for the help .. and if I do need something ill give you a shout.....
07-27-2014, 08:10 AM
#14
Advanced
Member Since: Nov 2010
Posts: 96
Likes: 0
Received 0 Likes
on
0 Posts

Really nice set up. I'm currently adding a few cosmetic tweaks to my set up. Steve Meade is a beast. I just ordered his distortion detector. I had a few questions about your install.
1. Did the 3 sixty 3 make that big of a difference? I have focal kr components in the front, focal perfomance coaxles in the rear, with a kenwood ddx 371 head unit with a kicker kx 800.5 amp. Im on the fence on picking up the kenwood processor but im wondering if the price is worth the increase in sound quality with a h/u with a pretty decent eq.
2. low-amperage power distribution/relay circuitry- you completely lost me here. Could you explain one more time what it does, also would you recommend I add one in my set up?
07-27-2014, 02:40 PM
#15
Really nice set up. I'm currently adding a few cosmetic tweaks to my set up. Steve Meade is a beast. I just ordered his distortion detector. I had a few questions about your install.
1. Did the 3 sixty 3 make that big of a difference? I have focal kr components in the front, focal perfomance coaxles in the rear, with a kenwood ddx 371 head unit with a kicker kx 800.5 amp. Im on the fence on picking up the kenwood processor but im wondering if the price is worth the increase in sound quality with a h/u with a pretty decent eq.
1. Did the 3 sixty 3 make that big of a difference? I have focal kr components in the front, focal perfomance coaxles in the rear, with a kenwood ddx 371 head unit with a kicker kx 800.5 amp. Im on the fence on picking up the kenwood processor but im wondering if the price is worth the increase in sound quality with a h/u with a pretty decent eq.
Whether or not you should pay for one depends on whether or not you'll do the tuning with it. I haven't yet, but I've just been waiting for a day when the garage isn't too hot. It sounds good right now; it's leaps and bounds above the stock system, but I can tell there's significant room for improvement just from EQ and TA adjustment. Then again, you should be able to accomplish at least 80% of that improvement by properly tuning with the EQ built into your HU. I just figured that while I was dumping so much $$$$ into everything, I may as well go with the best option out there.
current draw on the HU. I didn't actually do the math on it, but I figured it was better to be safe than sorry.
So basically what happens is the blue wire from the HU has +12V whenever the car is on or in accessory mode. When that's the case, the 3Sixty.3 turns on. The 3Sixty.3 has its own accessory wire, which has +12V whenever it's powered up. That wire energizes a relay rated for 40A, which is way more than I'll ever need it to power. Gotta love headroom. The relay powers the amp turn ons, backup camera, and the fan system, and gets its power from a fused line from the smaller distribution block. The output from the relay goes to a small fuse block with 6 outputs that takes AGM fuses.
This setup is definitely a bit complicated, but I really enjoy messing with electrical wiring (enough that I changed my major from mechanical to electrical engineering last semester). It was a fun project as well as a good fit for my system.
I would say that unless you're turning on more than 2 devices, or using the acc wire to power a device (a fan, camera, etc.) you're definitely safe with the HU's accessory wire.
07-27-2014, 07:04 PM
#16
Advanced
Member Since: Nov 2010
Posts: 96
Likes: 0
Received 0 Likes
on
0 Posts
Right now, I have the EQ on my 3Sixty.3 set completely flat, and I haven't done any time alignment or anything yet. I've messed with the EQ in the head unit a bit, but other than that I haven't gotten around to tuning anything yet. It's mostly a matter of how much adjustability you want. The stock HU offers bass and treble control (maybe mid too, don't recall), my HU offers 13 band EQ I think, as well as limited filter and TA control, and the 3sixty.3 offers 32-band EQ, infinitely adjustable filter and TA control, as well as precise level and gain control for every channel. Most other processors will offer similar functionality.
Whether or not you should pay for one depends on whether or not you'll do the tuning with it. I haven't yet, but I've just been waiting for a day when the garage isn't too hot. It sounds good right now; it's leaps and bounds above the stock system, but I can tell there's significant room for improvement just from EQ and TA adjustment. Then again, you should be able to accomplish at least 80% of that improvement by properly tuning with the EQ built into your HU. I just figured that while I was dumping so much $$$$ into everything, I may as well go with the best option out there.
Sure! Typically when you install an aftermarket audio system, you need a signal to turn on your amplifier. This signal usually comes from the blue wire in the aftermarket head unit's wiring harness. This wire is sufficient for turning on one or two devices, but as I was using the signal from that wire to turn on the 3Sixty.3, 2 amplifiers, a backup camera, and my fan system, I felt that there was going to be too much
current draw on the HU. I didn't actually do the math on it, but I figured it was better to be safe than sorry.
So basically what happens is the blue wire from the HU has +12V whenever the car is on or in accessory mode. When that's the case, the 3Sixty.3 turns on. The 3Sixty.3 has its own accessory wire, which has +12V whenever it's powered up. That wire energizes a relay rated for 40A, which is way more than I'll ever need it to power. Gotta love headroom. The relay powers the amp turn ons, backup camera, and the fan system, and gets its power from a fused line from the smaller distribution block. The output from the relay goes to a small fuse block with 6 outputs that takes AGM fuses.
This setup is definitely a bit complicated, but I really enjoy messing with electrical wiring (enough that I changed my major from mechanical to electrical engineering last semester). It was a fun project as well as a good fit for my system.
I would say that unless you're turning on more than 2 devices, or using the acc wire to power a device (a fan, camera, etc.) you're definitely safe with the HU's accessory wire.
Thank your for the advice and tips. I will add this information to my knowledge toolbox. Congrats again on the killer set up!

 07-30-2014, 01:02 AM
#18
Definitely give Dennis a call over at Double D Mods. His package made it super easy to get everything working. About as close to plug-and-play as I could get with my setup.