

 03-25-2015, 02:24 PM
Last edit by: IB Advertising
See related guides and technical advice from our community experts:
Browse all: Interior How-Tos
- C6 Corvette: How to Install Rear Subwoofer
Step by step instructions for do-it-yourselfers...
Browse all: Interior How-Tos

C6 Coupe REAR Speaker Swap "How To" w/pics
07-16-2009, 03:17 AM
#1
Tech Contributor
Thread Starter

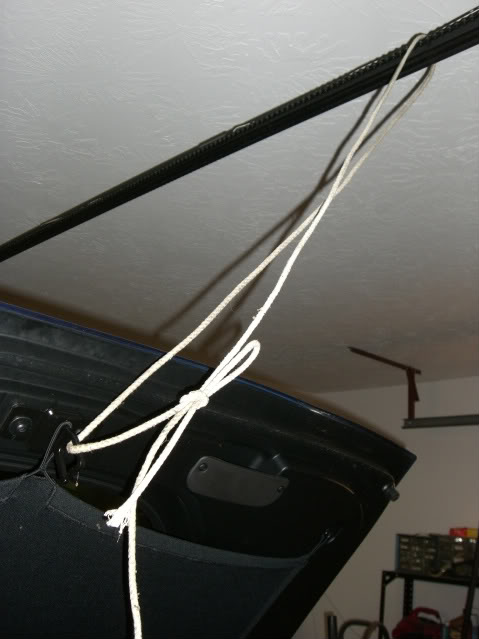
Support the hatch, even if you do it one side at a time, just one shock can't hold it up. The rope doesn't need to be tight, it just needs to keep the hatch from falling.
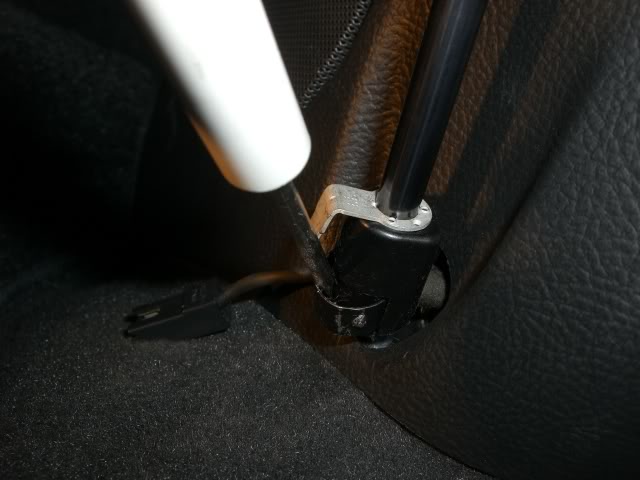
Pull up the rubber boot at the bottom of one of the shocks. Unplug the rear defogger. Pry out the retaining clip far enough to grab it with a pair of pliers, then pull it out. Push up on the hatch to release the tension on the shock and it will easily slide right off of the mount. Repeat on the other side.
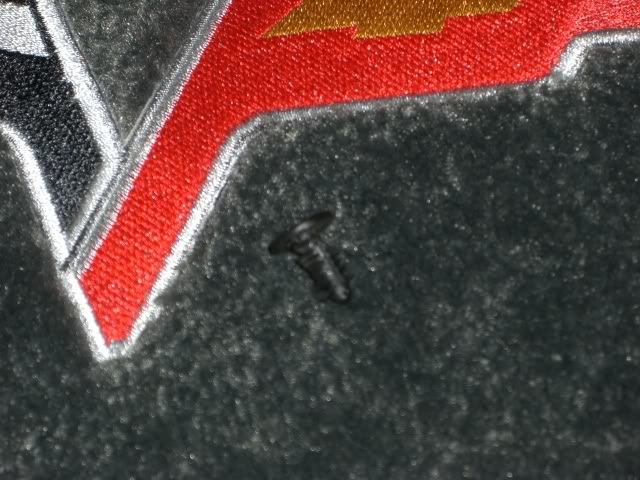
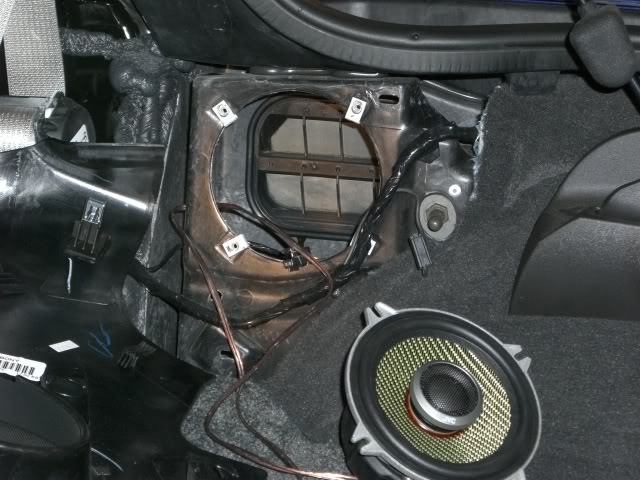
Pull out the four push pins at the top edge of the speaker trim plates (two on each side). Mine really didn't want to come out. I used a small screwdriver to pry them out enough to slide a pair of dikes (diagonal wire cutter) under and pull (do NOT squeeze the handle, just pull).

A pic of the little bastard that you're dealing with.
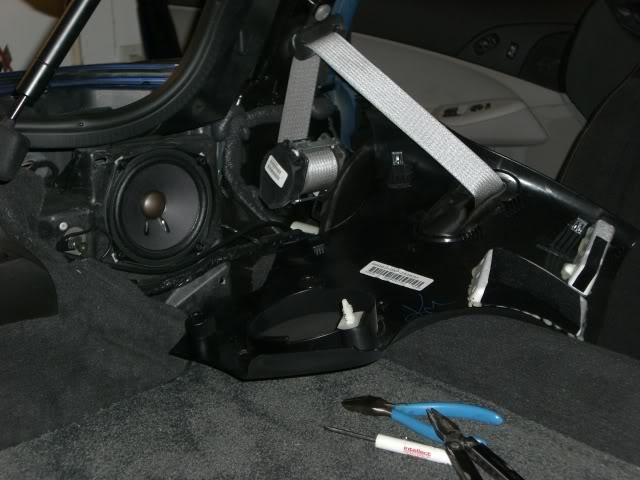
To pull off the trim panel, reach under the front lower corner and pull straight out about 1". You should feel one of the friction clips release. Slide your hand up near the top front corner and pull it out until that clip releases.
Now there's one pin left in the rear upper corner. It's a pin similar to the four little buggers that you already removed, only it's a lot bigger and much more stubborn. You SHOULD be able to rotate the trim panel off of the last pin without pulling out the pin if you tilt the front lower edge up and down while guiding the upper edge out from under the roof panel. The pin isn't rigidly attached to the trim piece. If that doesn't work you'll need to pull the pin out while it's attached to the trim piece. Good luck!
Once the trim piece is removed you can pull the pin out with pliers and slide it back on to the trim piece. Here's a pic of the back of the trim piece. The silver clips are on either side of the seat belt hole, and the white pin is next to the speaker grill.
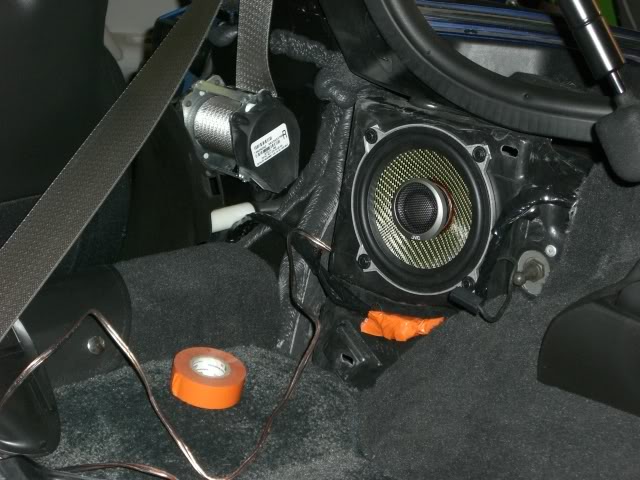
Pull out your old speaker, mount the new one. It helps if you have a magnetized adapter gizmo for your nut driver to help prevent dropping the screws.
I was surprised to find the cabin pressure relief vent behind the passenger side speaker.
Do whatever you need to with the wires. Connect them to your new speaker if you're reusing them, or tape them to the existing wire loom to prevent any rattles.
Put everything back on in the reverse order. Don't forget to push the defogger plug through the hole in the trim piece before you get it snugged back down. I found it was easiest to slide the trip piece under the roof panel, then get the top clip into position, line up the rear pin but don't push it in, insert the lower front clip (look up from below to see where the hole is), then use your palm to pound everything into place.

Pull up the rubber boot at the bottom of one of the shocks. Unplug the rear defogger. Pry out the retaining clip far enough to grab it with a pair of pliers, then pull it out. Push up on the hatch to release the tension on the shock and it will easily slide right off of the mount. Repeat on the other side.
Pull out the four push pins at the top edge of the speaker trim plates (two on each side). Mine really didn't want to come out. I used a small screwdriver to pry them out enough to slide a pair of dikes (diagonal wire cutter) under and pull (do NOT squeeze the handle, just pull).
A pic of the little bastard that you're dealing with.
To pull off the trim panel, reach under the front lower corner and pull straight out about 1". You should feel one of the friction clips release. Slide your hand up near the top front corner and pull it out until that clip releases.
Now there's one pin left in the rear upper corner. It's a pin similar to the four little buggers that you already removed, only it's a lot bigger and much more stubborn. You SHOULD be able to rotate the trim panel off of the last pin without pulling out the pin if you tilt the front lower edge up and down while guiding the upper edge out from under the roof panel. The pin isn't rigidly attached to the trim piece. If that doesn't work you'll need to pull the pin out while it's attached to the trim piece. Good luck!
Once the trim piece is removed you can pull the pin out with pliers and slide it back on to the trim piece. Here's a pic of the back of the trim piece. The silver clips are on either side of the seat belt hole, and the white pin is next to the speaker grill.
Pull out your old speaker, mount the new one. It helps if you have a magnetized adapter gizmo for your nut driver to help prevent dropping the screws.
I was surprised to find the cabin pressure relief vent behind the passenger side speaker.
Do whatever you need to with the wires. Connect them to your new speaker if you're reusing them, or tape them to the existing wire loom to prevent any rattles.
Put everything back on in the reverse order. Don't forget to push the defogger plug through the hole in the trim piece before you get it snugged back down. I found it was easiest to slide the trip piece under the roof panel, then get the top clip into position, line up the rear pin but don't push it in, insert the lower front clip (look up from below to see where the hole is), then use your palm to pound everything into place.

The following 5 users liked this post by markcz:
AtlEngineer (12-29-2023),
ClashBandicoot (01-13-2017),
Docwade (04-17-2021),
TMODcustoms (10-29-2022),
tshirtmeister (02-03-2019)


The following 3 users liked this post by Jimmy 2 Times:
03-19-2011, 04:17 PM
#7
Tech Contributor
 03-22-2011, 08:27 PM
#8
Instructor

Was just thinking the other day about my panel popper and how great of an investment it's been for me. It will pay for itself many times over in saved time and aggravation over the years - well worth the $.

 02-23-2012, 02:24 AM
#11

Are those suckers reusable to a 100% fit (nice and tight), or is it better to order new ones prior to doing the job? Do anybody know the p/n? That clip above looks pretty beat up, and reusing them usually leads to a not tight panel fit. Comments welcome. Just ordered the rear speakers for my '12 CE. The front speakers are supposed to be better for '12, but we'll see. Thanks gang.
 02-23-2012, 06:00 PM
#12
Tech Contributor
Thread Starter
For 1 or 2 removals it should be fine to reuse. You should be able to find some at a local auto parts store for about 1/10 the price of what GM charges.
Also just FYI, since I originally posted this thread I've purchased a set of Trim Removal Tools, they do make it much easier
Also just FYI, since I originally posted this thread I've purchased a set of Trim Removal Tools, they do make it much easier
05-01-2012, 08:17 AM
#13
Intermediate

Member Since: Feb 2012
Location: Frederick MD
Posts: 37
Likes: 0
Received 0 Likes
on
0 Posts

Are those suckers reusable to a 100% fit (nice and tight), or is it better to order new ones prior to doing the job? Do anybody know the p/n? That clip above looks pretty beat up, and reusing them usually leads to a not tight panel fit. Comments welcome. Just ordered the rear speakers for my '12 CE. The front speakers are supposed to be better for '12, but we'll see. Thanks gang.
06-27-2012, 04:05 PM
#14
07-03-2012, 09:01 AM
#15

coming from a gt500 with the shaker 1000 system, I was real surprised with how decent the corvette's system was.
I was even more surprised when I messed with the settings and put all the sound go the rear how the sound was so weak. the fronts carry all the base and im hoping to find a set of non components to replace the rears with, more or less of a small sub type seeing how the sound from the fronts are more than sufficient for the size of the car.
I was even more surprised when I messed with the settings and put all the sound go the rear how the sound was so weak. the fronts carry all the base and im hoping to find a set of non components to replace the rears with, more or less of a small sub type seeing how the sound from the fronts are more than sufficient for the size of the car.
07-03-2012, 07:26 PM
#16
Tech Contributor
Thread Starter
coming from a gt500 with the shaker 1000 system, I was real surprised with how decent the corvette's system was.
I was even more surprised when I messed with the settings and put all the sound go the rear how the sound was so weak. the fronts carry all the base and im hoping to find a set of non components to replace the rears with, more or less of a small sub type seeing how the sound from the fronts are more than sufficient for the size of the car.
I was even more surprised when I messed with the settings and put all the sound go the rear how the sound was so weak. the fronts carry all the base and im hoping to find a set of non components to replace the rears with, more or less of a small sub type seeing how the sound from the fronts are more than sufficient for the size of the car.
The signal coming out of the HU is full spectrum and full volume on the rears, it's the Bose amp that does the 'conditioning'.
The following users liked this post:
skar (02-23-2016)
11-24-2012, 02:42 PM
#17
Supporting Vendor

The C6 rears aren't even in stereo, they're just low-volume mono fill to accent the fronts. All of the bass comes from the powered "subs" in the doors.
The signal coming out of the HU is full spectrum and full volume on the rears, it's the Bose amp that does the 'conditioning'.
The signal coming out of the HU is full spectrum and full volume on the rears, it's the Bose amp that does the 'conditioning'.
On the Non-Bose system, the rear speakers are wired in stereo. Either way, they are just rear fill more than anything. In alot of the aftermarket installs we have done, Dave has either eliminated the rear speakers altogether, or just run them off very low power, either from the aftermarket radio or from a low powered aftermarket amp, just to provide rear fill for those who want it.
A good 2 or 3 way component system, along with our C6 sub enclosure that Dave designed when he was running MadVette Motorsports, is a great setup that all of our customers love much more than the OEM stereo.
 12-05-2012, 10:11 AM
#18
Burning Brakes

A good 2 or 3 way component system, along with our C6 sub enclosure that Dave designed when he was running MadVette Motorsports, is a great setup that all of our customers love much more than the OEM stereo. [/QUOTE]
I cannot seem to find any replacement speakers (especially the subs) for the non Bose application. Can I ask what speakers you would recommend for repleacement? I was hoping to just have a small amp and keep the stock head unit and put in quality speakers, no enlclosures or anything like that. I appreciate your input.
[/QUOTE]I cannot seem to find any replacement speakers (especially the subs) for the non Bose application. Can I ask what speakers you would recommend for repleacement? I was hoping to just have a small amp and keep the stock head unit and put in quality speakers, no enlclosures or anything like that. I appreciate your input.
12-05-2012, 05:26 PM
#19
Tech Contributor
Thread Starter
Even in non-bose the best upgrade is a 6.5" component set in the doors on adapter plates (easily made from 1/4" MDF for $6).
Best way to get signal for amp is with THIS
Get a cheap 2-channel amp and the fronts are done.
However, the bass will be seriously lacking without a sub. If you get/make a sub box and add a real sub in the back it sounds soooo much better. Instead of 2-channel amp go with a bridgeable 4-channel to use 1&2 for fronts and bridge 3&4 to sub.
Rears can be eliminated or keep oem HU and speakers functional.
12-05-2012, 05:34 PM
#20
Supporting Vendor
Even in non-bose the best upgrade is a 6.5" component set in the doors on adapter plates (easily made from 1/4" MDF for $6).
Best way to get signal for amp is with THIS
Get a cheap 2-channel amp and the fronts are done.
However, the bass will be seriously lacking without a sub. If you get/make a sub box and add a real sub in the back it sounds soooo much better. Instead of 2-channel amp go with a bridgeable 4-channel to use 1&2 for fronts and bridge 3&4 to sub.
Rears can be eliminated or keep oem HU and speakers functional.
