1987 corvette 4+3 to t56 swap completed!!
 11-03-2012, 05:18 PM
#1
Advanced

Thread Starter

Member Since: Mar 2012
Location: Jonesboro Georgia
Posts: 73
Likes: 0
Received 0 Likes
on
0 Posts
I purchased an 87 4+3 corvette a few months back and have been stacking parts to attempt a t56 swap as the 4+3 is quite possibly the worst transmission I have ever drove, lol. Anyways, I just got back from my first test drive with the swap and lets say I am very excited!!  The transmission shifts excellent and gives the car more of a sports car feel.
Here is a parts list break down:
I bought a t56 swap from camaroz28.com for 1250 shippied. The clutch setup was garbage as well as the hydraulics, but the t56 was in excellent shape, and I tore it down and rebuilt it with a steel 3-4 shift fork, billet keys, new springs, and bronze shift pads, I also replaced the input shaft and seal.. Everything in the trans was in excellent shape.
The Following from the local Oreilly auto parts for a 97 z28 Camaro
Flywheel
Starter
Roller pilot bearing
New slave cylinder
The clutch I got from summit, it is a Ram replacement for a 97 z28
http://www.summitracing.com/parts/ra...maro/year/1997
Pro street Conversion crossmember http://www.prostreetcustoms.net/CorvettePage.html
Thanks alot to Tom Gasper!! Great service
To adapt the stock master cylinder to the lt1 slave I used the following
http://www.summitracing.com/parts/rus-640281
http://www.summitracing.com/parts/aer-fbm2048
http://www.summitracing.com/parts/rus-670420
http://www.summitracing.com/parts/fra-496304
http://www.summitracing.com/parts/ea...4erl/overview/
There was a few questions I had that I couldn't find answers for and hopefully I can answer those for anyone looking. I had to take an airhammer and dent a little portion of the exhaust in where the Y merge is to make the exhaust clear the t56.
The stock driveshaft works just fine! It's a tight fight to get in with the C member in but it slides all the way in and comes back out about 3/4 of an inch..
The C member is a pain in the butt to get in with the t56 but with a nice pull bar to move the transmission over a little it slides in with some hammering/finagling... Another pain in the butt task was cutting the old shifter assembly out and using fiberglass to cover to the hole.. It is definitely not the most fun thing to do..
I still have yet to do the reverse lockout solenoid, the speedo, or figure out something to get the shifter in the stock console.. That is in my future plans for the next few weeks. However I definitely think this swap was way better than doing a ZF.. I am a huge fan of the t56 and have rebuilt quite a few of them and never had an issue. I have a few pictures I will be posting up of the swap that can hopefully persuade some more people into doing this.
Also from what I understand if you have a 86 or older you would need to get a centerforce flywheel that run around 250-300 dollars for 2 piece rear main seal motors.
Thanks,
Craig
The transmission shifts excellent and gives the car more of a sports car feel.Here is a parts list break down:
I bought a t56 swap from camaroz28.com for 1250 shippied. The clutch setup was garbage as well as the hydraulics, but the t56 was in excellent shape, and I tore it down and rebuilt it with a steel 3-4 shift fork, billet keys, new springs, and bronze shift pads, I also replaced the input shaft and seal.. Everything in the trans was in excellent shape.
The Following from the local Oreilly auto parts for a 97 z28 Camaro
Flywheel
Starter
Roller pilot bearing
New slave cylinder
The clutch I got from summit, it is a Ram replacement for a 97 z28
http://www.summitracing.com/parts/ra...maro/year/1997
Pro street Conversion crossmember http://www.prostreetcustoms.net/CorvettePage.html
Thanks alot to Tom Gasper!! Great service
To adapt the stock master cylinder to the lt1 slave I used the following
http://www.summitracing.com/parts/rus-640281
http://www.summitracing.com/parts/aer-fbm2048
http://www.summitracing.com/parts/rus-670420
http://www.summitracing.com/parts/fra-496304
http://www.summitracing.com/parts/ea...4erl/overview/
There was a few questions I had that I couldn't find answers for and hopefully I can answer those for anyone looking. I had to take an airhammer and dent a little portion of the exhaust in where the Y merge is to make the exhaust clear the t56.
The stock driveshaft works just fine! It's a tight fight to get in with the C member in but it slides all the way in and comes back out about 3/4 of an inch..
The C member is a pain in the butt to get in with the t56 but with a nice pull bar to move the transmission over a little it slides in with some hammering/finagling... Another pain in the butt task was cutting the old shifter assembly out and using fiberglass to cover to the hole.. It is definitely not the most fun thing to do..
I still have yet to do the reverse lockout solenoid, the speedo, or figure out something to get the shifter in the stock console.. That is in my future plans for the next few weeks. However I definitely think this swap was way better than doing a ZF.. I am a huge fan of the t56 and have rebuilt quite a few of them and never had an issue. I have a few pictures I will be posting up of the swap that can hopefully persuade some more people into doing this.
Also from what I understand if you have a 86 or older you would need to get a centerforce flywheel that run around 250-300 dollars for 2 piece rear main seal motors.
Thanks,
Craig
 11-03-2012, 05:36 PM
#2
Racer

Member Since: Sep 2006
Location: Newark DE
Posts: 289
Likes: 0
Received 0 Likes
on
0 Posts
Great job, but did you search before you started?
http://forums.corvetteforum.com/c4-t...985-vette.html
There's dozens of posts on this swap and parts lists too.
http://forums.corvetteforum.com/c4-t...985-vette.html
There's dozens of posts on this swap and parts lists too.
11-03-2012, 05:53 PM
#3
Team Owner

Pro Mechanic
Nice job on the swap though. For sure I agree that the T56 is better than the 4...and especially the +3.
11-03-2012, 09:41 PM
#4
Advanced
Thread Starter
Member Since: Mar 2012
Location: Jonesboro Georgia
Posts: 73
Likes: 0
Received 0 Likes
on
0 Posts
Yeah, I did a pretty vast search and saw that post... However 3-4 questions I covered here were not covered in the other threads.. Such as the driveshaft, the crossmember working or not, and how much the shifter needs to be moved..
I've only drove 1 zf before and I really didn't like the way it felt, and it was kinda noisy... I've owned at least 10 t56's over the years and I really love the more connected feeling that the t56 offers. I really think it is more of a personal preference thing though. Plus I've personally built quite a few t56's and have never had an issue. Even with alot of abuse.
Anyways, I was just posting up my good experience with the swap and adding another corvette to the t56 swap list!
Thanks,
Craig
11-04-2012, 10:19 AM
#5
Burning Brakes

Yeah, I did a pretty vast search and saw that post... However 3-4 questions I covered here were not covered in the other threads.. Such as the driveshaft, the crossmember working or not, and how much the shifter needs to be moved..
Anyways, I was just posting up my good experience with the swap and adding another corvette to the t56 swap list!
Anyways, I was just posting up my good experience with the swap and adding another corvette to the t56 swap list!
Where are your pictures, fade2blk? All that work and we don't to even see a shift ****
 Good to hear you are experienced with the t56; wished my pockets were deeper and I too would have gotten all those neat (T56) upgrades. As it was my cheap T56 needed a 5/6 syncro, reverse syncro and gear, plus I did the reverse fork mod.
Although I wouldn't call the 4+3 the "worst", it's nothing like the T56. I love my T56

Oh ya, did you get to read this (for your speedo)
http://forums.corvetteforum.com/c4-t...he-speedo.html
11-04-2012, 10:22 AM
#6
Advanced
Thread Starter
Member Since: Mar 2012
Location: Jonesboro Georgia
Posts: 73
Likes: 0
Received 0 Likes
on
0 Posts
Actually those questions were covered in the smattering of T56 threads. But no matter, more info is always good. Don't you think it's time for a T56 stickie?
Where are your pictures, fade2blk? All that work and we don't to even see a shift **** Good to hear you are experienced with the t56; wished my pockets were deeper and I too would have gotten all those neat (T56) upgrades. As it was my cheap T56 needed a 5/6 syncro, reverse syncro and gear, plus I did the reverse fork mod.
Although I wouldn't call the 4+3 the "worst", it's nothing like the T56. I love my T56
Where are your pictures, fade2blk? All that work and we don't to even see a shift ****
Good to hear you are experienced with the t56; wished my pockets were deeper and I too would have gotten all those neat (T56) upgrades. As it was my cheap T56 needed a 5/6 syncro, reverse syncro and gear, plus I did the reverse fork mod.Although I wouldn't call the 4+3 the "worst", it's nothing like the T56. I love my T56
. I may have missed those answers somewhere in the post. I scrolled the your thread and 1-2 others 4-5 times before attempting the swap.. I guess with so much information a few small things can be missed or forgotten.. lol Your thread actually gave me the most info and thanks for that!!.. I think they should definitely make a sticky and combine all the information/pictures together!
Rebuilding a t56 is actually a pretty simple job! It just takes a little bit of patience.. I actually first started rebuilding manuals at the Acura dealership 6-7 years ago when I was 19. After a year or so I figured if I could rebuild a 6 speed in a 07 TL type S I can do a t56.. lol
I guess this kind of could of been a bit of a rerun of the t56 swap, I guess am just excited it is all in and want to share my experience with others looking into the swap
Thanks Again,
Craig
11-04-2012, 10:26 AM
#7
Advanced
Thread Starter
Member Since: Mar 2012
Location: Jonesboro Georgia
Posts: 73
Likes: 0
Received 0 Likes
on
0 Posts
Oh ya, did you get to read this (for your speedo)
http://forums.corvetteforum.com/c4-t...he-speedo.html[/QUOTE]
I actually found that one last night doing some research!! I am heading to summit today to pick up the sgi-5 box. Thankfully a huge summit racing warehouse is only 15 minutes from me!
http://forums.corvetteforum.com/c4-t...he-speedo.html[/QUOTE]
I actually found that one last night doing some research!! I am heading to summit today to pick up the sgi-5 box.
Thankfully a huge summit racing warehouse is only 15 minutes from me!
11-04-2012, 10:44 AM
#8
Burning Brakes
Must be nice having Summit just down the road, I got 5 different "parts stores" with 20 miles and I usually don't get anything from them 
Here's some shifter info (if you didn't find it)
http://forums.corvetteforum.com/c4-t...acement-2.html
Oh ya, I did this reverse mod to my T56 (along with the new gear and syncro). Have you seen it/done it?
http://www.thirdgen.org/techboard/tr...6-reverse.html
Post up your pictures!
Here's some shifter info (if you didn't find it)
http://forums.corvetteforum.com/c4-t...acement-2.html
Oh ya, I did this reverse mod to my T56 (along with the new gear and syncro). Have you seen it/done it?
http://www.thirdgen.org/techboard/tr...6-reverse.html
Post up your pictures!
Last edited by DanZ51; 11-04-2012 at 11:07 AM.
11-06-2012, 12:44 PM
#9
Advanced
Thread Starter
Member Since: Mar 2012
Location: Jonesboro Georgia
Posts: 73
Likes: 0
Received 0 Likes
on
0 Posts
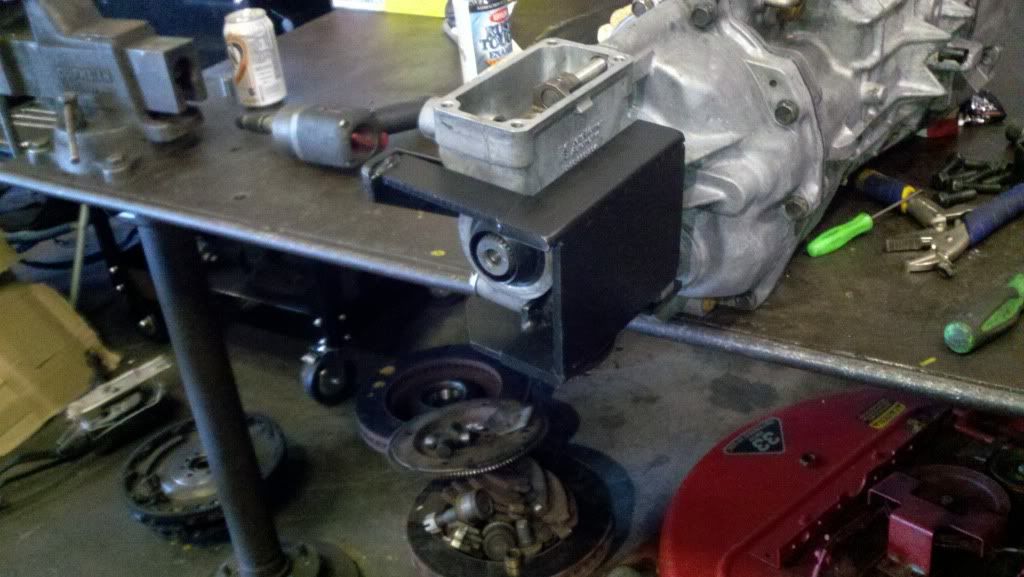
Another problem I had when doing this swap was bolting the starter on.. I used an lt1 starter and they have different length starter bolts than a l98.. I ended up ordering bolts from gm parts direct
14037733 1.87" length
12338064 4.33" length
The threads are the same size as the factory ones.. I read a couple post of people just stacking washers/lugnuts to make the longer bolts work.. Well I was really uncomfortable with that idea as a starter bolt really takes alot of stress.
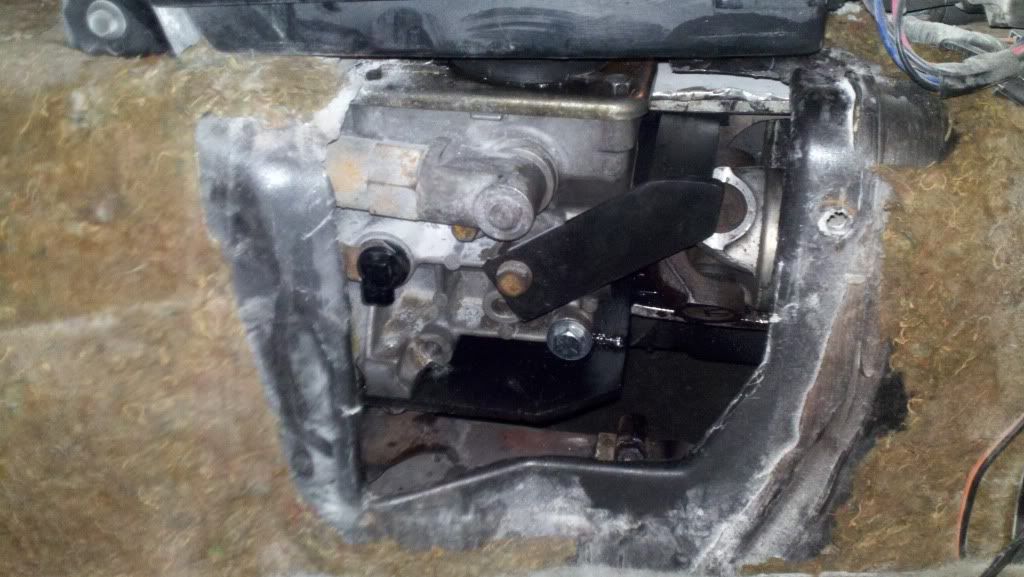
Here are a few pictures of what I worked on last night.. I really didn't like the fiberglass patch, it didn't feel too sturdy.. So I ripped it all out and started from scratch.
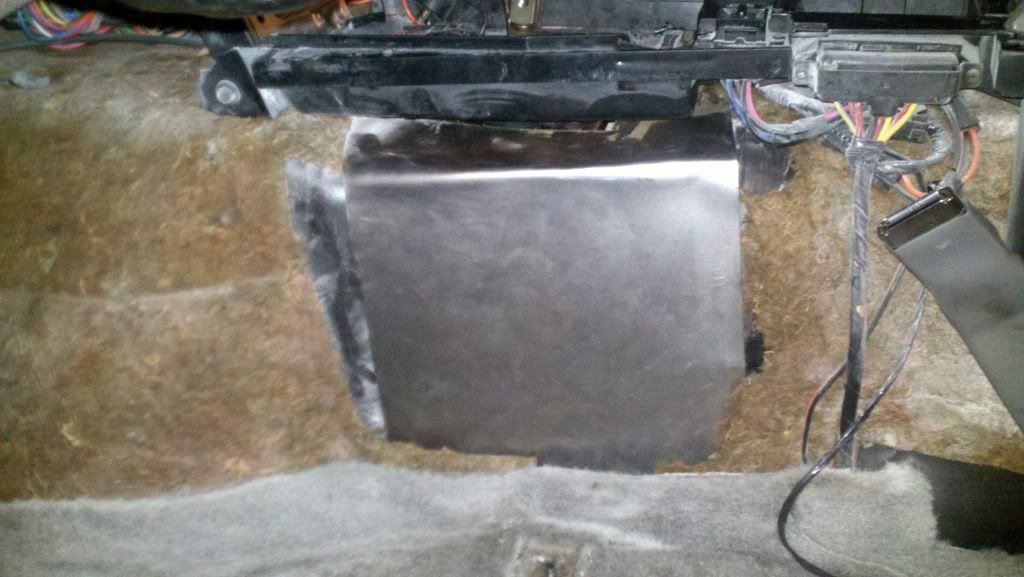
This might be a little different from what other people did, but I am a little more handy with steel than fiberglass.. lol I got a 1/8" thick stainless sheet from lowes for 20 bucks. Made a template with some cardboard, then cut the steel into shape and used a vise with a small hammer to tap it into shape..
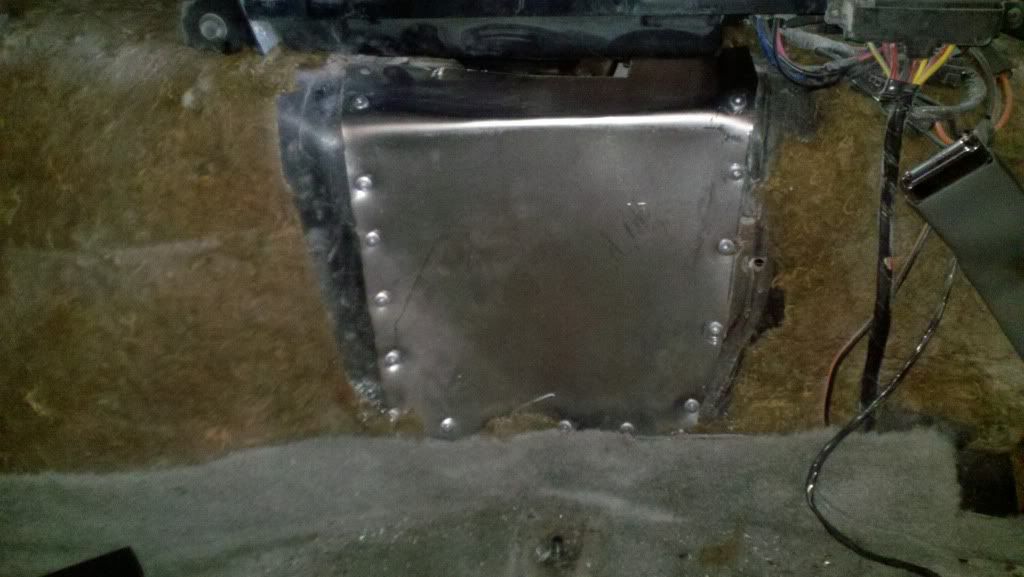
I then used some 3/16" 1/8th long pop rivets to secure it to the body. I will be sealing it from the underneath with silicone and then using an underbody coating to cover it.. I am still debating on using dynomat on the inside.
Here are some photo's, and a few pictures of the transmission build..

14037733 1.87" length
12338064 4.33" length
The threads are the same size as the factory ones.. I read a couple post of people just stacking washers/lugnuts to make the longer bolts work.. Well I was really uncomfortable with that idea as a starter bolt really takes alot of stress.
Here are a few pictures of what I worked on last night.. I really didn't like the fiberglass patch, it didn't feel too sturdy.. So I ripped it all out and started from scratch.
This might be a little different from what other people did, but I am a little more handy with steel than fiberglass.. lol I got a 1/8" thick stainless sheet from lowes for 20 bucks. Made a template with some cardboard, then cut the steel into shape and used a vise with a small hammer to tap it into shape..
I then used some 3/16" 1/8th long pop rivets to secure it to the body. I will be sealing it from the underneath with silicone and then using an underbody coating to cover it.. I am still debating on using dynomat on the inside.
Here are some photo's, and a few pictures of the transmission build..
Last edited by fade2blk500; 11-06-2012 at 12:55 PM.
11-07-2012, 02:20 PM
#10
Burning Brakes
Fiberglass is all about layers. A couple of that super heavy weave I hadf laying around was plenty. 
I would definitely use the dyna-mat or something to keep the noise down. I'm looking for some sound deadener for around the shift tower because I got a bit of road noise leaking in.
Nice pix
I would definitely use the dyna-mat or something to keep the noise down. I'm looking for some sound deadener for around the shift tower because I got a bit of road noise leaking in.
Nice pix
11-07-2012, 03:00 PM
#11
Advanced
Thread Starter
Member Since: Mar 2012
Location: Jonesboro Georgia
Posts: 73
Likes: 0
Received 0 Likes
on
0 Posts
Something else I have discovered is that the tailshaft seal has been leaking fluid. I pulled the driveshaft to inspect the seal and see if it was leaking. The driveshaft is a very tight fit and it actually goes in so far that the seal is riding on a rusted part of the yoke.
I'm thinking
A. Replace the yoke
B. Have the driveshaft cut 1/2" and get it rebalanced.
I'm thinking that having the driveshaft cut will have to be my route because I have read that the yoke needs to have at least 1" before it bottoms out. Where as I have about 1/2".. It is a very tight fit getting the driveshaft in. Any opinions??
Thanks,
Craig
11-07-2012, 04:24 PM
#12
Team Owner
Pro Mechanic
I'd just emery/sand/polish the rusty part of the shaft.
11-07-2012, 05:03 PM
#13
Advanced
Thread Starter
Member Since: Mar 2012
Location: Jonesboro Georgia
Posts: 73
Likes: 0
Received 0 Likes
on
0 Posts
I had done that right before I put it back in.. I took a small wire brush and tried to get it smooth as possible and then used some scotchbright to clean it up. Hopefully the leak will be fixed.. Whenever I drive home tonight I will be able to tell.
Thanks,
Craig
Thanks,
Craig
11-08-2012, 12:37 PM
#14
Burning Brakes
I didn't have any problem with my yoke/tail shaft seal and still run the stock shaft. Although I have written on my C-beam in big letters with a marker "INSTALL DRIVESHAFT BEFORE BEFORE C-BEAM" because you get pretty mad at yourself when you make that mistake
If you seal leaks again, I would replace the seal and get a new yoke. A yoke would be far cheaper than trying to get an aluminum driveshaft shortened and balanced (at least around here in the sticks).
http://www.dennysdriveshaft.com/c72_...nsmission.html
If you seal leaks again, I would replace the seal and get a new yoke. A yoke would be far cheaper than trying to get an aluminum driveshaft shortened and balanced (at least around here in the sticks).
http://www.dennysdriveshaft.com/c72_...nsmission.html
11-08-2012, 12:49 PM
#15
Drifting

Any type of sound deadening material would cut down tremendously any noise trying to filter in near your shifter.
BTW, nice job. I especially like your metal work!
BTW, nice job. I especially like your metal work!
11-19-2012, 10:42 AM
#17
Team Owner

Member Since: Oct 2004
Location: altered state
Posts: 81,242
Received 3,043 Likes
on
2,602 Posts
St. Jude Donor '05

Where did you buy your rebuild/upgrade parts from?
T56 is a good trans...not quite as strong as the ZF but will take some pretty hard abuse and hold up Ok.
T56 is a good trans...not quite as strong as the ZF but will take some pretty hard abuse and hold up Ok.
11-20-2012, 11:39 AM
#18
Burning Brakes
Don't worry about the T56 not working perfectly. I had to pull mine out twice to take care of 5/6 syncro and reverse (such is the way with cheap T56 deals) . I don't regret it at all. My enthusiasm returned the moment it rolled down the road with the new trans.
Last edited by DanZ51; 11-20-2012 at 11:45 AM.
11-20-2012, 11:58 AM
#19
Le Mans Master

Thanks, so far the hardest thing to deal with has been the damn pilot bushing, I've bought three bushings and have gotten three different sizes. And installing it has been a pain. I'm a little nervous about getting all the wiring set up but looking at it, really it's just a handful of plugs and wires needing extended.
11-20-2012, 01:58 PM
#20
Burning Brakes
I replaced my pilot bushing with the one that came with my cheap clutch/pressure plate. Then I read the T56's were designed to work with roller pilot bearings. So I pulled it back out, realizing that it wasn't pure bronze (failed the magnet test). And installed the roller. Yep the gal at Advanced Auto handed my the wrong one. Went home found the right part number and got the RIGHT one the next day.
If you're having problems getting the old pilot out I use an old trick. Used a tap to thread inside of the bushing. Then used a corresponding big bolt to push the bushing out (by screwing it in).
The wiring was super easy. Just takes time for good connections and finding a place for the Digital Dakota box (mines in what used to be the ash tray).
Don't forget to take a picture or two