
Sun Visor removal/replacement
 09-21-2011, 11:04 AM
#1
Melting Slicks

Thread Starter
Member Since: Sep 2007
Location: Long Island, Nassau County New York
Posts: 2,599
Likes: 0
Received 1 Like
on
1 Post

Can any of you guys direct me to link for the sun visor removal and replacement? I know its here somewhere, I just cant find it.
Thanks!!
Thanks!!


 09-21-2011, 12:20 PM
#3
Safety Car


Sunshade Replacement
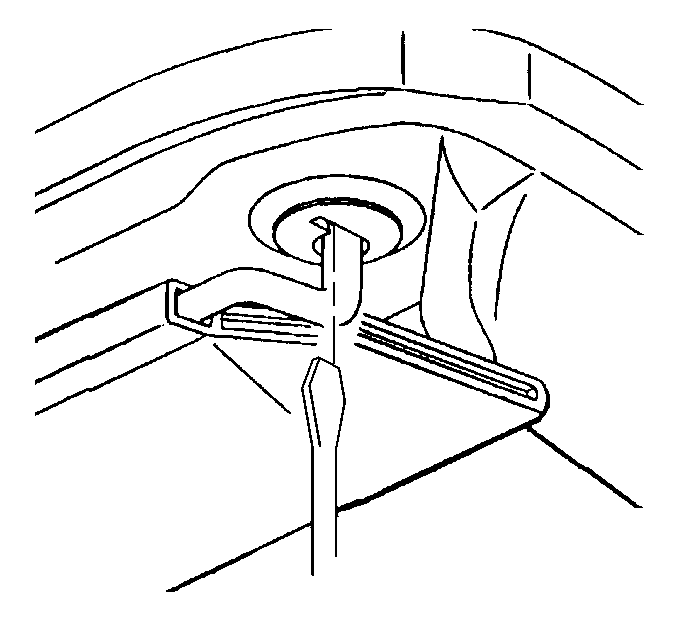
Removal Procedure

1.Tilt the sunshade down toward the windshield.
2.Insert a flat head screwdriver blade into the slot in the sunshade inner bezel.
3.Using the screwdriver against the elbow of the sunshade arm for leverage pull down on the sunshade arm while rotating the sunshade outboard until the sunshade stops. (the first tab disengages).
4.Push up on the sunshade and continue rotating the sunshade outboard until the sunshade with the inner bezel disengages from the mounting bezel.
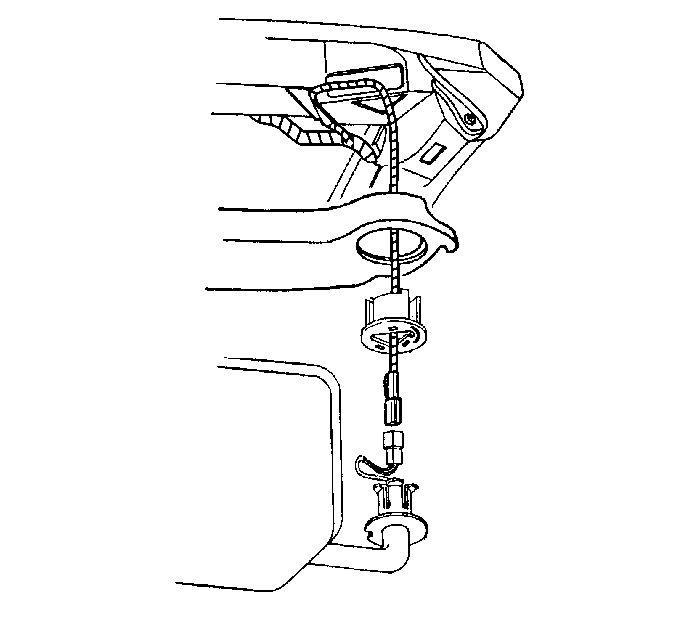
5.Disconnect the electrical connector.
6.Remove the sunshade.
7.Disassemble as necessary.
If removing the mounting bezel, pull the bezel from the garnish molding with your fingers.
If replacing the inner bezel, remove the bezel from the sunshade shaft and press the new bezel onto the shaft.
Installation Procedure
1.Route the harness through the mounting bezel.
2.Insert the mounting bezel into the garnish molding engaging the snap fingers.
3.Connect the harness to the sunshade electrical connector.
4.Push the connector up through the bezel and through the hole in the garnish molding.
5.Position the sunshade approximately midway between the windshield and the side of the vehicle.
6.Insert the rod with inner bezel firmly attached fully into the mounting bezel.
7.Rotate the sunshade toward the centerline of the vehicle until the sunshade locks in place.
Removal Procedure
1.Tilt the sunshade down toward the windshield.
2.Insert a flat head screwdriver blade into the slot in the sunshade inner bezel.
3.Using the screwdriver against the elbow of the sunshade arm for leverage pull down on the sunshade arm while rotating the sunshade outboard until the sunshade stops. (the first tab disengages).
4.Push up on the sunshade and continue rotating the sunshade outboard until the sunshade with the inner bezel disengages from the mounting bezel.
5.Disconnect the electrical connector.
6.Remove the sunshade.
7.Disassemble as necessary.
If removing the mounting bezel, pull the bezel from the garnish molding with your fingers.
If replacing the inner bezel, remove the bezel from the sunshade shaft and press the new bezel onto the shaft.
Installation Procedure
1.Route the harness through the mounting bezel.
2.Insert the mounting bezel into the garnish molding engaging the snap fingers.
3.Connect the harness to the sunshade electrical connector.
4.Push the connector up through the bezel and through the hole in the garnish molding.
5.Position the sunshade approximately midway between the windshield and the side of the vehicle.
6.Insert the rod with inner bezel firmly attached fully into the mounting bezel.
7.Rotate the sunshade toward the centerline of the vehicle until the sunshade locks in place.
 04-19-2017, 01:37 PM
#6
or does the whole damn thing have to come down to be taken apart ?
04-19-2017, 06:20 PM
#7
Team Owner

Member Since: Jul 2016
Location: The Steel City, Colorful Colorado
Posts: 25,306
Received 1,679 Likes
on
1,182 Posts
Winner 2020 C7 of the Year - Modified
Just gently pry out the plastic lens and you can get to the bulb.
The following users liked this post:
SG Lou (04-19-2017)
 05-25-2017, 06:01 PM
#9

Sunshade Replacement
Removal Procedure
1.Tilt the sunshade down toward the windshield.
2.Insert a flat head screwdriver blade into the slot in the sunshade inner bezel.
3.Using the screwdriver against the elbow of the sunshade arm for leverage pull down on the sunshade arm while rotating the sunshade outboard until the sunshade stops. (the first tab disengages).
4.Push up on the sunshade and continue rotating the sunshade outboard until the sunshade with the inner bezel disengages from the mounting bezel.

5.Disconnect the electrical connector.
6.Remove the sunshade.
7.Disassemble as necessary.
If removing the mounting bezel, pull the bezel from the garnish molding with your fingers.
If replacing the inner bezel, remove the bezel from the sunshade shaft and press the new bezel onto the shaft.
Installation Procedure
1.Route the harness through the mounting bezel.
2.Insert the mounting bezel into the garnish molding engaging the snap fingers.
3.Connect the harness to the sunshade electrical connector.
4.Push the connector up through the bezel and through the hole in the garnish molding.
5.Position the sunshade approximately midway between the windshield and the side of the vehicle.
6.Insert the rod with inner bezel firmly attached fully into the mounting bezel.
7.Rotate the sunshade toward the centerline of the vehicle until the sunshade locks in place.
Removal Procedure
1.Tilt the sunshade down toward the windshield.
2.Insert a flat head screwdriver blade into the slot in the sunshade inner bezel.
3.Using the screwdriver against the elbow of the sunshade arm for leverage pull down on the sunshade arm while rotating the sunshade outboard until the sunshade stops. (the first tab disengages).
4.Push up on the sunshade and continue rotating the sunshade outboard until the sunshade with the inner bezel disengages from the mounting bezel.
5.Disconnect the electrical connector.
6.Remove the sunshade.
7.Disassemble as necessary.
If removing the mounting bezel, pull the bezel from the garnish molding with your fingers.
If replacing the inner bezel, remove the bezel from the sunshade shaft and press the new bezel onto the shaft.
Installation Procedure
1.Route the harness through the mounting bezel.
2.Insert the mounting bezel into the garnish molding engaging the snap fingers.
3.Connect the harness to the sunshade electrical connector.
4.Push the connector up through the bezel and through the hole in the garnish molding.
5.Position the sunshade approximately midway between the windshield and the side of the vehicle.
6.Insert the rod with inner bezel firmly attached fully into the mounting bezel.
7.Rotate the sunshade toward the centerline of the vehicle until the sunshade locks in place.
Searching for 02 C5 sun visor removal replacement assistance I found an excellent U tube video on removal. This thread is one for the books like most I've used.

The following users liked this post:
ShagVette (08-10-2023)
06-30-2017, 01:37 PM
#12
Advanced

Hey gang. I deleted the sun visors on my Trans Am and there were metal/billetdelete pieces that you could buy and screw into place so that there wasnt a big hole in your headliner. Is there anything like that for C5s? I want to take off my visors but I dont want big holes in the corners where they used to be.
 08-24-2018, 11:43 PM
#15
3rd Gear

Member Since: Oct 2017
Posts: 3
Likes: 0
Received 0 Likes
on
0 Posts
I recommend replacing the inner bezel on the new sunvisor with the old one. It's easy to do with a pair of channelocks. Put one jaw on the tubing
(be careful of the wires) and the other jaw under the bezel, then squeeze. The bezel will pop loose. The channelocks can also be used to pop the
old bezel onto the new visor arm.
The reason for my recommondation is this... I could not get the visors to lock into place. They hung loose or fell back out. So I took a close
look at what was going on. The problem is that the inner bezels are slightly different from the originals, enough to make them useless. The inner
bezel diameter is larger than the indent where it's supposed to fit in the outer bezel. After I sanded the diameter to fit, it still would not
lock into place.
08-25-2018, 07:26 PM
#17
3rd Gear
Member Since: Oct 2017
Posts: 3
Likes: 0
Received 0 Likes
on
0 Posts
Mine also came from Ecklers. Some people posting didn't seem to have problems. I don't know if there's more than one manufacturer or their quality varies. I'm very satisfied with mine now that they are installed. But it took me several days to figure out how to solve the installation problem; It would be better if the manufacturer didn't include the inner bezel and explained in the instructions how to install the old bezel on the new visor. I could have had the job done in 5 minutes.
09-26-2018, 08:23 AM
#18
Intermediate
I recommend replacing the inner bezel on the new sunvisor with the old one. It's easy to do with a pair of channelocks. Put one jaw on the tubing
(be careful of the wires) and the other jaw under the bezel, then squeeze. The bezel will pop loose. The channelocks can also be used to pop the
old bezel onto the new visor arm.
The reason for my recommondation is this... I could not get the visors to lock into place. They hung loose or fell back out. So I took a close
look at what was going on. The problem is that the inner bezels are slightly different from the originals, enough to make them useless. The inner
bezel diameter is larger than the indent where it's supposed to fit in the outer bezel. After I sanded the diameter to fit, it still would not
lock into place.
(be careful of the wires) and the other jaw under the bezel, then squeeze. The bezel will pop loose. The channelocks can also be used to pop the
old bezel onto the new visor arm.
The reason for my recommondation is this... I could not get the visors to lock into place. They hung loose or fell back out. So I took a close
look at what was going on. The problem is that the inner bezels are slightly different from the originals, enough to make them useless. The inner
bezel diameter is larger than the indent where it's supposed to fit in the outer bezel. After I sanded the diameter to fit, it still would not
lock into place.
09-26-2018, 09:58 AM
#19
The second set I bought in March of 2018 were from buyavette_inc on eBay for $179.00. I installed them in March 2018 and the Black color matches the Black interior like factory. The quality of these are like a brand new GM product. The safety sticker looks lithographed or printed in the material somehow un-removable and permanent. These were delivered ready to install with new circular turn snap locks requiring no additional parts. These were E-Z out of the box installation and matched the car like OEM.
Check these sun visors out and do your research. Call buyavette_inc and ask about the install lock rings. I know buyavette_inc visors were ready to install and play. I�ve owned my 02 C5 Vert 11 years. My only mistake was not joining Corvette Forum sooner. The projects I�ve done and the lessons I�ve learned from members here have saved me $$$$$$ and time.
Thanks all members! Mule.
The following users liked this post:
CorvetteBrent (10-02-2018)
09-26-2018, 11:42 AM
#20
3rd Gear
Member Since: Oct 2017
Posts: 3
Likes: 0
Received 0 Likes
on
0 Posts
Sorry to hear you tossed the original. At one point I figured I was going to have to screw them on, you might consider doing that.

