C5 brake install with pics
 06-26-2011, 01:38 PM
#1
Drifting

Thread Starter
Member Since: Dec 2005
Location: High Ridge Missouri
Posts: 1,313
Likes: 0
Received 2 Likes
on
2 Posts

I found a C5 install in the DIY sticky, but it was pretty much just a few pics of the finished project, not very helpful IMO.
Forgot to note this is for 88-96, but 84-87 should be similar
Start with the obvious vehicle on jack stands and wheels removed
Remove brake hose first and secure out of the way (13mm banjo bolt)
Caliper and bracket can be removed as one assembly (21mm bolts)
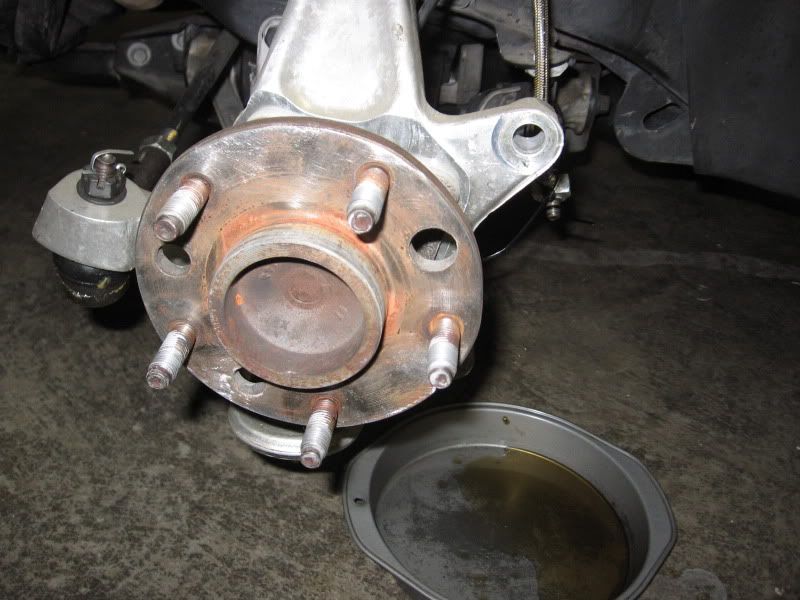
Remove rotor, should just pull off but are sometimes rusted to the hub and require a bit of persuasion if there is excessive rust on the hub make sure to clean rust off to avoid pulsation and uneven clamping when installing wheel and lugnuts
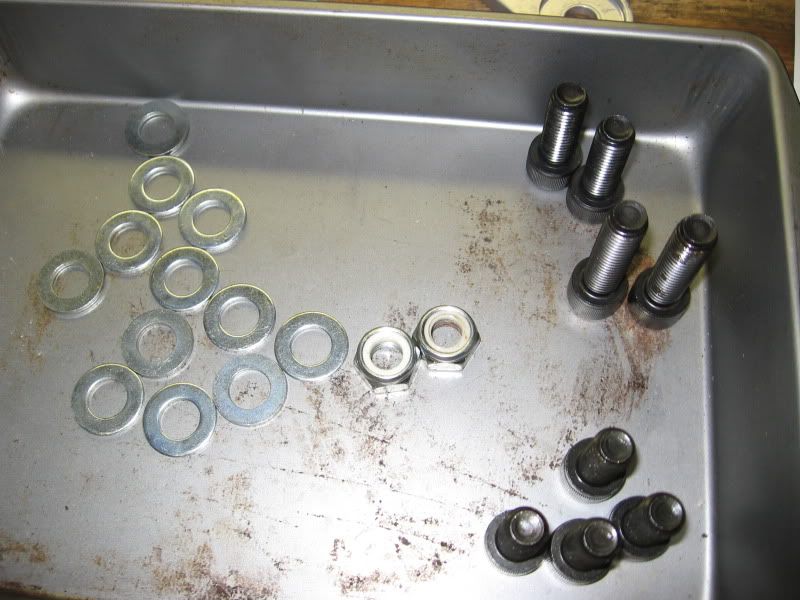
Adapter bracket, instructions and included hardware
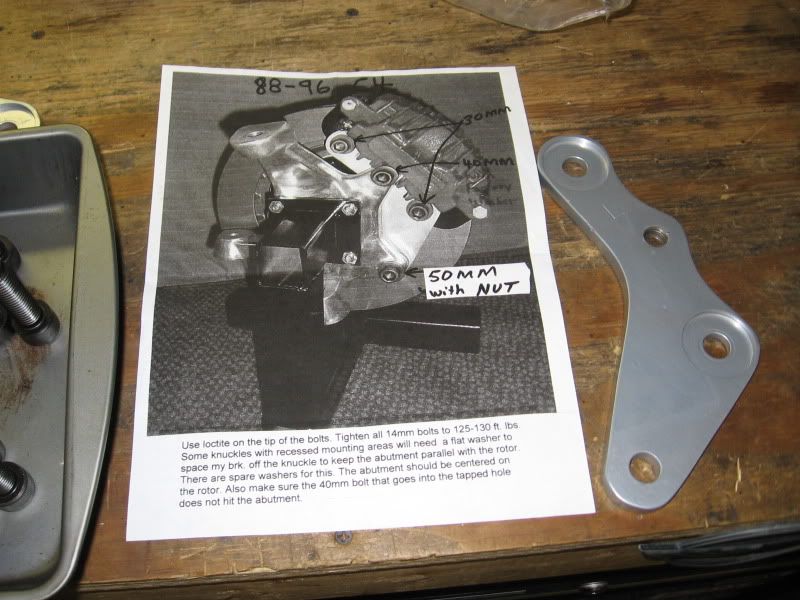
Bracket is installed to spindle using the 40mm long bolt in the top position, the bracket is internally threaded in this position the lower bolt is 50mm long and use with the supplied nut.
Notes on this step:
Washers are required (and included) between the bracket and spindle to maintain proper geometry and offset
Make sure to use locktite on these bolts
Torque to 130 ft lbs
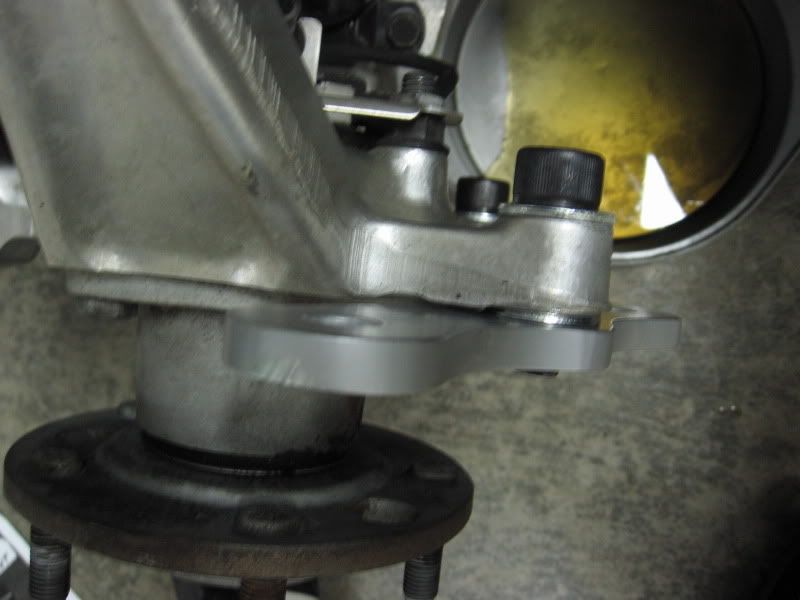
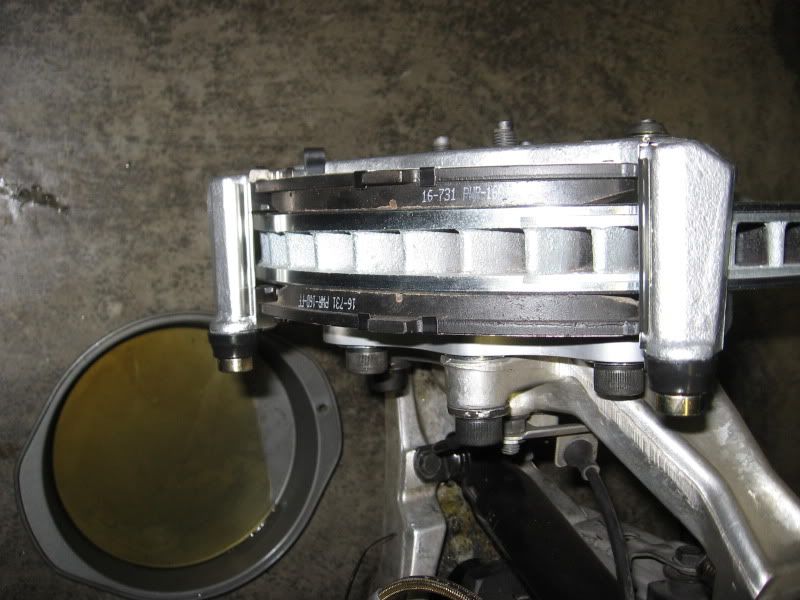
Found when installing the abutment bracket to adapter was the abutment bracket was contacting the tip of the upper 40mm bolt, removed both bolts and replaced the washers that were included with the adapter kit with the washers from the original bolts, these washers are about 3mm thicker and moved the bolt in far enough that it was no longer contacting the abutment bracket (please make sure you use the thick washers at the bolt head and the thin included washers between the brackets).

Sorry this pic was taken before I figured out I needed to exchange the washers at the bolt head, but you get the idea.
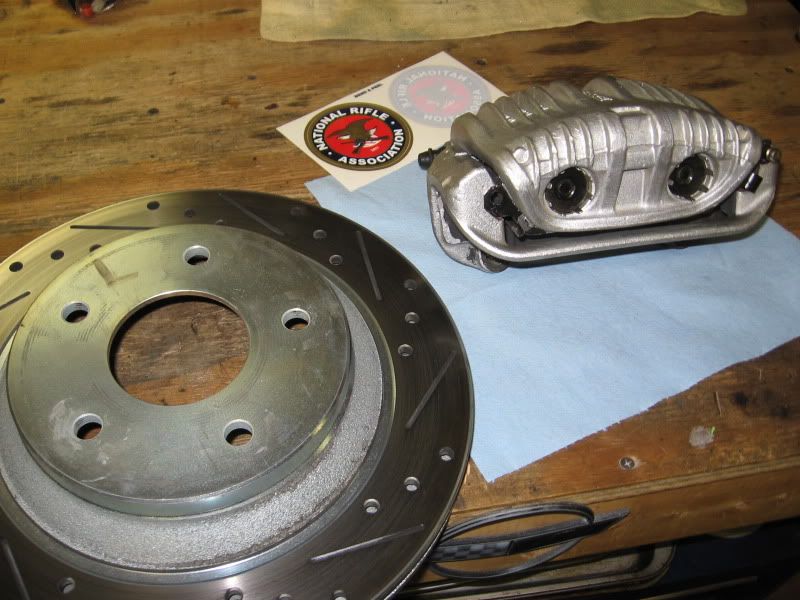
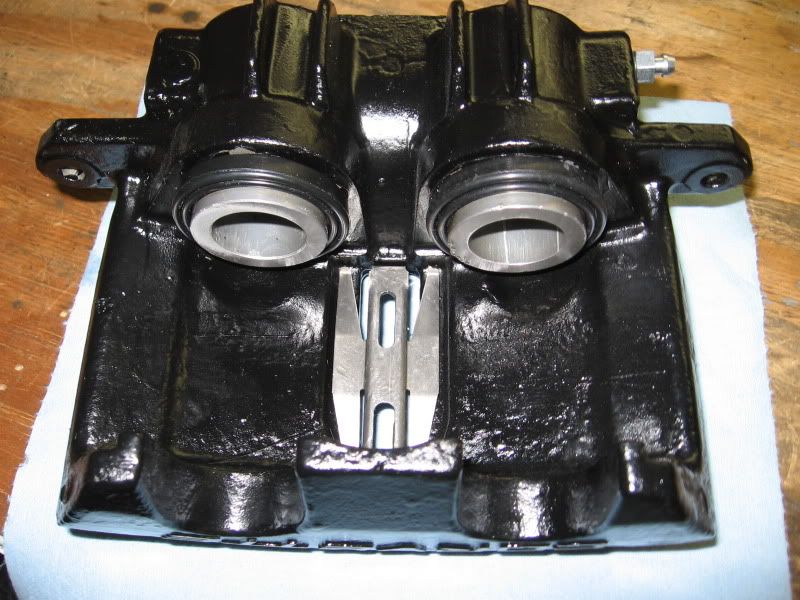
Caliper bracket, install pad slides and lubricate slides and pin slide holes. I prefer a heavy silicone paste.
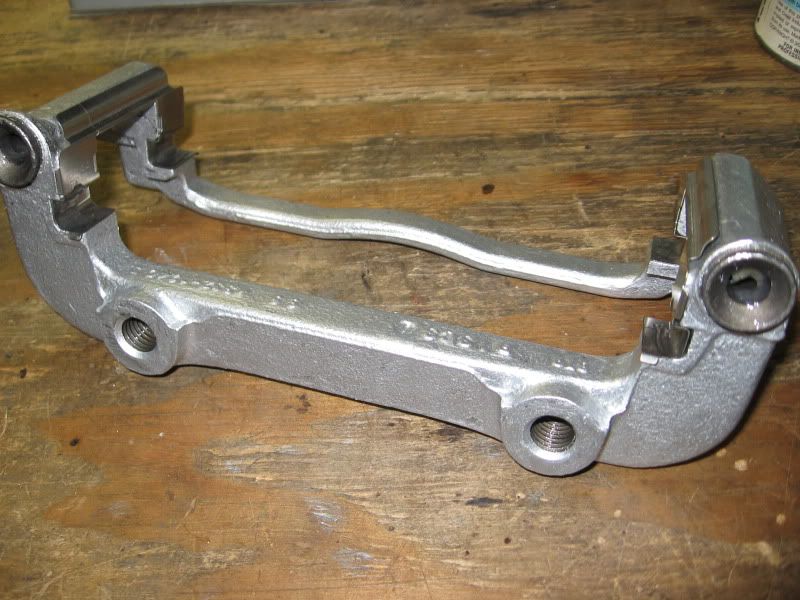
Install pins and dust boots

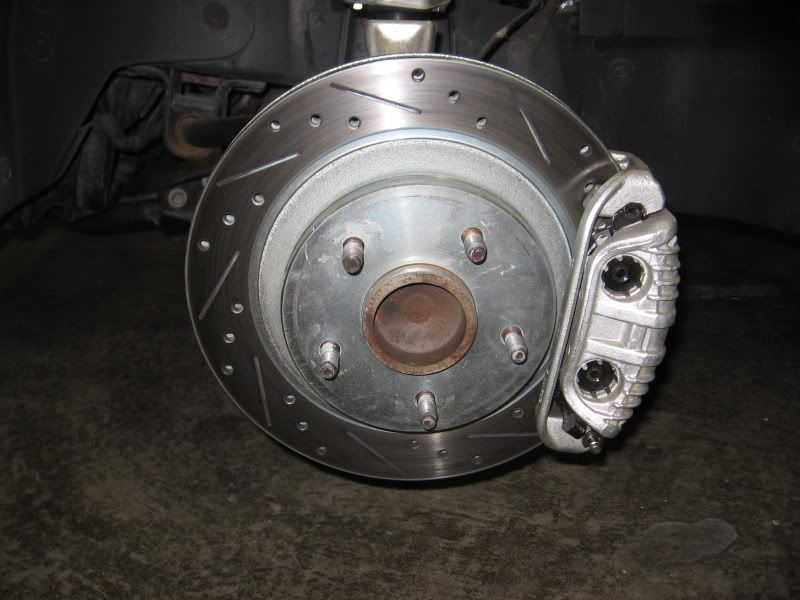
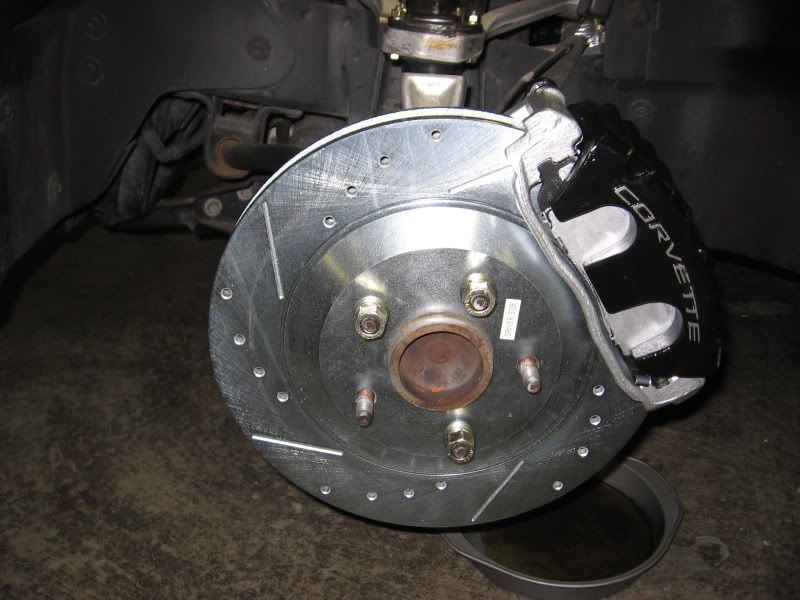
Install rotor (clean shipping coating from brake rotor using brake clean before installation) paying attention to install on proper side
Install 30mm bolts (use included washers behind bolt heads) make sure to use locktite and torque to 130 ftlbs
Install brake pads in abutment brakcet
Make sure to install the anti-rattle clip in the top of the caliper apply lube to the center rail of this clip where it contacts the pads
Install the caliper, torque slide pin bolts to 23 ftlbs (if you have new bolts they will come with loctite installed, if not make sure to apply some)
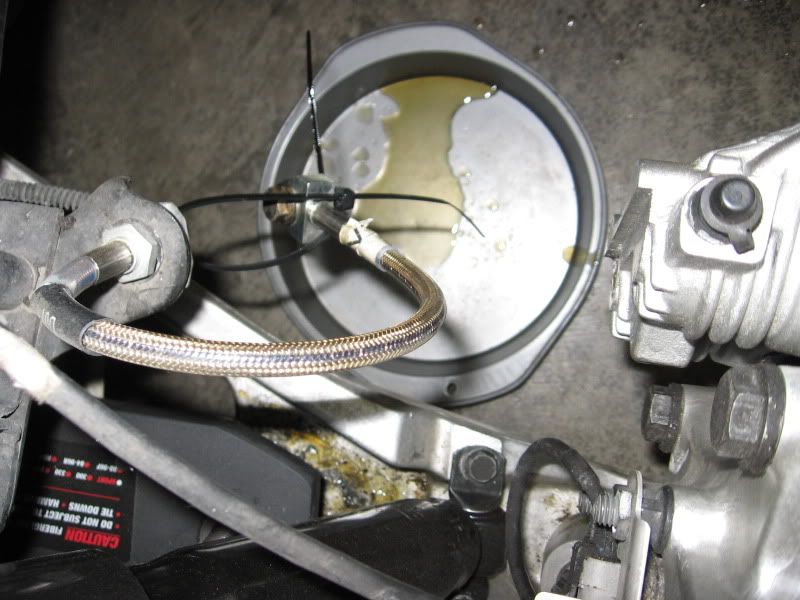
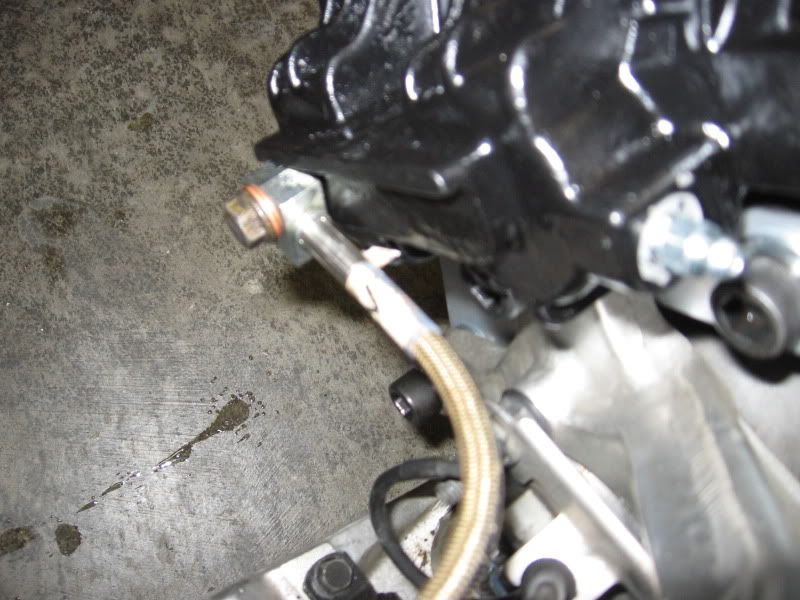
Reinstall the brake hose, use new copper crush sealing washers, torque banjo bolt to 33 ftlbs (if you haven't done so yet this is a good time to switch over to braided stainless hoses)
The rest is pretty normal straight forward stuff
Make sure to bleed the system (not ready to do this yet I've still have a DRM bais spring and a line lock to install).
After bleeding and before reinstalling the wheels start the vehicle (so as to get full brake assist and pressure) have someone, if available, apply and hold the pedal and carefully inspect for any leaks.
No leaks, reinstall wheels and tires
Lower from jack stands
Roadtest (being very careful to ensure brakes function properly, obviously) using the proper break-in/bedding procedure for your pads and rotors.
These pics were all taken while installing on the left side obviously the right side is a mirror image of doing the same thing.
Forgot to note this is for 88-96, but 84-87 should be similar
Start with the obvious vehicle on jack stands and wheels removed
Remove brake hose first and secure out of the way (13mm banjo bolt)
Caliper and bracket can be removed as one assembly (21mm bolts)
Remove rotor, should just pull off but are sometimes rusted to the hub and require a bit of persuasion if there is excessive rust on the hub make sure to clean rust off to avoid pulsation and uneven clamping when installing wheel and lugnuts
Adapter bracket, instructions and included hardware
Bracket is installed to spindle using the 40mm long bolt in the top position, the bracket is internally threaded in this position the lower bolt is 50mm long and use with the supplied nut.
Notes on this step:
Washers are required (and included) between the bracket and spindle to maintain proper geometry and offset
Make sure to use locktite on these bolts
Torque to 130 ft lbs
Found when installing the abutment bracket to adapter was the abutment bracket was contacting the tip of the upper 40mm bolt, removed both bolts and replaced the washers that were included with the adapter kit with the washers from the original bolts, these washers are about 3mm thicker and moved the bolt in far enough that it was no longer contacting the abutment bracket (please make sure you use the thick washers at the bolt head and the thin included washers between the brackets).
Sorry this pic was taken before I figured out I needed to exchange the washers at the bolt head, but you get the idea.
Caliper bracket, install pad slides and lubricate slides and pin slide holes. I prefer a heavy silicone paste.
Install pins and dust boots
Install rotor (clean shipping coating from brake rotor using brake clean before installation) paying attention to install on proper side
Install 30mm bolts (use included washers behind bolt heads) make sure to use locktite and torque to 130 ftlbs
Install brake pads in abutment brakcet
Make sure to install the anti-rattle clip in the top of the caliper apply lube to the center rail of this clip where it contacts the pads
Install the caliper, torque slide pin bolts to 23 ftlbs (if you have new bolts they will come with loctite installed, if not make sure to apply some)
Reinstall the brake hose, use new copper crush sealing washers, torque banjo bolt to 33 ftlbs (if you haven't done so yet this is a good time to switch over to braided stainless hoses)
The rest is pretty normal straight forward stuff
Make sure to bleed the system (not ready to do this yet I've still have a DRM bais spring and a line lock to install).
After bleeding and before reinstalling the wheels start the vehicle (so as to get full brake assist and pressure) have someone, if available, apply and hold the pedal and carefully inspect for any leaks.
No leaks, reinstall wheels and tires
Lower from jack stands
Roadtest (being very careful to ensure brakes function properly, obviously) using the proper break-in/bedding procedure for your pads and rotors.
These pics were all taken while installing on the left side obviously the right side is a mirror image of doing the same thing.
Last edited by ultraviolet70; 06-26-2011 at 02:11 PM.
 06-26-2011, 02:05 PM
#2
Melting Slicks


Nice job of documenting. Where did you get the adapters? Do C4 brake hoses work with the C5 calipers? And last question, how much difference is there in braking?
06-26-2011, 02:10 PM
#3
Drifting
Thread Starter
Member Since: Dec 2005
Location: High Ridge Missouri
Posts: 1,313
Likes: 0
Received 2 Likes
on
2 Posts
Various sources for the adapters, actually got mine off E-bay, but I know a member on here sells them and I believe Exotic Muscle sells them and VBandP sells them as well.
Yes the hoses and banjo bolts work.
Haven't driven yet not bled still have other items to do
"Make sure to bleed the system (not ready to do this yet I've still have a DRM bais spring and a line lock to install)."
Yes the hoses and banjo bolts work.
Haven't driven yet not bled still have other items to do
"Make sure to bleed the system (not ready to do this yet I've still have a DRM bais spring and a line lock to install)."
Last edited by ultraviolet70; 06-26-2011 at 04:40 PM.
06-26-2011, 03:04 PM
#4
Melting Slicks

you bought the same adapters as I did as I see the instruction are the same crappy xerox'd copy. Good job on documentation and figuring out how to use the OE washer for the 40mm bolt, wasted an hour on that one! The job was worth it, smooth braking! Got the pads on rotors for mine from a supporting vendor on this site!
06-26-2011, 04:32 PM
#5
Drifting
Thread Starter
Member Since: Dec 2005
Location: High Ridge Missouri
Posts: 1,313
Likes: 0
Received 2 Likes
on
2 Posts
you bought the same adapters as I did as I see the instruction are the same crappy xerox'd copy. Good job on documentation and figuring out how to use the OE washer for the 40mm bolt, wasted an hour on that one! The job was worth it, smooth braking! Got the pads on rotors for mine from a supporting vendor on this site!
06-26-2011, 10:46 PM
#6
Burning Brakes

Bravo!! Im liken the NRA stickers too. I do safety wire at work and think it's functional and looks great. This looks like a good place to show off a little.


 06-27-2011, 10:26 PM
#8
Safety Car

Various sources for the adapters, actually got mine off E-bay, but I know a member on here sells them and I believe Exotic Muscle sells them and VBandP sells them as well.
Yes the hoses and banjo bolts work.
Haven't driven yet not bled still have other items to do
"Make sure to bleed the system (not ready to do this yet I've still have a DRM bais spring and a line lock to install)."
Yes the hoses and banjo bolts work.
Haven't driven yet not bled still have other items to do
"Make sure to bleed the system (not ready to do this yet I've still have a DRM bais spring and a line lock to install)."

Let us know how it stops and so forth.
06-28-2011, 12:06 AM
#9
Drifting
Thread Starter
Member Since: Dec 2005
Location: High Ridge Missouri
Posts: 1,313
Likes: 0
Received 2 Likes
on
2 Posts
I'm hoping weekend to have time to work on the line lock and DRM spring.
Then I've still got to get the ignition back together before it'll run.
The problem is the car always comes second to everything else and my everything else list seems to keep growing.
07-29-2011, 12:14 AM
#10
Pro

Various sources for the adapters, actually got mine off E-bay, but I know a member on here sells them and I believe Exotic Muscle sells them and VBandP sells them as well.
Yes the hoses and banjo bolts work.
Haven't driven yet not bled still have other items to do
"Make sure to bleed the system (not ready to do this yet I've still have a DRM bais spring and a line lock to install)."
Yes the hoses and banjo bolts work.
Haven't driven yet not bled still have other items to do
"Make sure to bleed the system (not ready to do this yet I've still have a DRM bais spring and a line lock to install)."
What e-bay vendor did you get them from? How much?
07-29-2011, 11:28 AM
#12
Drifting
Thread Starter
Member Since: Dec 2005
Location: High Ridge Missouri
Posts: 1,313
Likes: 0
Received 2 Likes
on
2 Posts
I'm out of town right now so I'm doing this on my phone. The only ones on eBay right now are from Exoticmuscle for almost $200 shipped and I know I didn't buy from them and I know I didn't pay near that much. I get back Monday and I'll go through my receipts and send you the vendor info, just because they don't have any listed on eBay right now doesn't mean you can't contact them and see if they are still making them.
I've been trying to source these brackets w/ very little luck. Exotic Muscle wants $180.00 for them but doesn't stock them. VB&P doesn't sell them separately (They only offer them in an overpriced kit) Jeffvette who used to sell a nickel plated set for $125.00 does not return my calls or e-mails.
What e-bay vendor did you get them from? How much?
What e-bay vendor did you get them from? How much?
08-02-2011, 05:30 PM
#13
Pro
I'm out of town right now so I'm doing this on my phone. The only ones on eBay right now are from Exoticmuscle for almost $200 shipped and I know I didn't buy from them and I know I didn't pay near that much. I get back Monday and I'll go through my receipts and send you the vendor info, just because they don't have any listed on eBay right now doesn't mean you can't contact them and see if they are still making them.
Thanks
08-02-2011, 07:34 PM
#14
Drifting
Thread Starter
Member Since: Dec 2005
Location: High Ridge Missouri
Posts: 1,313
Likes: 0
Received 2 Likes
on
2 Posts
The pieces were nice and were powdercoated and shipping was fast. Price has gone up some but they're still cheaper than E.M.
Hope this helps.
http://cgi.ebay.com/ebaymotors/88-96...Q5fAccessories