
DIY Paint Side skirts and front splitter
 06-27-2011, 12:14 AM
#1
Le Mans Master

Thread Starter
Materials needed
Dawn dish soap or degrease product
2 cans Rust-Oleum truck bed coating
3 cans Rust-Oleum Primer 2 in 1 FIller & Sandable
4 cans Rust-Oleum Univeral All-Surface Flat Black
150 Grit Sand Paper
400 Grit Wet sand paper
600 Grit Wet sand paper
scotch bright pads
(heavy duty, finishing pad, red scotch bright sponge)
Tack Cloth
Step 1: Wash the fiberglass down to remove wax from the mold using Dawn dish soap or degrease product.
Step 2:
I chose to coat the underside of the fiber glass side skirts and front splitter with truck bed coating. This gave the fiberglass a finished look and possibly increased the strength.
Fiber Glass unfinished back side

Fiber GLass Finished with Truck Bed Coating

Step 3: Scuff the Gel Coat with 150 grit sand paper

You may choose to bypass adding primer and simply scuff the gelcoat and proceed with painting.
Step 4: Add Primer


Step 5: Sanding
Use Scotch Bright pads to remove loose primer from pieces.
Use scotch bright sponge to assist with wet sanding
Wet area to be worked and gently sand using 400 then 600 grit wet/dry sand paper

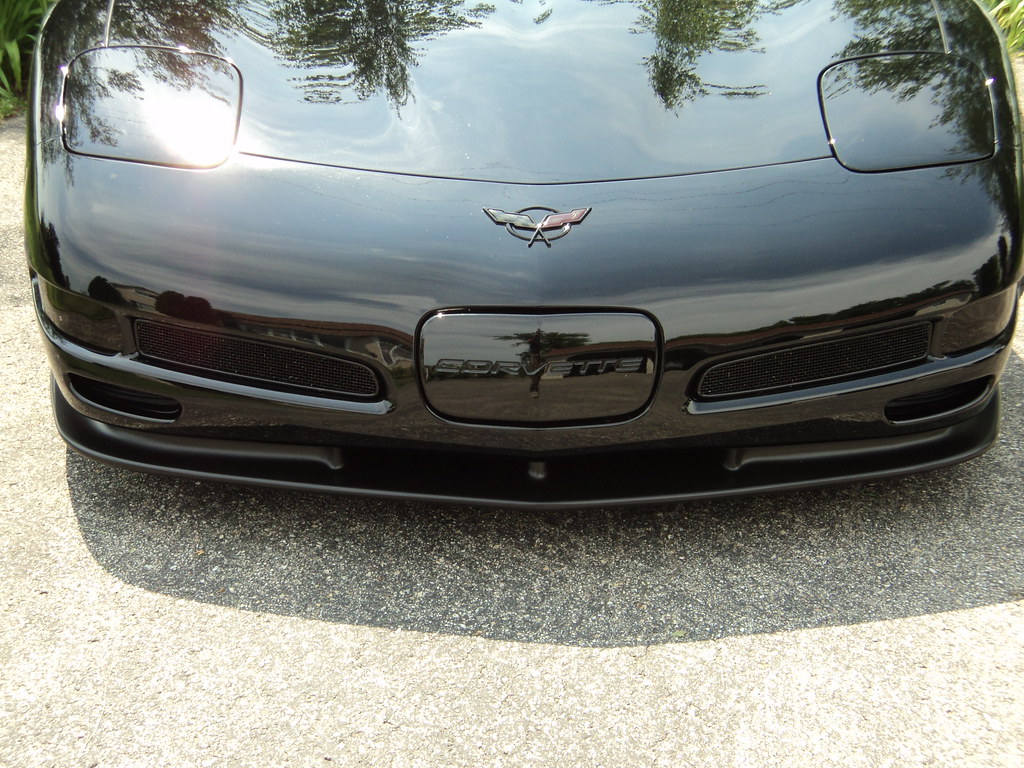
Step 6: Paint
Use Tack cloth to remove any particles from your surface before painting. You may find a static charge is present from sanding with the scotch bright pads. I used a dryer sheet to remove the static build up before painting.


Picture of painted side skirts next to gel coated front splitter


The pieces came with self tapping screws.
You will need to remove a screw at the rear and at the front of the underside of the vette.
I found that the screws are too short to go through the new material and keep the existing body panels in place.
The side skirts have indents showing where to drill the screws into the side of the lower body panel.
I chose not to drill into the side of the body panel and instead use 3M double sided tape along with drilling into the underside of the body/frame with self tapping screws.

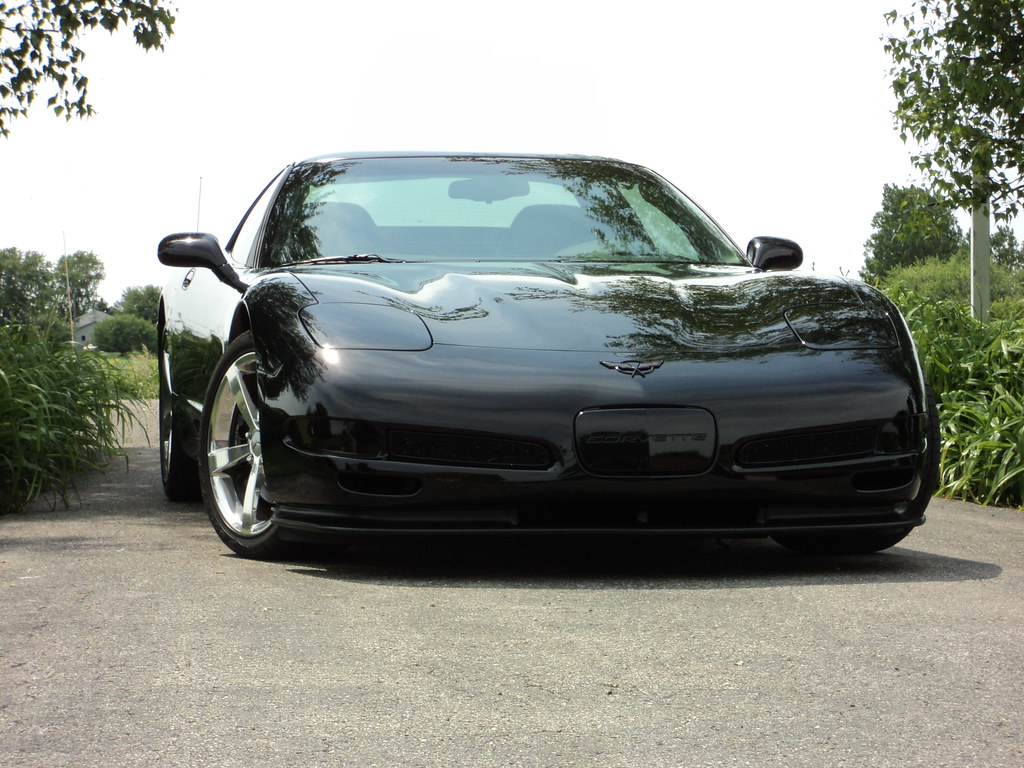
Before Install

After Install

Installed mini Spoiler

Install pics of the front splitter in the near future.
Dawn dish soap or degrease product
2 cans Rust-Oleum truck bed coating
3 cans Rust-Oleum Primer 2 in 1 FIller & Sandable
4 cans Rust-Oleum Univeral All-Surface Flat Black
150 Grit Sand Paper
400 Grit Wet sand paper
600 Grit Wet sand paper
scotch bright pads
(heavy duty, finishing pad, red scotch bright sponge)
Tack Cloth
Step 1: Wash the fiberglass down to remove wax from the mold using Dawn dish soap or degrease product.
Step 2:
I chose to coat the underside of the fiber glass side skirts and front splitter with truck bed coating. This gave the fiberglass a finished look and possibly increased the strength.
Fiber Glass unfinished back side
Fiber GLass Finished with Truck Bed Coating
Step 3: Scuff the Gel Coat with 150 grit sand paper
You may choose to bypass adding primer and simply scuff the gelcoat and proceed with painting.
Step 4: Add Primer
Step 5: Sanding
Use Scotch Bright pads to remove loose primer from pieces.
Use scotch bright sponge to assist with wet sanding
Wet area to be worked and gently sand using 400 then 600 grit wet/dry sand paper
Step 6: Paint
Use Tack cloth to remove any particles from your surface before painting. You may find a static charge is present from sanding with the scotch bright pads. I used a dryer sheet to remove the static build up before painting.
Picture of painted side skirts next to gel coated front splitter
The pieces came with self tapping screws.
You will need to remove a screw at the rear and at the front of the underside of the vette.
I found that the screws are too short to go through the new material and keep the existing body panels in place.
The side skirts have indents showing where to drill the screws into the side of the lower body panel.
I chose not to drill into the side of the body panel and instead use 3M double sided tape along with drilling into the underside of the body/frame with self tapping screws.
Before Install
After Install
Installed mini Spoiler
Install pics of the front splitter in the near future.
Last edited by Got uid0; 06-27-2011 at 12:22 AM.


 06-27-2011, 07:31 AM
#5
Melting Slicks

I like it. However, one suggestion. If you are going for the flat look, I wouldve sprayed it with some flat clear for protection.
Side note....congrats on tackling the job yourself
Side note....congrats on tackling the job yourself


 06-27-2011, 09:12 AM
#8
Team Owner

Member Since: Mar 2004
Location: Oklahoma City OK
Posts: 58,259
Received 1,675 Likes
on
1,298 Posts
C6 of Year Finalist (appearance mods) 2019

Good job!
06-27-2011, 11:07 AM
#9
Le Mans Master
Thread Starter
Purchased from bodykitman before JW carried it, so if you are interested hit up JW one of the better forum vendors!
Last edited by Got uid0; 06-27-2011 at 11:29 AM.
06-27-2011, 11:40 AM
#10
Tech Contributor
Member Since: Aug 1999
Location: Should this thoughtful, valuable contribution meet with no acknowledgement or 'thanks' this post----
Posts: 16,382
Received 399 Likes
on
257 Posts
nice...good idea not to use the molded in locations for the tapping screws....the odds of those holes hitting their mark are higher than winning the lottery!!


 [/quote]
06-27-2011, 10:28 PM
[/quote]
06-27-2011, 10:28 PM
#13
Melting Slicks
Man....that turned out really nice. I want to do that set up so bad but my car is in the weeds and my driveway would really love that front piece Turned out great man
Turned out great man
 06-29-2011, 02:45 PM
#17
Administrator


Member Since: Mar 2001
Location: In a parallel universe. Currently own 2014 Stingray Coupe.
Posts: 343,010
Received 19,303 Likes
on
13,975 Posts
C7 of the Year - Modified Finalist 2021
MO Events Coordinator
St. Jude Co-Organizer
St. Jude Donor '03-'04-'05-'06-'07-'08-'09-'10-'11-'12-'13-'14-'15-'16-'17-'18-'19-
'20-'21-'22-'23-'24
NCM Sinkhole Donor
CI 5, 8 & 11 Veteran

You did a great job and the new pieces look fantastic on the car.

