
Yonaka Racing Seats Installed Pics and Installation Process
 02-11-2011, 05:16 AM
#1
Instructor

Thread Starter
Member Since: Sep 2008
Location: San Francisco CA
Posts: 143
Likes: 0
Received 0 Likes
on
0 Posts
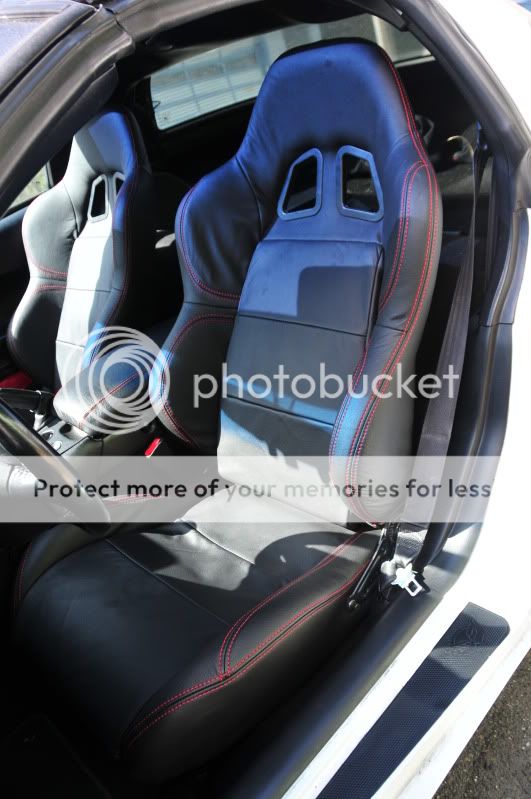
The following will just be sort of a visual DIY guide or just helpful visuals for the installation process of the Yonaka Racing Seats for the C5 Corvette. I have included some notes in the photos, so hopefully that helps. This will serve as a reference for those planning or thinking of replacing your seats.
See them in person! - I live in the San Francisco area, and basically anyone that would like to see how these are in the car in person and even test them out by sitting in them is welcome to. The final fitment and set up in the car are according to the photos shown below, so any other variations for installation will provide different space of course. Just email me instead of a PM: frank.ymlin@gmail.com.
Please excuse my elementary welding neatness, I have been self teaching and have not had too much practice.
I have had these installed for over 2 years now and they are still in excellent shape. There has not been any tears or rips and everything is still snug. I have the REAL LEATHER version of these seats.
NOTE: There are others who have installed these in a slightly different process, including cutting the interior trim pillar to relocate the seat belt retractor for more space to mount further back, and also another with a thinner mounting bracket that does not include the use of the stock feet brackets.
I have considered the thinner brackets after my fabrication because the end result is that it does sit about 3-4 inches higher than the stock seats, which would be uncomfortable for taller people. Also, for those taller than 5'8" or 5'9", I would recommend relocating the seat belt retractor in order to install these further back to get more leg room.
As for me, I am 5'7" and actually sit PERFECTLY comfortable in the seats with slightly improved front and side visibility due to the slightly higher seating.
Last edited by linf94112; 03-18-2011 at 03:57 AM.


 02-11-2011, 05:29 AM
#5
Instructor
Thread Starter
Member Since: Sep 2008
Location: San Francisco CA
Posts: 143
Likes: 0
Received 0 Likes
on
0 Posts
Now I actually have cushion for my butt.
02-11-2011, 11:47 AM
#6
Melting Slicks


I ordered these from Dennis will be installing once they arrive next week, where did you get this piece of metal from.. I see the sku on it so I assume a retailer..


 02-11-2011, 05:39 PM
#8
Melting Slicks
grind them off, thats all I did... worked like a charm... I just cant find the metal he used for the frame support I checked locally at home depot and lows
 02-14-2011, 05:36 AM
#11
Instructor
Thread Starter
Member Since: Sep 2008
Location: San Francisco CA
Posts: 143
Likes: 0
Received 0 Likes
on
0 Posts
As for the metal, I did in fact get it at Home Depot. They have it with the area they usually keep the threaded metal rods, angle steel and aluminum metal pieces, flat metal, and such.
You may even have to go to more than one Home Depot and even try a Home Depot Pro location just to check in case they do not have enough in stock since these things dont get reordered so quickly.
Hope that helps.
02-14-2011, 05:41 AM
#12
Instructor
Thread Starter
Member Since: Sep 2008
Location: San Francisco CA
Posts: 143
Likes: 0
Received 0 Likes
on
0 Posts
As for seat height, you should try to have the factory metal feet placed on top of the C-Channel metal and any other height reduction you see along the way for the seats to get you some more space.
The other option is using flat metal and none of the factory metal feet. Drill a hole for the rear mount location, get some 90 degree bends in front to mimic the original metal feet in front and then bolt down. This may give u an extra 2 inches of head and leg space.
Frank.
02-14-2011, 07:00 AM
#13
Administrator

Member Since: Mar 2001
Location: In a parallel universe. Currently own 2014 Stingray Coupe.
Posts: 342,705
Received 19,226 Likes
on
13,933 Posts
C7 of the Year - Modified Finalist 2021
MO Events Coordinator
St. Jude Co-Organizer
St. Jude Donor '03-'04-'05-'06-'07-'08-'09-'10-'11-'12-'13-'14-'15-'16-'17-'18-'19-
'20-'21-'22-'23-'24
NCM Sinkhole Donor
CI 5, 8 & 11 Veteran


Nice job modifying them to work in your car. They look so much better than the stock seats.
02-18-2011, 01:36 PM
#14
Instructor

Member Since: Feb 2007
Posts: 142
Likes: 0
Received 0 Likes
on
0 Posts
my seats just came in and they look great. i got the white stitching and i cant be happier with them. i got them from Dennis w/ double din, and he's been a great help so far. i would definetly recommend using him. ill post up if i find anything diffrent in my install.
02-18-2011, 11:51 PM
#15
Melting Slicks
I ordered mine from him too they got here at 6pm and right now both brackets are made driver is a flat bracket with no riser but seats will not fit with out removing factory belts... I am installing harness bar to fix this, I also cut and tac welded seats for more room no biggie for me though
will post pictures as available
will post pictures as available
my seats just came in and they look great. i got the white stitching and i cant be happier with them. i got them from Dennis w/ double din, and he's been a great help so far. i would definetly recommend using him. ill post up if i find anything diffrent in my install.
02-19-2011, 07:04 PM
#16
Melting Slicks
passenger seat done, hardest part is marking holes on bracket for slider with the seat in the car... holes have to be 14 1/4" apart but too far one way or the other and seat won't match up... I used the factory brackets on passenger side and see what everyone means with it being taller, my head is inch or so from top, good thing my girlfriend is 5'6" 110 bc it fits her... she is not happy with wearing ''5 point but she will get used to It lol or walk''

 Very nice
 03-03-2011, 12:08 AM
#18
Melting Slicks

sorry it took so long to upload ONE CELL PHONE PICTURE.. but they are installed and I LOVE THEM!!! Will have better pictures tomorrow once I get out the EOS
 )
)