
How to fix / repair HVAC climate actuators
 01-30-2011, 02:04 PM
#1
Instructor

Thread Starter
After replacing my battery I started to have HVAC codes show up:
B0361 H
BO363 H
BO365 H
BO367 H
B0441 H C
B0446 H C
Some codes were marked H (history) but after resetting the codes they immediately come back.
Here are the symptoms I observed (These might help those who are trying to diagnose their problems):
At this point Bill Curlee has given me feedback and thinks the actuator has broken teeth. The other possible issue is that the actuator needs to be reindexed. Thankfully this is the corvette forum and there is a wealth of information. I used the following up to this point in order to gain visual access to the drivers side actuator. This link also has a great report on how to reindex the drivers side actuator which I use later on.
Removing and reindexing drivers side actuator through drivers side kickpanel:
http://forums.corvetteforum.com/c5-t...actuators.html
Since I had issues with both drivers and passengers actuators I would need to remove the dash (only way to get to the passenger side actuator) and it would prove essential when attempting to repair the actuators since you need easy repeated access.
Here is the link to remove the dash:
http://forums.corvetteforum.com/c5-t...d-install.html
And how to access the passenger side actuator:
http://forums.corvetteforum.com/1557915431-post68.html
Finally I remove the drivers and passengers actuators, open them up and see:
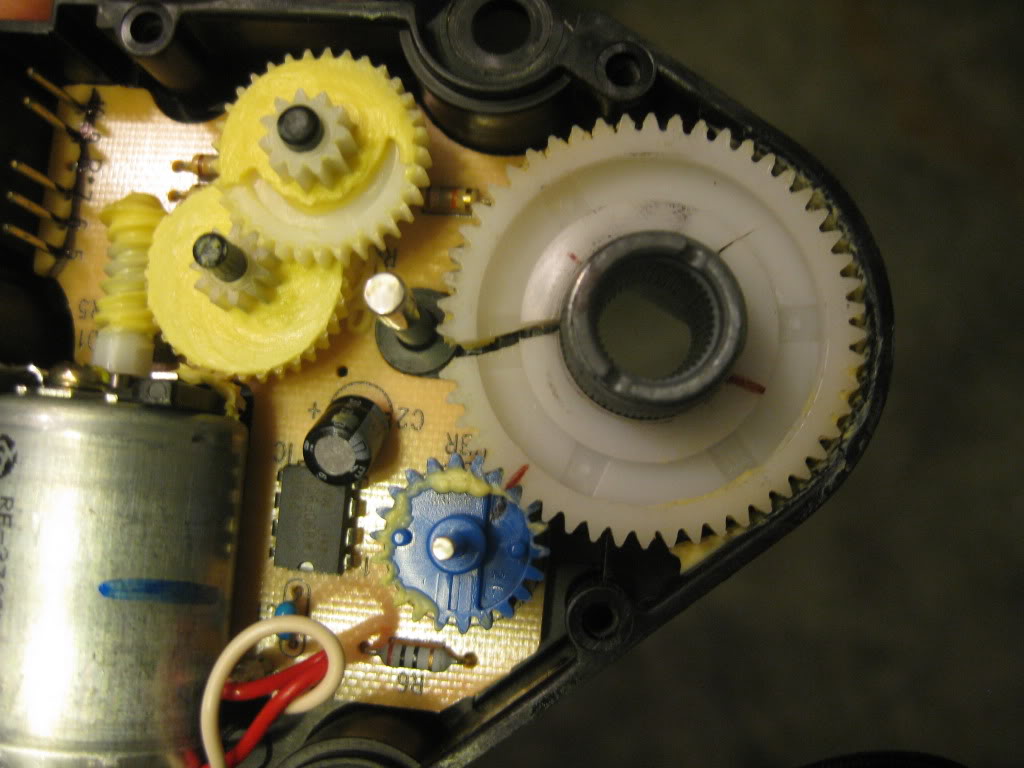
Both have a cracked drive gears. In fact they were broken in the exact same fashion – one crack split wide open and one smaller crack. At this point my car is in pieces and I need two new actuators ($100+ each).
I decided instead of buying and waiting for new actuators to arrive, to repair the cracked actuators. It appears they broke due to a manufacturing defect (clearly the hole in the middle of the plastic gear that was pressed onto the metal output shaft is too small of a diameter – by a significant amount – and therefore eventually cracked). It is possible that the new ones would have the same issue. Therefore, I found the best solution was to fix the broken gear with a little epoxy.
The first step is to mark the position of the blue gear where it contacts the drive gear. It is also important to mark the corresponding position on the metal shaft. I also found it necessary to mark the outside of the case since cleaning the plastic drive gear and output shaft prior to epoxy could remove the marks I made:
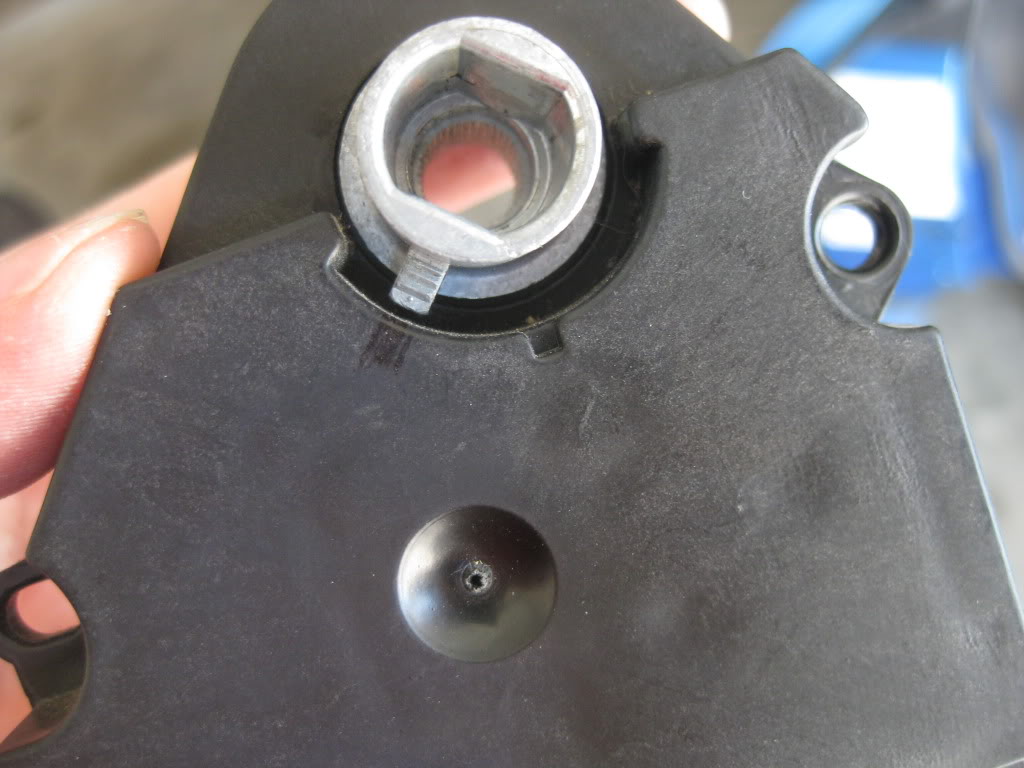
If you mess up the marks it isn’t a huge deal since you will have to reindex anyway, but it could help you reindex quicker.
After removing the driver gear the first step is to slide the plastic gear off of the metal output shaft. In order to increase the inner diameter I rolled some sandpaper onto a pen and then rolled the gear on my palm. This ensures that the inner diameter is uniformly sanded.
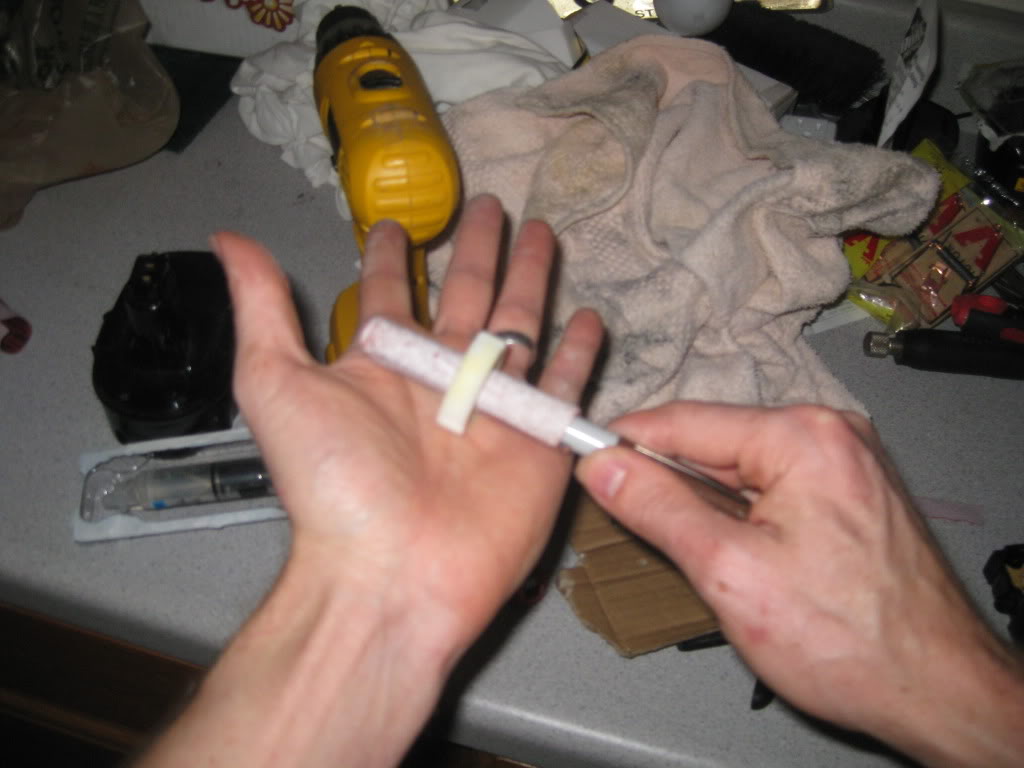
I used 100 grit sandpaper since it cuts pretty fast and keeps the surface rough which is important for epoxy adhesion. After several test fits, I got it down to a diameter that snugly fit over the metal output shaft and the large crack was completely closed.
I cleaned both the inner diameter and the metal shaft with brake cleaner (any non residue cleaner would work as well), and mixed up some 5 minute epoxy. I applied the epoxy to the metal shaft (and used a toothpick to stuff some into the crack of the white drive gear) and then slid the gear back on while splitting the crack slightly open to avoid rubbing the epoxy off the output shaft. A spring clamp was used to hold the crack shut and keep the gear tight on the output shaft:
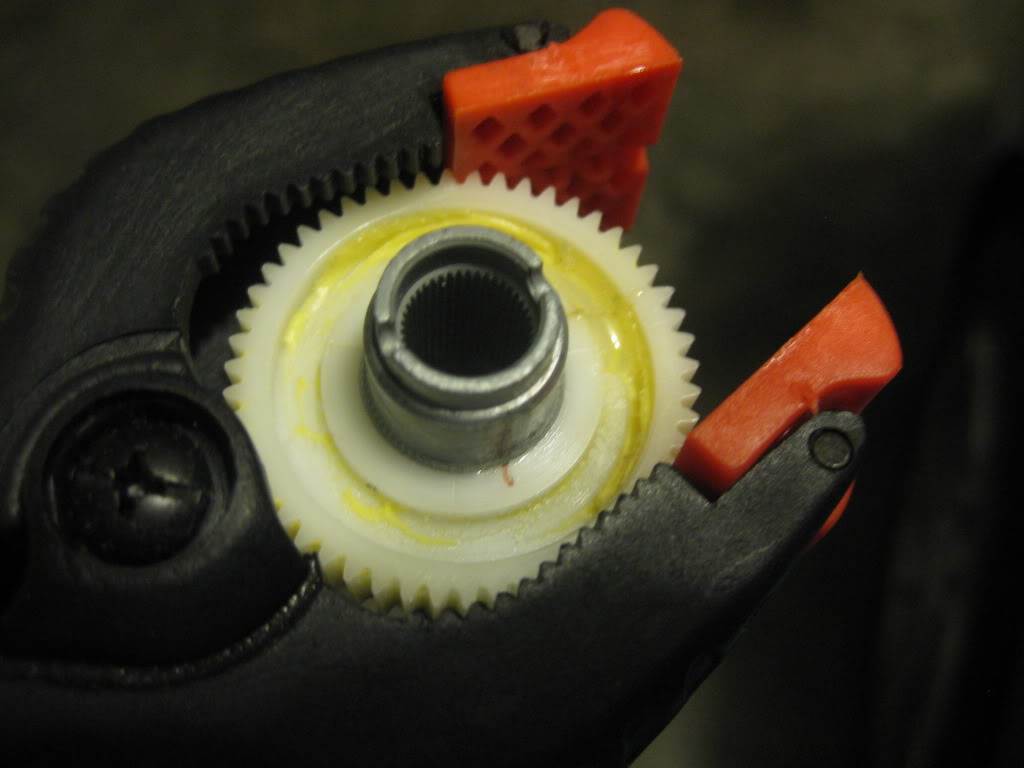
After letting the parts dry while I took a break, I put them back in the actuators and aligned them the best I could with the marks that I made. During the reassembly I also lightly coated the drive gear with some of the excess grease slung around inside the case. Don’t use too much or you might foul the sensor under the blue gear and have to clean it later:
http://forums.corvetteforum.com/c5-t...-indexing.html
Now comes the tricky part. I put both back in the car (I only attached them with one screw since I needed to test them). Reconnected the battery, turned the key to ON, and .... nothing had changed. I still got the same exact 6 codes listed at the beginning of this saga. Not to worry though. In retrospect this isn’t unexpected since with the drive gear cracked, the blue (index) gear had moved several teeth out of position after a couple weeks of driving with this issue. So, I disconnected the battery, pulled the passenger side actuator (easier to get to) opened it up and pulled the drive gear and moved it two teeth relative to the blue gear. If you have questions about this look at the link given above that addresses how to reindex. Reassembled, and … I still got the same 6 codes. I repeated this process 4-5 times until all of the passenger side codes went away (3 driver side remained). Success! Now in order to make sure I wasn’t operating on the edge of an index issue, I advanced another 4-6 teeth or so till the codes came back and then I split the difference (went backwards 2-3 teeth) so I was right in the sweet spot. With the passenger blend door full closed (rotated counter clockwise) below is what my blue gear position looks like. The blend door I am referring to is the door that the actuator opens and closes. You can open and close this door by rotating the white shaft that the actuator attaches to when you install it in the car. This picture could very well be close to what you will need for the passenger side:
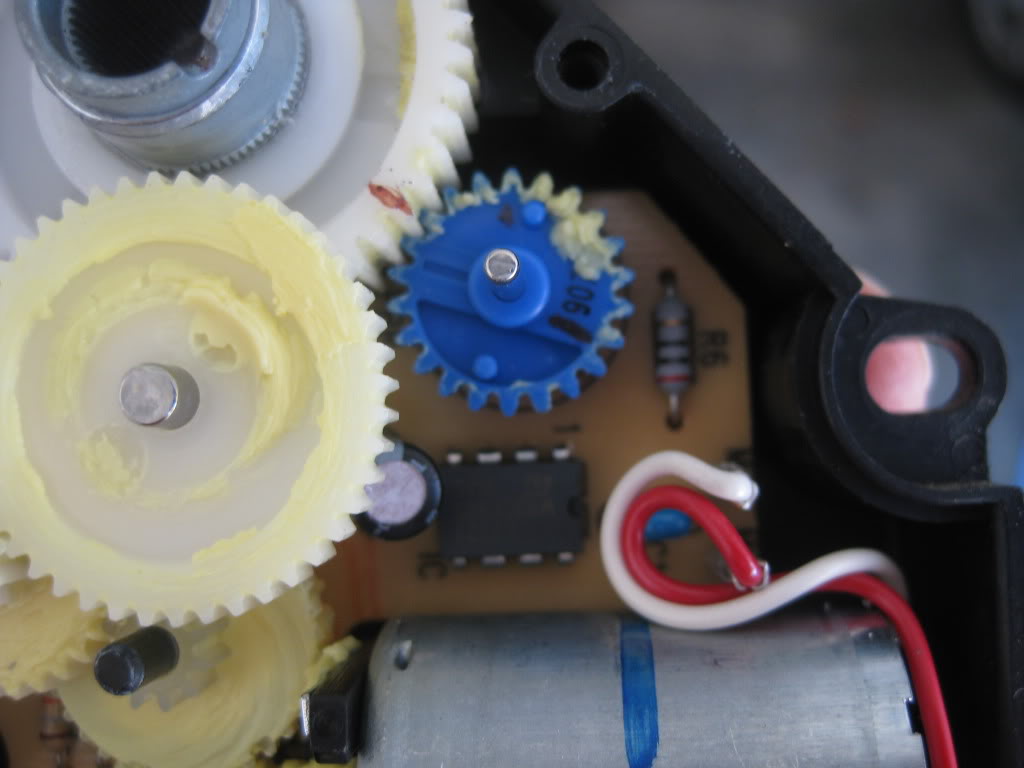
Note: Instead of the iterative approach above to align the blue gear, you can use an ohm meter (about 10 posts down in this thread: http://forums.corvetteforum.com/c5-t...post1577439590).
I repeated the same iterative process for the drivers side and after another 4-5 iterations I had no codes at all for the HVAC. After finding the sweet spot just as I did with the drivers side, here is the final tooth position for the blue gear (with the blend door closed – clockwise since this is the drivers side):
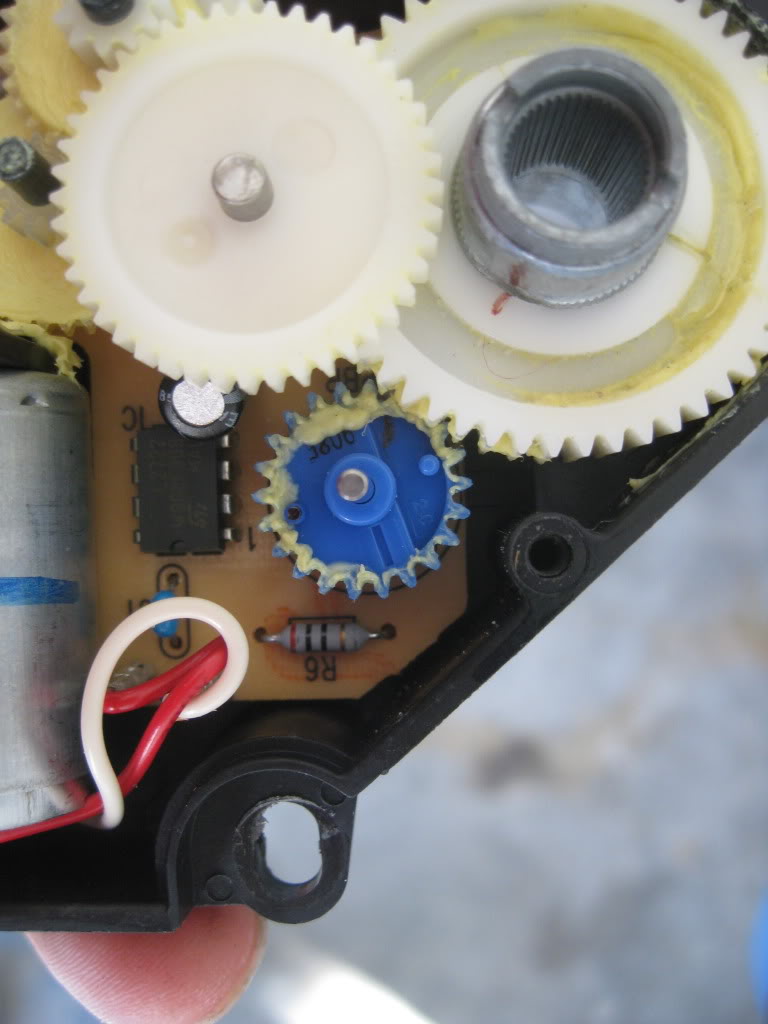
Hope this helps someone. Reindexing the blue gear relative to the drive gear takes some patience - at least in my case since mine was so far off - but eventually the codes did go away.
I would like to thank those who contributed to the other great write ups that helped me access and diagnose my (previously) broken actuators.
B0361 H
BO363 H
BO365 H
BO367 H
B0441 H C
B0446 H C
Some codes were marked H (history) but after resetting the codes they immediately come back.
Here are the symptoms I observed (These might help those who are trying to diagnose their problems):
- After resetting the codes both the passenger and drivers side would default to full hot. The passenger side is unresponsive to any input on the temperature ****. The drivers side is also unresponsive to input on the temperature **** and stays full hot - until I get down to 60 then it switches to full cold and if I increase the temperature setting back up it stays full cold. Meanwhile the passenger side is still full hot.
- As I decrease the temperature setting on the drivers side I can hear noises inside the dash - a plasticy clicking sound, even though the temperature remains the same coming out of the vents. The mode settings all work fine - I can select between upper, lower, defrost without issue – so I assume it is not an issue with the vacuum connection. After removing the drivers kickpanel I can just see the output shaft from the actuator. I put the key in and turn to ON. The fan is on and set to the lowest setting. I clear the HVAC codes and I observe the following:
- First the actuator rotates clockwise roughly 90 degrees at a pretty fast rate - takes ~5 sec. It pauses breifly and then starts to step back counter clockwise rotating ~45 degrees in short bursts. This takes about 12 sec. Lastly it finishes the last 45 degrees counter clockwise at the same speed as when it moved clockwise. After all of this the same 6 HVAC codes have returned.
At this point Bill Curlee has given me feedback and thinks the actuator has broken teeth. The other possible issue is that the actuator needs to be reindexed. Thankfully this is the corvette forum and there is a wealth of information. I used the following up to this point in order to gain visual access to the drivers side actuator. This link also has a great report on how to reindex the drivers side actuator which I use later on.
Removing and reindexing drivers side actuator through drivers side kickpanel:
http://forums.corvetteforum.com/c5-t...actuators.html
Since I had issues with both drivers and passengers actuators I would need to remove the dash (only way to get to the passenger side actuator) and it would prove essential when attempting to repair the actuators since you need easy repeated access.
Here is the link to remove the dash:
http://forums.corvetteforum.com/c5-t...d-install.html
And how to access the passenger side actuator:
http://forums.corvetteforum.com/1557915431-post68.html
Finally I remove the drivers and passengers actuators, open them up and see:
Both have a cracked drive gears. In fact they were broken in the exact same fashion – one crack split wide open and one smaller crack. At this point my car is in pieces and I need two new actuators ($100+ each).
I decided instead of buying and waiting for new actuators to arrive, to repair the cracked actuators. It appears they broke due to a manufacturing defect (clearly the hole in the middle of the plastic gear that was pressed onto the metal output shaft is too small of a diameter – by a significant amount – and therefore eventually cracked). It is possible that the new ones would have the same issue. Therefore, I found the best solution was to fix the broken gear with a little epoxy.
The first step is to mark the position of the blue gear where it contacts the drive gear. It is also important to mark the corresponding position on the metal shaft. I also found it necessary to mark the outside of the case since cleaning the plastic drive gear and output shaft prior to epoxy could remove the marks I made:
If you mess up the marks it isn’t a huge deal since you will have to reindex anyway, but it could help you reindex quicker.
After removing the driver gear the first step is to slide the plastic gear off of the metal output shaft. In order to increase the inner diameter I rolled some sandpaper onto a pen and then rolled the gear on my palm. This ensures that the inner diameter is uniformly sanded.
I used 100 grit sandpaper since it cuts pretty fast and keeps the surface rough which is important for epoxy adhesion. After several test fits, I got it down to a diameter that snugly fit over the metal output shaft and the large crack was completely closed.
I cleaned both the inner diameter and the metal shaft with brake cleaner (any non residue cleaner would work as well), and mixed up some 5 minute epoxy. I applied the epoxy to the metal shaft (and used a toothpick to stuff some into the crack of the white drive gear) and then slid the gear back on while splitting the crack slightly open to avoid rubbing the epoxy off the output shaft. A spring clamp was used to hold the crack shut and keep the gear tight on the output shaft:
After letting the parts dry while I took a break, I put them back in the actuators and aligned them the best I could with the marks that I made. During the reassembly I also lightly coated the drive gear with some of the excess grease slung around inside the case. Don’t use too much or you might foul the sensor under the blue gear and have to clean it later:
http://forums.corvetteforum.com/c5-t...-indexing.html
Now comes the tricky part. I put both back in the car (I only attached them with one screw since I needed to test them). Reconnected the battery, turned the key to ON, and .... nothing had changed. I still got the same exact 6 codes listed at the beginning of this saga. Not to worry though. In retrospect this isn’t unexpected since with the drive gear cracked, the blue (index) gear had moved several teeth out of position after a couple weeks of driving with this issue. So, I disconnected the battery, pulled the passenger side actuator (easier to get to) opened it up and pulled the drive gear and moved it two teeth relative to the blue gear. If you have questions about this look at the link given above that addresses how to reindex. Reassembled, and … I still got the same 6 codes. I repeated this process 4-5 times until all of the passenger side codes went away (3 driver side remained). Success! Now in order to make sure I wasn’t operating on the edge of an index issue, I advanced another 4-6 teeth or so till the codes came back and then I split the difference (went backwards 2-3 teeth) so I was right in the sweet spot. With the passenger blend door full closed (rotated counter clockwise) below is what my blue gear position looks like. The blend door I am referring to is the door that the actuator opens and closes. You can open and close this door by rotating the white shaft that the actuator attaches to when you install it in the car. This picture could very well be close to what you will need for the passenger side:
Note: Instead of the iterative approach above to align the blue gear, you can use an ohm meter (about 10 posts down in this thread: http://forums.corvetteforum.com/c5-t...post1577439590).
I repeated the same iterative process for the drivers side and after another 4-5 iterations I had no codes at all for the HVAC. After finding the sweet spot just as I did with the drivers side, here is the final tooth position for the blue gear (with the blend door closed – clockwise since this is the drivers side):
Hope this helps someone. Reindexing the blue gear relative to the drive gear takes some patience - at least in my case since mine was so far off - but eventually the codes did go away.
I would like to thank those who contributed to the other great write ups that helped me access and diagnose my (previously) broken actuators.
Last edited by cjcvette; 04-25-2011 at 02:25 PM.
 01-30-2011, 05:42 PM
#2
Tech Contributor


Member Since: Dec 1999
Location: Anthony TX
Posts: 32,736
Received 2,180 Likes
on
1,583 Posts
CI 6,7,8,9,11 Vet
St. Jude Donor '08

Fantastic post and a fantastic job. I am going to put this in my "Post that must be saved" file for sure!!
Great job!
Great job!
01-30-2011, 08:20 PM
#3
Melting Slicks


 Saving this thread for future use in case I end up with this problem. Thanks for taking the time to post this.
  01-30-2011, 09:41 PM
#4
Instructor
Member Since: Dec 2007
Location: Orlando Florida
Posts: 165
Likes: 0
Received 0 Likes
on
0 Posts
With the actuator plugged in but not installed, i can adjust the hvac controls and the motor does not move. Im guessing indexing wont solve this problem and that either the motor or the circuitry is dead correct?


 02-03-2011, 09:57 PM
#8
Instructor
Thread Starter
02-14-2011, 07:15 PM
#11
Race Director


Excellent info for those who are fighting these nagging actuator issues. I'm updating my thread from several years ago with your link. I'm sure others will find it useful. Here's hoping I don't have to start a similar thread on my C6 in the C6 forums! 
04-16-2011, 01:01 PM
#13
Burning Brakes

Great post
copied it to my "how to" folder
following is not exactly on subject but may be related
don't know if the following applies to corvettes, but on my 2004 Silverado I changed the battery and upon starting the truck had heat and no A/C
talked to dealer service dept and they asked if I had turned the HVAC system to OFF before disconnecting the battery
I didn't and he said that caused the control module to lose memory and it had to be reset with their Tech 2 tool
$100 later it was good again
from now on I'll turn HVAC off in all GM cars when disconnecting the battery
The following users liked this post:
BRKLYN (06-30-2022)
04-16-2011, 04:29 PM
#14
Melting Slicks
Great post
copied it to my "how to" folder
following is not exactly on subject but may be related
don't know if the following applies to corvettes, but on my 2004 Silverado I changed the battery and upon starting the truck had heat and no A/C
talked to dealer service dept and they asked if I had turned the HVAC system to OFF before disconnecting the battery
I didn't and he said that caused the control module to lose memory and it had to be reset with their Tech 2 tool
$100 later it was good again
from now on I'll turn HVAC off in all GM cars when disconnecting the battery
copied it to my "how to" folder
following is not exactly on subject but may be related
don't know if the following applies to corvettes, but on my 2004 Silverado I changed the battery and upon starting the truck had heat and no A/C
talked to dealer service dept and they asked if I had turned the HVAC system to OFF before disconnecting the battery
I didn't and he said that caused the control module to lose memory and it had to be reset with their Tech 2 tool
$100 later it was good again
from now on I'll turn HVAC off in all GM cars when disconnecting the battery
The following users liked this post:
DARKKNIGHT (08-22-2021)
05-26-2011, 03:03 PM
#15
Advanced

Member Since: May 2006
Location: Dahlgren Virginia
Posts: 67
Likes: 0
Received 0 Likes
on
0 Posts
The codes B0365 and B0367 correspond to "right actuator feedback short to ground" and "right actuator feedback open." I'm surprised a broken gear would cause codes indicating electrical problems like this.
I have the same codes and if the ignition is on I can hear the actuator grinding and whimpering in there non-stop. I will be checking the gears and trying your fix before spending $300. I just don't understand why the broken gear would throw those codes.
I have the same codes and if the ignition is on I can hear the actuator grinding and whimpering in there non-stop. I will be checking the gears and trying your fix before spending $300. I just don't understand why the broken gear would throw those codes.
05-26-2011, 03:13 PM
#16
Tech Contributor
The codes B0365 and B0367 correspond to "right actuator feedback short to ground" and "right actuator feedback open." I'm surprised a broken gear would cause codes indicating electrical problems like this.
I have the same codes and if the ignition is on I can hear the actuator grinding and whimpering in there non-stop. I will be checking the gears and trying your fix before spending $300. I just don't understand why the broken gear would throw those codes.
I have the same codes and if the ignition is on I can hear the actuator grinding and whimpering in there non-stop. I will be checking the gears and trying your fix before spending $300. I just don't understand why the broken gear would throw those codes.
05-29-2011, 07:33 PM
#18
Advanced
Member Since: Aug 2009
Location: Central Coast Ca
Posts: 52
Likes: 0
Received 0 Likes
on
0 Posts

I pulled the passenger actuator appart expecting to see broken gears but found all to be like new so I disconnected the motor from the circuit board and connected it to a 9V battery and it worked fine. Next I tested the potentiometer 8,000 Ohms between pins 7 and 10 on the board and variabe resistance between 9 and 7 or 10 as expected. I put the driver side actuator on the passenger side and it worked so I pulled it apart and found it to be like new as well. I checked all the resistors, capacitors and the diode on the board and compared the values to the bad one and they were all the same. The only thing left is the IC OP Amp L2722 $1.33 from Newark or Digikey. I'll post when I get a new one installed, anyone else had this problem?
06-03-2011, 10:16 AM
#19
Advanced
Member Since: Aug 2009
Location: Central Coast Ca
Posts: 52
Likes: 0
Received 0 Likes
on
0 Posts
I replaced the Op Amp yesterday and now the actuator works, I guess just dissassembling and reassemlbing the unit could have fixed it but for $1.33 why not try it.
06-03-2011, 06:03 PM
#20
Instructor
Thread Starter