Replacing body mounts on a 69 vs. 77???
 01-19-2011, 06:18 PM
#1
Race Director

Thread Starter

I'm going to replace my rear body mounts this weekend if all goes will with lifting it one side at a time and loosening the old bolts which are being soaked in PB now.
I found this website that a fellow member did that I believe will be a tremendous help but I'm wondering what are the differences between my 69 that he had to do on his 77 that I don't have to worry about?
http://europeancorvette.com/html/bod...eplacement.htm
He talks about the front frame extension removal? Do I need to do that?
 01-19-2011, 06:34 PM
#2
I used that link as a general guide, but I did not remove the front frame extension when I did my '76. That looked like such a huge PITA with all those little inaccessible fasteners for the bumper cover. So what I did was to remove the 6 big, accessible bolts on both front frame extensions, and then just loosen the hidden 2 bolts with an impact. After doing that, I was able to tilt the body upwards from the rear using a jack on either side. Also I'm not sure if it makes a difference or not, but I did have my radiator and core support out at the time. The only problem I ran into with this method, is the whole body shifted forward by maybe 1/4" which may not seem like much, but it'll keep those bushings from lining up. So I put 2 very long bolts in both rocker channel alignment holes, and kept some rearward pressure on them as the jacks lowered. (good to have a helper or two with this part) It worked like a charm. And then to tighten those hidden bolts up again, I just wedged a big screwdriver in the pocket to hold the nut still.
[/USE MY METHOD AT YOUR OWN RISK]
Last edited by wcsinx; 01-19-2011 at 06:39 PM.
01-20-2011, 12:14 AM
#3
Advanced


Member Since: Jun 2010
Location: Carol Stream IL
Posts: 98
Likes: 0
Received 0 Likes
on
0 Posts
I would be really careful with this, the body is glued together and jacking up to much will break the seam and screw up the alignment of your door jams. I didn't touch the frame extension bolts because like wcsinx said it can screw up your body height. All I did to replace the body mounts was 1 loosen up all the body mounts 2 use some wide wood shoring (4x4 or what ever you can find) to take pressure off the body mounts with a jack 3 replace the bushing. I did have a few extra steps because the tabs on the frame corroded causing me to make some new plates to rivet on to the body tabs. Also measure the height of the car in multiple spots. You might find that an extra shim here or there will level the car out. The door jams are a good indicator of the body being out of alignment. It looks like the doors are saggin towards the rear of the car but the front of the car could below or the back might be high.
01-20-2011, 05:48 AM
#4
Race Director
Thread Starter
I would be really careful with this, the body is glued together and jacking up to much will break the seam and screw up the alignment of your door jams. I didn't touch the frame extension bolts because like wcsinx said it can screw up your body height. All I did to replace the body mounts was 1 loosen up all the body mounts 2 use some wide wood shoring (4x4 or what ever you can find) to take pressure off the body mounts with a jack 3 replace the bushing. I did have a few extra steps because the tabs on the frame corroded causing me to make some new plates to rivet on to the body tabs. Also measure the height of the car in multiple spots. You might find that an extra shim here or there will level the car out. The door jams are a good indicator of the body being out of alignment. It looks like the doors are saggin towards the rear of the car but the front of the car could below or the back might be high.
My rear body mounts are broken and all of my seat belt reinforcements need replacing.
I bought an entire new bolt, spacer, and shim kit for the mounts so i'll look into my door gaps and height as I'm sure there are areas that could use a bit more to straighten it out.
01-20-2011, 05:40 PM
#5
Race Director
Thread Starter
But I mean does my 69 even have frame extension bolts?
Do I have grounding points for wires in different places than the 77 that I should be worried about?
Do I have grounding points for wires in different places than the 77 that I should be worried about?
01-20-2011, 08:36 PM
#6
Oh doh, I misread you. Not sure if there's any differences in the frames, but of course you don't have bumper covers. That should make things a lot easier on you.
01-20-2011, 10:41 PM
#7
Advanced
Member Since: Jun 2010
Location: Carol Stream IL
Posts: 98
Likes: 0
Received 0 Likes
on
0 Posts
You wont be lifting hight enough to break any grounds, just high enough to slip the old bushings out and the new ones in.
What do you mean the rear mounts are broken? Like the bushing collapsed and the rubber sides flaked off? Or the mounting tabs rotted throught?
What do you mean the rear mounts are broken? Like the bushing collapsed and the rubber sides flaked off? Or the mounting tabs rotted throught?
01-21-2011, 09:27 AM
#8
Race Director
Thread Starter

 01-21-2011, 07:58 PM
#9
Race Director
Thread Starter
Okay. I started un bolting the mounts tonight and so far...not so good.
I started at the rear and the bolts are spinning but are not coming lose.
For #4 the inside nut isn't spinning, the bot is spinning but not coming out...
for #3 the bot is spinning but so is something in the frame
If nobody has any suggestions I'll most likely see about #2 and #1 tomorrow.
Then start lifting the body on the one side to put a little pressure on #3 and #4 to see if they then come lose.
01-21-2011, 11:27 PM
#10
Ugh ... not good. That means you broke the captive nuts' cages off the frame. You're now going to have to lift the body high enough to weld on new ones which means no shortcuts.
01-22-2011, 12:00 AM
#11
Heel & Toe
Member Since: Nov 2010
Posts: 23
Likes: 0
Received 0 Likes
on
0 Posts
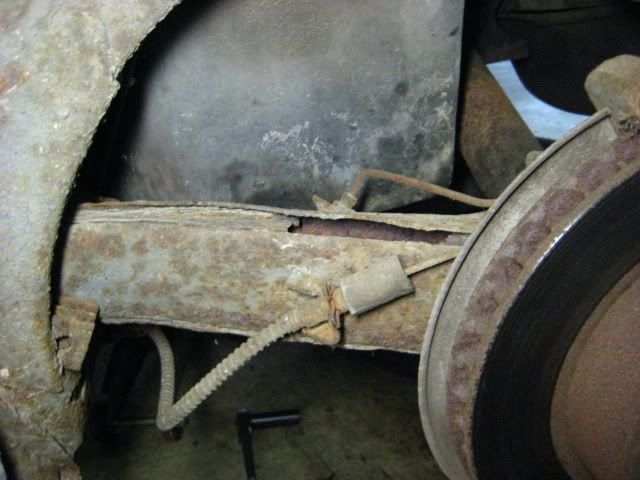
Looking at your pic you could have enough fiberglass rot behind the metal plate to prevent you from securely replacing and riveting the number 4. If that is the case let me know and I will tell you how to replace the cupped part of the fiberglass by forming it with a fiberglass kit.
01-22-2011, 08:13 AM
#12
Intermediate

Member Since: Feb 2005
Posts: 41
Likes: 0
Received 0 Likes
on
0 Posts

I had the same issue. In fact all of the mounts were shot. I decided the best way to fix everything and to make the car safe was to do a body off. I found this link that can be of some help. http://www.1-4u-computer-graphics.co...num=1140291082 Don't worry about the fiberglass damage under the #4 body mount reinforcment, fiberglass repair is not as hard sheetmetal repair. Some people use large washers on the inside of the mount, but since I had the body off, it was easy to get to the inside of the mount to replace the cage and nut.
In my case every mount was spinning free or rusted solid. I had to spend several hours grinding off bolt heads so I could then start to lift the body. If this is the route you will take, there are instructions on what needs to be done to lift the body. It's a pain in the a$$, but it makes life easy when it comes to preping and welding on the frame. My guess is that if #4 is that bad, the others may be in rough shape as well.
In my case every mount was spinning free or rusted solid. I had to spend several hours grinding off bolt heads so I could then start to lift the body. If this is the route you will take, there are instructions on what needs to be done to lift the body. It's a pain in the a$$, but it makes life easy when it comes to preping and welding on the frame. My guess is that if #4 is that bad, the others may be in rough shape as well.
01-22-2011, 09:52 AM
#13
Race Director
Thread Starter
I had the same issue. In fact all of the mounts were shot. I decided the best way to fix everything and to make the car safe was to do a body off. I found this link that can be of some help. http://www.1-4u-computer-graphics.co...num=1140291082 Don't worry about the fiberglass damage under the #4 body mount reinforcment, fiberglass repair is not as hard sheetmetal repair. Some people use large washers on the inside of the mount, but since I had the body off, it was easy to get to the inside of the mount to replace the cage and nut.
In my case every mount was spinning free or rusted solid. I had to spend several hours grinding off bolt heads so I could then start to lift the body. If this is the route you will take, there are instructions on what needs to be done to lift the body. It's a pain in the a$$, but it makes life easy when it comes to preping and welding on the frame. My guess is that if #4 is that bad, the others may be in rough shape as well.
In my case every mount was spinning free or rusted solid. I had to spend several hours grinding off bolt heads so I could then start to lift the body. If this is the route you will take, there are instructions on what needs to be done to lift the body. It's a pain in the a$$, but it makes life easy when it comes to preping and welding on the frame. My guess is that if #4 is that bad, the others may be in rough shape as well.
I have photos of #2 and #1 as well which I didn't think where all that bad.

So let me put a quick list together of what I now need for a body lift.
I don't have an engine lift...
I don't have a welder...
I'll have to build the body cart but i've seen diagrams somewhere and am good with wood so that should be easy.
what else is needed?
Can it be done in a normal garage or is height an issue?
01-22-2011, 01:26 PM
#14
Team Owner


Member Since: Jun 2000
Location: Southbound
Posts: 38,928
Likes: 0
Received 1,468 Likes
on
1,247 Posts
Cruise-In II Veteran

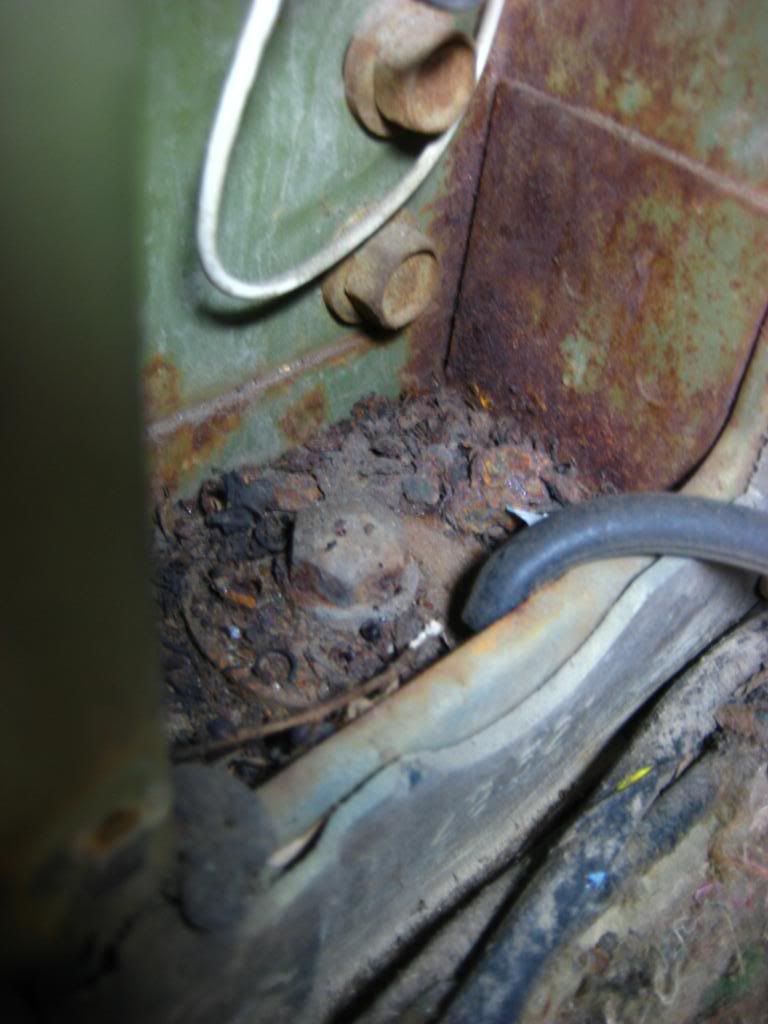
3 and 4 used caged nuts; sounds like yours are spinning.
The 69 AIM shows all the factory ground strap points and their locations. The 77 points may have been the same, but rely on the AIM.

The 69 AIM shows all the factory ground strap points and their locations. The 77 points may have been the same, but rely on the AIM.
01-22-2011, 01:46 PM
#15
Burning Brakes

Do you have any pictures of your #3 through the access hole?
Vacuum out your #2 and #3 and get a real good look in there. With the state of your #4 and #2 indications you maybe looking at birdcage issues. I know simply because I just got done fixing mine and had all the same indications as you. But you never know you could be better off than I was.
This can certainly be done in your shop, but as you posted you are going to need the tools and it sounds to me like your body mount cage nuts are gone so you will be lifting it to at least get access to weld on new cages and nuts.
Doing the actual repairs alone is not so bad. You can do the actual work alone but lifting the body alone and putting it on a dolly is a little more.
I've got pictures in my profile with the stuff I've had to repair and how I lifted the body etc. My body has been on the dolly for 2yrs now. The rockers and windshield header were the longest items I researched. The #4 body mounts and cages were an absolute pain in the but because the convertible has brackets that the decklid springs goes to... just awful to work on. 3/4 of my frame had to be replaced so that has set my project behind a little.
Last edited by mysixtynine; 01-22-2011 at 01:52 PM.
01-22-2011, 01:59 PM
#16
Race Director
Thread Starter
Do you have any pictures of your #3 through the access hole?
Vacuum out your #2 and #3 and get a real good look in there. With the state of your #4 and #2 indications you maybe looking at birdcage issues. I know simply because I just got done fixing mine and had all the same indications as you. But you never know you could be better off than I was.
This can certainly be done in your shop, but as you posted you are going to need the tools and it sounds to me like your body mount cage nuts are gone so you will be lifting it to at least get access to weld on new cages and nuts.
Doing the actual repairs alone is not so bad. You can do the actual work alone but lifting the body alone and putting it on a dolly is a little more.
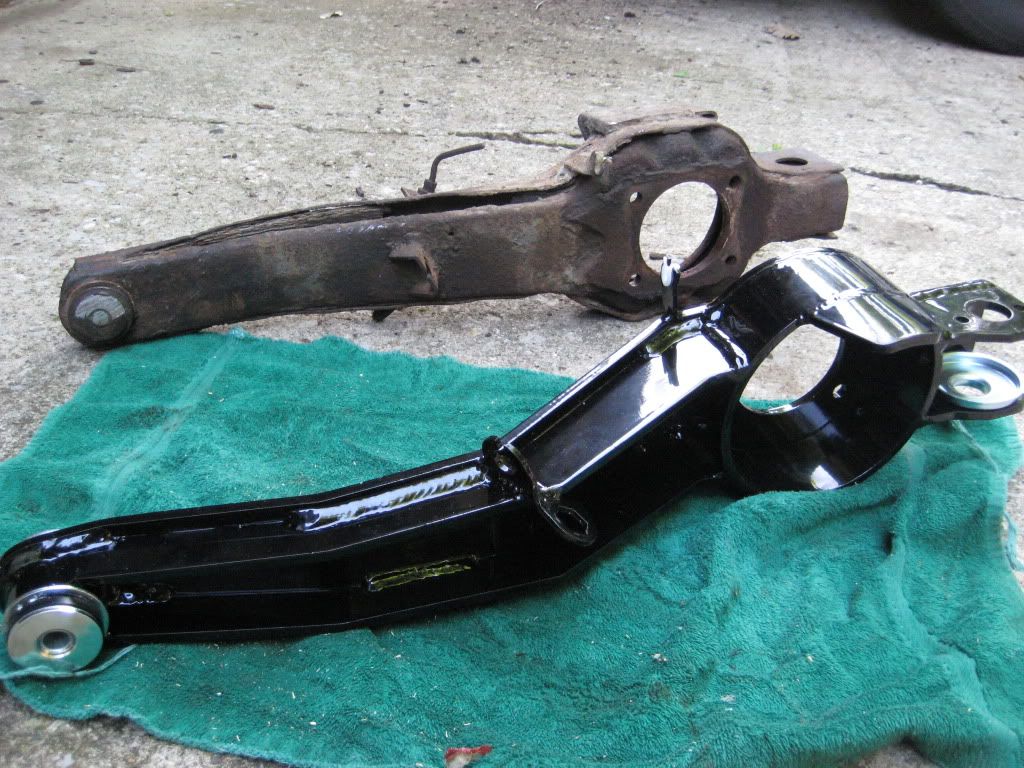
I'm sure I do have birdcage issue as my trailing arms where completely rusted when i went to replace them. It may not be incredibly bad yet but I may also be wrong.
To me I'm not worried about rust too much. Sure I don't know how to fix it yet but the purpose of this car was to teach me and if i didn't have the rust...I would never attempt to fix a lot of the things wrong with this car.
The only thing that is pissing me off is the fact that my car will not be drivable for a LONG time.
I just love driving it so most of my large projects i was planning on doing this winter. But with a new job and a move that threw a wrench is the works. Plus this whole new project unraveling it's looking like finishing by spring is out of the question for me... my work is farming so it's VERY seasonal so spring and fall I will have very little time to work on the car.