
How to replace a fuel pump
 11-22-2010, 05:50 PM
#1
Safety Car


Thread Starter


There has been some interest in what it takes to swap a fuel pump on a C6 so I thought I'd share what I've learned. I have done this job 4-5 times on manual transmission cars. The manual transmission has more room around the sides to work than the automatic. On automatic transmission cars the factory service procedures call for lowering the rear drivetrain. At least one forum member claims that it can be done on automatics without lowering the drivetrain. I can't vouch for the automatic but it is very do-able on the manual transmission cars.
Disclaimers; it isn't fun, it isn't easy, there are lots of ways to screw it up, several connections are made in the blind and you absolutely have to have patience or you'll never get it all done.
Second disclaimer; I am not a mechanic, I do not do this for a living but anything that smells of gasoline (or diesel) is my hobby. I've been involved in this hobby since I was a kid....decades ago! I do not have a lift in my garage and my collection of tools reads mostly "Craftsman". Everything I do is done on jack stands. Several of the images I used for this writeup came from other sources so don't blame me for the dirty parts and unkept work areas in some of those shots!
Time to allot for the task: I'd say plan on spending a full day on this one if it is your first time!
Here goes....
First a few fuel system basics;
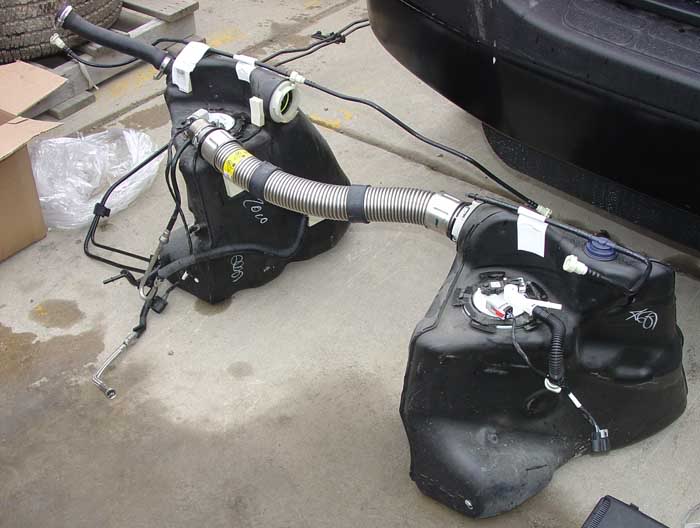
- The C6 has two tanks which hold about 9 gallons each
- When you fuel up, the driver's side tank fills first and when it is full the fuel spills over into the large crossover tube and then fills the passenger side tank
- The fuel in the passenger side tank is expended first by passing fuel over to the driver's side continuously via a pump driven purely off of fuel pressure from the electric fuel pump in the driver's side tank. It takes approximately 50psi or more for the fuel transfer function to work.
- When the passenger side tank is empty your gas gauge will read 1/2 full.
- There is a fuel level sending unit in each tank
- The last 1/2 of your fuel supply is in the driver's side tank.
- Your fuel pump uses the recirculating fuel to cool the pump. The lower you let your fuel level get the less cooling of the pump. Guys who continuously run down below a 1/4 or less can expect a shorter fuel pump life.
- For much more detail on how the fuel system functions in our cars go to the following link. Although the link tells you it is for a 2003-2004, the system components and functionality are identical to the C6...
http://www.corvetteactioncenter.com/...ystem-389.html
Disclaimers; it isn't fun, it isn't easy, there are lots of ways to screw it up, several connections are made in the blind and you absolutely have to have patience or you'll never get it all done.
Second disclaimer; I am not a mechanic, I do not do this for a living but anything that smells of gasoline (or diesel) is my hobby. I've been involved in this hobby since I was a kid....decades ago! I do not have a lift in my garage and my collection of tools reads mostly "Craftsman". Everything I do is done on jack stands. Several of the images I used for this writeup came from other sources so don't blame me for the dirty parts and unkept work areas in some of those shots!
Time to allot for the task: I'd say plan on spending a full day on this one if it is your first time!
Here goes....
First a few fuel system basics;
- The C6 has two tanks which hold about 9 gallons each
- When you fuel up, the driver's side tank fills first and when it is full the fuel spills over into the large crossover tube and then fills the passenger side tank
- The fuel in the passenger side tank is expended first by passing fuel over to the driver's side continuously via a pump driven purely off of fuel pressure from the electric fuel pump in the driver's side tank. It takes approximately 50psi or more for the fuel transfer function to work.
- When the passenger side tank is empty your gas gauge will read 1/2 full.
- There is a fuel level sending unit in each tank
- The last 1/2 of your fuel supply is in the driver's side tank.
- Your fuel pump uses the recirculating fuel to cool the pump. The lower you let your fuel level get the less cooling of the pump. Guys who continuously run down below a 1/4 or less can expect a shorter fuel pump life.
- For much more detail on how the fuel system functions in our cars go to the following link. Although the link tells you it is for a 2003-2004, the system components and functionality are identical to the C6...
http://www.corvetteactioncenter.com/...ystem-389.html
Last edited by Motorhead-47; 02-18-2015 at 09:23 PM.

The following 15 users liked this post by Motorhead-47:
bjmsam (05-18-2018),
Dieselfab67 (05-20-2016),
IamJon (08-25-2021),
Is2scooby (10-14-2015),
JMB (01-10-2019),
and 10 others liked this post.
11-22-2010, 06:20 PM
#2
Safety Car
Thread Starter
Post #2
- To get to the fuel pump the driver's side tank must be removed from the vehicle...there is absolutely no other way to get to it. It has to come out of the top of the tank and no, you can not cut a hole from above to access it.
- You really want to start the job with as close to an empty fuel system as reasonably possible. Absolutely do not work with more than 1/2 a tank because I know of no way to easily get the fuel out of the passenger side tank.
- You need about 24" of clearance under the car to get the tank out. A set of 6 ton or larger jack stands should get you there. I have a set of 12 tons that are total beasts that I use under the rear cradle.
- If you are pulling both tanks than you need to remove both rear wheels. You don't need to drop the passenger side tank to remove the pump in the driver's side though
- Assuming you have less than 1/2 tank the technique I use to remove the rest of the fuel in the driver's tank is to let the fuel pump do the work for me. Of course this doesn't work if you have a dead pump. In that case you are stuck with the siphon it out as best you can method. Each gallon weighs about 7lbs and works against you later in the effort so best to get as much out now as you can.
- If your current pump is still working what I do is disconnect the fuel line under the hood at the metal pipe at the firewall. I then slip a 5' piece of rubber 3/8" fuel line over that metal line and put the other end in a large gas can setting on the floor.
- To get the fuel pump to run continuously without the car running you will have to jumper across two terminals of the fuel pump relay under the hood in the fuse box. Once you've done this you simply turn the ignition to the start position (don't crank the motor over) and let the fuel pump run the driver's side tank dry for you. The pump relay is #55 in the fuse box.
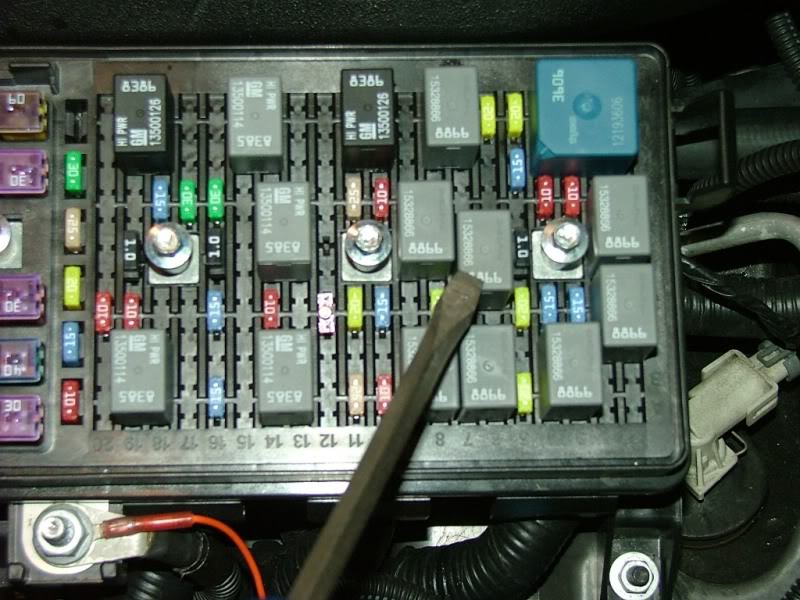
Jumper from here
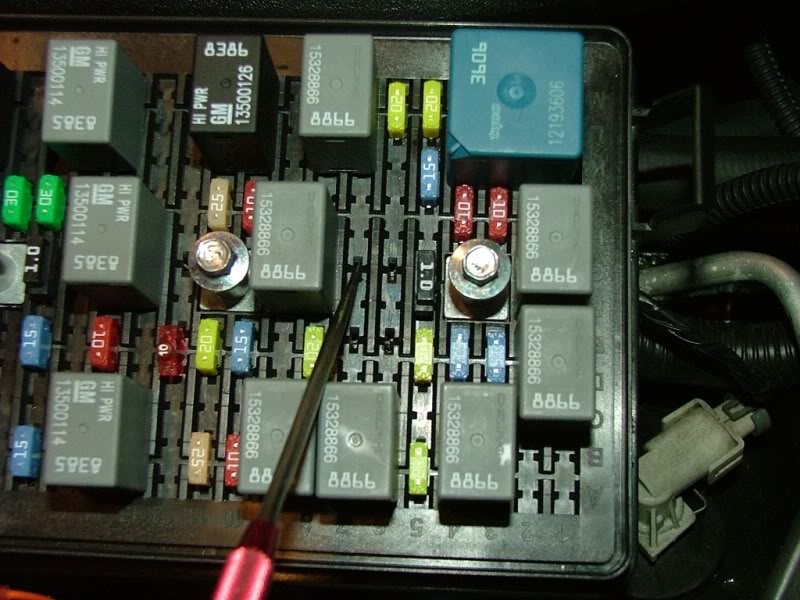
to diagonally across to the terminal here to get the pump to run continuously
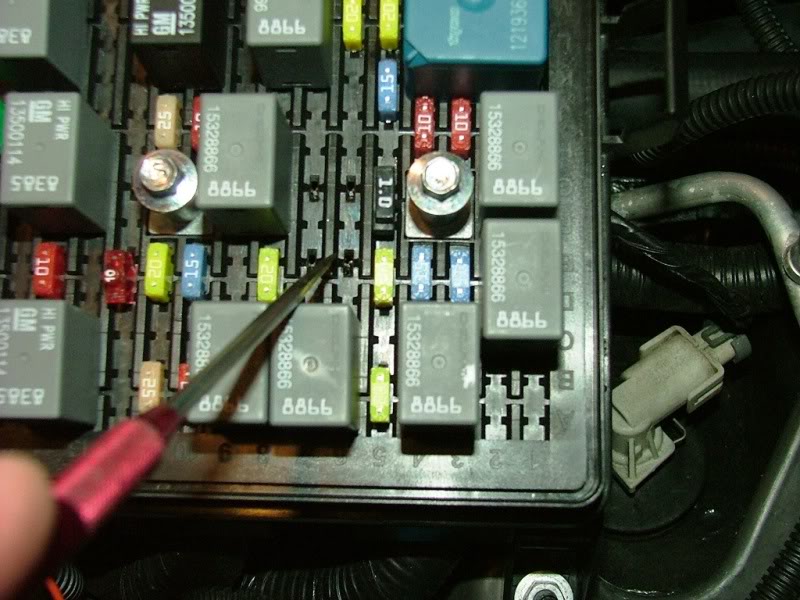
When the tank is dry shut the car off and DISCONNECT THE BATTERY NEGATIVE TERMINAL!
- Reconnect the fuel line to the fuel rail and store the gas can in a safe place.
- To get to the fuel pump the driver's side tank must be removed from the vehicle...there is absolutely no other way to get to it. It has to come out of the top of the tank and no, you can not cut a hole from above to access it.
- You really want to start the job with as close to an empty fuel system as reasonably possible. Absolutely do not work with more than 1/2 a tank because I know of no way to easily get the fuel out of the passenger side tank.
- You need about 24" of clearance under the car to get the tank out. A set of 6 ton or larger jack stands should get you there. I have a set of 12 tons that are total beasts that I use under the rear cradle.
- If you are pulling both tanks than you need to remove both rear wheels. You don't need to drop the passenger side tank to remove the pump in the driver's side though
- Assuming you have less than 1/2 tank the technique I use to remove the rest of the fuel in the driver's tank is to let the fuel pump do the work for me. Of course this doesn't work if you have a dead pump. In that case you are stuck with the siphon it out as best you can method. Each gallon weighs about 7lbs and works against you later in the effort so best to get as much out now as you can.
- If your current pump is still working what I do is disconnect the fuel line under the hood at the metal pipe at the firewall. I then slip a 5' piece of rubber 3/8" fuel line over that metal line and put the other end in a large gas can setting on the floor.
- To get the fuel pump to run continuously without the car running you will have to jumper across two terminals of the fuel pump relay under the hood in the fuse box. Once you've done this you simply turn the ignition to the start position (don't crank the motor over) and let the fuel pump run the driver's side tank dry for you. The pump relay is #55 in the fuse box.
Jumper from here
to diagonally across to the terminal here to get the pump to run continuously
When the tank is dry shut the car off and DISCONNECT THE BATTERY NEGATIVE TERMINAL!
- Reconnect the fuel line to the fuel rail and store the gas can in a safe place.
Last edited by Motorhead-47; 11-27-2010 at 07:29 PM.
The following users liked this post:
IamJon (08-25-2021)
11-22-2010, 07:07 PM
#3
Safety Car
Thread Starter
Post #3
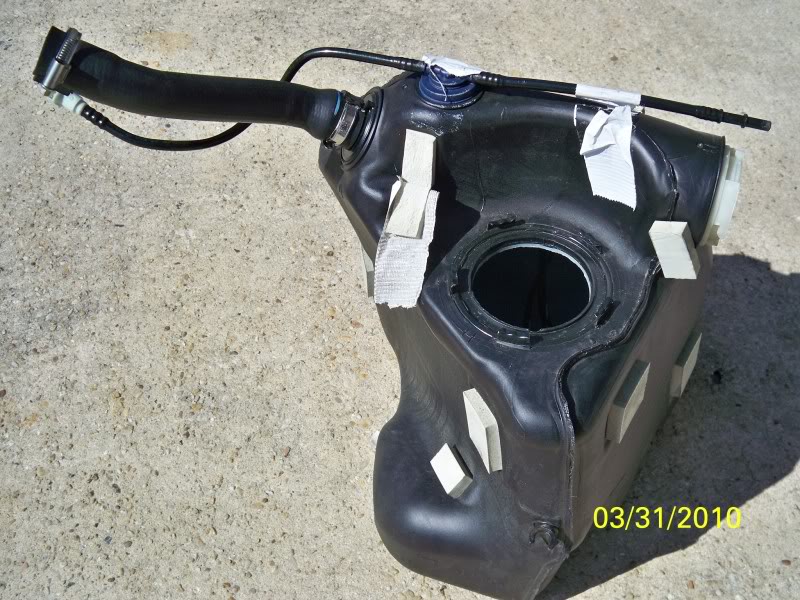
- Next remove the driver's side rear inner fender liner. Just a few fasteners that are pretty obvious. You don't have to completely remove the liner if you choose not to. You can remove the front half of the fasteners and then fold the flexible liner back and tuck it over the axle out of the way.
- At this point you need to disconnect the fuel filler hose and the vent return hose at the fuel filler neck. The filler hose coupler is a simple hose clamp and the vent line has a quick disconnect fitting that works by pushing in with your fingers on the wide spot of the tan/white connector. Sometimes it is easier to get those disconnected by first pressing the connector and then pushing in as if reconnecting the fitting and followed by pulling it apart. The in then out motion seems to release the tension on the connector
- In the same general area as the fuel filler you will see a 4 pin connector with larger gauge wires on the outer pins and smaller gauge wires on the inner pins. The outer wires are the positive and ground wires for the electric fuel pump and the two inner wires are for the fuel sending unit FYI. This connector should be attached to the chassis with a barbed connector. Unplug that connector. It's not obvious to the eye but the portion of that connector that is/was attached to the car was the chassis side of the harness. The unsecured/loose end of the connector is the wiring harness to the fuel pump itself.
- From below, the tank is held in position by the five bolts that hold the aluminum panel under the tank. These five bolts are the only physical/mechanical connection that secure the tank to the car. Go ahead and remove those five bolts. Not to worry though because your empty tank won't move yet! It is held up by the crossover tube.
- Next disconnect the fuel line that snakes it's way down the rear of the tank. This requires the same fuel line disconnect tool that you used under the hood to release the fuel line when you drained the tank. Some fuel will spill when you do this. Be prepared to catch a few ounces.
Last edited by Motorhead-47; 11-27-2010 at 07:42 PM.
The following 2 users liked this post by Motorhead-47:
IamJon (08-25-2021),
That_White_C6 (10-09-2018)
11-22-2010, 07:23 PM
#4
Safety Car
Thread Starter
Post #4
Now the fun begins
- You need to unlatch the crossover tube. To do this you will be working in the blind. Study the following images to understand what the connector looks like and how it latches.
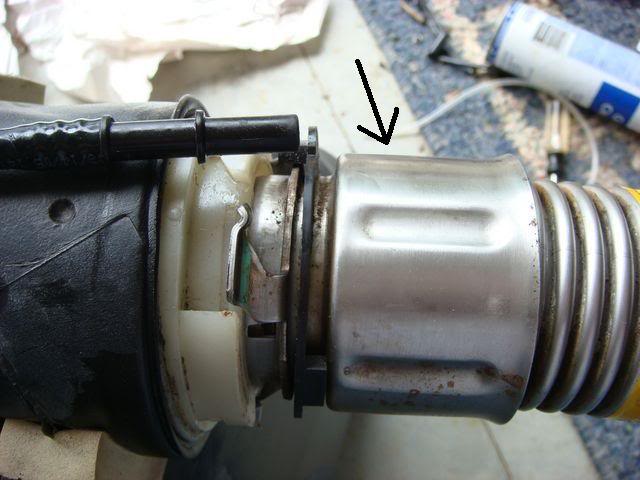
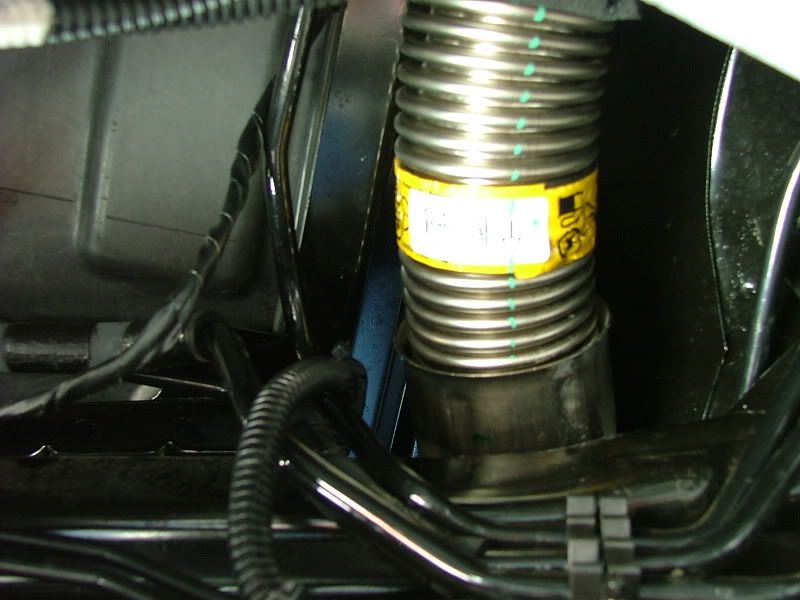
Looking up from below this is what you will see. This is the collar you will turn once you have unlatched the locking ring of the fastener
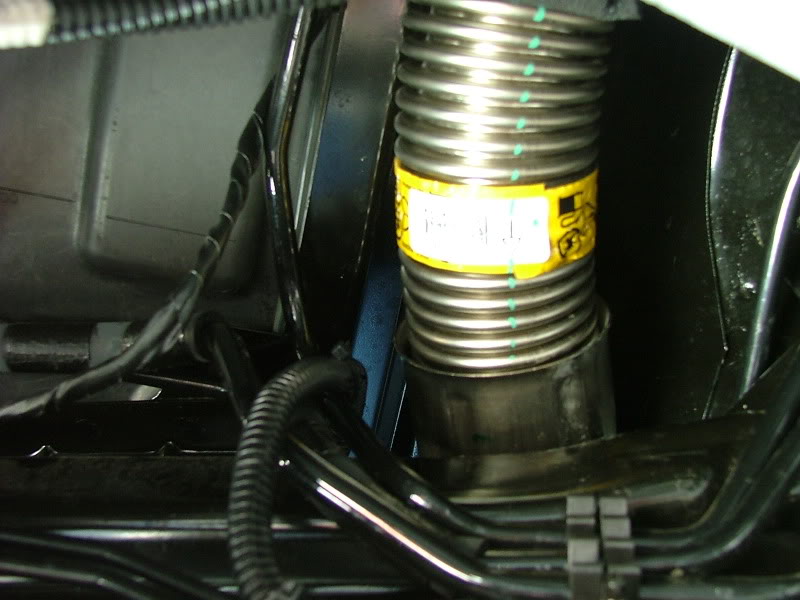
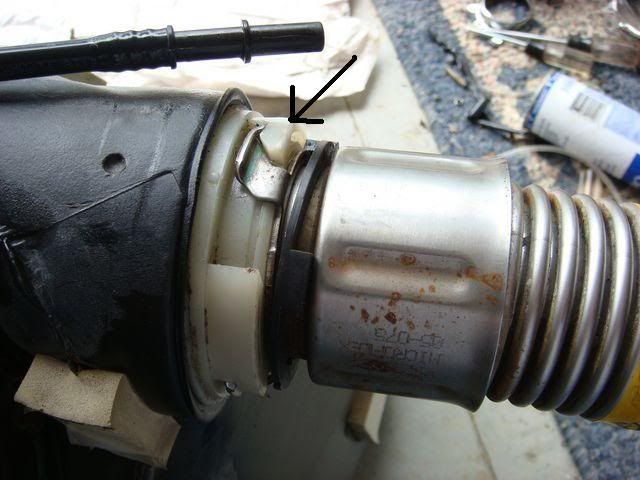
- There is a thin black plastic ring that locks the connector in place with one tab that keeps the crossover tube coupler from moving. Reach up and pull that black tab back out of the connector latch. Here is a so-so photo of that plastic ring but unfortunately it doesn't show you where the locking tab is. You'll be able to feel it with your fingers. There is only one tab to worry with. Not my dirty car parts or photo but you get the idea.
Once you have the tab out of the way simply reach up and turn the couple counterclockwise to disconnect the fitting. You don't need to turn it very far...maybe 20 degrees or so. It does not unscrew. It is a short counterclockwise movement.

- At this point the the crossover tube needs to be separated from the nylon fitting in the tank. This is done by pulling it directly out of the fitting. Not so easy though as it isn't possible to collapse the metal crossover tube. You need to do a few simple things that will give you the needed 3/4" or so of play. What I do is go over to the passenger side tank and drop the 5 bolts holding the aluminum pan under the tank. This results in some tension on the crossover tube in the direction of the passenger side tank (A good thing)
- Next reach up above the transmission and you will feel a spring loaded c-clamp type fitting that the crossover tube is snapped into. You can't see it but it is there. If you pull down on the crossover tube by hand the crossover tube should pop out of that spring loaded fitting.
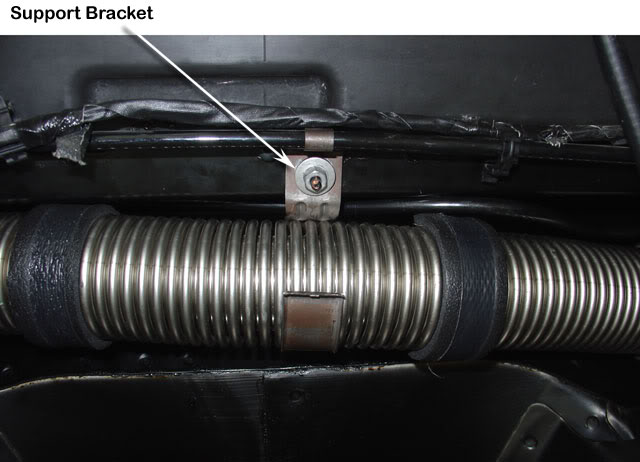
Between this little bit of play gained in the crossover tube and the loose driver's side tank you should be able to pull the coupler out of the tank. It isn't easy and cuss words are the norm. Be careful that you pull directly back on the coupler to separate it because there are several fragile fuel lines on the inside of that coupler.

- You still have one more line to disconnect before lowering that tank! There is a vent line above the tank that used the same type coupler as the vent you removed from the filler neck. Reach up above the tank and find that coupler and disconnect it.
- Guess what!? You can now safely lower the tank out of the car!
Now the fun begins
- You need to unlatch the crossover tube. To do this you will be working in the blind. Study the following images to understand what the connector looks like and how it latches.
Looking up from below this is what you will see. This is the collar you will turn once you have unlatched the locking ring of the fastener
- There is a thin black plastic ring that locks the connector in place with one tab that keeps the crossover tube coupler from moving. Reach up and pull that black tab back out of the connector latch. Here is a so-so photo of that plastic ring but unfortunately it doesn't show you where the locking tab is. You'll be able to feel it with your fingers. There is only one tab to worry with. Not my dirty car parts or photo but you get the idea.
Once you have the tab out of the way simply reach up and turn the couple counterclockwise to disconnect the fitting. You don't need to turn it very far...maybe 20 degrees or so. It does not unscrew. It is a short counterclockwise movement.
- At this point the the crossover tube needs to be separated from the nylon fitting in the tank. This is done by pulling it directly out of the fitting. Not so easy though as it isn't possible to collapse the metal crossover tube. You need to do a few simple things that will give you the needed 3/4" or so of play. What I do is go over to the passenger side tank and drop the 5 bolts holding the aluminum pan under the tank. This results in some tension on the crossover tube in the direction of the passenger side tank (A good thing)
- Next reach up above the transmission and you will feel a spring loaded c-clamp type fitting that the crossover tube is snapped into. You can't see it but it is there. If you pull down on the crossover tube by hand the crossover tube should pop out of that spring loaded fitting.
Between this little bit of play gained in the crossover tube and the loose driver's side tank you should be able to pull the coupler out of the tank. It isn't easy and cuss words are the norm. Be careful that you pull directly back on the coupler to separate it because there are several fragile fuel lines on the inside of that coupler.
- You still have one more line to disconnect before lowering that tank! There is a vent line above the tank that used the same type coupler as the vent you removed from the filler neck. Reach up above the tank and find that coupler and disconnect it.
- Guess what!? You can now safely lower the tank out of the car!
Last edited by Motorhead-47; 05-30-2012 at 07:21 PM.
The following users liked this post:
IamJon (08-25-2021)
11-22-2010, 07:50 PM
#5
Safety Car
Thread Starter
Post #5
- There is a large metal locking ring that secures the fuel pump to the tank. You need to rotate it counterclockwise to unlock that ring. I use a plastic mallet and a dowel to rotate the collar.
- With the collar released you can then pull the pump HALFWAY out of the tank. To get the pump completely out you need to disconnect the line that goes forward to the passenger side tank and the second line that serves as the return line from the passenger side tank. The return line dumps into the white fuel pump bucket.

This is the line set that is in the tank. One end has the connector that you can release with your fingers and the other end is secured with a plastic hose clamp with it's end resting in the pump's sump.
- If you look at the above photo closely you'll recognize that the other end of those two lines is what plugs into the nylon fitting at the top of the tank where the crossover tube mates up.
- Once you have the two fuel lines disconnected you can then begin to fish the pump out of the tank. Be careful because you have a long fuel level float wire and float still attached to the pump.
- I have found that the bottom half of the fuel pump seems to expand after it is installed. It can be a challenge to get the bottom half of the pump through the tank's opening. Sometimes it takes a bit of persuasion with a small screwdriver.
- There is a large metal locking ring that secures the fuel pump to the tank. You need to rotate it counterclockwise to unlock that ring. I use a plastic mallet and a dowel to rotate the collar.
- With the collar released you can then pull the pump HALFWAY out of the tank. To get the pump completely out you need to disconnect the line that goes forward to the passenger side tank and the second line that serves as the return line from the passenger side tank. The return line dumps into the white fuel pump bucket.
This is the line set that is in the tank. One end has the connector that you can release with your fingers and the other end is secured with a plastic hose clamp with it's end resting in the pump's sump.
- If you look at the above photo closely you'll recognize that the other end of those two lines is what plugs into the nylon fitting at the top of the tank where the crossover tube mates up.
- Once you have the two fuel lines disconnected you can then begin to fish the pump out of the tank. Be careful because you have a long fuel level float wire and float still attached to the pump.
- I have found that the bottom half of the fuel pump seems to expand after it is installed. It can be a challenge to get the bottom half of the pump through the tank's opening. Sometimes it takes a bit of persuasion with a small screwdriver.
Last edited by Motorhead-47; 11-22-2010 at 09:03 PM.
The following users liked this post:
IamJon (08-25-2021)
11-22-2010, 08:00 PM
#6
Safety Car
Thread Starter
Post #6.
Most new fuel pumps do not come with the fuel level sending unit. This means you'll need to transfer over the old one.
Fuel level sending unit attached to pump. It just clips on and doesn't need any comment as to how to R&R it.
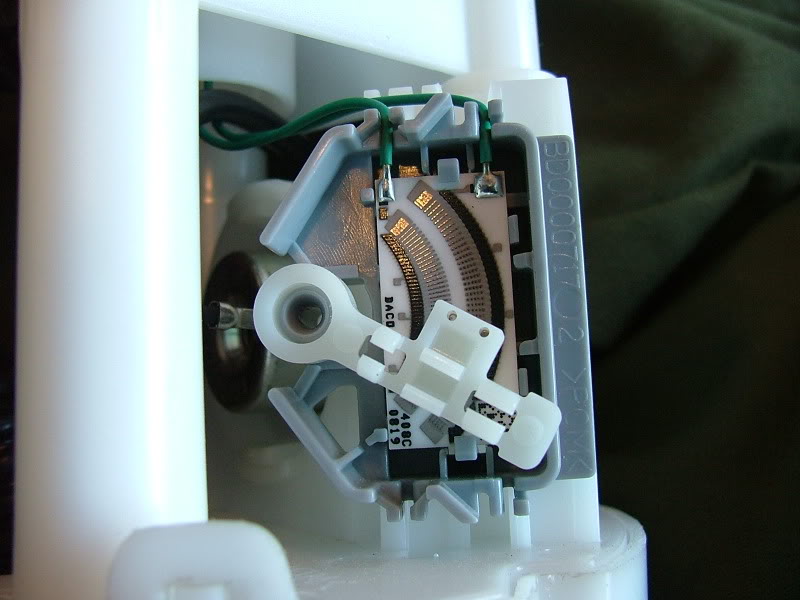
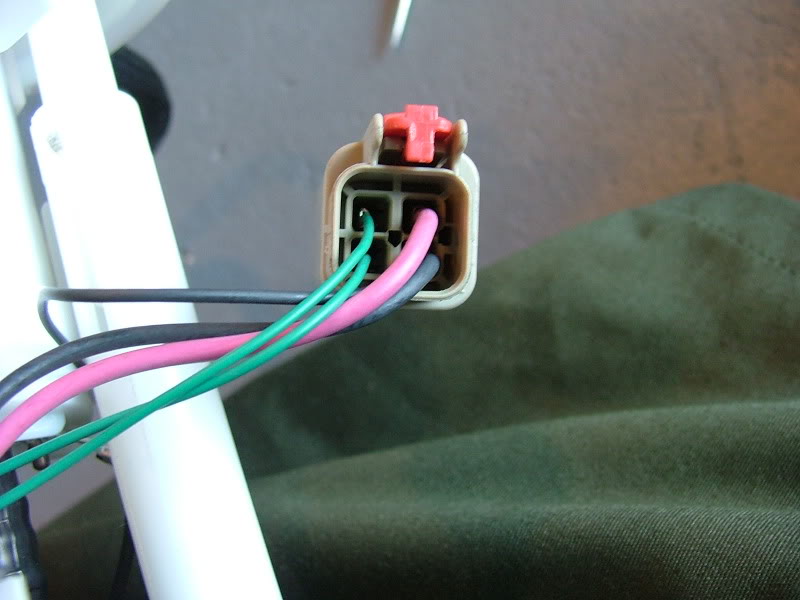
-You'll need to remove the fuel sending unit wire leads from the old connector and plug them into your new fuel pump's connector. The two smaller gauge wires on the left are the ones that have to come out. In the center of the back of that connector is a hole. Inserting a small jeweler's screwdriver allows you to release a lock which then allows the front of that wire connector shell to come off. From the front you insert that jeweler's screwdriver into the shell and release the tang holding those two wires in. The fuel sending unit wires then simply plug into the bottom of the new fuel pump connector. Double check to make sure they are secure. If not, you'll be doing this all over again for a "no gas gauge" problem.
- You are now ready to install the pump back in the tank. Don't forget to attach the fuel level float to the sending unit.
Most new fuel pumps do not come with the fuel level sending unit. This means you'll need to transfer over the old one.
Fuel level sending unit attached to pump. It just clips on and doesn't need any comment as to how to R&R it.
-You'll need to remove the fuel sending unit wire leads from the old connector and plug them into your new fuel pump's connector. The two smaller gauge wires on the left are the ones that have to come out. In the center of the back of that connector is a hole. Inserting a small jeweler's screwdriver allows you to release a lock which then allows the front of that wire connector shell to come off. From the front you insert that jeweler's screwdriver into the shell and release the tang holding those two wires in. The fuel sending unit wires then simply plug into the bottom of the new fuel pump connector. Double check to make sure they are secure. If not, you'll be doing this all over again for a "no gas gauge" problem.
- You are now ready to install the pump back in the tank. Don't forget to attach the fuel level float to the sending unit.
Last edited by Motorhead-47; 11-22-2010 at 10:03 PM.
11-22-2010, 08:15 PM
#7
Safety Car
Thread Starter
Post #7
Getting the pump back in and the in-tank fuel lines connected is a bit of a chinese puzzle.
- Attach a piece of safety wire to the loop of one of the inside lines and the other end of that wire to the connector on the other fuel line. Let the wire hang outside of the fuel tank opening. Now insert the pump halfway into the opening being sure not to get the fuel level float bound up on the lines in the tank.
- Using the safety wire, pull the two lines in the tank to where you can reach them with your fingers and attach the clip on the one fuel line to it's fitting and then insert the return line into the fuel pump bucket and secure it with the nylon fastener you removed earlier.
- With that all done you can remove the safety wire, drop the pump in the rest of the way, and then secure it all up with the large metal lock ring you took off earlier.
- You are now ready to put the tank back in the car!
Last edited by Motorhead-47; 11-22-2010 at 09:19 PM.
The following users liked this post:
IamJon (08-25-2021)
11-22-2010, 08:20 PM
#8
Safety Car
Thread Starter
Post #8
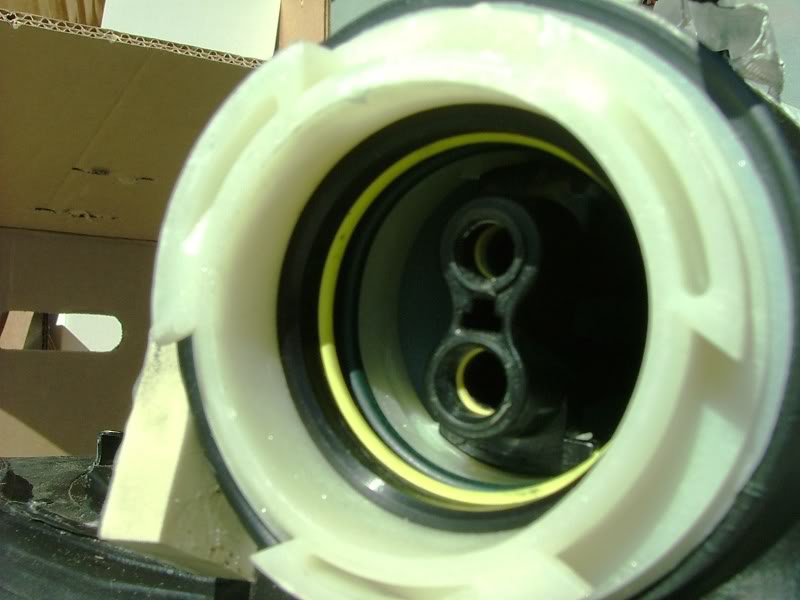
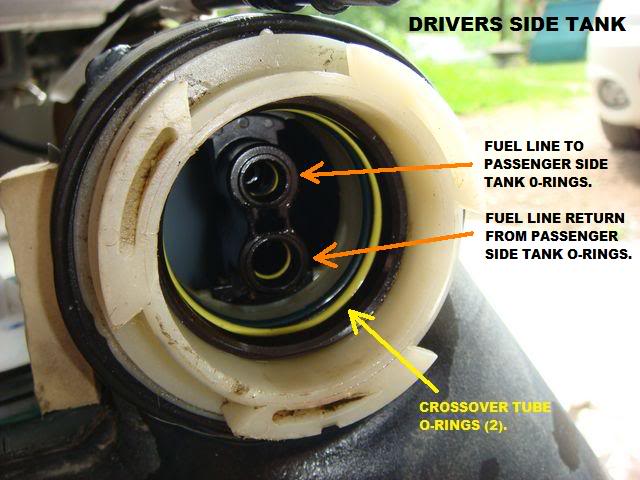
- Before you go any further take a close look at the stack of spacers, o-rings, etc. in the following photo. Be sure this is 100% correct. These connections are critical! Make sure you have not lost any of the 3 pieces that seal the crossover tube to the tank. At the rear is a black o-ring followed by a green o-ring followed by a tapered ferrell. Also, look closely at the two fittings that carry fuel to the passenger side tank. There should be a plastic ferrel with an o-ring behind each. Also make note of the T-shaped hole between the forward and return lines. The crossover tube has the male counterpart to that T to align things properly. Once you are sure everything looks like the two images below you need to lubricate all of the o-rings with a few drops of oil. This will help everything fall into place when you get ready to attach the crossover tube.
- Before you go any further take a close look at the stack of spacers, o-rings, etc. in the following photo. Be sure this is 100% correct. These connections are critical! Make sure you have not lost any of the 3 pieces that seal the crossover tube to the tank. At the rear is a black o-ring followed by a green o-ring followed by a tapered ferrell. Also, look closely at the two fittings that carry fuel to the passenger side tank. There should be a plastic ferrel with an o-ring behind each. Also make note of the T-shaped hole between the forward and return lines. The crossover tube has the male counterpart to that T to align things properly. Once you are sure everything looks like the two images below you need to lubricate all of the o-rings with a few drops of oil. This will help everything fall into place when you get ready to attach the crossover tube.
Last edited by Motorhead-47; 11-22-2010 at 10:01 PM.
The following users liked this post:
IamJon (08-25-2021)
11-22-2010, 08:36 PM
#9
Safety Car
Thread Starter
Post #9
Time to put the tank back in the car
- Spend a few seconds and put a little bit of oil on the crossover tube connector in the car. It will help
- Slip the tank under the car, raise it up by hand, feed the wiring harness over to the filler neck area, get the filler neck in position and loosely support the tank with something.
- Reach above the tank and reconnect that vent line that you can't see
- Raise the tank up and with one hand moving the tank and the other hand on the crossover tube coupler you should be able to plug the crossover tube coupler into the tank. If things are aligned properly it should drop right in. You'll know if it is right because you'll be able to easily lock the coupler with a short clockwise turn.
- Attach the fuel line from the tank to the hard line that leads to the engine compartment
- Attach the fuel filler neck and vent tube
- Connect the fuel pump harness to the chassis connector
- Put the 5 bolts back in each (driver and passenger side) of the aluminum pans that support the fuel tanks
- Put fuel back in the tank
- Before buttoning it all back up and taking it off the jack stand I'd go ahead and reconnect the battery. Don't forget to reinstall the fuel pump relay. When you first turn the key on the fuel pump will only run for a few seconds to prime the line. This is normal. The pump will not run full time until the car starts.
- Fire it up!
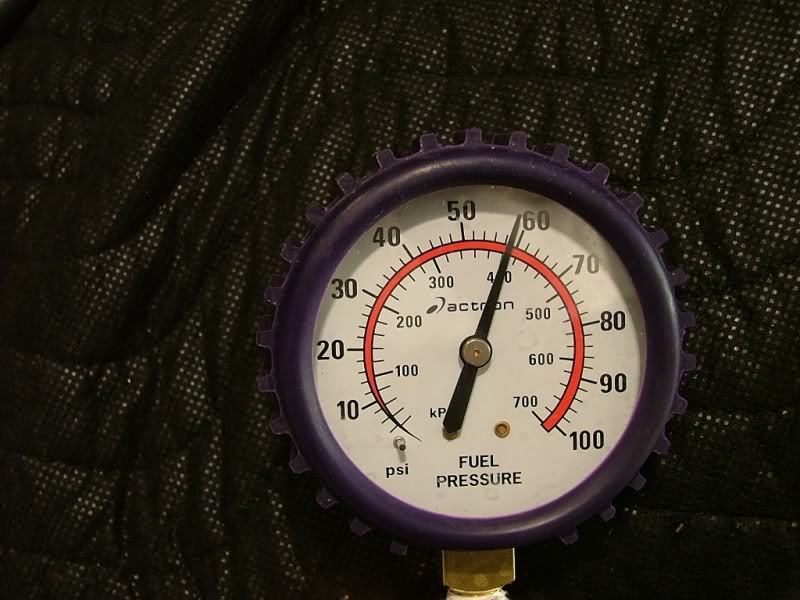
If you did it all correctly then this is what you should see at the fuel rail connector
Time to put the tank back in the car
- Spend a few seconds and put a little bit of oil on the crossover tube connector in the car. It will help
- Slip the tank under the car, raise it up by hand, feed the wiring harness over to the filler neck area, get the filler neck in position and loosely support the tank with something.
- Reach above the tank and reconnect that vent line that you can't see
- Raise the tank up and with one hand moving the tank and the other hand on the crossover tube coupler you should be able to plug the crossover tube coupler into the tank. If things are aligned properly it should drop right in. You'll know if it is right because you'll be able to easily lock the coupler with a short clockwise turn.
- Attach the fuel line from the tank to the hard line that leads to the engine compartment
- Attach the fuel filler neck and vent tube
- Connect the fuel pump harness to the chassis connector
- Put the 5 bolts back in each (driver and passenger side) of the aluminum pans that support the fuel tanks
- Put fuel back in the tank
- Before buttoning it all back up and taking it off the jack stand I'd go ahead and reconnect the battery. Don't forget to reinstall the fuel pump relay. When you first turn the key on the fuel pump will only run for a few seconds to prime the line. This is normal. The pump will not run full time until the car starts.
- Fire it up!
If you did it all correctly then this is what you should see at the fuel rail connector
Last edited by Motorhead-47; 11-22-2010 at 10:09 PM.
The following users liked this post:
IamJon (08-25-2021)
11-22-2010, 08:39 PM
#10
Safety Car
Thread Starter
And finally post #10
Directions per the factory service manual
Fuel Tank Replacement - Left Side
Tools Required
J 37088-A Fuel Line Disconnect tool
Removal Procedure
1. Disconnect the negative battery cable. Refer to Battery Negative Cable Disconnection and Connection in Engine Electrical.
2. Drain the fuel tank. Refer to Fuel Tank Draining .
3. Raise and support the vehicle. Refer to Lifting and Jacking the Vehicle in General Information.
4. Remove the left rear tire. Refer to Tire and Wheel Removal and Installation in Tires and Wheels.
5. Remove the left rear wheelhouse panel. Refer to Wheelhouse Panel Replacement in Body Rear End.
6. Remove both mufflers. (A6 only) Refer to Exhaust Muffler Replacement - Left Side and Exhaust Muffler Replacement - Right Side in Engine Exhaust.
7. Remove the driveline support assembly. (A6 only) Refer to Driveline Support Assembly Replacement in Propeller Shaft.
8. Disconnect the fuel fill hose and recirc line from the fill pipe.
9. Disconnect the fuel pump jumper harness connector.
10. Disconnect the fuel feed pipe (4) at the rear of the left fuel tank. Refer to Plastic Collar Quick Connect Fitting Service .
11. Cap the fuel pipes to prevent fuel system contamination.
12. Loosen the fuel tank strap in order to drop the tank approximately one inch.
13. Disengage the crossover tube connector position assurance (CPA) retainer by pulling the tab (1) outward and rotate.
Important: The crossover tube CPA is released when the latch disengages from the tank connection groove.
14. Rotate crossover tube collar counterclockwise to disengage.
15. Disconnect the crossover tube from the left fuel tank by pulling straight out.
Important: Take care not to disturb the internal O-rings in the fuel tank connections.
16. Disconnect the evaporative emission (EVAP) crossover pipe quick connect fitting at the left fuel tank.
17. Cap the evaporative emission (EVAP) pipe to prevent system contamination.
18. Remove the fuel tank strap mount bolts.
19. Remove the fuel tank strap from the vehicle.
20. Remove the fuel tank.
Installation Procedure
Install the fuel tank.
21. Install the fuel tank strap to the vehicle.
22. Install the fuel tank strap bolts loosely leaving the tank hanging approximately one inch.
23. Remove the cap from the EVAP pipe.
24. Connect the EVAP crossover pipe quick connect fitting at the left fuel tank.
25. Lubricate the crossover tube to fuel tank connection O-rings with GM P/N 1051717 (Canadian P/N 5728223) rubber lubricant.
Important: Note the location of the T-shaped alignment feature (5) between the jet pump feed/return pipes connector.
26. Lubricate the crossover tube O-ring mating surfaces with GM P/N 1051717 (Canadian P/N 5728223) rubber lubricant.
Important: Note the T-shaped alignment feature on the crossover tube.
Important: The crossover tube will not fully seat into the fuel tank if the jet pump lines are misaligned.
27. Connect the crossover tube to the left fuel tank using the features previously noted.
Important: The crossover tube collar tangs will not latch if misalignment exists.
28. Rotate the crossover tube collar clockwise to engage the tangs.
29. Rotate the crossover tube CPA retainer counterclockwise past the collar latching tang and push the tab (1) into the locked position.
Important: If the CPA retainer is locked into position, the crossover tube collar will not rotate.
30. Test the crossover tube to fuel tank connection by attempting to rotate the crossover tube collar counterclockwise.
Tighten the fuel tank strap bolts.
Tighten
Tighten the bolts to 25 N•m (18 lb in).
31. Remove the cap from the fuel pipes.
32. Connect the fuel feed pipe at the rear of the left fuel tank. Refer to Plastic Collar Quick Connect Fitting Service .
33. Connect the fuel pump jumper harness connector.
34. Connect the fuel fill hose and recirc line to the fill tube.
Tighten
Tighten the clamp to 4 N•m (35 lb in).
35. Install the driveline support assembly. (A6 only) Refer to Driveline Support Assembly Replacement in Propeller Shaft.
36. Install both mufflers. Refer to Exhaust Muffler Replacement - Left Side and Exhaust Muffler Replacement - Right Side in Engine Exhaust.
37. Install the left rear wheelhouse panel. Refer to Wheelhouse Panel Replacement in Body Rear End.
38. Install the Left rear tire. Refer to Tire and Wheel Removal and Installation in Tires and Wheels.
39. Lower the vehicle.
40. Refuel the fuel tank.
41. Connect the negative battery cable. Refer to Battery Negative Cable Disconnection and Connection in Engine Electrical.
42. Perform the following procedure in order to test for leaks:
Turn ON the Ignition switch, for 2 seconds.
Turn OFF the ignition, for 10 seconds.
Turn ON the ignition.
Inspect for fuel leaks.
Last edited by Motorhead-47; 11-22-2010 at 10:06 PM.
The following 3 users liked this post by Motorhead-47:
11-22-2010, 10:25 PM
#12
Race Director


Member Since: Jul 2000
Location: Out Where the Buses Don't Run, Eglin AFB/ Niceville FL
Posts: 15,244
Received 1,426 Likes
on
774 Posts
2022 Corvette of the Year Finalist -- Modified
2021 C6 of the Year Winner - Modified
Finalist 2020 C7 of the Year -- Modified
2020 C6 of the Year Finalist - Modified

Wow Ken. You covered this in some serious detail. For anyone contemplating a DIY on this task this is about as clear as it gets for instructions. I know for a fact first hand that Ken knows the ins and outs and tricks and pitfalls of swapping out a fuel pump. 

The following users liked this post:
Joe Jorgensen (07-12-2021)


The following users liked this post:
Richard Ho (03-10-2020)


 been waiting for this!!!
01-07-2011, 03:58 PM
been waiting for this!!!
01-07-2011, 03:58 PM
#15
Safety Car

Member Since: Aug 2006
Location: Apache Junction AZ
Posts: 4,347
Likes: 0
Received 22 Likes
on
18 Posts

Post #4
Now the fun begins
- You need to unlatch the crossover tube. To do this you will be working in the blind. Study the following images to understand what the connector looks like and how it latches.
Looking up from below this is what you will see. This is the collar you will turn once you have unlatched the locking ring of the fastener
- There is a thin black plastic ring that locks the connector in place with one tab that keeps the crossover tube coupler from moving. Reach up and pull that black tab back out of the connector latch. Here is a so-so photo of that plastic ring but unfortunately it doesn't show you where the locking tab is. You'll be able to feel it with your fingers. There is only one tab to worry with. Not my dirty car parts or photo but you get the idea.

Once you have the tab out of the way simply reach up and turn the couple counterclockwise to disconnect the fitting. You don't need to turn it very far...maybe 20 degrees or so. It does not unscrew. It is a short counterclockwise movement.
- At this point the the crossover tube needs to be separated from the nylon fitting in the tank. This is done by pulling it directly out of the fitting. Not so easy though as it isn't possible to collapse the metal crossover tube. You need to do a few simple things that will give you the needed 3/4" or so of play. What I do is go over to the passenger side tank and drop the 5 bolts holding the aluminum pan under the tank. This results in some tension on the crossover tube in the direction of the passenger side tank (A good thing)
- Next reach up above the transmission and you will feel a spring loaded c-clamp type fitting that the crossover tube is snapped into. You can't see it but it is there. If you pull down on the crossover tube by hand the crossover tube should pop out of that spring loaded fitting. Between this little bit of play gained in the crossover tube and the loose driver's side tank you should be able to pull the coupler out of the tank. It isn't easy and cuss words are the norm. Be careful that you pull directly back on the coupler to separate it because there are several fragile fuel lines on the inside of that coupler.

- You still have one more line to disconnect before lowering that tank! There is a vent line above the tank that used the same type coupler as the vent you removed from the filler neck. Reach up above the tank and find that coupler and disconnect it.
- Guess what!? You can now safely lower the tank out of the car!
Now the fun begins
- You need to unlatch the crossover tube. To do this you will be working in the blind. Study the following images to understand what the connector looks like and how it latches.
Looking up from below this is what you will see. This is the collar you will turn once you have unlatched the locking ring of the fastener
- There is a thin black plastic ring that locks the connector in place with one tab that keeps the crossover tube coupler from moving. Reach up and pull that black tab back out of the connector latch. Here is a so-so photo of that plastic ring but unfortunately it doesn't show you where the locking tab is. You'll be able to feel it with your fingers. There is only one tab to worry with. Not my dirty car parts or photo but you get the idea.
Once you have the tab out of the way simply reach up and turn the couple counterclockwise to disconnect the fitting. You don't need to turn it very far...maybe 20 degrees or so. It does not unscrew. It is a short counterclockwise movement.
- At this point the the crossover tube needs to be separated from the nylon fitting in the tank. This is done by pulling it directly out of the fitting. Not so easy though as it isn't possible to collapse the metal crossover tube. You need to do a few simple things that will give you the needed 3/4" or so of play. What I do is go over to the passenger side tank and drop the 5 bolts holding the aluminum pan under the tank. This results in some tension on the crossover tube in the direction of the passenger side tank (A good thing)
- Next reach up above the transmission and you will feel a spring loaded c-clamp type fitting that the crossover tube is snapped into. You can't see it but it is there. If you pull down on the crossover tube by hand the crossover tube should pop out of that spring loaded fitting. Between this little bit of play gained in the crossover tube and the loose driver's side tank you should be able to pull the coupler out of the tank. It isn't easy and cuss words are the norm. Be careful that you pull directly back on the coupler to separate it because there are several fragile fuel lines on the inside of that coupler.
- You still have one more line to disconnect before lowering that tank! There is a vent line above the tank that used the same type coupler as the vent you removed from the filler neck. Reach up above the tank and find that coupler and disconnect it.
- Guess what!? You can now safely lower the tank out of the car!
BJK
01-08-2011, 12:24 AM
#16
Melting Slicks


I didn't realize it was heart surgery.
01-08-2011, 12:43 AM
#17
Safety Car
Member Since: Aug 2006
Location: Apache Junction AZ
Posts: 4,347
Likes: 0
Received 22 Likes
on
18 Posts
 Hey, I figured we might as well have the whole shebang.
 I'm going to be taking on this project in a few week. Thanks to these pictures and the write up it doesn't seem as intimidating a project as before.
BJK
Last edited by 07MontRedcp; 01-08-2011 at 12:47 AM.
The following users liked this post:
Joe Jorgensen (07-12-2021)
