

 03-03-2015, 12:54 PM
Last edit by: IB Advertising
See related guides and technical advice from our community experts:
Browse all: Cleaning and Detailing
- How to restore your headlights
Step by step instructions for do-it-yourselfers.
Browse all: Cleaning and Detailing

No Low Beam Headlights
09-26-2010, 01:35 PM
#1
Melting Slicks

Thread Starter
The low beam headlights on my 05 quit working.
The fuses for the left and right lamps are good. I replaced the relay this morning and the low beams are still not working.
Any suggestions?
The fuses for the left and right lamps are good. I replaced the relay this morning and the low beams are still not working.
Any suggestions?


Popular Reply
01-28-2013, 10:55 PM
Heel & Toe


Hi everyone!
I have had a low beam problem on my car since I bought it. Dealer tried to fix it before shipping it to me (by replacing a relay) and that did of course not work. After much back and forth arguing who's paying for what I decided to fix it myself.
First, a huuuuuge thank you to racerxr (Tom) here on the forum. Thanks for locating the problem and figuring out how to fix it as well as providing excellent descriptions and pictures via email! The wire was broken in EXACTLY the spot that you pointed out!
Yesterday me and my awesome girlfriend set out to fix the fuse box! We ended up following Tom's instructions for the most part with a few modifications. I have written a short step-by-step guide for how we fixed the problem. This is to further clarify how this CAN be done (this is by NO means the perfect solution) to those who are still wondering to fix it yourself or not. It was a pretty straight forward job, and absolutely well worth 1000 $
Take the fuse box out of the car. Very simple:
1. Disconnect the battery and the power cable that connects to the fuse box
2. Press the plastic clips that attaches the main part of the fuse box and pop it out
3. Unscrew the four metal bolts and knock on them so that each of the four blocks fall out
4. You're DONE
Disassemble the fuse box
1. Pull out all fuses and relays
2. Use a needle nose plier and un-swedge the metal sleeves that hold the two layers together.
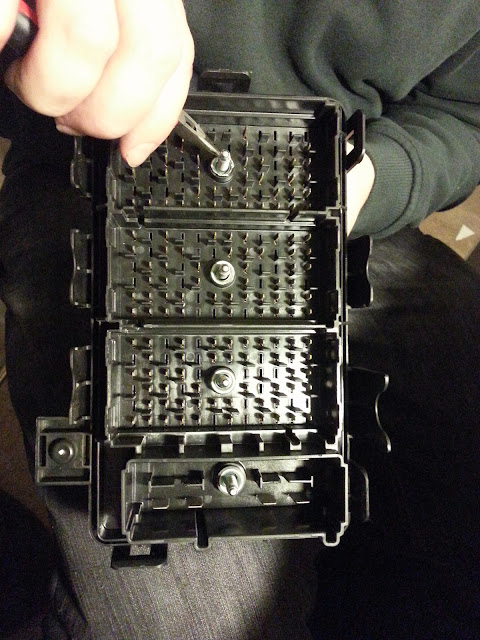

3. When un-swedged enoug, knock the bolts through the box so that it can be disassembled. I messed up the bolts so badly (bad needle nose pliers) during the un-swedging that I decided to cut the metal sleeves surrounding the bolts (see picture) so that they don't interfere. The sleeves are not needed as their only purpose is to keep you from opening the fusebox. When the box is in the car, it is held in place by the four bolts and the four block modules.

Replacing the broken wire
1. Get some 20 gauge copper wire. I bought some at Homedepot for 7 $

2. Find the broken broken wire and remove it. When you manage to open the fusebox, the broken wire is on the other side.

Very bad conductivity.
3. Replace the wire. As Tom suggested, I added a backup wire on the other side as well. So in case the wire breaks again there is a backup on the other side. I also removed some of the plastic guiding with a razor so that the copper wire can have nicer bends.

Backup wire on the back side

Put everything back together and drive after dark!
When putting the fusebox back together, simply align the four block modules and place the box on top of them (without the bolts in place). Then see through the bolt holes so that you make sure that they are sentered. Enter the bolts and screw in place each of the modules till each bolt is tightened. Check visually afterwards if all the blocks are in place.

edit: Link to the picasa album: https://picasaweb.google.com/1062290...FixCorvetteC6#
Thanks Tom!
I have had a low beam problem on my car since I bought it. Dealer tried to fix it before shipping it to me (by replacing a relay) and that did of course not work. After much back and forth arguing who's paying for what I decided to fix it myself.
First, a huuuuuge thank you to racerxr (Tom) here on the forum. Thanks for locating the problem and figuring out how to fix it as well as providing excellent descriptions and pictures via email! The wire was broken in EXACTLY the spot that you pointed out!
Yesterday me and my awesome girlfriend set out to fix the fuse box! We ended up following Tom's instructions for the most part with a few modifications. I have written a short step-by-step guide for how we fixed the problem. This is to further clarify how this CAN be done (this is by NO means the perfect solution) to those who are still wondering to fix it yourself or not. It was a pretty straight forward job, and absolutely well worth 1000 $
Take the fuse box out of the car. Very simple:
1. Disconnect the battery and the power cable that connects to the fuse box
2. Press the plastic clips that attaches the main part of the fuse box and pop it out
3. Unscrew the four metal bolts and knock on them so that each of the four blocks fall out
4. You're DONE
Disassemble the fuse box
1. Pull out all fuses and relays
2. Use a needle nose plier and un-swedge the metal sleeves that hold the two layers together.
3. When un-swedged enoug, knock the bolts through the box so that it can be disassembled. I messed up the bolts so badly (bad needle nose pliers) during the un-swedging that I decided to cut the metal sleeves surrounding the bolts (see picture) so that they don't interfere. The sleeves are not needed as their only purpose is to keep you from opening the fusebox. When the box is in the car, it is held in place by the four bolts and the four block modules.
Replacing the broken wire
1. Get some 20 gauge copper wire. I bought some at Homedepot for 7 $
2. Find the broken broken wire and remove it. When you manage to open the fusebox, the broken wire is on the other side.
Very bad conductivity.
3. Replace the wire. As Tom suggested, I added a backup wire on the other side as well. So in case the wire breaks again there is a backup on the other side. I also removed some of the plastic guiding with a razor so that the copper wire can have nicer bends.
Backup wire on the back side
Put everything back together and drive after dark!
When putting the fusebox back together, simply align the four block modules and place the box on top of them (without the bolts in place). Then see through the bolt holes so that you make sure that they are sentered. Enter the bolts and screw in place each of the modules till each bolt is tightened. Check visually afterwards if all the blocks are in place.
edit: Link to the picasa album: https://picasaweb.google.com/1062290...FixCorvetteC6#
Thanks Tom!
09-26-2010, 01:47 PM
#2
Safety Car

Not trying to insult you with the obvious, but have you checked the position of the lamp control on the multifunction lever/stalk?
The lamp control has 4 positions. With the engine running (in Park or Neutral, of course), have someone watch the headlights while you cycle thru all the positions.
The lamp control has 4 positions. With the engine running (in Park or Neutral, of course), have someone watch the headlights while you cycle thru all the positions.
09-26-2010, 01:53 PM
#3
Melting Slicks
Thread Starter
Not trying to insult you with the obvious, but have you checked the position of the lamp control on the multifunction lever/stalk?
The lamp control has 4 positions. With the engine running (in Park or Neutral, of course), have someone watch the headlights while you cycle thru all the positions.
The lamp control has 4 positions. With the engine running (in Park or Neutral, of course), have someone watch the headlights while you cycle thru all the positions.
01-01-2011, 10:32 PM
#4
Pro

Member Since: Jul 2004
Location: Menlo Park CA
Posts: 622
Likes: 0
Received 0 Likes
on
0 Posts

Anyone have a solution for this mysterious low beam issue? I have the exact issue, the low beams work for a while in the morning and then cease to work. High beams and all other signals/fogs work fine.
Mine is an early 2005 and we've had a ton of rain recently and some have suggested that water may be the culprit.
Before I start swapping relays, ballasts or bulbs I wanted to see if anyone had a resolution to this problem.
Thanks!
Mine is an early 2005 and we've had a ton of rain recently and some have suggested that water may be the culprit.
Before I start swapping relays, ballasts or bulbs I wanted to see if anyone had a resolution to this problem.
Thanks!
01-02-2011, 06:55 AM
#5
Burning Brakes


Anyone have a solution for this mysterious low beam issue? I have the exact issue, the low beams work for a while in the morning and then cease to work. High beams and all other signals/fogs work fine.
Mine is an early 2005 and we've had a ton of rain recently and some have suggested that water may be the culprit.
Before I start swapping relays, ballasts or bulbs I wanted to see if anyone had a resolution to this problem.
Thanks!
Mine is an early 2005 and we've had a ton of rain recently and some have suggested that water may be the culprit.
Before I start swapping relays, ballasts or bulbs I wanted to see if anyone had a resolution to this problem.
Thanks!
01-02-2011, 08:01 AM
#6
Team Owner


Do you have 12V at the bulb?
01-02-2011, 08:27 AM
#7
Tech Contributor
Member Since: Dec 2006
Location: Van Buren Arkansas
Posts: 10,962
Likes: 0
Received 26 Likes
on
25 Posts
Wounded Warrior Escort '11

Do you have the twighlight sentinel option and if so, turn it off, then try the headlamp switch. Trying to remember if we can even turn it off?
01-02-2011, 11:32 AM
#8
Pro
Member Since: Jul 2004
Location: Menlo Park CA
Posts: 622
Likes: 0
Received 0 Likes
on
0 Posts
Before I start changing bulbs or ballasts I want to be sure of the issue. A friend suggested a faulty fuse but I thought a fuse either works or it doesn't and wouldn't act in a sporadic manner.
Thanks for your replies, I hope I can figure this one out. As my corvette is my daily driver I'm feeling stranded at night.

The following users liked this post:
Dads2kconvertible (09-27-2021)
01-02-2011, 11:48 AM
#10
Team Owner
As far as parts replacement, the three areas to check are the relay (which you've done). The multi-function switch on the column and the BCM. You can also check the harness connections and ground connections with a multi-meter and or a test lamp. Since it is both lights my guess is going to be the multi-function switch on the column.
01-02-2011, 12:44 PM
#11
Team Owner
 01-02-2011, 01:45 PM
#12
Pro
Member Since: Jul 2004
Location: Menlo Park CA
Posts: 622
Likes: 0
Received 0 Likes
on
0 Posts
I have power to the lights as they work for a few hours in the morning. Then they fail to work regardless of position of the switch (auto or on). I just disconnected the battery for a minute then reconnected the negative terminal.
I think it may be a bad "mini relay" in the underhood fuse block... the one in the front left part of the fuse block. It seems strange that its the only big block type relay that is stamped "siemens" whereas all the others are Delphi. Probably no biggie but what stumps me is that it works then it doesn't and I've always thought relays are either bad or good. Not intermittent.
Thanks for all the responses so far, I hope to resolve this soon.
Chris
01-02-2011, 02:08 PM
#13
Tech Contributor
Member Since: Dec 2006
Location: Van Buren Arkansas
Posts: 10,962
Likes: 0
Received 26 Likes
on
25 Posts
Wounded Warrior Escort '11
You are correct that relays normally either work or don't work however, thats only referring to the electromagnet coil. The switch contacts that the coil provides is where the usual problem is. The contacts slowly give up over time and eventually fail. You can remove the cover of the relay or most relays and manually push on the contacts, if its only 12volts. However, I do not know if the relay in this case is running a higher voltage for the headlamp output or not being they are HIDs.
01-02-2011, 08:18 PM
#14
Pro
Member Since: Jul 2004
Location: Menlo Park CA
Posts: 622
Likes: 0
Received 0 Likes
on
0 Posts
Well I found from another member that after laying an icepack on the fusebox lid for 15 minutes it worked. Yesterday the lights would not turn back on after the car was driven in the AM. Even if I let the car sit for hours.
It must be getting too hot and shorting out. I'm hoping a replacement fuse block tray will solve the issue.
My temp gun read over 150 on some of the fuses after the car sat for 5 minutes with the hood up.

It must be getting too hot and shorting out. I'm hoping a replacement fuse block tray will solve the issue.
My temp gun read over 150 on some of the fuses after the car sat for 5 minutes with the hood up.
01-03-2011, 12:06 AM
#15
Melting Slicks
Thread Starter
I am sure the low beams work.... but only for a while in the morning. Then they go out and will not turn back on until the car has sat for many hours. I have tried all combinations of leaving it on twilight sentinel, always on or twisting stalk back to turn off then forward to turn back on.
Before I start changing bulbs or ballasts I want to be sure of the issue. A friend suggested a faulty fuse but I thought a fuse either works or it doesn't and wouldn't act in a sporadic manner.
Thanks for your replies, I hope I can figure this one out. As my corvette is my daily driver I'm feeling stranded at night.
The following 2 users liked this post by Jimbeaux:
C5forFun (10-29-2016),
corvette312 (06-19-2018)
05-08-2011, 04:55 PM
#17
Le Mans Master


Anyone have a solution for this mysterious low beam issue? I have the exact issue, the low beams work for a while in the morning and then cease to work. High beams and all other signals/fogs work fine.
Mine is an early 2005 and we've had a ton of rain recently and some have suggested that water may be the culprit.
Before I start swapping relays, ballasts or bulbs I wanted to see if anyone had a resolution to this problem.
Thanks!
Mine is an early 2005 and we've had a ton of rain recently and some have suggested that water may be the culprit.
Before I start swapping relays, ballasts or bulbs I wanted to see if anyone had a resolution to this problem.
Thanks!
The same thing happened to my car last week. Both low beams quit working all of a sudden, but would come back to life in the mornings after the engine had cooled down.
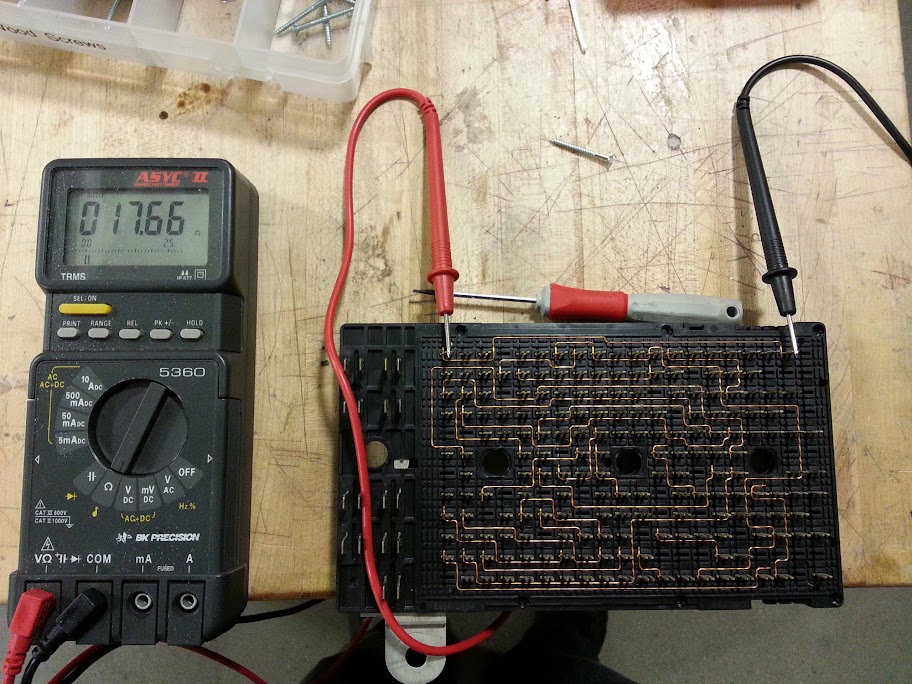
It didn't take long to isolate the problem to an intermittent open circuit somewhere in circuit no. 1970, the white/pink wire that goes from the BCM to pin 86 of the low-beam relay. But was it at a connector, or inside the harness, or what?
It's in the fuse box. To confirm, I removed the fuse/relay box from the car and unplugged the low-beam relay from the box. Then I hooked an ohmmeter to both ends of circuit 1970: pin F-12 of connector C3 (where the big purple-capped harness plugs in on the bottom) and the socket for pin 86 of the low-beam relay, on top.
At room temperature, the circuit had good continuity.
For fun, I placed the whole shebang inside a temperature-controlled test oven at work and set it for 80degC. Sure enough, right around 69degC the resistance took off as the circuit opened up. Then I turned on the cooler and presto, continuity returned after a few minutes.
The source of the problem is a loose connection inside the fuse box backplane itself.
I took a die grinder to the swaged ends of the four sleeves that hold the fuse box together and removed the bottom cover. Inside it's a giant punch-down block. The connector pins engage bare copper wires that are routed around a big plastic grid.
Unfortunately, it's a multi-layer arrangement, and circuit 1970 is not on the outer layer. To get to it you'd have to drill out a bunch of plastic rivets and then (it appears) disconnect the dozens of traces on the outer layer, which is completely impractical.*
So that's where I stopped, but what's happening is that a trace inside the box itself has come undone, and it opens up with thermal expansion. Your options are replacing the box, or rigging up a jumper wire to bypass the whole thing.
*UPDATE: It's not so impractical. The fusebox can be repaired. After unswaging the four sleeves, remove all the fuses and relays and the entire backplane can be removed, revealing the top layer and the broken copper wire. See here for more information.
Last edited by torquetube; 07-03-2012 at 12:59 PM.
The following 2 users liked this post by torquetube:
corvette312 (06-19-2018),
Dads2kconvertible (09-27-2021)
05-08-2011, 06:34 PM
#18
Team Owner

I would think that the loss of your headlights would be a safety issue and should be reported to https://www-odi.nhtsa.dot.gov/ivoq/
05-08-2011, 08:19 PM
#19
Le Mans Master
I would think that the loss of your headlights would be a safety issue and should be reported to https://www-odi.nhtsa.dot.gov/ivoq/

