
c3 windshield replacement


 11-24-2010, 02:34 PM
#3
Racer

The most common problem I see is the windshield being set too deep into the window frame. If this is the case, you will have a big gap between the upper windshield molding and the glass, biggest near the corners. Try laying the glass in the frame without sealer and replacing the molding first. Measure the gap between the glass and the molding. Your spacers will need to hold the glass this high. Butyl ribbon is easier and less messy than urethane sealer that is used on later vehicles. I'll avoid the butyl vs urethand debate here. Whatever you use, the ribbon or bead will need to be slightly higher than your measurement. You will not be compressing it much when installing the glass and spacers will help you judge.
The following users liked this post:
artguyCarrol (01-05-2023)
11-24-2010, 11:03 PM
#4
Instructor
Member Since: Oct 2006
Location: Monroe Washington
Posts: 127
Likes: 0
Received 0 Likes
on
0 Posts
The most common problem I see is the windshield being set too deep into the window frame. If this is the case, you will have a big gap between the upper windshield molding and the glass, biggest near the corners. Try laying the glass in the frame without sealer and replacing the molding first. Measure the gap between the glass and the molding. Your spacers will need to hold the glass this high. Butyl ribbon is easier and less messy than urethane sealer that is used on later vehicles. I'll avoid the butyl vs urethand debate here. Whatever you use, the ribbon or bead will need to be slightly higher than your measurement. You will not be compressing it much when installing the glass and spacers will help you judge.
 any photos?
11-25-2010, 08:54 AM
any photos?
11-25-2010, 08:54 AM
#5
Team Owner

Member Since: Sep 2006
Location: Westminster Maryland
Posts: 30,173
Likes: 0
Received 2,878 Likes
on
2,515 Posts

Hi,
I found no hint that spacers were used when the windshield was installed on my 71. I saved everything that I cut out and found just the damming strip and thiocol sealer St. Louis used.
When I put the new windshield in using a damming strip from a toyota and 1/4" round 3M ribbon sealer. I then filled the perimeter of the windshield frame with butyl sealer from a tube.
I test fit the glass to make sure the ss trim would be tight against it. The glass was from Auto City Classic.
It all went well.
Regards,
Alan
Last edited by Alan 71; 11-25-2010 at 11:28 AM.
The following users liked this post:
artguyCarrol (01-05-2023)
11-25-2010, 09:26 AM
#6
Melting Slicks

11-25-2010, 10:12 AM
#7
Le Mans Master


Member Since: Jul 2006
Location: charlotte north carolina
Posts: 8,117
Likes: 0
Received 100 Likes
on
92 Posts

make sure to install the moulding clips and upper outer ends first. also, make sure the windshield wiper crank arm clears to glass extension when it rotates. i learned the hard way the first time i used the wipers!!
11-25-2010, 10:35 AM
#8
Race Director

The spacers are to ensure the glass doesn't sink too low as the ribbon sealer stays soft. I'm a little surprised Alan got a correct fit with a 1/4" ribbon. We used the larger 3/8" on my '71 and it turned out perfect.
11-25-2010, 10:51 AM
#9
Team Owner
Member Since: Sep 2006
Location: Westminster Maryland
Posts: 30,173
Likes: 0
Received 2,878 Likes
on
2,515 Posts
Hi Z,
Did you use a damming strip? I believe that has an effect on how the glass settles relative to the dimension to/from the windshield frame too.
Regards,
Alan

Did you use a damming strip? I believe that has an effect on how the glass settles relative to the dimension to/from the windshield frame too.
Regards,
Alan
Last edited by Alan 71; 11-25-2010 at 11:26 AM.
11-25-2010, 02:51 PM
#11
Team Owner
Member Since: Sep 2006
Location: Westminster Maryland
Posts: 30,173
Likes: 0
Received 2,878 Likes
on
2,515 Posts
Hi Z,
Yes, it happened to be a toyota part. I had a couple of glass shops let me search through their boxes of miscellaneous strips and the toyota seemed to be the closest in color and size to my original.
The strip is really only necessary if you don't want the sealing material (what ever you use) to show when you look through the glass from the out side. That's why St. Louis used it. I see the damming strip on VERY few cars.
Regards,
Alan
11-25-2010, 02:54 PM
#12
Instructor
Member Since: Oct 2006
Location: Monroe Washington
Posts: 127
Likes: 0
Received 0 Likes
on
0 Posts
 11-28-2010, 01:01 PM
#13
Drifting

It is no debate among professionals and AGSS ANSi Standards.
I have posted info on another ongoing post.
I was a Certified LOF Installer for 15 years back in the early 70's and 80's. Have kept up with it ever since.
All C3's used Thiokol or Urethane from there inception.
Here is the product data sheet from 3M.
It says it all.
http://multimedia.3m.com/mws/mediawe...SevTSeSSSSSS--
It is to be used as a supplement with urethane. Shear strength of Window Weld butyl is 15 PSI shear strength of cured urethane is 550 PSI. How much energy do you think your body has in a front end collision or roll going 70 MPH? It is as important as seat belts to keep your body in the car.
3M Window-Weld
Tacky, solid sealers designed for use with structural urethane adhesive to bond automotive glass to the car
body in full cut installation procedures. It may be used for installing windshields, backlites and bond to
primed metal and glass. Compatible with urethane, polysulfide and butyl sealants.
Directions for Use
1. Remove all old sealant.
2. Prime bare metal with appropriate primer system (urethane primer if products used with a urethane
adhesive).
Clean glass with 3MTM 3. Glass Cleaner-P.N. 08968.
4. Position windshield or backlite on pinchweld.
5. Be certain sealer makes complete contact between glass and pinchweld.
6. Use hand pressure on glass to insure a good seal.
7. Back fill with liquid sealant.
8. Water test using a gentle spray of water on roof.
Applications
For installation of stationary glass when used as supplementary sealer/bonding material with urethane
adhesive.
Directions for Use
3M glass products are intended for use as part of the repair process outlined in service manuals provided
by automotive manufacturers. For detailed instructions by car model, refer to information available from
the automobile manufacturer.
3MTM Windo-WeldTM Ribbon Sealer is designed and intended for use as a replacement to original
equipment butyl installations or as a supplementary sealant when installing stationary glass with urethane
adhesive.
** 3MTM WINDO-WELDTM RIBBON SEALER IS NOT INTENDED FOR A WINDSHIELD OR
BACKGLASS WHERE OEM URETHANE WAS ORIGINALLY USED. For urethane set glass, refer to
and follow 3M Auto Glass Replacement Urethane directions. In some urethane set applications, use of
this product may be appropriate as a supplementary sealant.
Last edited by highschool67; 11-28-2010 at 01:13 PM.
11-28-2010, 01:11 PM
#14
Drifting
Thiokol was used in early C3 models till the advent of urethanes.
Polysulfide compounds area very strong covalent bonded chemical that can withstand the forces of weather better then most out on the market today. They create watertight seals and protect against wind. (a little water is actually commonly believed to help the compound take affect more quickly)
This compound was used to patch up bullet-riddled aircraft during WWII. If it can stand up to that task, it should be able to handle anything you throw at it. Polysulfide has been in use since the �20s, (Thiokol Polysulfide Technology, named for the man who invented it) but it really came to shine in the 1940s and after, as one of the most effective aerospace sealants found. It�s high performance and the ease at which it can be used has made it perfect for things like aircraft fuel tanks, and high-tension joints.
The following users liked this post:
artguyCarrol (01-05-2023)
04-08-2013, 11:53 AM
#15

Hi!
I'm about to mount the new windshield in a couple of days.
But I'm a bit concerned/worried about the ribbon sealer routing.
I've read PWS69 (http://www.speakeasy.org/~pws/Corvette.htm) nice and informative instructions.
But I'm still not sure how to route the butyl ribbon sealer at the bottom part.
Do the ribbon sealer go in a straight line from left to right side or does the ribbon sealer in some way follow the curved windshield ?
Or should I put the sealer in a straight line and then add som extra ribbon tape under the lower curved part of the windshield ?
Is there anyone with pictures with the ribbon sealer mounted, but not the windshield itself ? (Or is most people to stressed during this current operation... no time for pictures)
Any help appreciated
Many thanks
Valle
04-08-2013, 02:02 PM
#16
Team Owner
Member Since: Sep 2006
Location: Westminster Maryland
Posts: 30,173
Likes: 0
Received 2,878 Likes
on
2,515 Posts
Hi V,
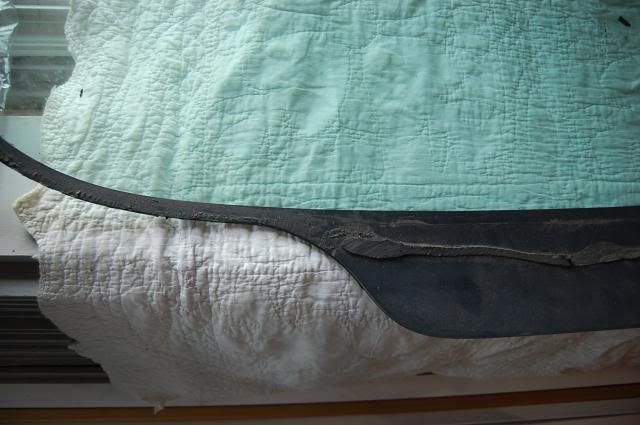
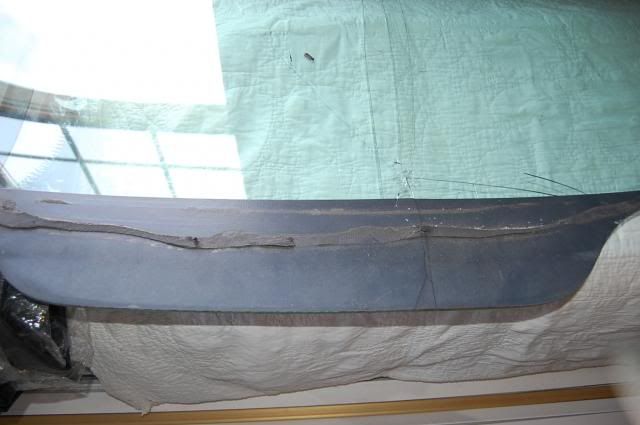
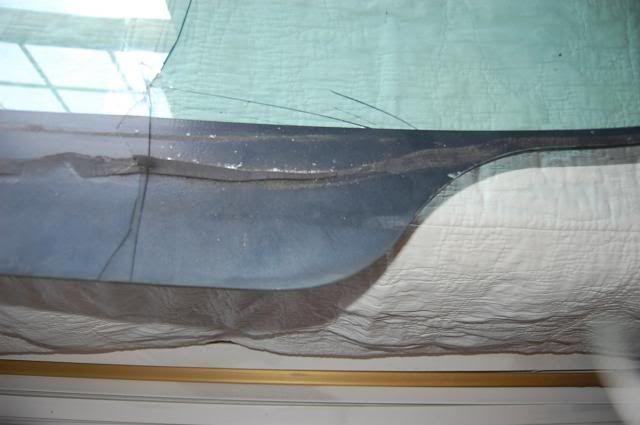
I ran the ribbon to lay in the 'flat lip' that continues down the windshield posts and across the cowl.
Here's some pictures of where it was on my original 71 windshield. You can see another band of sealer was run a few inches down from the first.
Regards,
Alan

I ran the ribbon to lay in the 'flat lip' that continues down the windshield posts and across the cowl.
Here's some pictures of where it was on my original 71 windshield. You can see another band of sealer was run a few inches down from the first.
Regards,
Alan
Last edited by Alan 71; 04-08-2013 at 02:05 PM.
04-08-2013, 05:30 PM
#18
Team Owner
Member Since: Sep 2006
Location: Westminster Maryland
Posts: 30,173
Likes: 0
Received 2,878 Likes
on
2,515 Posts
Hi 7T9,
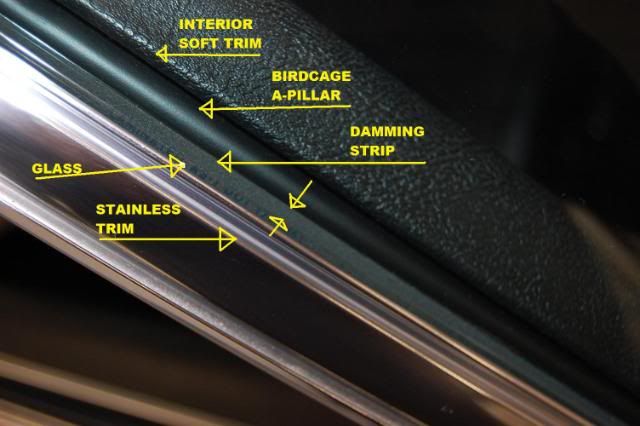
The pillar trim can only be taken off after the rubber weatherstrip and it's retainer has been removed.
Then the screws which fasten the ss trim to the a-pillar can be accessed and the trim removed.
After the pillar trim is off the long thin piece at the top (right at the glass) can be carefully pried off.
Earlier cars have clips that hold the trim piece in place. Later cars have sealer that holds it in place (maybe some clips too?)... I'm not sure when the change took place.
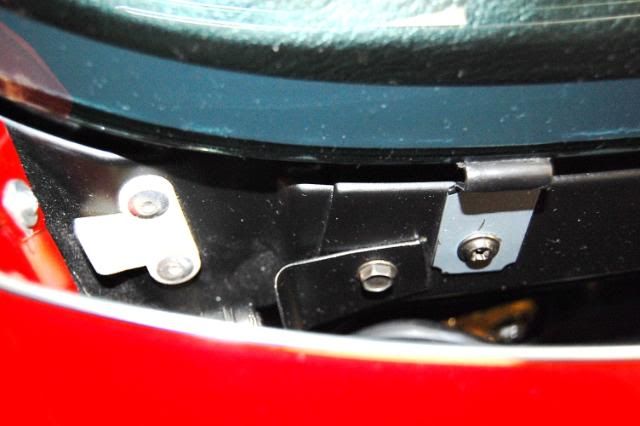
Here's a picture of the a-pillar retainer coming off, and the ss trim under it.
The AIM is a help on these pieces and their fasteners.
Regards,
Alan


The pillar trim can only be taken off after the rubber weatherstrip and it's retainer has been removed.
Then the screws which fasten the ss trim to the a-pillar can be accessed and the trim removed.
After the pillar trim is off the long thin piece at the top (right at the glass) can be carefully pried off.
Earlier cars have clips that hold the trim piece in place. Later cars have sealer that holds it in place (maybe some clips too?)... I'm not sure when the change took place.
Here's a picture of the a-pillar retainer coming off, and the ss trim under it.
The AIM is a help on these pieces and their fasteners.
Regards,
Alan
04-08-2013, 05:31 PM
#19
Alan: Thanks!!! This was exactly the info i needed.
Now I feel alot more confident adding extra sealer in two rows in the lower part. The upper sealer will be the same one that goes around the whole window frame. And the lower part as an extra support added.
Many thanks
Now I feel alot more confident adding extra sealer in two rows in the lower part. The upper sealer will be the same one that goes around the whole window frame. And the lower part as an extra support added.
Many thanks