
Pop up headlight Problem
 04-10-2010, 11:37 PM
#1
Instructor

Thread Starter

Last fall, my headlight motor sounded like a meat grinder - but the lights did not pop up. I installed the brass gear - I've had nothing but problems with that "fix" - the lights would wind down so tight they would not pop up. The only way to get them to work was to manually loosen them, and then the lights would work for one or two times. I'm still working on getting that fixed. I have the ACA HID lights, and yes, they are installed properly.
Now, (when the lights pop up/down), both sides would pop up, then the drivers side goes down, click the switch OFF, the passenger side goes down, then the driver's side opens. I know the lights are connected the proper way from last fall, so there is nothing connected "backwards".
Anybody have any ideas?
Thanx in advance....
D.
 04-10-2010, 11:51 PM
#2
Night Owl for life

Member Since: Nov 2003
Location: Bugs Bunny should'a made a left turn here
Posts: 23,194
Received 3,241 Likes
on
1,664 Posts

sounds like your popup motor housings are coming apart.
04-10-2010, 11:56 PM
#3
Instructor
Thread Starter
Will I be able to tell by looking at them? If the motor housings are coming apart - does that mean I need to spend $$ to buy the new headlight motors?
04-10-2010, 11:59 PM
#4
Night Owl for life
Member Since: Nov 2003
Location: Bugs Bunny should'a made a left turn here
Posts: 23,194
Received 3,241 Likes
on
1,664 Posts
they're kinda hard to tell unless you pull them out.
you don't need new ones, just secure them with a dickman clamp or DIY with small screws.
you don't need new ones, just secure them with a dickman clamp or DIY with small screws.
04-11-2010, 12:36 AM
#6
Tech Contributor
Member Since: Dec 2003
Location: Horncastle Lincolnshire, England
Posts: 19,384
Likes: 0
Received 79 Likes
on
61 Posts
2023 C5 of the Year Finalist - Unmodified

It could be a number of things but a cheap and easy one to start with if you've already replaced the gears is this one:
Number: 00-08-42-002
Subject: Left Headlamp Door Does Not Stay Closed (Shim Headlamp Door Motor/Actuator and Replace Insulators)
Model Year: 2000 Chevrolet Corvette
Condition
Some customers may comment that the left front headlamp door does not remain closed after the headlamps are turned off. Others may comment
that the left headlamp door closes when the headlamps are turned off, but then reopens. In either case, the right headlamp door operates properly.
Correction
Important
The following information applies to the left front headlamp door motor/actuator only. It does not apply to and should not be performed on the right front headlamp door motor/actuator.
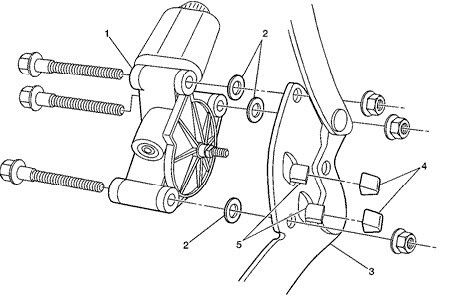
Install one washer (2) between the left headlamp door motor/actuator (1) and the mounting bracket (3) at each of the three attaching bolt locations. Also replace the
insulator (4) on each of the two mounting bracket travel stop tabs (5) as shown. For information on headlamp motor/actuator removal, see the Headlamp Motor/Actuator
Replacement procedure in the Lighting sub-section of Body & Accessories in the appropriate Service Manual.
Parts Information
Part Number Description Qty Per Vehicle
11505463 Washer 3
16524060 Insulator 2
Number: 00-08-42-002
Subject: Left Headlamp Door Does Not Stay Closed (Shim Headlamp Door Motor/Actuator and Replace Insulators)
Model Year: 2000 Chevrolet Corvette
Condition
Some customers may comment that the left front headlamp door does not remain closed after the headlamps are turned off. Others may comment
that the left headlamp door closes when the headlamps are turned off, but then reopens. In either case, the right headlamp door operates properly.
Correction
Important
The following information applies to the left front headlamp door motor/actuator only. It does not apply to and should not be performed on the right front headlamp door motor/actuator.
Install one washer (2) between the left headlamp door motor/actuator (1) and the mounting bracket (3) at each of the three attaching bolt locations. Also replace the
insulator (4) on each of the two mounting bracket travel stop tabs (5) as shown. For information on headlamp motor/actuator removal, see the Headlamp Motor/Actuator
Replacement procedure in the Lighting sub-section of Body & Accessories in the appropriate Service Manual.
Parts Information
Part Number Description Qty Per Vehicle
11505463 Washer 3
16524060 Insulator 2
The following users liked this post:
C5-50th (09-03-2020)
04-15-2010, 05:30 PM
#9
Night Owl for life
Member Since: Nov 2003
Location: Bugs Bunny should'a made a left turn here
Posts: 23,194
Received 3,241 Likes
on
1,664 Posts
 04-16-2010, 09:07 PM
#10
Instructor
Thread Starter
05-05-2010, 11:51 PM
#11
Instructor
Thread Starter
The driver side motor epoxy job was starting to let go. I used a hose clamp to hold the motor together.... you don't even notice it! In addition, I added the washers.
So far..... no problems.
So far..... no problems.
05-06-2010, 12:09 AM
#12
Team Owner


Glad you got the problem resolved. I know I'm late but thought I would share this information in case it can help others. A friend had a similar problem and posted a detailed fix with pics.
Click here for the original thread.
Click here for the original thread.
To Larry....... thanks again for posting a vid of my "winky".
To TheRadioFlyer.....Thanks for the disassembly procedure. I especially like the fact that I didn't have to remove the entire driver side Headlamp assembly to fix the 2 problems that where lurking beneath.
1) The plastic cover that is GLUED on over the nylon gear had popped off. This was a huge GM blunder when they changed from cast aluminum cover('97 to '99 models), which uses 3 screws to secure the cover, to a completely plastic housing for the motor/worm gear and nylon gear(2000 to 2004). The nylon gear will push against the cover, and it is only a matter of time before the pressure breaks the GLUE bond......and I don't care what kind of magic glue there is out there, it will not hold.
2) As per GM service bulletin, motor should be offset with washers so that the armature which raises and lowers the light makes better contact with the limiter tabs. There were enough customer complaints regarding faulty operation of the driver side Headlamp to issue this bulletin, and how to correct the problem.
I took some pics and added notes on what I did to fix both of the above design flaws, as well as how to eliminate the need for GLUE for the motor housing cover.


Job Completed. Took me about 2 hours, but I move real slooooooooooooooooooow.........otherwise I get more "honey do's" when I go into the house !!! (-; Another benefit was that I could better align the body colored headlamp cover, as the folks at GM did a poor job on this as well. This adjustment is done by maneauvering the cover directly under the body panel to adjust/equalize the top/bottom/left/right gap clearance .

The following pic is out of sequence, but I did want to show the 2 critical pivot bolts that hold the light assembly to the..........car

Below are the only tools required for this job:

Take a look at the following picture. This is what you will never have to mess with again!!The "wrap tie" method will eliminate the need for GLUE, can be done without removal from car, and will surely last a very long time !! But if you like the GLUE method, here's a pic I found in the DIY section....

To TheRadioFlyer.....Thanks for the disassembly procedure. I especially like the fact that I didn't have to remove the entire driver side Headlamp assembly to fix the 2 problems that where lurking beneath.
1) The plastic cover that is GLUED on over the nylon gear had popped off. This was a huge GM blunder when they changed from cast aluminum cover('97 to '99 models), which uses 3 screws to secure the cover, to a completely plastic housing for the motor/worm gear and nylon gear(2000 to 2004). The nylon gear will push against the cover, and it is only a matter of time before the pressure breaks the GLUE bond......and I don't care what kind of magic glue there is out there, it will not hold.
2) As per GM service bulletin, motor should be offset with washers so that the armature which raises and lowers the light makes better contact with the limiter tabs. There were enough customer complaints regarding faulty operation of the driver side Headlamp to issue this bulletin, and how to correct the problem.
I took some pics and added notes on what I did to fix both of the above design flaws, as well as how to eliminate the need for GLUE for the motor housing cover.
Job Completed. Took me about 2 hours, but I move real slooooooooooooooooooow.........otherwise I get more "honey do's" when I go into the house !!! (-; Another benefit was that I could better align the body colored headlamp cover, as the folks at GM did a poor job on this as well. This adjustment is done by maneauvering the cover directly under the body panel to adjust/equalize the top/bottom/left/right gap clearance .
The following pic is out of sequence, but I did want to show the 2 critical pivot bolts that hold the light assembly to the..........car
Below are the only tools required for this job:
Take a look at the following picture. This is what you will never have to mess with again!!The "wrap tie" method will eliminate the need for GLUE, can be done without removal from car, and will surely last a very long time !! But if you like the GLUE method, here's a pic I found in the DIY section....
05-06-2010, 05:06 AM
#13
Le Mans Master

Member Since: Jul 2009
Location: Los Angeles California
Posts: 9,526
Likes: 0
Received 10 Likes
on
10 Posts
That brass gear fix didn't work for my 97 Formula. I ended up with the same issues you're having. The headlight would go down and wind down too tight to reopen, and then finally the epoxy wore and the housing came apart.
The best fix, in my honest opinion, is getting another headlight motor unit. I'd try the above zip-tie trick first though. But that brass gear doesn't have enough give which is why it gets too tight. I can imagine using a resistor between the line would fix that but it'd slow the motor down a bit.
The best fix, in my honest opinion, is getting another headlight motor unit. I'd try the above zip-tie trick first though. But that brass gear doesn't have enough give which is why it gets too tight. I can imagine using a resistor between the line would fix that but it'd slow the motor down a bit.
04-16-2012, 01:04 PM
#14
3rd Gear

Member Since: Apr 2012
Posts: 3
Likes: 0
Received 0 Likes
on
0 Posts

Thank you for the pics and description of how to repair the one eyed popup headlight problem. I would not have tried it without the help.
I added two washers and I think three would be better.
I added two washers and I think three would be better.
04-16-2012, 04:32 PM
#15

Looks like I am not the only one with this problem. I replaced my gears with the brass ones as well. Could never get the adjustment right as far as having these headlights pop up on their own. I usually wind up popping the hood and loosing the manual gear drive a bit to get both headlights to pop up. I don't seem to have more trouble with one side then the other for some reason. I also had my housing covers come off over time. I have tried some other epoxies as well. If it happens again I may try the cable tie method shown in photo graphic detail here.
Todd
Todd
09-07-2014, 12:44 PM
#16
Intermediate
Looks like I am not the only one with this problem. I replaced my gears with the brass ones as well. Could never get the adjustment right as far as having these headlights pop up on their own. I usually wind up popping the hood and loosing the manual gear drive a bit to get both headlights to pop up. I don't seem to have more trouble with one side then the other for some reason. I also had my housing covers come off over time. I have tried some other epoxies as well. If it happens again I may try the cable tie method shown in photo graphic detail here.
Todd
Todd
So I got lucky. I can imagine that the nylon gears would be stripped before long. So where can I buy more nylon stops?
09-07-2014, 01:18 PM
#17
Intermediate
It appears that there are three nylon "stops" that the headlight housing bumps as it goes up and down. Two on top and one below the gear housing. My driver's headlight would go up fine but going down it would make a terrible racket as it hit the closed position. Looking at the bottom white nylon stop, it was notched about 4mm at one point. I pulled it off and flipped it around and reconnected the power. Headlights go up and down with no complaints.
So I got lucky. I can imagine that the nylon gears would be stripped before long. So where can I buy more nylon stops?
So I got lucky. I can imagine that the nylon gears would be stripped before long. So where can I buy more nylon stops?
Last edited by dutch911; 09-07-2014 at 01:24 PM.
11-03-2014, 09:51 PM
#18
Instructor

Dammit. Not-so-lucky. Now the headlight goes down with no problem or noise but doesn't go up with the switch action. Passenger side up and down no problem or noise. On the drivers side when the switch is activated, the manual control **** takes a brief slow turn about 1/4 rotation counter-clockwise (the direction you turn it if you want to raise the headlight). If I manually give it a little twist counter-clockwise before actuating the switch, it goes fine. The resistance is kinda snug for about a quarter turn then quite loose. If I turn it to the loose part, it will go up just fine with the switch. Perhaps I need to replace the stop as it is tightening the ....manual control?... too much when it puts the headlight down?
sounds like that nylon stop is shot; you can try 5/16" or 3/8" gas line cut to the size of the stop or slightly larger and try that in its place. I got some at a local auto store based on the advice on another related thread. It worked for me. Make sure both the stops on the mount for the headlight motor have this or good (new) nylon stops.
Its not you, its just a crappy design.
 02-25-2017, 10:37 PM
#19

:My pop up head light work fine except when I shut them off the pop up go down but then drive side pop up goes up I rebutted it but the same thing
Last edited by Salboy; 02-26-2017 at 09:00 AM.