
Front Bumper Removal?
 11-22-2009, 06:27 PM
#1
Melting Slicks

Thread Starter

Does anyone have a thorough write up of how to do this (Pics would be great too!)
I want to get the original build sheet out of the car.
Any help would be great.

I want to get the original build sheet out of the car.
Any help would be great.
 11-22-2009, 07:29 PM
#2
Racer

Where were you three weeks ago? I had mine off and could have given you pics and everything. Oh well, text it is.
First there is a row of fasteners that is easily visible when the hood is open (between the headlights) along the top of the bumper cover. Two clips on the side (pull up on center with clip tool) and the bolts I believe are 7mm.
Next I would go after the 7's lining the wheel well area. Might be 3-4 if I remember correctly. Next it is time to get underneath and pull out the two access panels on each side (7's). Looking along the bottom it should be fairly obvious what needs to come off. Mine did not have the lower air dam on it so yours probably needs to come off.
Now from the bottom you will have to reach all the way up into the corners where the bumper cover meets the fender. There are two 10's, or 11's, can't remember. I would use an extension and maybe a flex socket to get at these easier, they are the hardest part of the cover.
That should be it. Have someone there with you to help take it off and on so there is no scratching of paint. When I had mine off I took a look at the build sheet and thought it was pretty cool that it was in there, kinda like an old relic or something. The last person to touch it was probably on the assembly line building the car 10 years ago (mines a 2000).
Hope this helps and if I am missing something others will chime in, hopefully with pictures.
11-22-2009, 07:37 PM
#3
Melting Slicks
Thread Starter
Thanks for the info.
Its on my winter to do list, when I do it I will be sure to take some pictures to help others.
Its on my winter to do list, when I do it I will be sure to take some pictures to help others.
11-22-2009, 09:32 PM
#4
Burning Brakes

I think it would be cool to have the original build sheet, but i didn't want to go through the hassle of taking the bumper cover off, so i
got a copy from the Corvette Museum. Good luck.
got a copy from the Corvette Museum. Good luck.
11-22-2009, 09:45 PM
#5
Melting Slicks
Thread Starter
Yeah, I was thinking the same, but I'm going to be putting in a vararam, and clear corner lenses and painting the calipers over the winter, so I decided I might as well go all out.
11-22-2009, 09:52 PM
#6
Administrator


Member Since: Mar 2001
Location: In a parallel universe. Currently own 2014 Stingray Coupe.
Posts: 342,707
Received 19,233 Likes
on
13,933 Posts
C7 of the Year - Modified Finalist 2021
MO Events Coordinator
St. Jude Co-Organizer
St. Jude Donor '03-'04-'05-'06-'07-'08-'09-'10-'11-'12-'13-'14-'15-'16-'17-'18-'19-
'20-'21-'22-'23-'24
NCM Sinkhole Donor
CI 5, 8 & 11 Veteran


Had a little work done to my front fascia recently and had the body shop retreive the build sheet while the fascia was off the car. Nice to have the real thing and will be getting it framed soon.
11-22-2009, 11:30 PM
#7
Burning Brakes
11-23-2009, 02:20 AM
#8
Tech Contributor
Member Since: Dec 2003
Location: Horncastle Lincolnshire, England
Posts: 19,384
Likes: 0
Received 79 Likes
on
61 Posts
2023 C5 of the Year Finalist - Unmodified


Its a lot of work. I might be tempted to pay the $40 and get one from The NCM.
Here you go
Document ID# 657216
2002 Chevrolet Corvette
________________________________________
Fascia Replacement - Front Bumper
Removal Procedure
1. Raise and support the vehicle. Refer to Lifting and Jacking the Vehicle in General Information.
Pic 1
2. Remove the air deflector and the left and right outer valance. Refer to Air Deflector Replacement - Front Bumper Fascia .
Pic 2

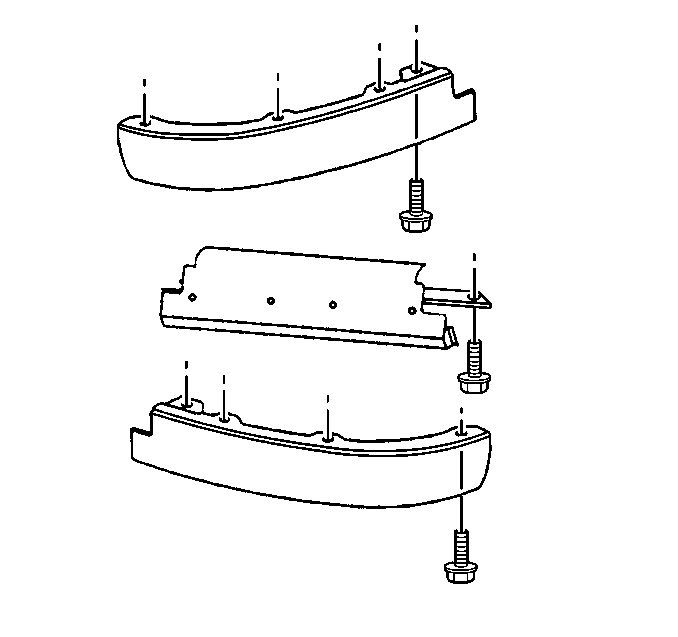
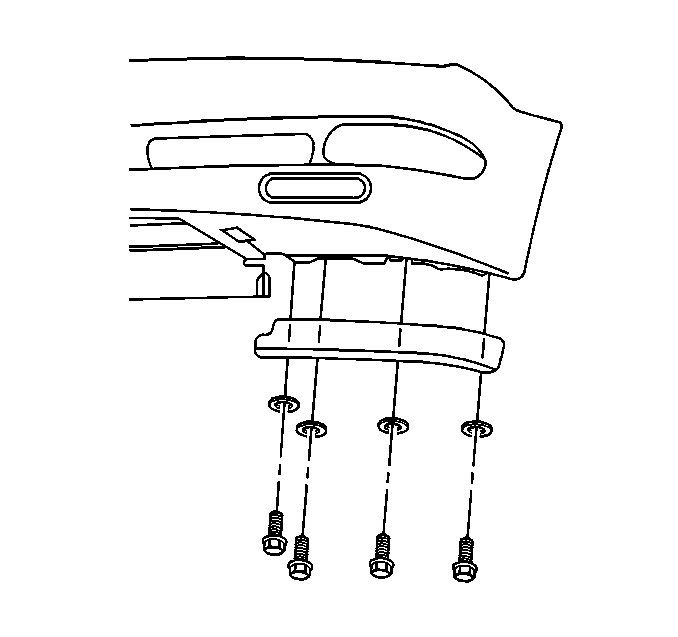
3. Remove the fascia to skid bar bolts.
Pic 3
4. Remove the fascia to radiator support bolts.
5. Remove the fascia lower close out panels. Refer to Close Out Panel - Front Bumper Fascia Lower .
Pic 4

6. Remove the wheelhouse panel to fascia bolts.
Pic 5
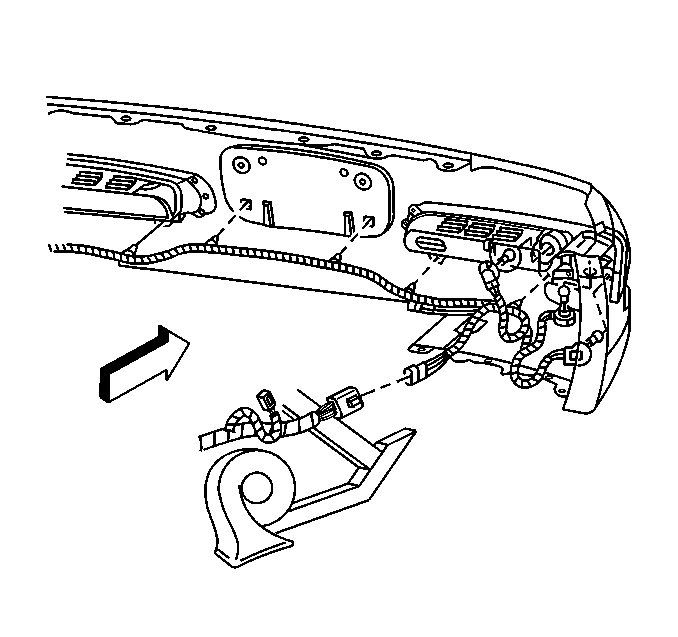
7. Disconnect the fascia harness connector.
Pic 6
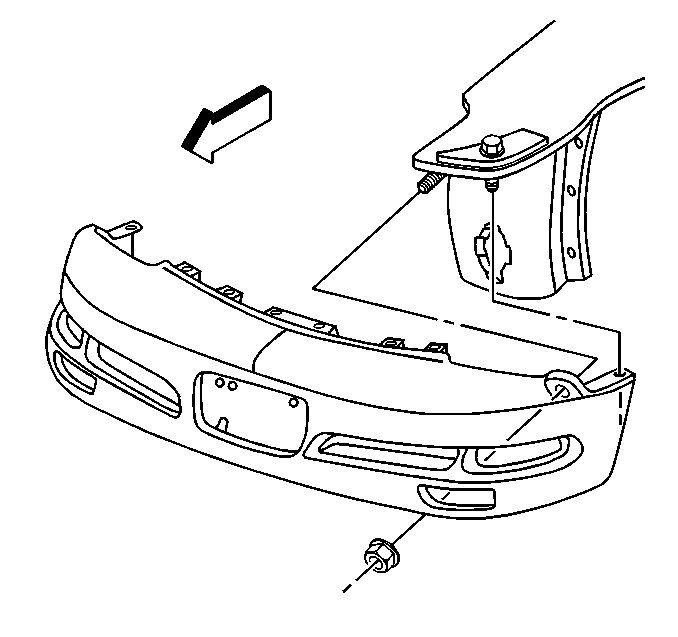
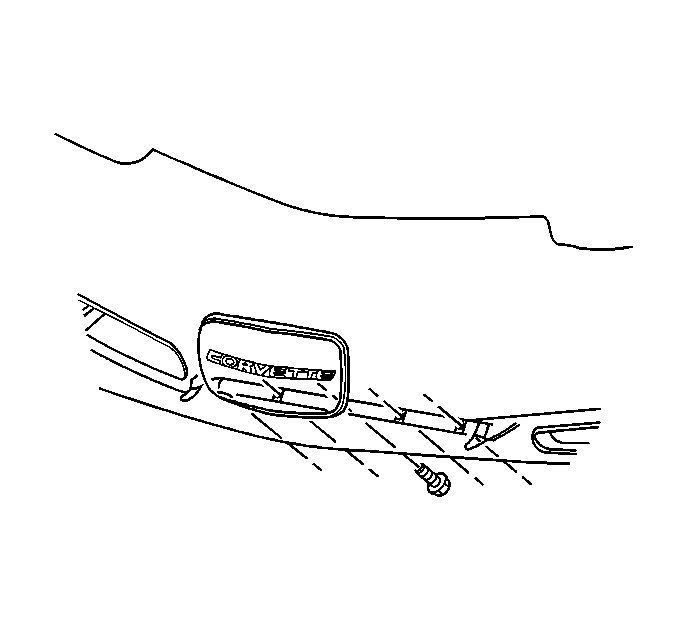
8. Remove the nuts from the fender reinforcement studs.
Pic 7
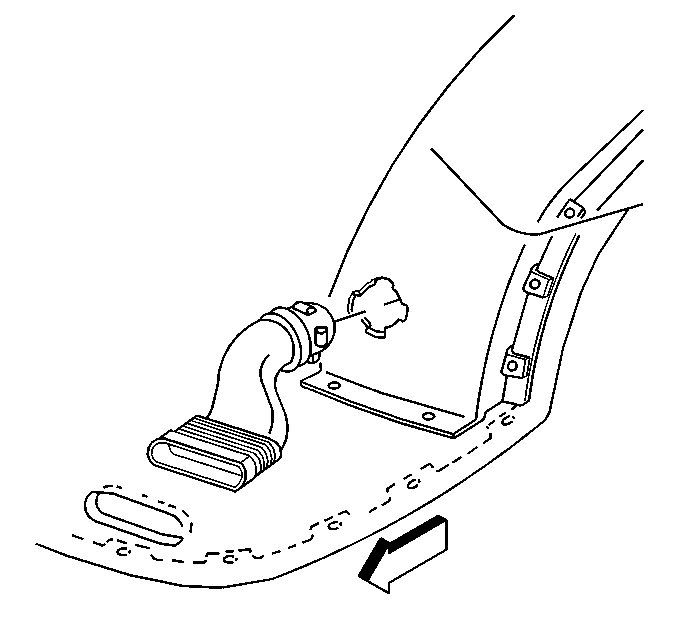
9. Disconnect the front brake caliper cooling ducts from the fascia. Pull the fascia outward slightly to release the tension between the ducts and the fascia.
10. Lower the vehicle.
Pic 8
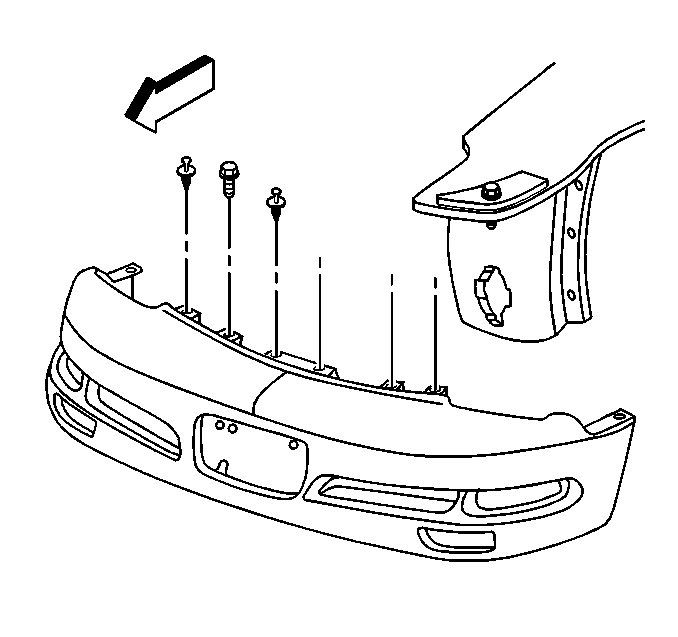
11. Remove fascia upper flange to fascia retainer push-pins and bolts.
12. Remove the fascia.
13. Remove the fascia grilles from the fascia. Refer to Fascia Grille Replacement .
14. Remove the fog lamps from the fascia. Refer to Fog Lamp Replacement - Front .
Installation Procedure
1. Install the fog lamps to the fascia. Refer to Fog Lamp Replacement - Front .
2. Install the fascia grilles to the fascia. Refer to Fascia Grille Replacement .
3. Position the fascia to the front of the vehicle.
4. Secure the upper flange of the fascia to the fascia retainer with the push-pin retainers.
Notice
Use the correct fastener in the correct location. Replacement fasteners must be the correct part number for that application. Fasteners requiring replacement or fasteners requiring the use of thread locking compound or sealant are identified in the service procedure. Do not use paints, lubricants, or corrosion inhibitors on fasteners or fastener joint surfaces unless specified. These coatings affect fastener torque and joint clamping force and may damage the fastener. Use the correct tightening sequence and specifications when installing fasteners in order to avoid damage to parts and systems.
5. Install the upper flange to fascia retainer bolts.
Tighten
Tighten the front fascia upper flange bolts to 5 N�m (44 lb in).
6. Raise and support the vehicle. Refer to Lifting and Jacking the Vehicle in General Information.
7. Connect the fascia harness connector.
8. Align the fascia to the fenders at the headlamp opening and flush the fender to the vertical joint.
9. Install the fascia nuts to the forward studs on the right and left fender reinforcements.
Tighten
Tighten the front fascia to the fender reinforcement stud nuts to 5 N�m (44 lb in).
10. Align and flush the fascia to the fender at the horizontal joint.
11. Install the fascia nuts to the rearward studs on the right and left front fender reinforcement.
Tighten
Tighten the front fascia to the fender reinforcement stud nuts to 5 N�m (44 lb in).
12. Install the wheelhouse to fascia bolts.
Tighten
Tighten the front wheelhouse to fascia bolts to 3 N�m (27 lb in).
13. Install the brake caliper cooling ducts to the fascia. Refer to Brake Caliper Cooling Duct Replacement - Front .
14. Install the fascia close out panels. Refer to Close Out Panel - Front Bumper Fascia Lower .
15. Install the lower fascia flange to radiator support screws.
Tighten
Tighten the front fascia lower flange to the radiator support screws to 8 N�m (71 lb in).
16. Install the fascia to skid bar bracket bolts.
Tighten
Tighten the front fascia to the skid bar bracket bolts to 3 N�m (27 lb in).
17. Install the air deflector. Refer to Air Deflector Replacement - Front Bumper Fascia .
Pic 9
18. Install the right and left outer valance. Refer to Valance Panel Replacement - Front .
19. Lower the vehicle.
The following 2 users liked this post by DeeGee:
DaveC-98-C5 (11-27-2018),
SpeedRacerMach (10-15-2018)
11-23-2009, 07:00 AM
#9
Melting Slicks
Thread Starter
How did I know DeeGee would come through?
Hmmm...you have me thinking maybe I should change my mind
But this is an "over the winter" thing, so no rush.
Hmmm...you have me thinking maybe I should change my mind
But this is an "over the winter" thing, so no rush.
07-25-2015, 04:06 AM
#11
Instructor
Wow! DeeGee! Thank you so much for posting that, this was by far the best front bumper removal tutorial I've seen thought a good hour of searching! Just got it off and back on to install by projector headlights all in an afternoons work. Finished pretty late (it just hit 3am as I type this) but it went pretty smooth without any hickups!
07-25-2015, 06:51 AM
#12
Le Mans Master

Wow! DeeGee! Thank you so much for posting that, this was by far the best front bumper removal tutorial I've seen thought a good hour of searching! Just got it off and back on to install by projector headlights all in an afternoons work. Finished pretty late (it just hit 3am as I type this) but it went pretty smooth without any hickups!
FWIW:
Almost all bolts on the C-5 (and C-6) are either 7-10 or 13.
There are a couple of 8's behind the tail lights and one somewhere under the dash, but I forget the exact location.
The following users liked this post:
SpeedRacerMach (10-15-2018)
07-25-2015, 06:57 PM
#14
Drifting

One note - the facia needs to be on the car to install the Vararam. There are no fasteners per se for the Vararam as it basically wedges in place. I spent about 3 hours today installing the Vararam so I have very recent experience. The worst part of the entire install was laying on the floor of the garage for about 2 hours - otherwise not difficult. 
Oops - did not notice this thread was 6 years old.
Oops - did not notice this thread was 6 years old.
Last edited by frsr06; 07-25-2015 at 07:06 PM.
