
 02-20-2015, 06:23 PM
Last edit by: IB Advertising
See related guides and technical advice from our community experts:
Browse all: Engine and Powertrain
- How to replace water pump
Step by step instructions for do-it-yourselfers.
Browse all: Engine and Powertrain

Replacement Optispark and Water pump install - Part 1 (includes pictures)
11-03-2009, 11:38 PM
#1
Racer

Thread Starter

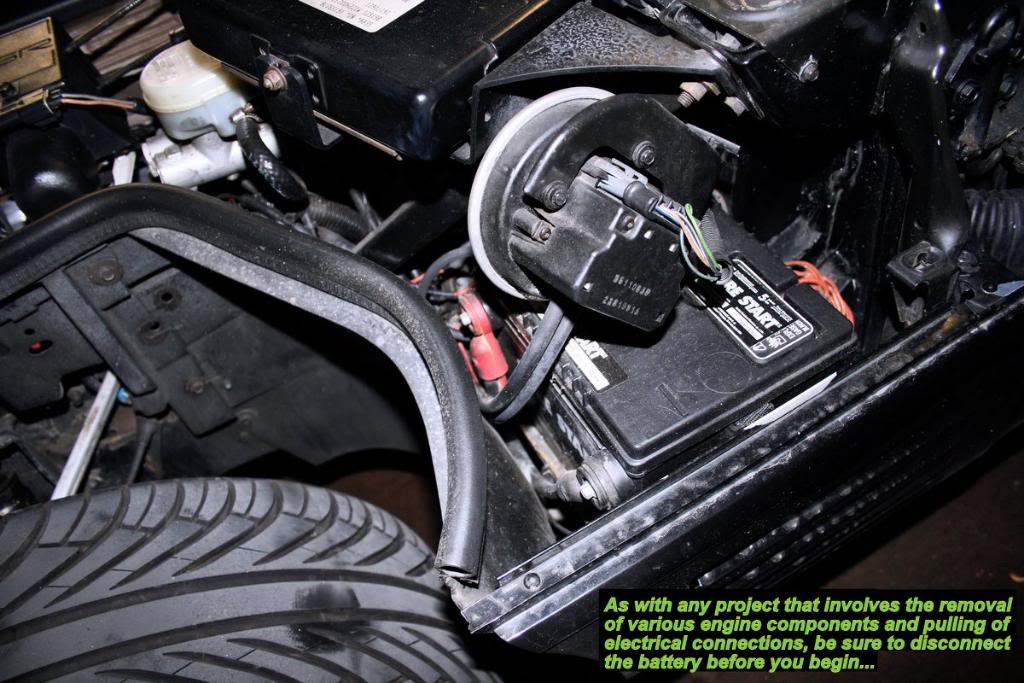
A little background story:
A few month's back, my '92 developed a very strange "hesitation" problem which would show up a few seconds after the car started running - only to last a few seconds - then disappear all together. I couldn't figure it out and needless to say, it drove me nuts.
Even though the car drove just fine after the initial stumble, I was determined to figure out what the problem was and fix it even if it was just a minor annoyance. Over the next few month's, I purchased and installed a new set of Bosch III injectors. A Walbro 255 High Performance fuel pump. New filter and a new fuel pressure regulator.
The problem remained.
I then turned to the ignition system and replaced the coil and module and still no dice. The car had new plug wires and O2 sensors put on a few month's back the same time I installed my long tube headers. I'd run out of ignition parts to replace...
Except for one that is...
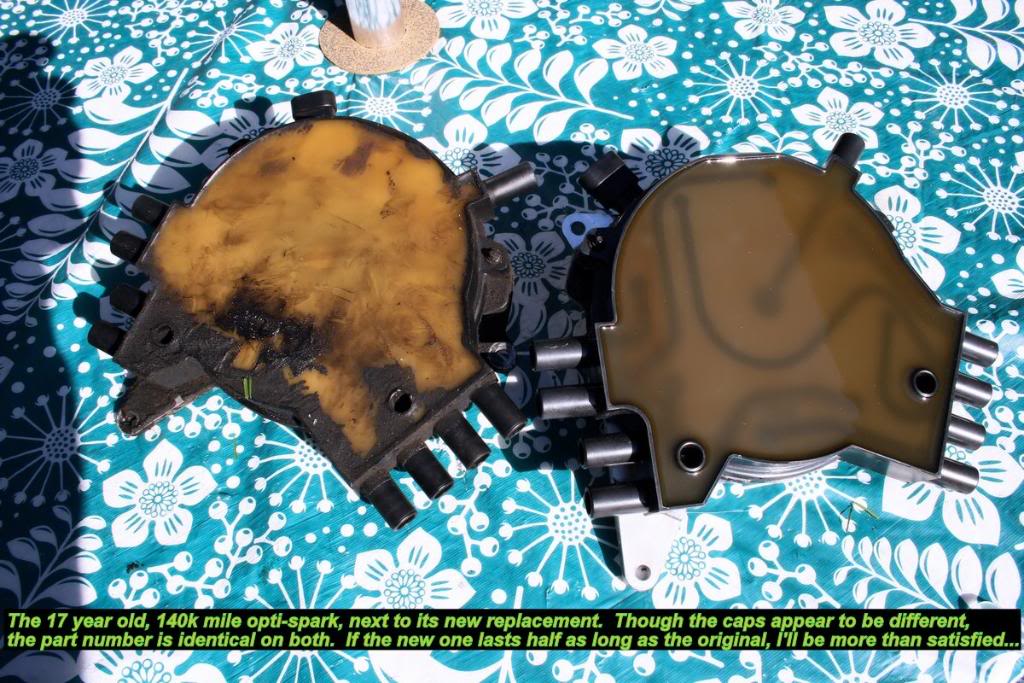
From the get-go, everybody told me it was my opti-spark, but I was stubborn and didn't want to hear any of it. I've had plenty of experience with opti-spark failures in the past with other LT1 equipped vehicles I've owned and while the "hesitation" symptom was indeed a common tell-tale sign of a bad opti, the fact that this stumble only lasted a brief few seconds only to disappear until the next day left me thinking the issue had to be something besides the opti-spark.
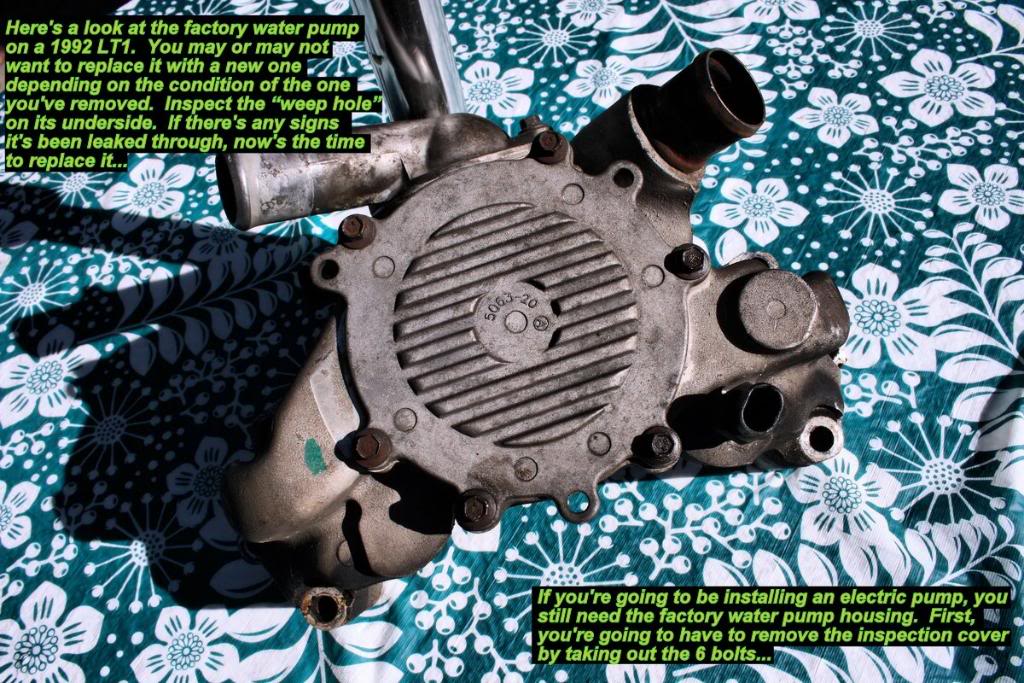
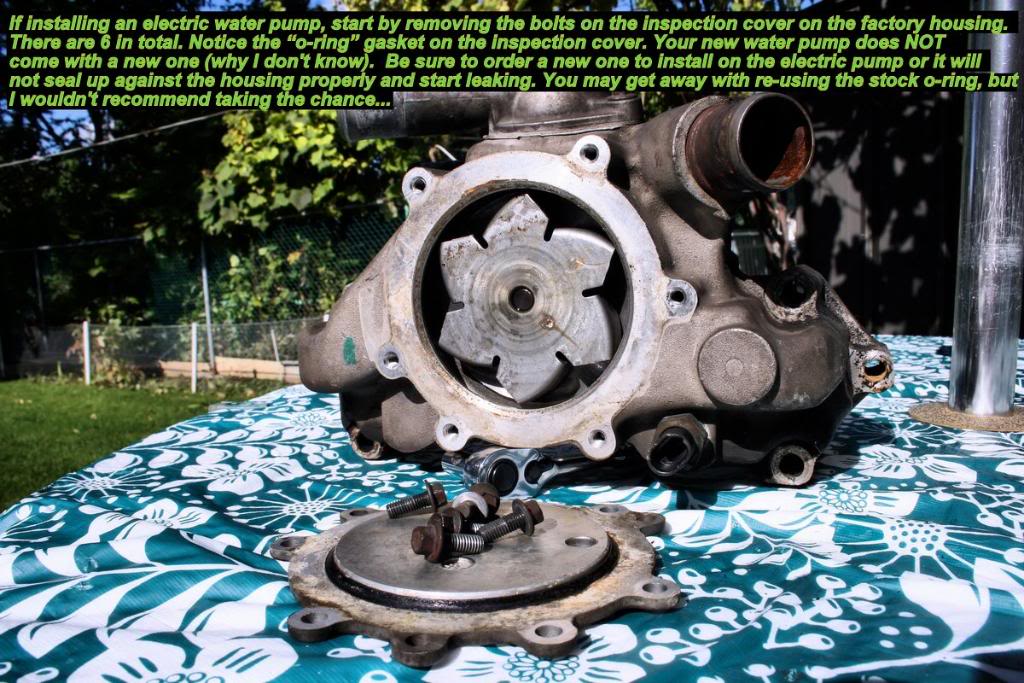
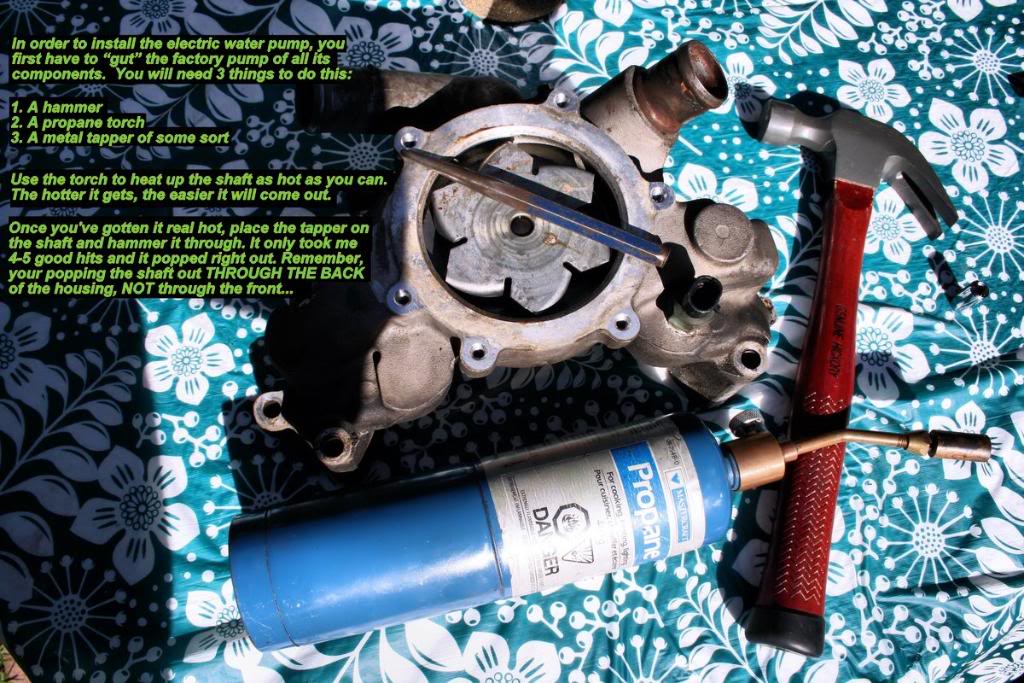
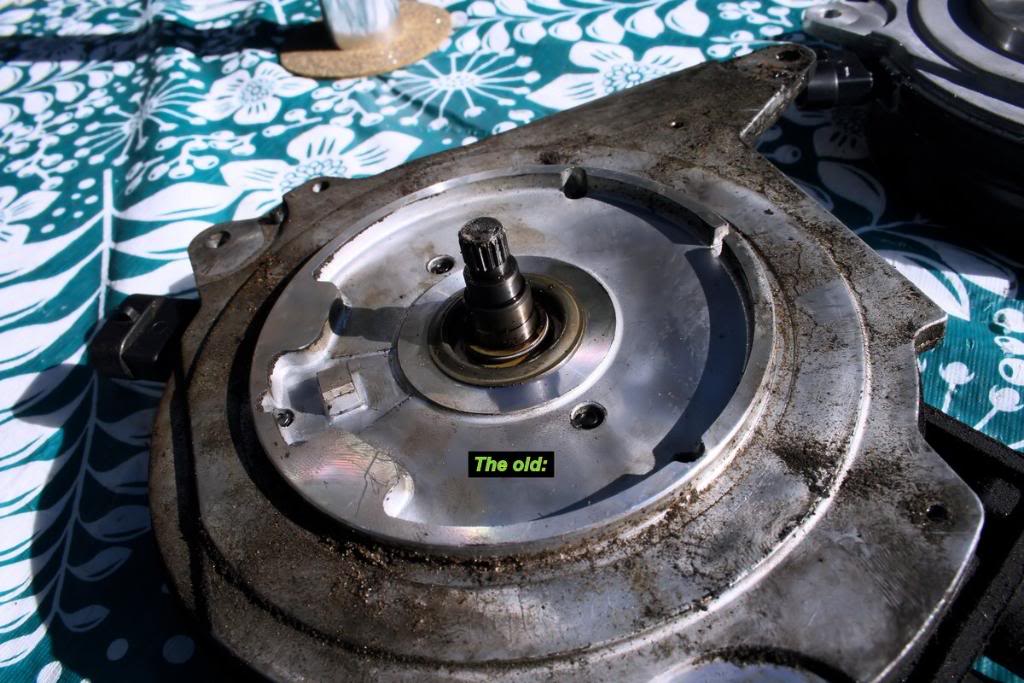
Well, after running out of ideas (as well as parts to replace) I bit the bullitt and went out and purchased a new Delco opti-spark. It occurred to me at that point, that since I had to remove the now 17 year old water pump to get to the opti-spark, I may as well buy a new pump to go along with it. No sense in doing things half-@ssed, I always like to say.
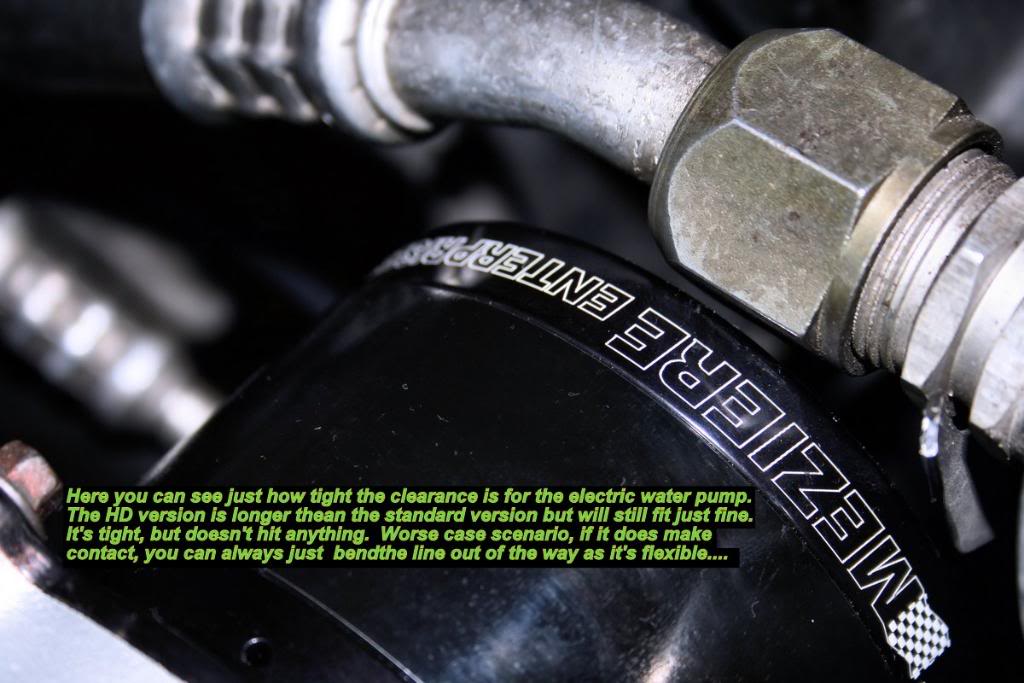
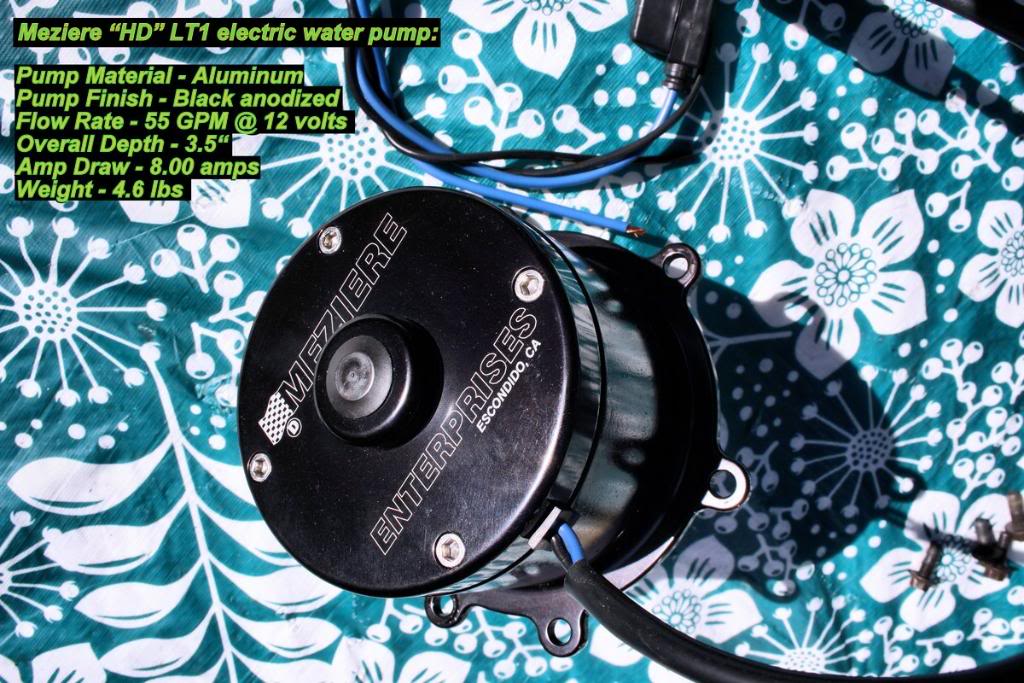
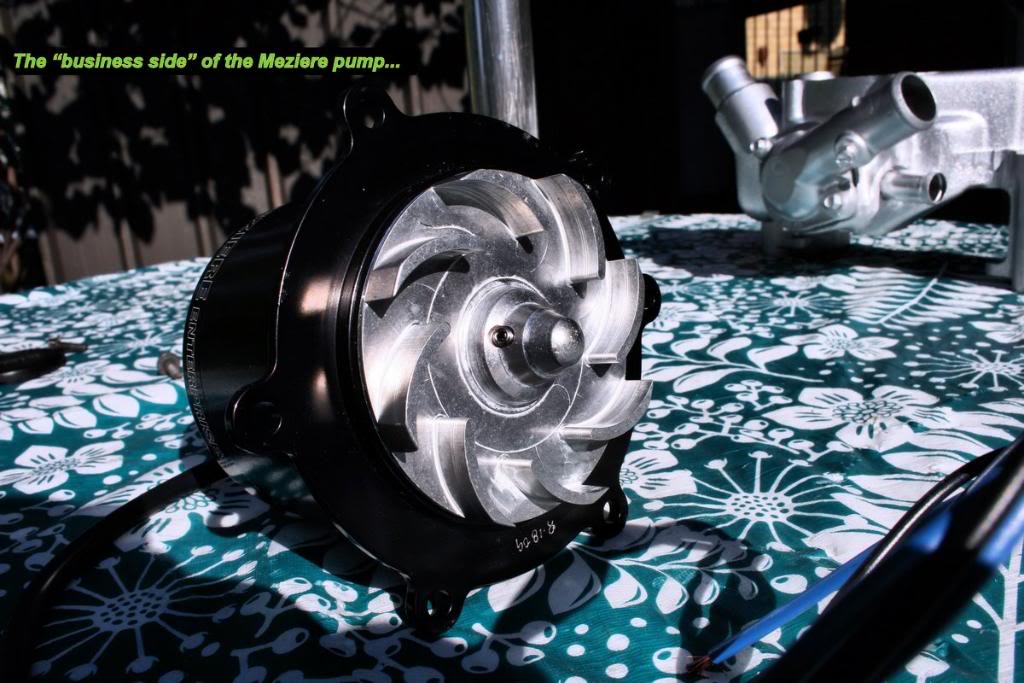
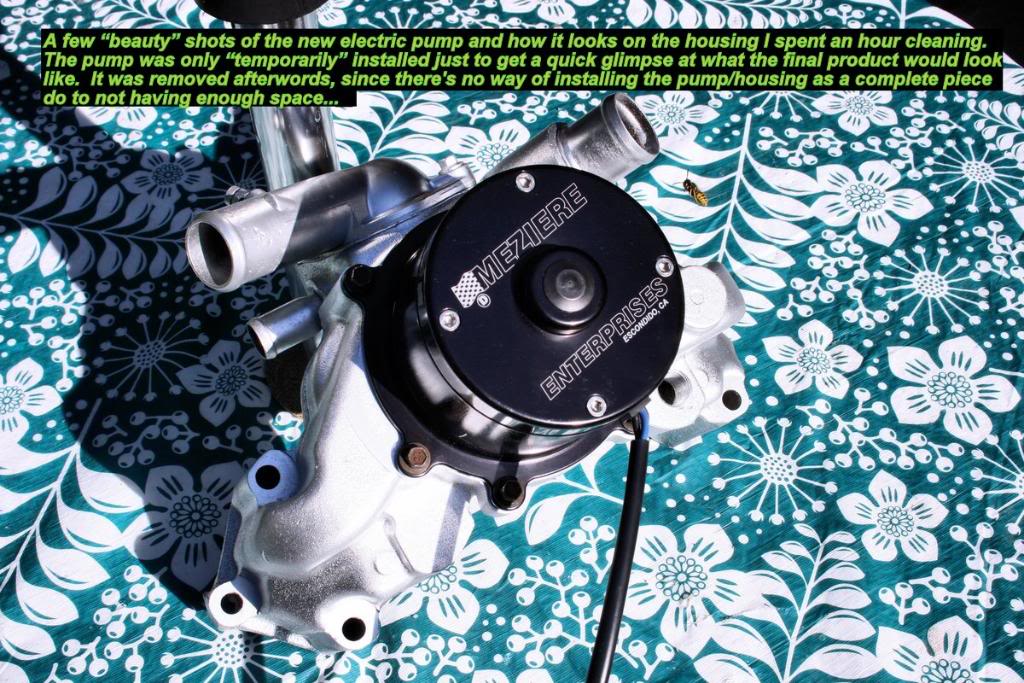
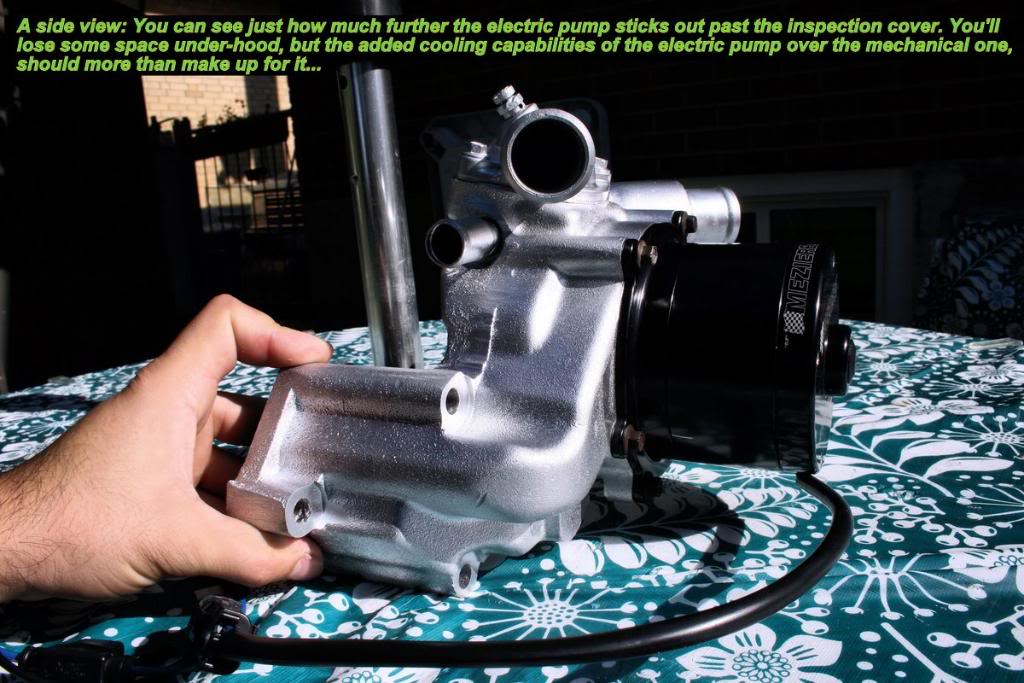
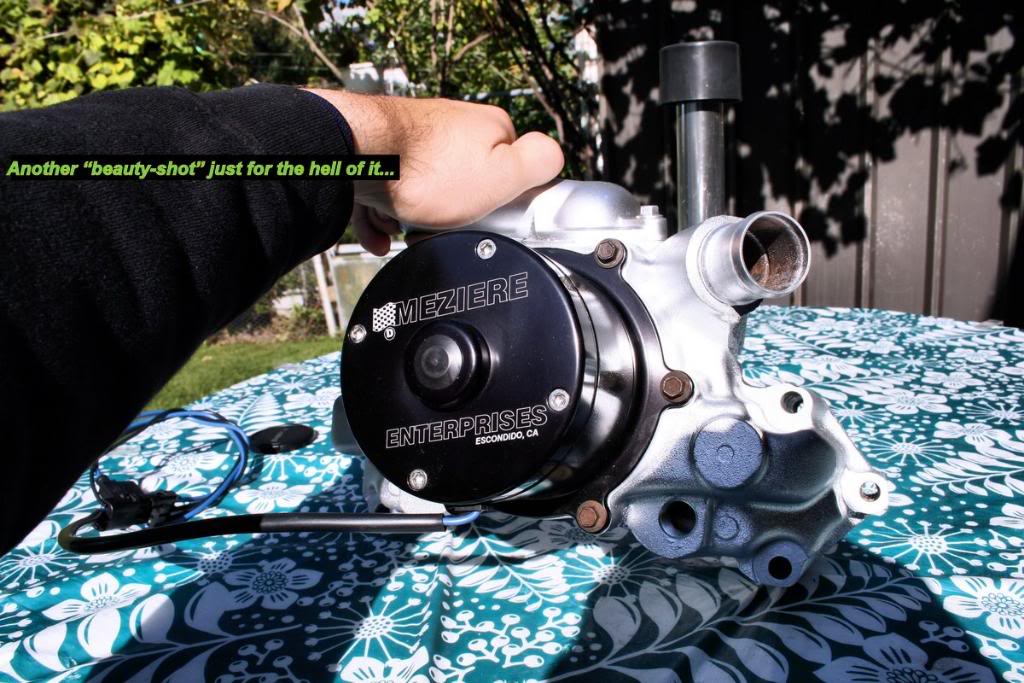
After doing a bit of research, I decided to go with an electric water pump instead. The Meziere HD electric pump to be exact. I honestly didn't expect it to be worth much, (if any) horse power, but the idea of having a pump being able to circulate the same amount of coolant throughout my system regardless of the RPM I was at, I found very appealing.
The factory mechanical pump doesn't circulate coolant very well at low RPM. My Vette has always run a bit hotter than I'm comfortable with, especially when sitting in stop-and-go traffic. Although I'm aware the LT1's were designed to run at higher temperatures, I still didn't like seeing my coolant temperature rising to 210' in traffic. The electric pump in my opinion, would do a better job at cooling my engine during "real world" conditions (aka: stop-and-go). If I could manage to pick up a few more horses with the electric pump, all the better, but it's not the reason I decided to go electric.
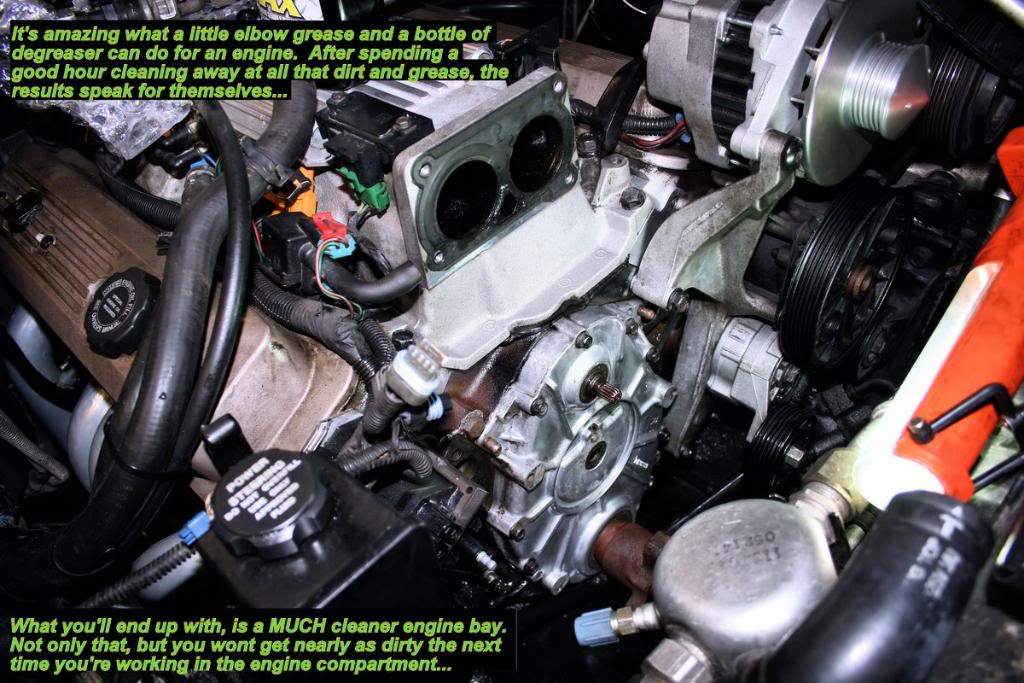
Anyways, after getting all the parts, I slowly began the project. What was originally supposed to be a "Saturday afternoon job" ended up turning into a month long project. Work was hectic and I'd never have enough time to get to my car. An hour here. A few minutes there.... It just seemed to take forever.
I managed to snap off a few pictures each time I'd get a chance to work on the car and figured I'd post them up for all of you to see. I used to always document the work I did on my car's over the years but most of the info I recorded has long been lost/deleted over the years as I went from owning one car to the next. (I wish I still had all that info)
Hopefully, some of you can use the information in the following posts and make use of some of the pictures I've taken for future projects of your own.
So here goes...
Let me know if there's any interest in further updates, otherwise I'll save myself the time and keep this stuff for my self
OPTI-SPARK & WATER PUMP INSTALL (PART 1)
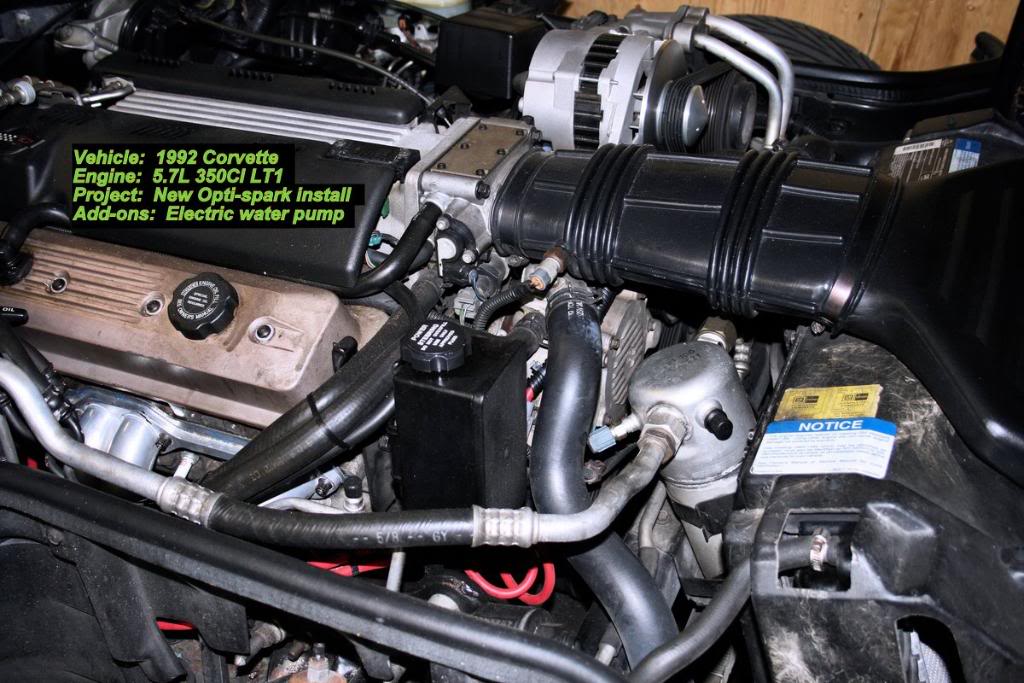


A few month's back, my '92 developed a very strange "hesitation" problem which would show up a few seconds after the car started running - only to last a few seconds - then disappear all together. I couldn't figure it out and needless to say, it drove me nuts.
Even though the car drove just fine after the initial stumble, I was determined to figure out what the problem was and fix it even if it was just a minor annoyance. Over the next few month's, I purchased and installed a new set of Bosch III injectors. A Walbro 255 High Performance fuel pump. New filter and a new fuel pressure regulator.
The problem remained.
I then turned to the ignition system and replaced the coil and module and still no dice. The car had new plug wires and O2 sensors put on a few month's back the same time I installed my long tube headers. I'd run out of ignition parts to replace...
Except for one that is...
From the get-go, everybody told me it was my opti-spark, but I was stubborn and didn't want to hear any of it. I've had plenty of experience with opti-spark failures in the past with other LT1 equipped vehicles I've owned and while the "hesitation" symptom was indeed a common tell-tale sign of a bad opti, the fact that this stumble only lasted a brief few seconds only to disappear until the next day left me thinking the issue had to be something besides the opti-spark.
Well, after running out of ideas (as well as parts to replace) I bit the bullitt and went out and purchased a new Delco opti-spark. It occurred to me at that point, that since I had to remove the now 17 year old water pump to get to the opti-spark, I may as well buy a new pump to go along with it. No sense in doing things half-@ssed, I always like to say.
After doing a bit of research, I decided to go with an electric water pump instead. The Meziere HD electric pump to be exact. I honestly didn't expect it to be worth much, (if any) horse power, but the idea of having a pump being able to circulate the same amount of coolant throughout my system regardless of the RPM I was at, I found very appealing.
The factory mechanical pump doesn't circulate coolant very well at low RPM. My Vette has always run a bit hotter than I'm comfortable with, especially when sitting in stop-and-go traffic. Although I'm aware the LT1's were designed to run at higher temperatures, I still didn't like seeing my coolant temperature rising to 210' in traffic. The electric pump in my opinion, would do a better job at cooling my engine during "real world" conditions (aka: stop-and-go). If I could manage to pick up a few more horses with the electric pump, all the better, but it's not the reason I decided to go electric.
Anyways, after getting all the parts, I slowly began the project. What was originally supposed to be a "Saturday afternoon job" ended up turning into a month long project. Work was hectic and I'd never have enough time to get to my car. An hour here. A few minutes there.... It just seemed to take forever.
I managed to snap off a few pictures each time I'd get a chance to work on the car and figured I'd post them up for all of you to see. I used to always document the work I did on my car's over the years but most of the info I recorded has long been lost/deleted over the years as I went from owning one car to the next. (I wish I still had all that info)
Hopefully, some of you can use the information in the following posts and make use of some of the pictures I've taken for future projects of your own.
So here goes...
Let me know if there's any interest in further updates, otherwise I'll save myself the time and keep this stuff for my self
OPTI-SPARK & WATER PUMP INSTALL (PART 1)
Last edited by LT1*C4; 03-01-2013 at 11:59 PM.

The following users liked this post:
Need4Sneed (07-30-2023)

Popular Reply
11-03-2009, 11:40 PM
Racer
Thread Starter
OPTI-SPARK & WATER PUMP INSTALL (PART 3)


----------------
----------------
- LT1C4
----------------
----------------
- LT1C4


 11-03-2009, 11:40 PM
#3
Racer
Thread Starter
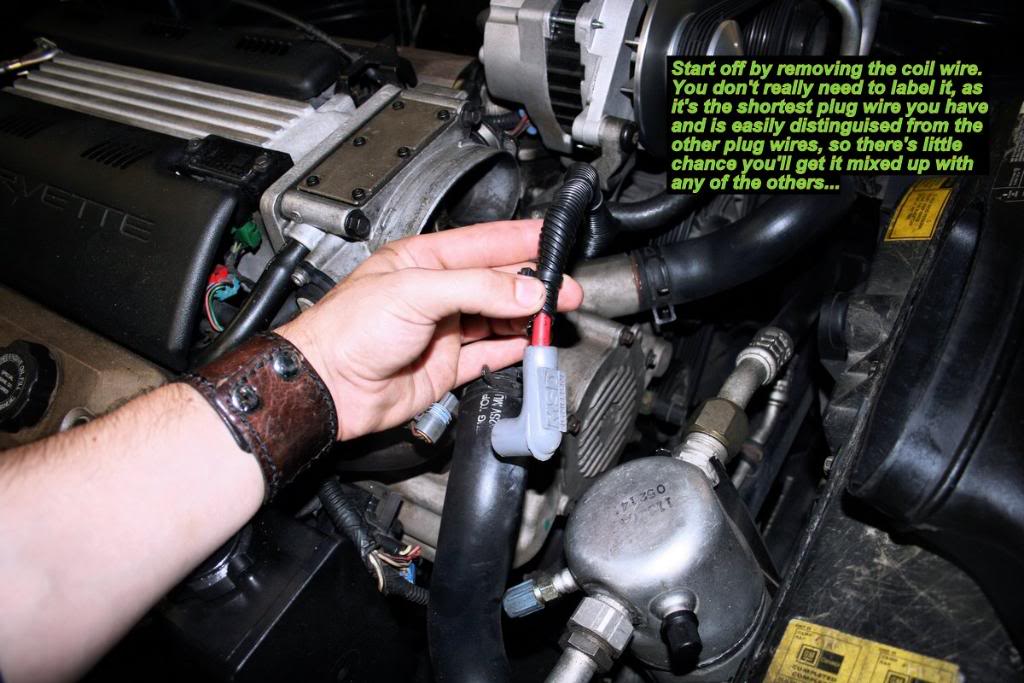
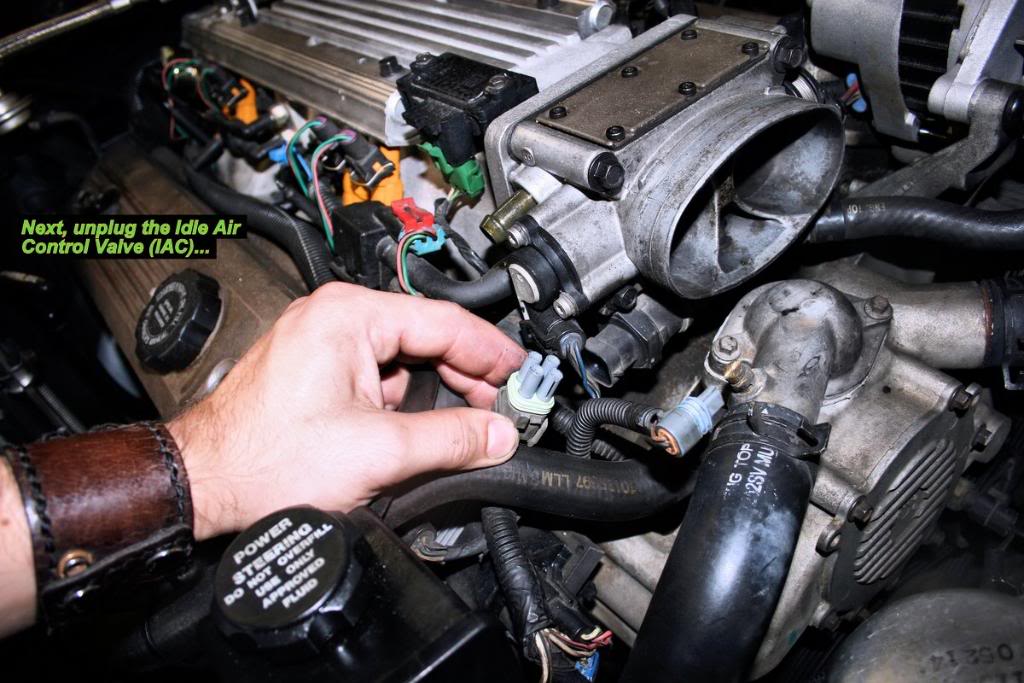
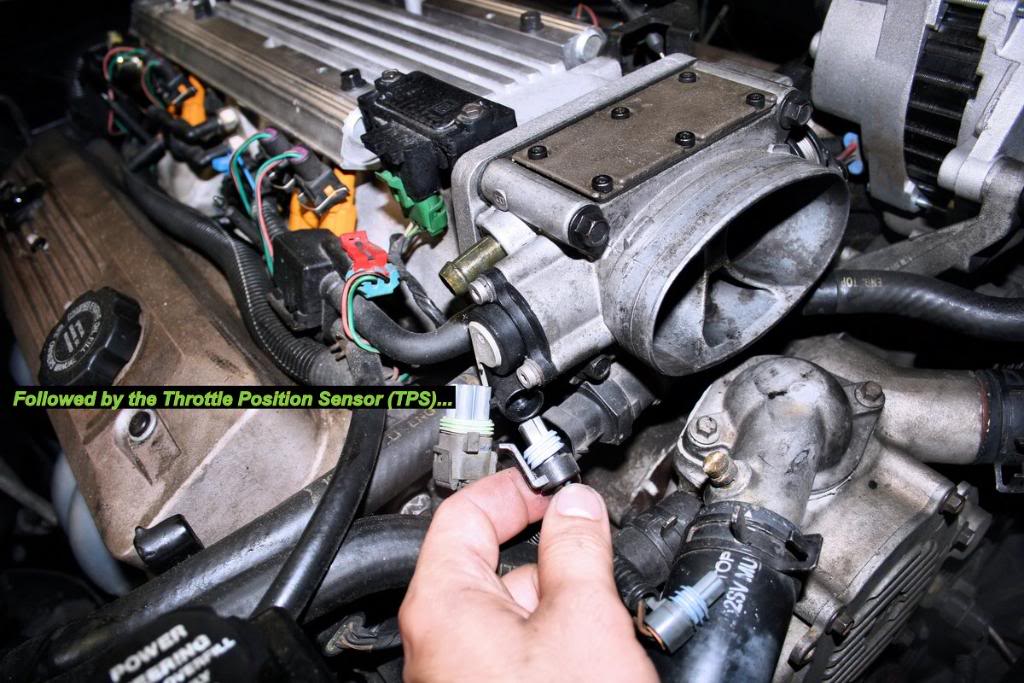
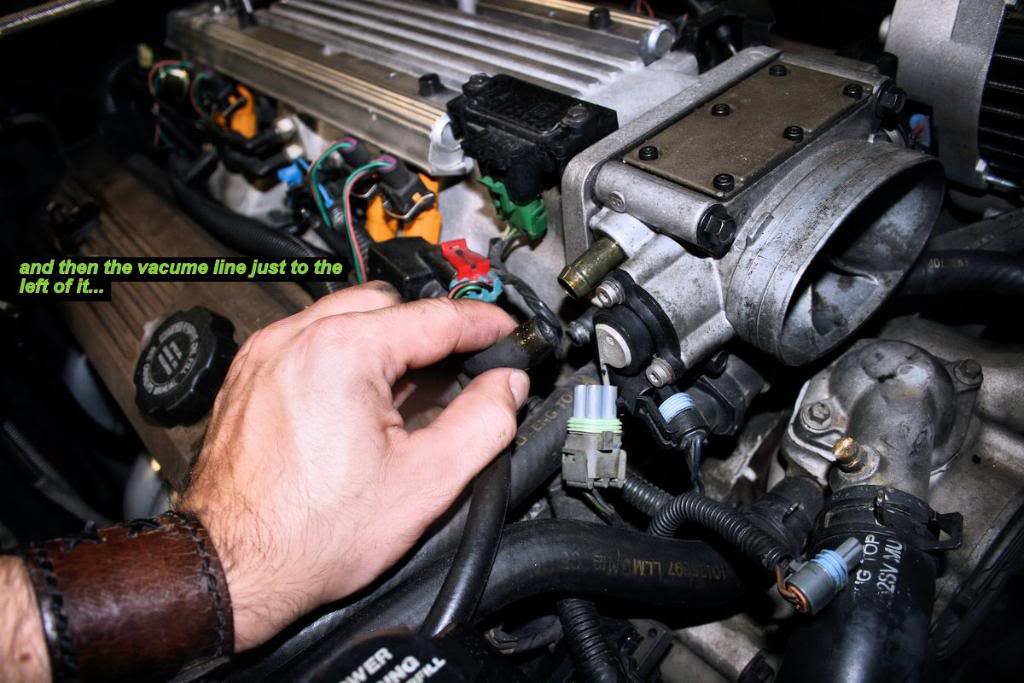
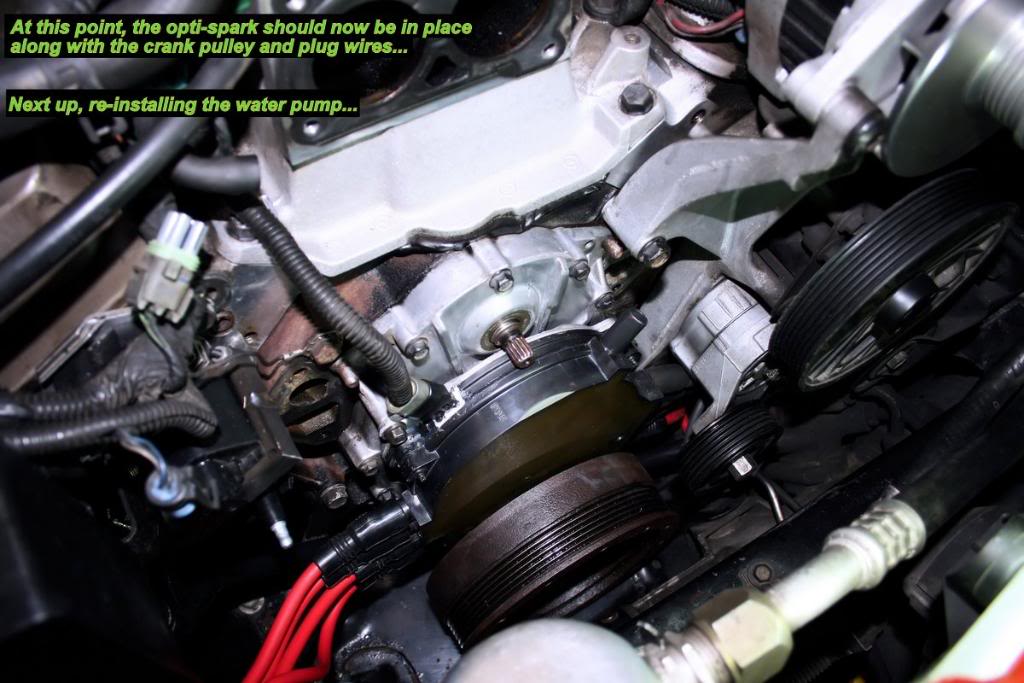
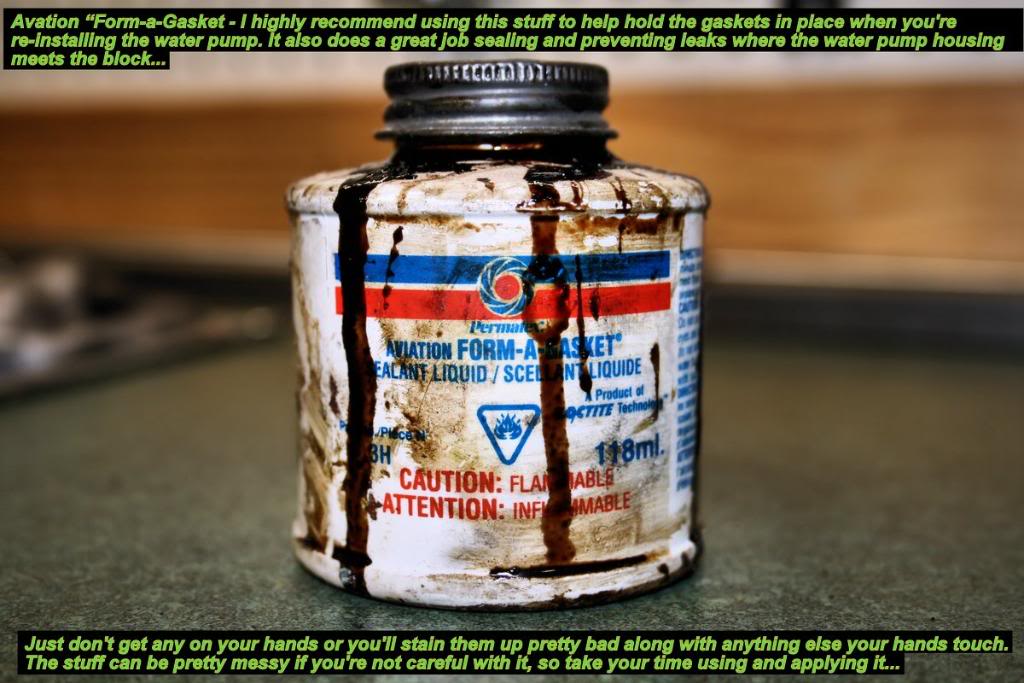
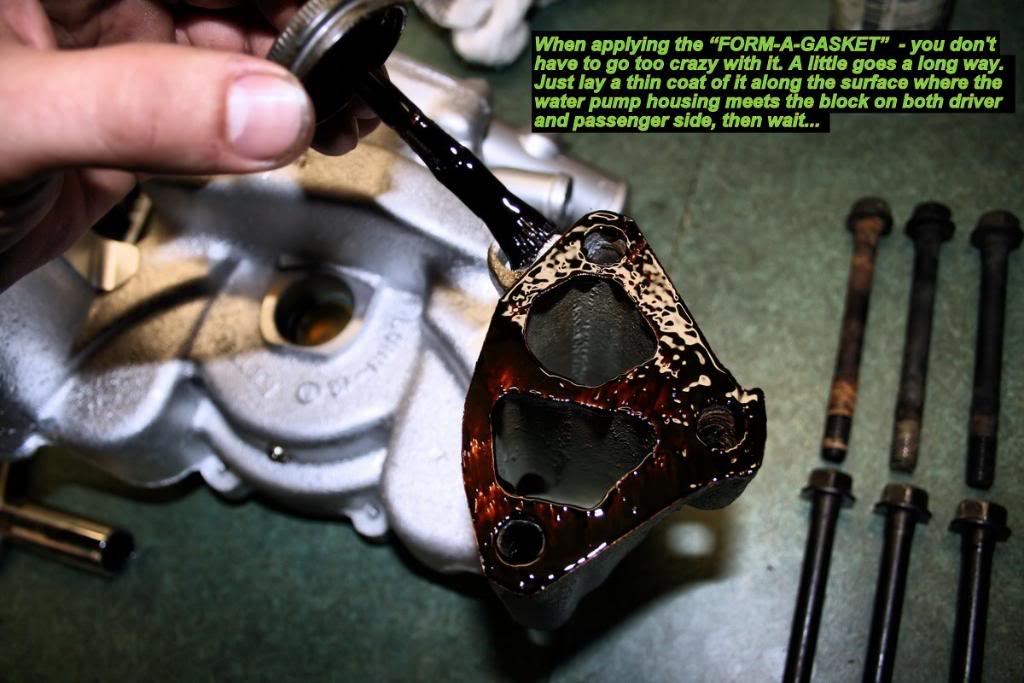
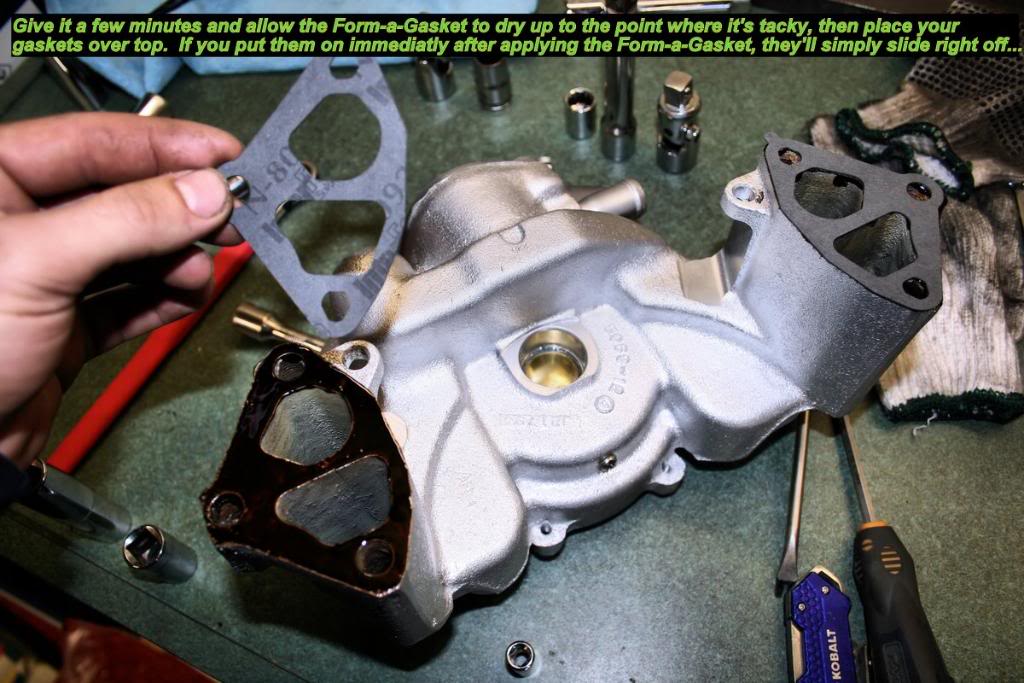
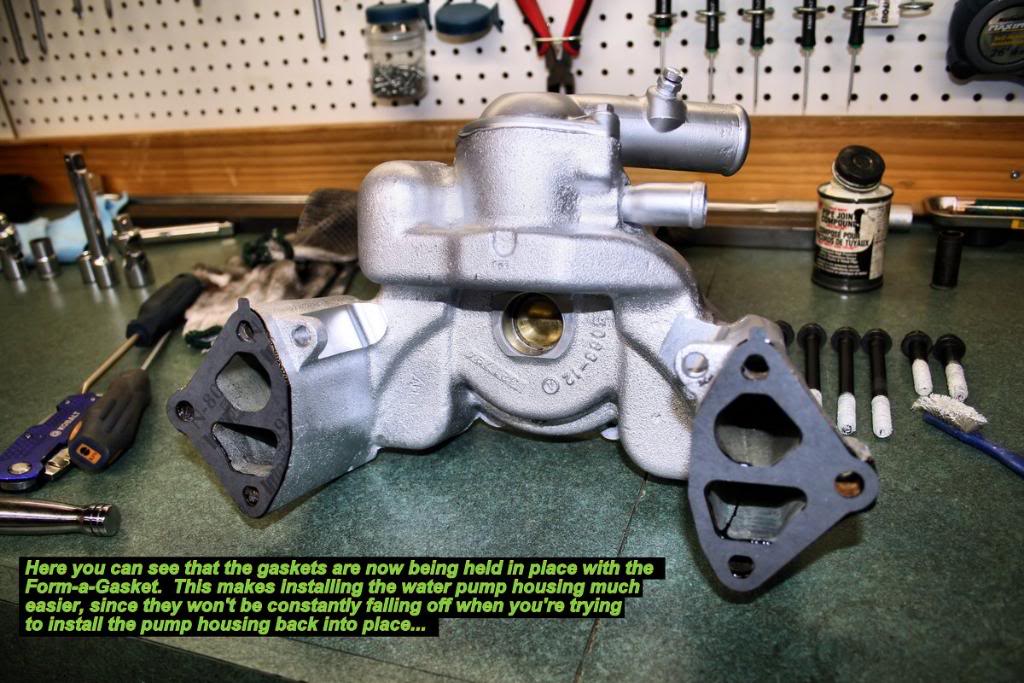
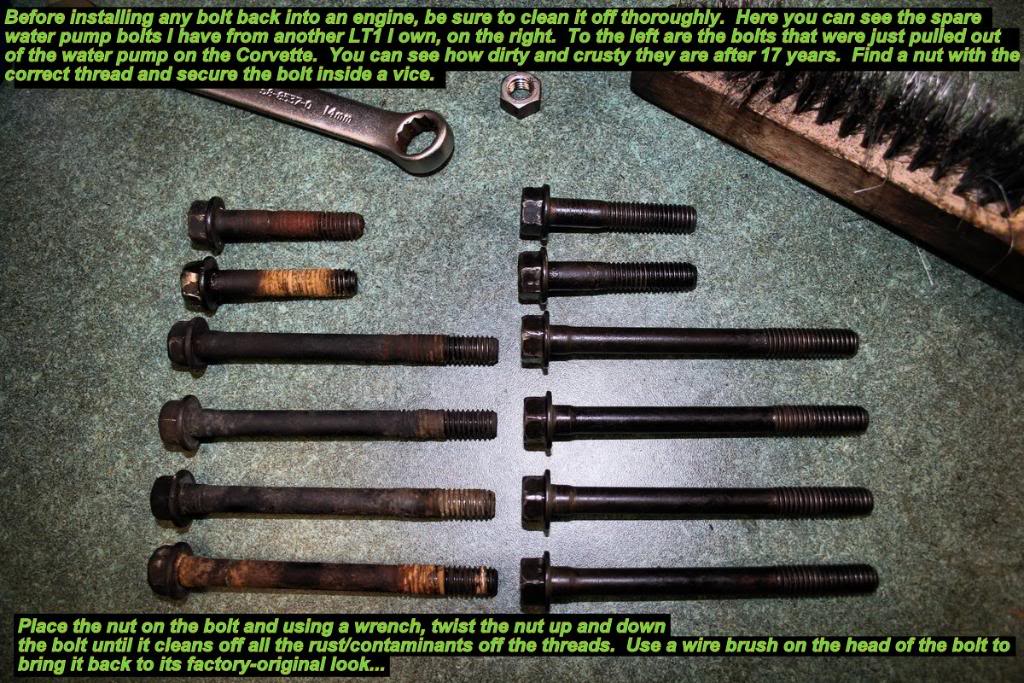
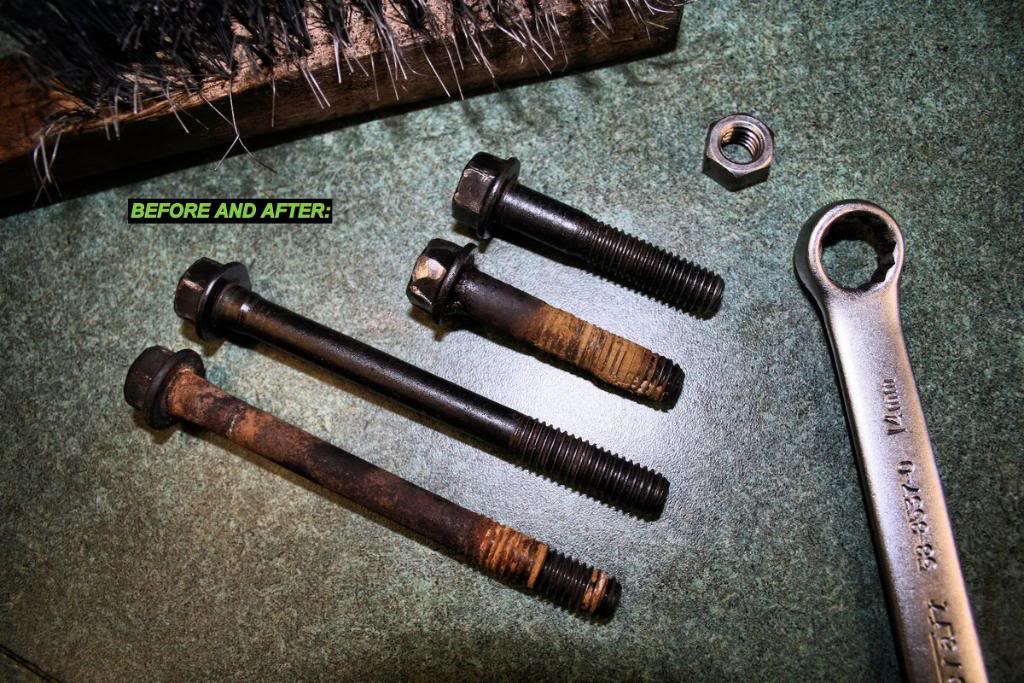
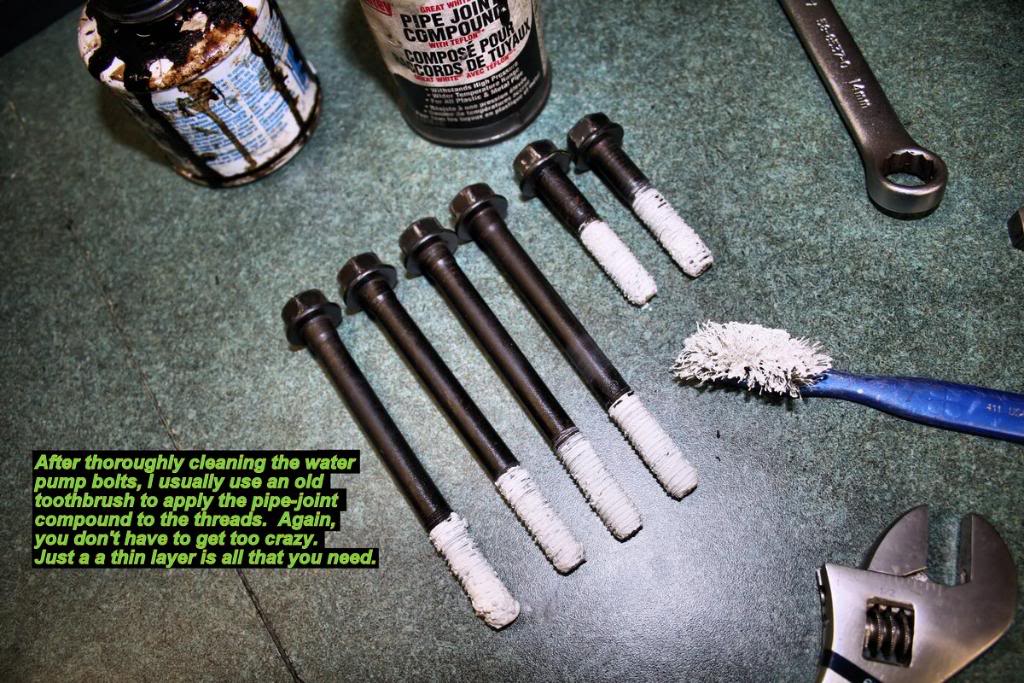
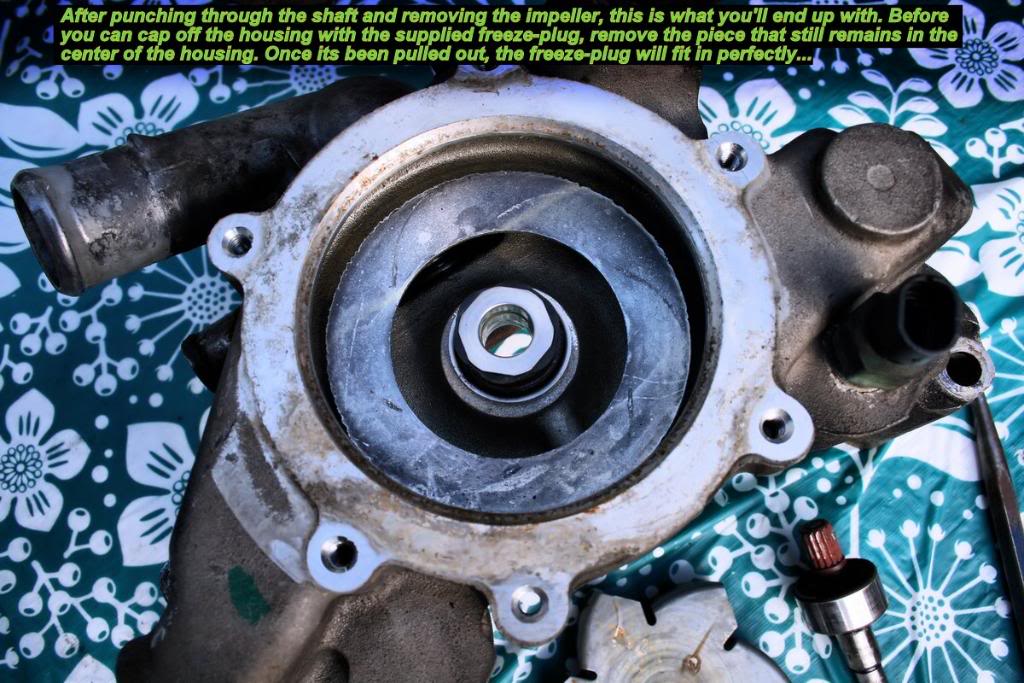
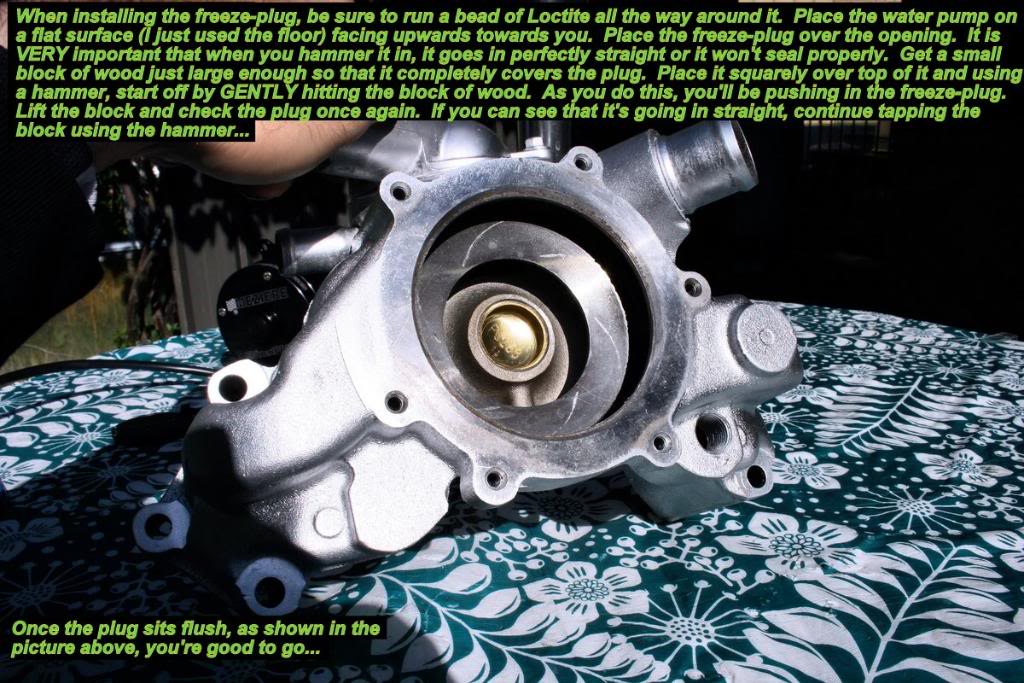
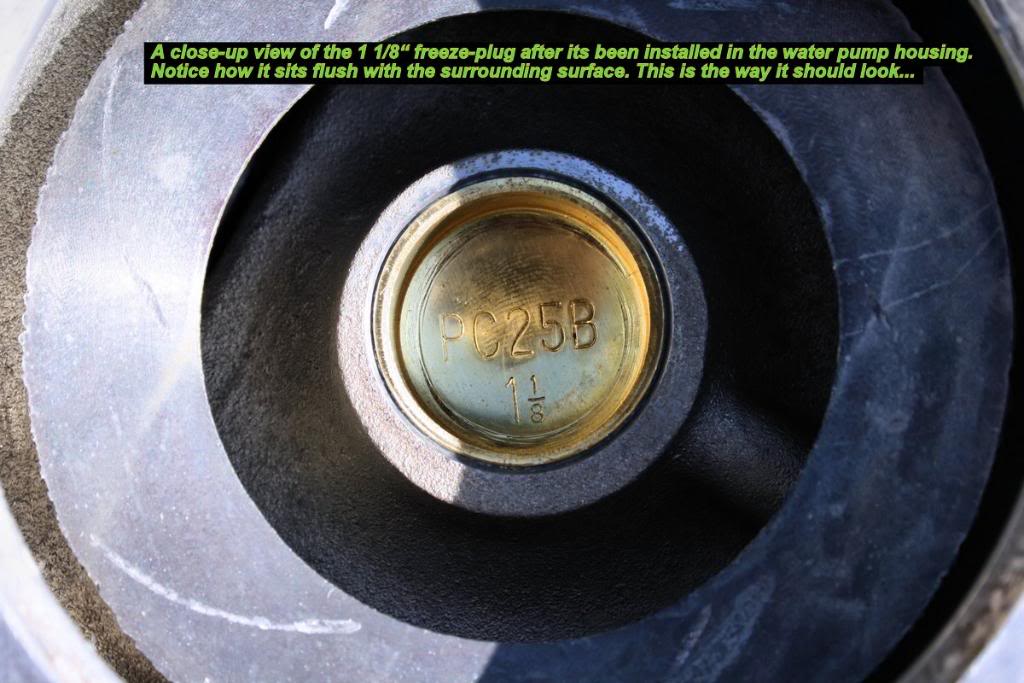
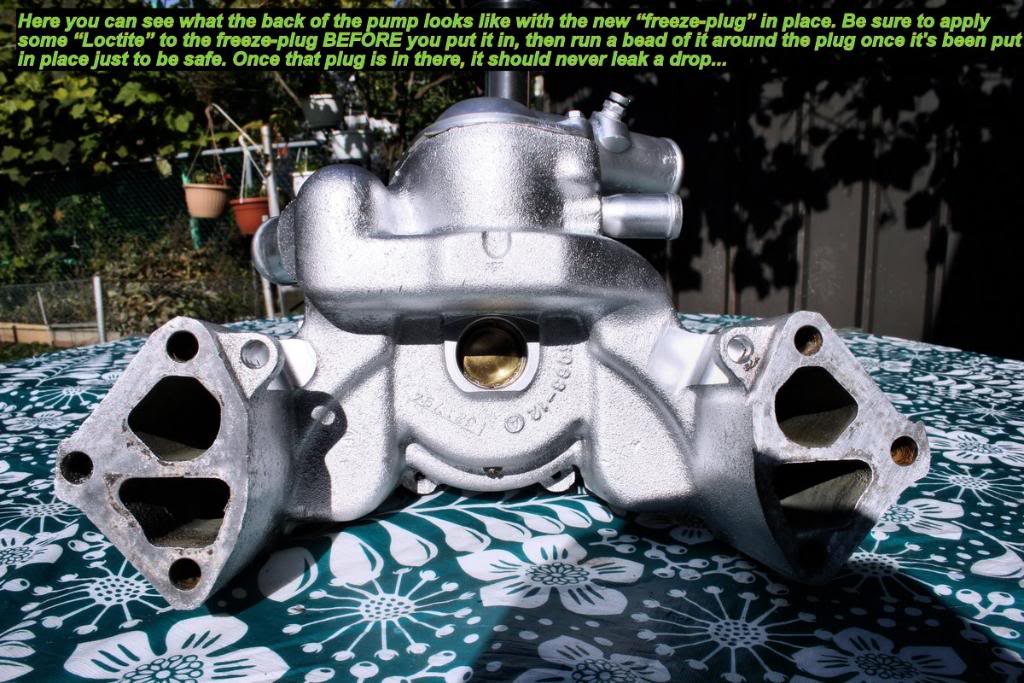
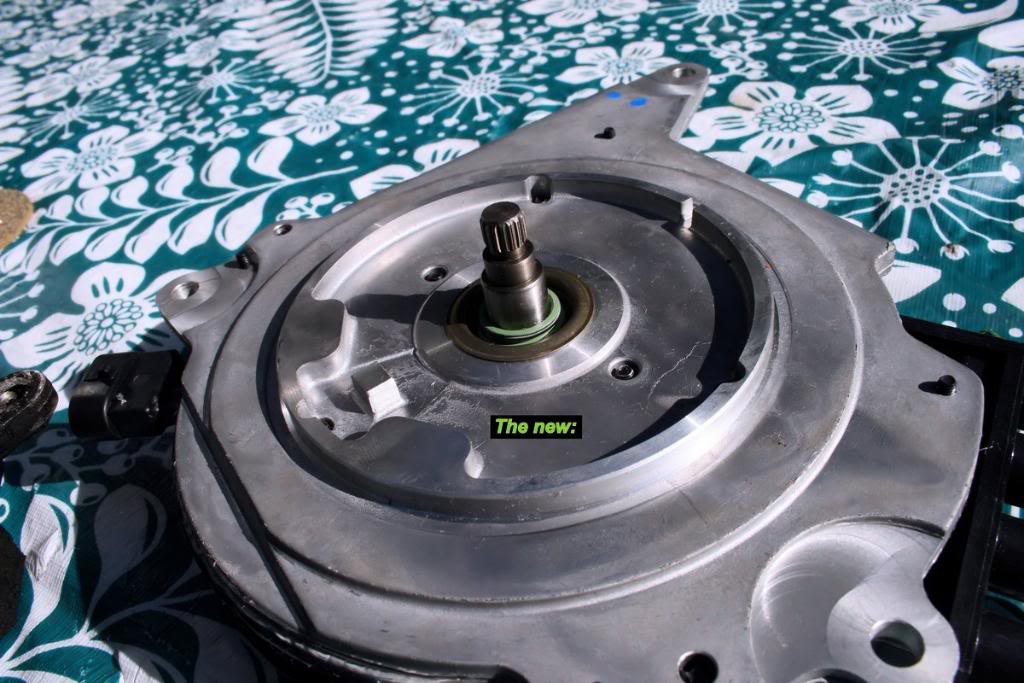
OPTI-SPARK & WATER PUMP INSTALL (PART 3)
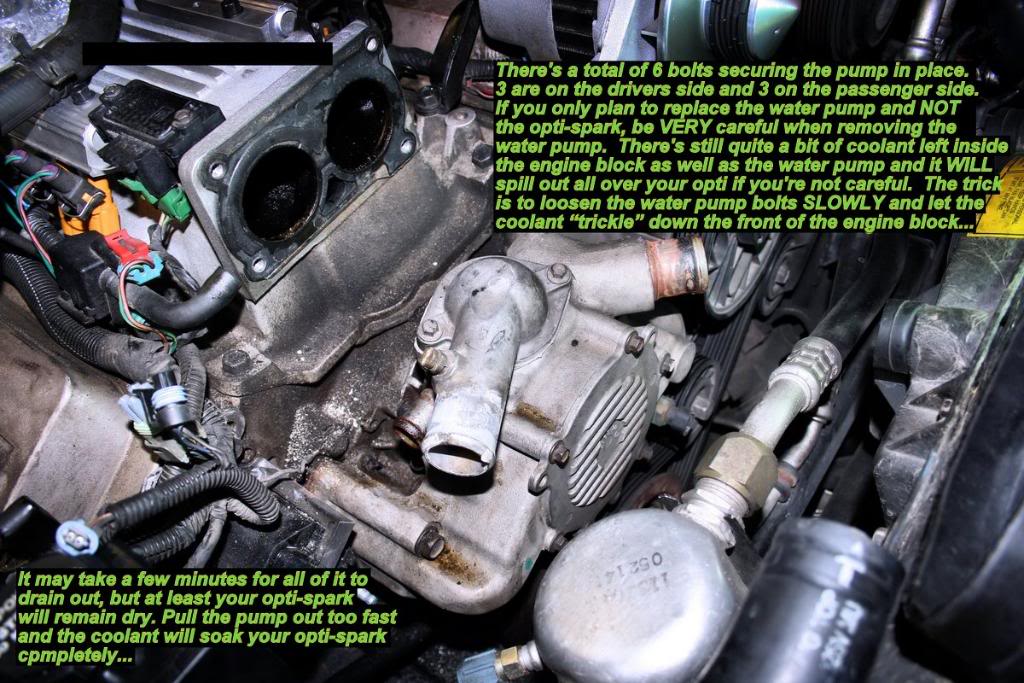
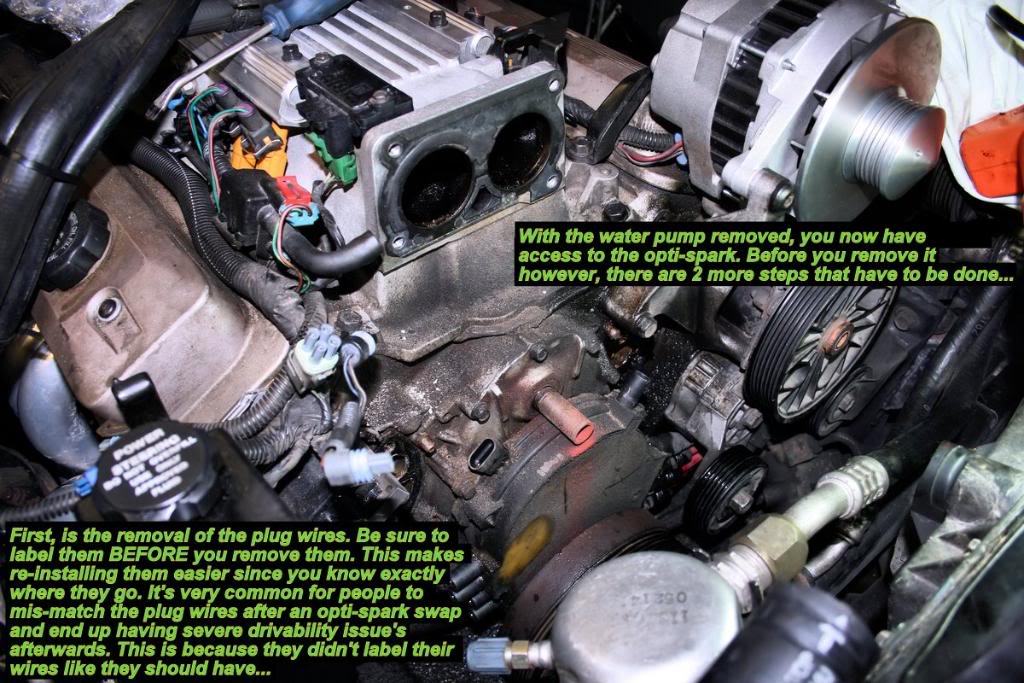
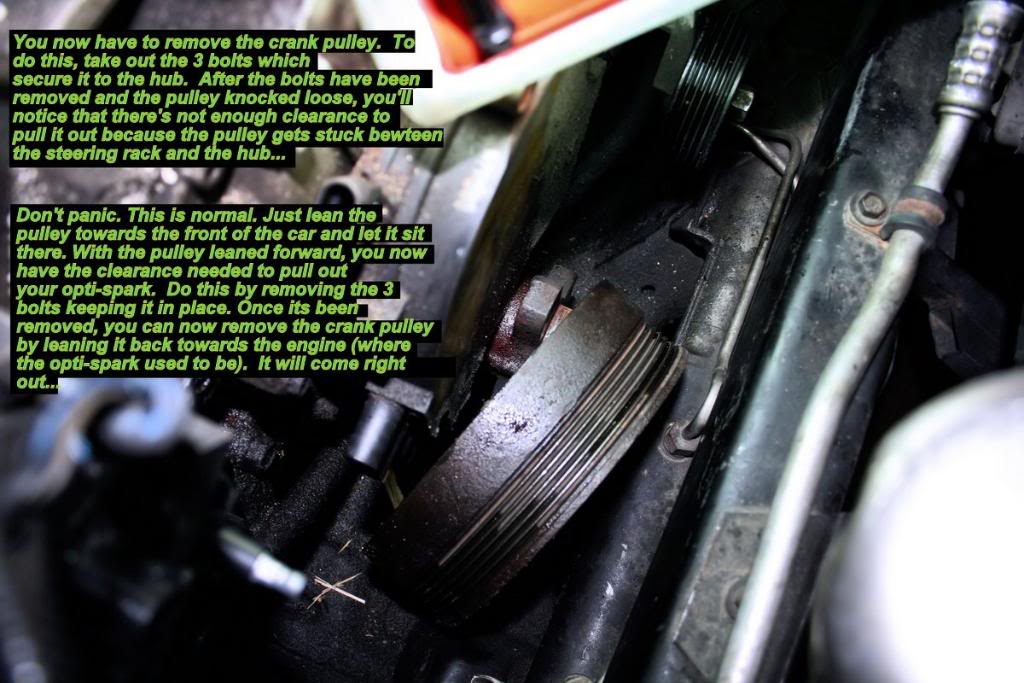
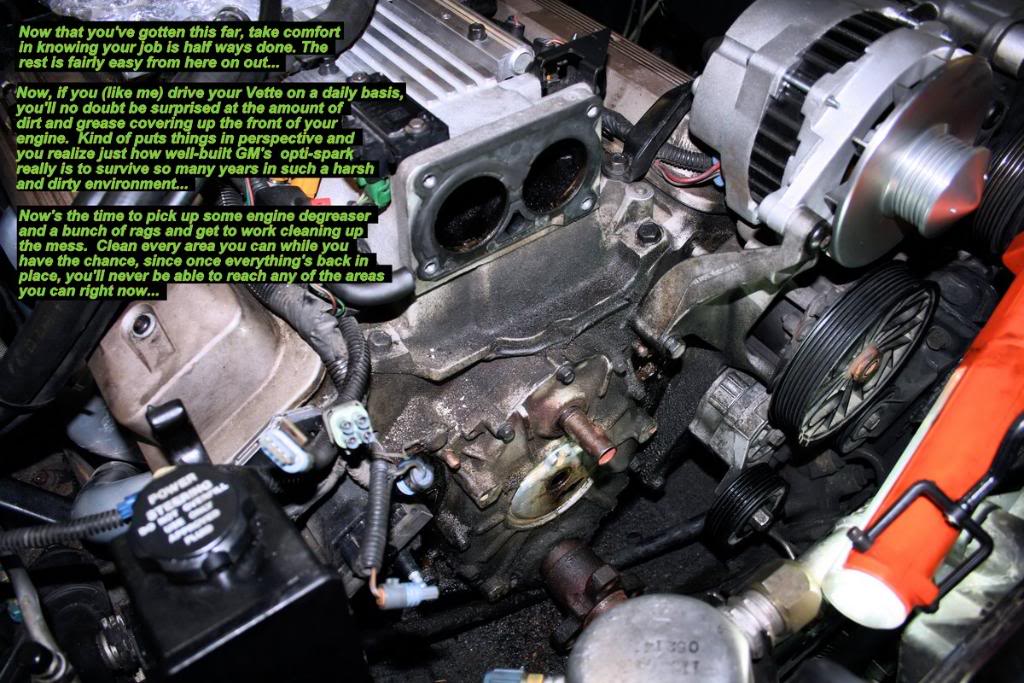
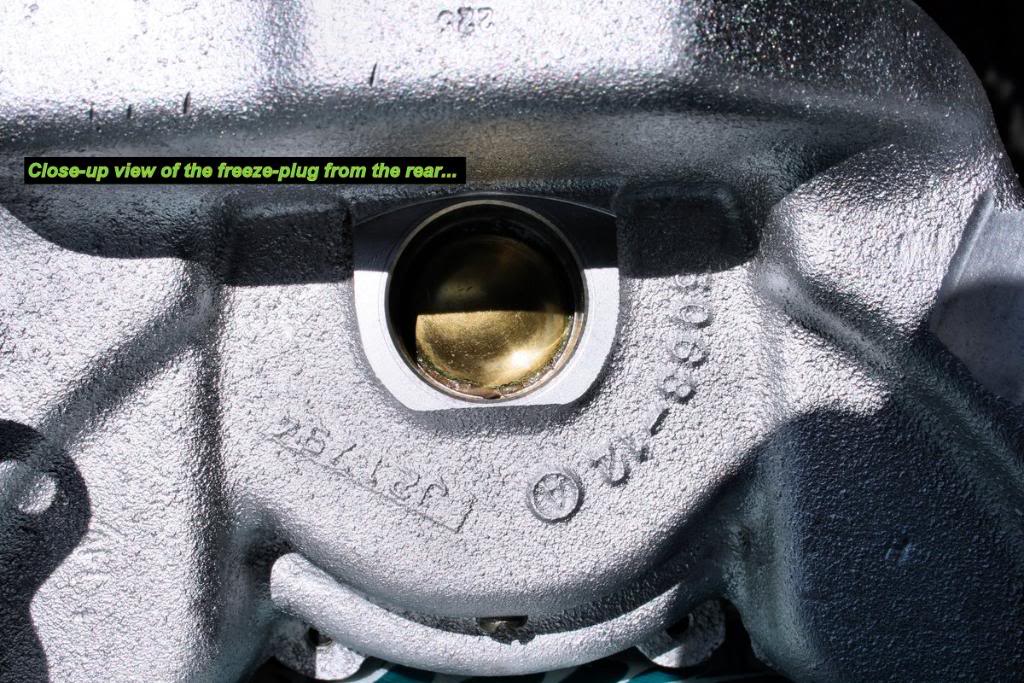
Attachment 48157408
Attachment 48157409
Attachment 48157410
Attachment 48157411
Attachment 48157412
Attachment 48157413
Attachment 48157414
Attachment 48157415
Attachment 48157416
Attachment 48157417
Attachment 48157418
Attachment 48157419
Attachment 48157420
Attachment 48157421
Attachment 48157422
Attachment 48157423
Attachment 48157424
Attachment 48157425
Attachment 48157426
Attachment 48157427
----------------
----------------
- LT1C4
Last edited by LT1*C4; 03-02-2013 at 12:02 AM.
The following 6 users liked this post by LT1*C4:
bigblockin (08-16-2021),
Cautrell05 (11-01-2019),
CrackerjackLT1 (04-30-2020),
Geovette350 (10-27-2021),
Malmed (03-23-2024),
and 1 others liked this post.
11-04-2009, 12:02 AM
#4
Pro

Member Since: Feb 2006
Location: Schwenksville PA
Posts: 502
Likes: 0
Received 0 Likes
on
0 Posts
I have 70K on my 92, but want to drive it cross country next summer, so for peace of mind I plan on doing this job in the winter. this thread will be very helpvful. thanks.


 11-04-2009, 01:38 PM
#10
Melting Slicks

I knew someone would comment on the Dex Cool. It is not the recommended coolant for your engine. GM didn't change to Dex Cool til 95, I think.
I would have removed the water pump drive shaft. It is a pain but removes a potential oil leak.
If you remove the knock sensor(s) it will reduce the mess when you remove the water pump.
I would put on new hoses and belt if they are more than 4-5 years old.
Otherwise a nice job!!

I would have removed the water pump drive shaft. It is a pain but removes a potential oil leak.
If you remove the knock sensor(s) it will reduce the mess when you remove the water pump.
I would put on new hoses and belt if they are more than 4-5 years old.
Otherwise a nice job!!
Last edited by MK 82; 11-04-2009 at 01:52 PM.
11-04-2009, 02:34 PM
#13
Melting Slicks


Member Since: Feb 2008
Location: West Chester PA
Posts: 2,347
Received 48 Likes
on
37 Posts
St. Jude Donor '09-'10-'11,'13-'14-'15-'16-'17-'18-'19-'20-'21,'22-'23-'24


Great pictures and an outstanding narrative Very nice of you to take the time, it will surely be helpful for anyone attempting this in the future. Thanks 
Very nice of you to take the time, it will surely be helpful for anyone attempting this in the future. Thanks
 11-04-2009, 05:57 PM
#15
Race Director

I will add this is a good time to replace plug wires and if you need to replace your seals in your timing cover !
Also if keeping the stock Watter Pump tap out the weep hole on the bottom and put a fitting and hose so when it fails the opti doesn't get drenched. I cheated and used a plastic vacuum fitting just pushed in which will still reduce the amount falling on the OPTI by 98 percent.
I am planing on a electric WP on my Hot Rod but I was wondering about how the timing cover hole is plugged off ???
Here is another link that has some useful pointers on replacing those seals to prevent oil leaks.
http://www.impalasuperstore.com/nais...TOPIC_ID=30984
I just had to redue my sons Camaro cause the seal was nicked when the WP was installed !
Get brave guys and learn to do things with help from friends and the forum cause no one loves your car like you do and you can do some serious cleaning at the same time.
Also these engines are a snap to pull if you have the lift !
Last edited by larry00; 11-04-2009 at 06:03 PM.

 11-04-2009, 07:24 PM
#17
Safety Car

Very Nice write up and Great pics ! This will surely come in handy the next time my friend asks me to help change his opti or waterpump . I'll just email him the link and say your welcome 
And hes not using dex cool. it is Dex cool 'approved' coolant.
And hes not using dex cool. it is Dex cool 'approved' coolant.
11-04-2009, 08:02 PM
#18
Drifting

Thanks I will save this.
I have a seal up front leaking (one of the three I think in the timing chain cover)so everthing must come off.
I just don't know if I should replace the opti???? 72,000 miles
I have a seal up front leaking (one of the three I think in the timing chain cover)so everthing must come off.
I just don't know if I should replace the opti???? 72,000 miles
11-04-2009, 08:08 PM
#19
Burning Brakes


Member Since: Oct 2009
Location: Minneapolis MN
Posts: 773
Likes: 0
Received 0 Likes
on
0 Posts
 Dexcool is garbage
 Otherwise awesome,awesome postI wish Alldata was this detailed.I hope everyone starts doing this,this is great!Is the 1994 to 1996 set-up the same?-meaning you can't screw up getting the distibutor rotor on wrong location/pointing direction?I could watch stuff/posts like this all daylove it.Those headers looked very nice.Why no painted red intake or throttle air foil?Those foils add 10horsepower
 Seriously though,very nice engine bay-CLEAN
11-04-2009, 08:16 PM
Seriously though,very nice engine bay-CLEAN
11-04-2009, 08:16 PM
#20
Burning Brakes
Member Since: Oct 2009
Location: Minneapolis MN
Posts: 773
Likes: 0
Received 0 Likes
on
0 Posts
 .To me this would be the perfect time to do everything "while your there".I don't know for sure,but am guessing 100 hp increase from this.More if you have headers/exhaust work done.Anyone agree/disagree with this much power increase?Oh & an airfoil