
How to remove seat mounting bolts ?
 06-21-2008, 02:34 PM
#1
Drifting

Thread Starter
Member Since: Sep 2007
Location: Hurst (Fort Worth area) Texas
Posts: 1,283
Likes: 0
Received 6 Likes
on
5 Posts
St. Jude Donor '09

The title pretty much says it all...
Can someone please tell me how to remove the bolts that come up through the floor pan to which the seats are fastened?
Thanks !
Can someone please tell me how to remove the bolts that come up through the floor pan to which the seats are fastened?
Thanks !
 06-21-2008, 03:20 PM
#2
Team Owner

Member Since: Oct 2004
Location: San Clemente CA
Posts: 27,420
Likes: 0
Received 59 Likes
on
48 Posts

15mm socket, a short extension and a ratchet will do it. The front bolt covers are removed by prying them up with a flat screw driver or putty knife. Move the seat forward for the rear bolts and back for the front. Good luck.
06-21-2008, 03:33 PM
#3
Race Director


I didn't want to do it, but I was swapping seats to get full power in the Z06. The bolts stick up through the floor, the seat rails fit down over them, and a nut holds the seat to the floor.
When I tried to take out the passenger seat, one of the front nuts wouldn't come off - the bolt was just spinning around. I jacked up the car and could see the heads of the bolts - on the Z06 they are about the size of a quarter. They are flat, round bolt heads with no way to grab ahold of the thing to hold it while I unscrewed the nut. I ended up needing to drill a hole in that flat bolt head until I could break it off to remove the bolt. I replaced it with a regular hex head bolt and big flat washer.
I just went out an looked under my 2005 coupe without jacking it up. I looks pretty much the same. I could see the round heads of the rear bolts (they are round, but a little thicker and not as wide in diameter as the ones on the Z06), but the front bolts seem to be up a little bit in a frame member - there is an area of goop covering a couple of holes where I think the bolts are. I think you could peel that stuff off and see the round bolt heads up in there.
In the case of the Z06, after I drilled the bolt out, I could see that under the head of the bolt was a sort of star-pattern. It looks something like this elevator bolt, but it had a lobe/star pattern under the head:
It seemed to just be held in with some automotive goop or RTV to kind of seal it up to the elements and hold it in place.
So.....I think you could just take the nut off inside the cockpit and whack the tip of the bolt with a hammer - I think that would just knock it right out, but YMMV!!!
Good luck!!!
Bob
 06-21-2008, 04:33 PM
#4
Drifting
Thread Starter
Member Since: Sep 2007
Location: Hurst (Fort Worth area) Texas
Posts: 1,283
Likes: 0
Received 6 Likes
on
5 Posts
St. Jude Donor '09
I am only going to remove the rear bolts from the driver's side anyway, so - based on your experience - it should be pretty easy!
Thanks again!

Rob
07-09-2008, 06:52 PM
#5
Drifting
Thread Starter
Member Since: Sep 2007
Location: Hurst (Fort Worth area) Texas
Posts: 1,283
Likes: 0
Received 6 Likes
on
5 Posts
St. Jude Donor '09
Being basically a chronic Obsessive-compulsive disorder sufferer, I wanted larger seat bolts and full thread engagement when installing my HARDBAR lap belt mounting bracket. That necessitated removing the OEM seat bolts (at the back of the seat) and replacing them with M12-1.75 class 10.9 flange-head bolts with a 1/8" X 2" cold-rolled steel bar reinforcement.
Removing the OEM bolts was a nuisance. After removing the seat hold-down nuts front and back, I simply slipped a foot-long piece of small-diameter plumbing pipe over the bolt and moved it (hard!) from side-to-side and front-to-rear. That broke loose the bolt from the cross piece under the car. The resulting hole wasn't pretty!
OK... here's what it looked like before I started dorking around with it!

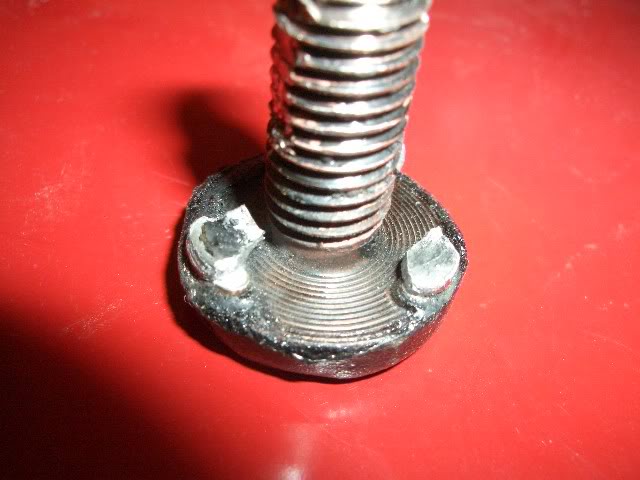
Here's the bolt... you can see the "bosses" where it was swedged (or welded?) to the cross piece.
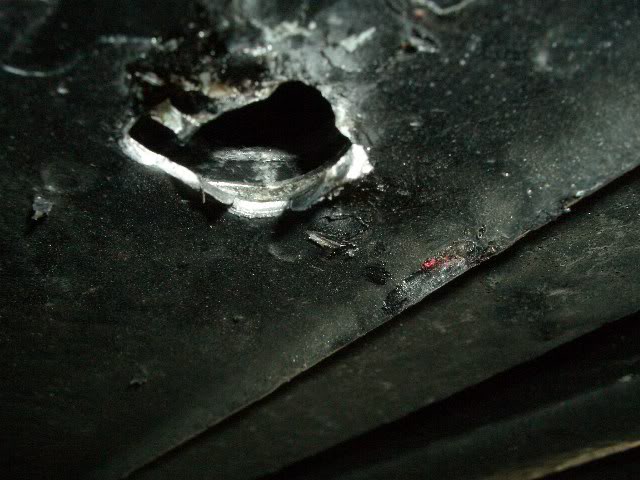
The hole after wrestling the bolt out (it sure isn't pretty. Even so, I had to run a drill bit through the hole to make it large enough where the M12 bolt would go through)...
Here's my reinforcement piece (1/8" cold rolled steel, well painted)...

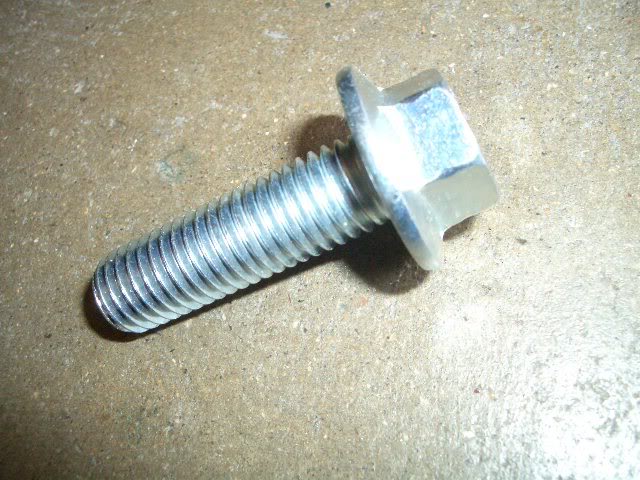
M12-1.785 class 10.9 flange head bolt...
Reinforcement and new bolts installed...

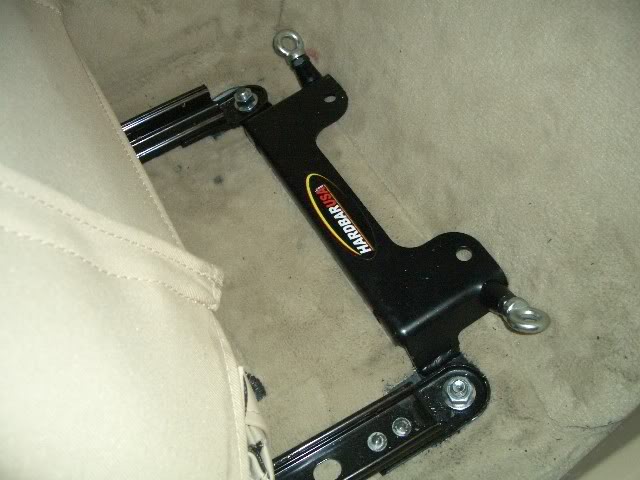
The HARDBAR mounting bracket installed... This thing is super-strong!!! Please forgive the 'crud' on the carpet... I took the photo before I cleaned up everything!
Now, wasn't that boring?
Cheers to all
Rob
Removing the OEM bolts was a nuisance. After removing the seat hold-down nuts front and back, I simply slipped a foot-long piece of small-diameter plumbing pipe over the bolt and moved it (hard!) from side-to-side and front-to-rear. That broke loose the bolt from the cross piece under the car. The resulting hole wasn't pretty!
OK... here's what it looked like before I started dorking around with it!
Here's the bolt... you can see the "bosses" where it was swedged (or welded?) to the cross piece.
The hole after wrestling the bolt out (it sure isn't pretty. Even so, I had to run a drill bit through the hole to make it large enough where the M12 bolt would go through)...
Here's my reinforcement piece (1/8" cold rolled steel, well painted)...
M12-1.785 class 10.9 flange head bolt...
Reinforcement and new bolts installed...
The HARDBAR mounting bracket installed... This thing is super-strong!!! Please forgive the 'crud' on the carpet... I took the photo before I cleaned up everything!
Now, wasn't that boring?
Cheers to all
Rob
Last edited by RFP; 07-21-2008 at 09:55 PM.
The following users liked this post:
thehaggis (12-11-2015)
07-10-2008, 12:28 AM
#7
Race Director
Rob
 Very nice!!!
Those bolts look a little different than the ones on the Z06, maybe because of the steel vs. alumininum frame.
That's a great looking job - I think any tech inspector will look at those and pass the installation with flying colors.
Did you do that on both sides? I think I read that if you're going to have a passenger/instructor you need the same harness setup on both sides.
Bob
Very nice!!!Those bolts look a little different than the ones on the Z06, maybe because of the steel vs. alumininum frame.
That's a great looking job - I think any tech inspector will look at those and pass the installation with flying colors.
Did you do that on both sides? I think I read that if you're going to have a passenger/instructor you need the same harness setup on both sides.
Bob
07-10-2008, 07:26 AM
#8
Team Owner


That's a good looking set up Rob.
07-10-2008, 09:27 AM
#9
Drifting
Thread Starter
Member Since: Sep 2007
Location: Hurst (Fort Worth area) Texas
Posts: 1,283
Likes: 0
Received 6 Likes
on
5 Posts
St. Jude Donor '09
Rob
Very nice!!!
Those bolts look a little different than the ones on the Z06, maybe because of the steel vs. alumininum frame.
That's a great looking job - I think any tech inspector will look at those and pass the installation with flying colors.
Did you do that on both sides? I think I read that if you're going to have a passenger/instructor you need the same harness setup on both sides.
Bob
Very nice!!!Those bolts look a little different than the ones on the Z06, maybe because of the steel vs. alumininum frame.
That's a great looking job - I think any tech inspector will look at those and pass the installation with flying colors.
Did you do that on both sides? I think I read that if you're going to have a passenger/instructor you need the same harness setup on both sides.
Bob
Even though I put sealer around the holes as I was putting this all back together, I think that I will add some spray-on "undercoating" as an added protection against any water working it's way into the structure.
I know that this is a dumb thread, I just wanted to post it thinking that sooner or later someone else will probably want to know about those bolts.
Rob
07-10-2008, 12:16 PM
#10
Race Director
I guess you're doing this for a harness setup for HPDE's or Auto-xing.
If you run a stock seat and regular street seat belt setup, that (for now) will be suitable for most track events.
However, if you run an aftermarket harness ALL the track day event sponsors are adopting the PCA rules that require a race seat with shoulder strap pass-through slots if you run a 5 or 6 point harness - you will NOT be allowed to run a stock seat, even if you put slots in it for the straps to run through the seat back.
The rules will require the anti-submarine crotch straps to come through the seat bottom - not under the front of the seat.
If you're running solo then all you'll need is your driver's seat set up properly.
If you're running in a run group that requires an instructor at any time, the rules require that the passenger seat be an "equal" set up to the driver's seat. You could have a Recaro on one side and a Sparco on the other side, but you'd need to have an acceptable harness on both sides.
I just attended the recent NCM HPDE at VIR and ran with the stock seats and belts, but if you had a harness system I believe the tech inspectors were requiring compliance with the new rules.
There has been lots of discussion about it over on the Auto-x/Road Race section of the forum. Here's one thread about it:
http://forums.corvetteforum.com/show....php?t=1972285
Bob
07-10-2008, 03:39 PM
#11
Drifting
Thread Starter
Member Since: Sep 2007
Location: Hurst (Fort Worth area) Texas
Posts: 1,283
Likes: 0
Received 6 Likes
on
5 Posts
St. Jude Donor '09
Rob
I guess you're doing this for a harness setup for HPDE's or Auto-xing.
If you run a stock seat and regular street seat belt setup, that (for now) will be suitable for most track events.
However, if you run an aftermarket harness ALL the track day event sponsors are adopting the PCA rules...
I guess you're doing this for a harness setup for HPDE's or Auto-xing.
If you run a stock seat and regular street seat belt setup, that (for now) will be suitable for most track events.
However, if you run an aftermarket harness ALL the track day event sponsors are adopting the PCA rules...
Thanks, Bob for the informative and helpful post (and the link, as well).
All of this just goes to reveal what a phoney I am.
 I really do have to admit that I'm going to all this trouble without any real intention of any 'track' time (of course, that could change in a heartbeat).
 I've been thinking that I had pretty much gotten all of that ('racing') out of my system back in the early 1980s when I was active in Porsche Club of America. I didn't have any recognizable talent, but did have excellent enough instruction that I managed to win First in Class in our local PCA region's autocross and track series for the year in 1983 (two nice trophies... still got 'em!).
Maybe I just want the 'Vette to look 'trackable'... but, who knows?
Yeah, I know... I'm pathetic!!!

 02-02-2018, 10:55 PM
#13
5th Gear


Member Since: Feb 2018
Posts: 5
Likes: 0
Received 0 Likes
on
0 Posts
It's an electric seat the seat is all the way back and the motor does not work trying to get the pan out is there any way to move the pan forward to get at those bolts in the back I am losing my mind what little I have left thanks for your concern I appreciate it

