
NEW Interior LED Mod Thread
 04-14-2008, 01:04 AM
#1
Le Mans Master

Thread Starter
Member Since: May 2006
Location: DuBois PA
Posts: 5,987
Likes: 0
Received 18 Likes
on
16 Posts
St. Jude Donor '11-'12-'13-'14-'15

The Interior LED Mod Thread is OUT OF CONTROL so we decided to start some new ones, a stock location swap and a customized one. This Thread will help those owners who want to change the color of all the stock locations with a direct one for one bulb swap, except the IPC! There are some options out there for the IPC but nothing that really looks stock with a different color, at least until enough pre-orders are made for the customizable Speedhut gauges http://www.speedhut.com/15orders_el_...ber=104&bhcp=1
OK here is a rundown of various parts and options you’ll need to change your color. These parts are tried and true BUT not written in stone of course. The Type 194 and 212 Festoons listed are what I ended up using, there are many more options out there. The NEO Wedge Type A and B are a direct replacement with a resistor built into the base of the LED. Oznium has begun selling them as well, http://www.oznium.com/corvette-c5-led for $2.49
If you’re doing Red you can replace the stock blue bulb covers with Red ones. Go to http://www.mcmaster.com/
In the Find Products window (upper left) type in 16925K11 you want the G Type T1 Dia. 1/8”, Height 10/64”, OD 5/32” $3.79 for 10. Click the part number and then you can choose your color and quantity.
Switches (Doors, Fog/Trunk, DIC and Traction/Selective Ride Control)
13* ea. – NEO WEDGE Type B bulbs, 10mm (3/8”) diameter $2.99 ea.
http://autolumination.com/74.htm
*Note: If you are optioned with Selective ride control add one NEO Wedge
Dimmer/HUD
4* ea. - NEO WEDGE Type A, 8mm (5/16") diameter $2.99 ea.
http://autolumination.com/74.htm
*Note: If you do not have HUD subtract THREE. These are the closest fit but the mounting hole will still need filed out just a tad. Some HUD switch packs supposedly have a total of THREE bulbs.
Footwells and Cargo Area
4 ea. – 194 Matrix Super Star bulbs,. 10mm diameter x 26mm overall $7.99 ea.
http://autolumination.com/194.htm
Map Lights
Non Electrochromatic
2 ea. – 212 Festoon 2 LED bulbs, 10mm wide x 44mm overall length. $9.99 ea.
http://autolumination.com/festoon.htm
Electrochromatic
12 ea. 5mm LEDs
http://www.oznium.com/led
*Note: For 2000s check your Map lights to see if you have the LED array or Festoon bulbs, I believe there may have been a cross over early in 2000.
Automatic Gear Indicator (PRNDL)
1 ea. – 194 Matrix Super Star bulbs,. 10mm diameter x 26mm overall $7.99 ea.
http://autolumination.com/194.htm
HVAC (Dual Climate) Controller (Leaving stock Orange LEDs in)
14 ea. - 5mm LED's with XXX* Ohm resistors,
http://www.oznium.com/led
OR
14 ea – NEO WEDGE Type B bulbs, (removed from bases) 10mm (3/8”) diameter $2.99 ea.
http://autolumination.com/74.htm
Radio/CD Player (Leaving stock Red LED in)
10 ea. - 5mm LED's with XXX* Ohm resistors,
http://www.oznium.com/led
OR
10 ea - NEO WEDGE Type B bulbs, (removed from bases) 10mm (3/8”) diameter $2.99 ea.
http://autolumination.com/74.htm
Under Hood
1 ea. – Super Star Festoon Dome Bulb: White. 10mm wide x 44mm overall $9.99 ea.
http://autolumination.com/festoon.htm
UPDATE: The 1997s take a 212-2 Festoon and the 1998 - 2004s use a Type 561 rigid loop bulb. We think the 44mm should work fine in both. See Post #24 by ljthe2nd
**Note – 470 Ohm = Blue, White, Green, Aqua & Pink
560 Ohm – Red, Orange & Yellow
Last edited by tstar; 04-29-2008 at 03:52 AM.
 04-14-2008, 01:08 AM
#2
Le Mans Master
Thread Starter
Member Since: May 2006
Location: DuBois PA
Posts: 5,987
Likes: 0
Received 18 Likes
on
16 Posts
St. Jude Donor '11-'12-'13-'14-'15
Here are few tips and cautions that we’ve learned through trial and error.
Carlton (Spdkilz) has a fantastic website for instructions on what you’ll be doing;
http://www.spdkilz.com/techtip.html
Vette Essentials is also a tremendous resource for dismantling your car. As a matter of fact I’ll be buying some of their stuff just because of all the work they’ve put into their on line instructions!
http://www.vetteessentials.com/instr...structions.htm
The door switch packs pop right out. Carefully pry the Driver’s from the BOTTOM and the Passenger from the TOP with a flat tip screwdriver.
Take the HVAC unit out BEFORE the Radio, I scratched and dented the heck out of my HVAC unit with the Radio taking the connectors off the back of it.
The NEO Wedge bulbs must be oriented correctly to work, if the bulb does not work, remove it and turn it around 180 degrees and re-install it. It won’t hurt the LED if it is in backwards.
Always buy some spare LEDs!
One of the problems with using the LEDs to replace the incandescent stock bulbs is the light pattern, The incandescents have a 360 degree light output while LEDs have a very finite beam of light. When using a standard LED to light the various components, sand/shave the top flat to disperse the light output better. Below shows a 10mm before and after.

Here are some comparison pics showing the light pattern of a shaved and unshaved LED;


A few locations just will not look correct after the swap, the Traction Control/ Active Handling (TC/AH) button, HUD Page button and the Auto PRNDL indicator. These areas are pretty dim to begin with and get worse with an LED especially the TC/AH button!
Tim
Carlton (Spdkilz) has a fantastic website for instructions on what you’ll be doing;
http://www.spdkilz.com/techtip.html
Vette Essentials is also a tremendous resource for dismantling your car. As a matter of fact I’ll be buying some of their stuff just because of all the work they’ve put into their on line instructions!
http://www.vetteessentials.com/instr...structions.htm
The door switch packs pop right out. Carefully pry the Driver’s from the BOTTOM and the Passenger from the TOP with a flat tip screwdriver.
Take the HVAC unit out BEFORE the Radio, I scratched and dented the heck out of my HVAC unit with the Radio taking the connectors off the back of it.
The NEO Wedge bulbs must be oriented correctly to work, if the bulb does not work, remove it and turn it around 180 degrees and re-install it. It won’t hurt the LED if it is in backwards.
Always buy some spare LEDs!
One of the problems with using the LEDs to replace the incandescent stock bulbs is the light pattern, The incandescents have a 360 degree light output while LEDs have a very finite beam of light. When using a standard LED to light the various components, sand/shave the top flat to disperse the light output better. Below shows a 10mm before and after.
Here are some comparison pics showing the light pattern of a shaved and unshaved LED;
A few locations just will not look correct after the swap, the Traction Control/ Active Handling (TC/AH) button, HUD Page button and the Auto PRNDL indicator. These areas are pretty dim to begin with and get worse with an LED especially the TC/AH button!
Tim
Last edited by tstar; 04-25-2008 at 02:39 AM.


 04-14-2008, 01:17 AM
#4
Le Mans Master
Thread Starter
Member Since: May 2006
Location: DuBois PA
Posts: 5,987
Likes: 0
Received 18 Likes
on
16 Posts
St. Jude Donor '11-'12-'13-'14-'15
Radio PCB Front View,;

Radio PCB Rear View;

HVAC. All mounting hole are verticle with he POSITIVE lead towards the TOP of the board (towards the end of the board where the Display is), diagram coutesy of VetteFTW;

Bench Testing Pinouts;
Hot Ground Notes
Driver’s Door 22 21
Fog/Trunk 7 8
HUD 6 7
DIC 10 9
TC/AH 1(10) 2 (9)
Passenger Door* 2 1
HVAC C5, C12, C16 C1 Or hook up to the back of any bulb
Radio Hook up to the back of any bulb
Tim
Radio PCB Rear View;
HVAC. All mounting hole are verticle with he POSITIVE lead towards the TOP of the board (towards the end of the board where the Display is), diagram coutesy of VetteFTW;
Bench Testing Pinouts;
Hot Ground Notes
Driver’s Door 22 21
Fog/Trunk 7 8
HUD 6 7
DIC 10 9
TC/AH 1(10) 2 (9)
Passenger Door* 2 1
HVAC C5, C12, C16 C1 Or hook up to the back of any bulb
Radio Hook up to the back of any bulb
Tim
Last edited by tstar; 01-21-2010 at 07:44 PM.
The following users liked this post:
TCFS (09-14-2021)
04-14-2008, 01:37 AM
#6
Le Mans Master
Thread Starter
Member Since: May 2006
Location: DuBois PA
Posts: 5,987
Likes: 0
Received 18 Likes
on
16 Posts
St. Jude Donor '11-'12-'13-'14-'15
First there is a better way to work on the Radio board we just recently discovered;
http://www.corvetteradios.com/home/Page1bulb.jpg
The above site shows how to remove the Board from the Radio! It's also a fantastic site for parts and info!
After first installing the LEDs you'll need to adjust the aiming on them to get the lighting as even as you can. One way to help disperse the LED's tight beam is to reflect it back "up" unto the white plastic reflector plate with aluminum foil disks placed directly under the LEDs;

I also wrap the wave guides (upper right and lower left corners in pic above) with Foil to help disperse the light...
Here's how it should look after aiming and using the Foil;

Tim
http://www.corvetteradios.com/home/Page1bulb.jpg
The above site shows how to remove the Board from the Radio! It's also a fantastic site for parts and info!
After first installing the LEDs you'll need to adjust the aiming on them to get the lighting as even as you can. One way to help disperse the LED's tight beam is to reflect it back "up" unto the white plastic reflector plate with aluminum foil disks placed directly under the LEDs;
I also wrap the wave guides (upper right and lower left corners in pic above) with Foil to help disperse the light...
Here's how it should look after aiming and using the Foil;
Tim
Last edited by tstar; 04-25-2008 at 02:43 AM.
04-14-2008, 01:53 AM
#7
Le Mans Master
Thread Starter
Member Since: May 2006
Location: DuBois PA
Posts: 5,987
Likes: 0
Received 18 Likes
on
16 Posts
St. Jude Donor '11-'12-'13-'14-'15
The HVAC usually turns out pretty good with a direct bulb swap. One thing I like to do is place a Blue LED under the Blue temperature sweep and a Red LED under the Red sweep. This adds color to the dial indicator on the Passenger Temperature control dial.


Notice the Big 10mm LED to the left of the display. I did this as an experiment and it worked so well in lighting this rocker switch I kept it in. It would also work well for the Recirculate/Fresh Air Rocker switch. You'll have to cut a larger hole in the rubber backing for the 10mms.

If you get some dark fringing around some of the buttons, you need to trim away the rubber collar around that LED;

Tim
Notice the Big 10mm LED to the left of the display. I did this as an experiment and it worked so well in lighting this rocker switch I kept it in. It would also work well for the Recirculate/Fresh Air Rocker switch. You'll have to cut a larger hole in the rubber backing for the 10mms.
If you get some dark fringing around some of the buttons, you need to trim away the rubber collar around that LED;
Tim
Last edited by tstar; 04-14-2008 at 02:26 AM.
The following users liked this post:
keepinmyc5alive (11-08-2015)
04-14-2008, 02:09 AM
#8
Le Mans Master
Thread Starter
Member Since: May 2006
Location: DuBois PA
Posts: 5,987
Likes: 0
Received 18 Likes
on
16 Posts
St. Jude Donor '11-'12-'13-'14-'15
There are a few ways to fix the very dim lighting in this button. This technique was created by Bell. You drill a hole and embed an LED directly into the back of the button;


Tim
Tim
 04-15-2008, 12:45 AM
#10
Melting Slicks

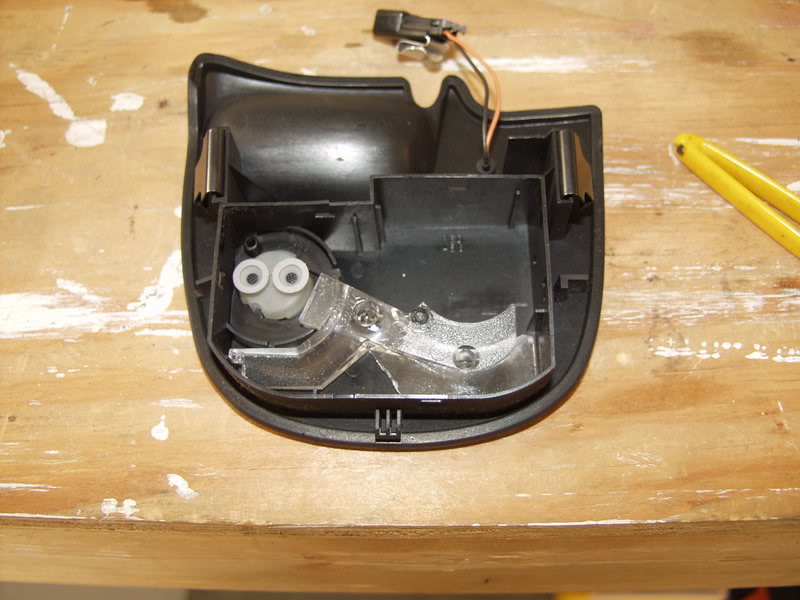
Here is another option on lighting the Active Handling button. This one does not require drilling into the button.
Once you have opened up the housing, remove the clear plastic wave guide. With LED's installed this gets in the way.
Carefully remove the circuit board from the back half of the case. There are two plastic clips that hold it to the case.
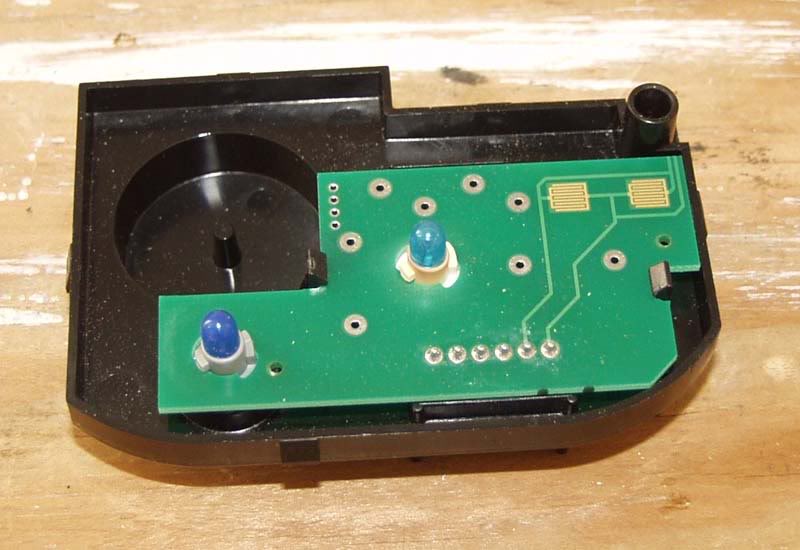
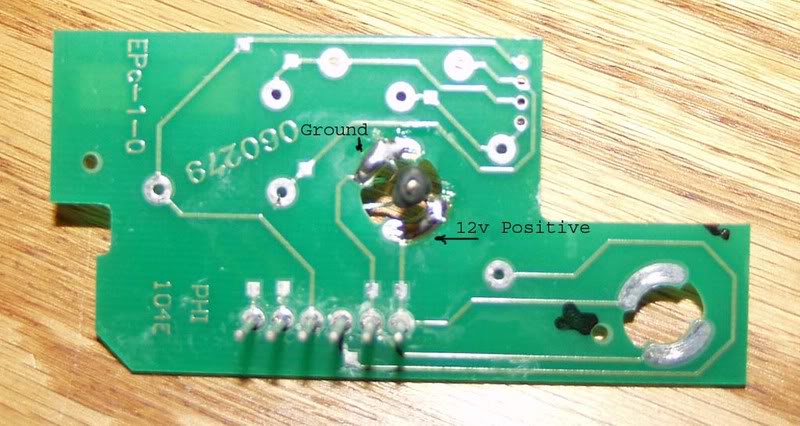
In the following picture of the circuit board make note of where the positive and negative contacts are for the lamp. The LED will be soldered to the circuit board here.
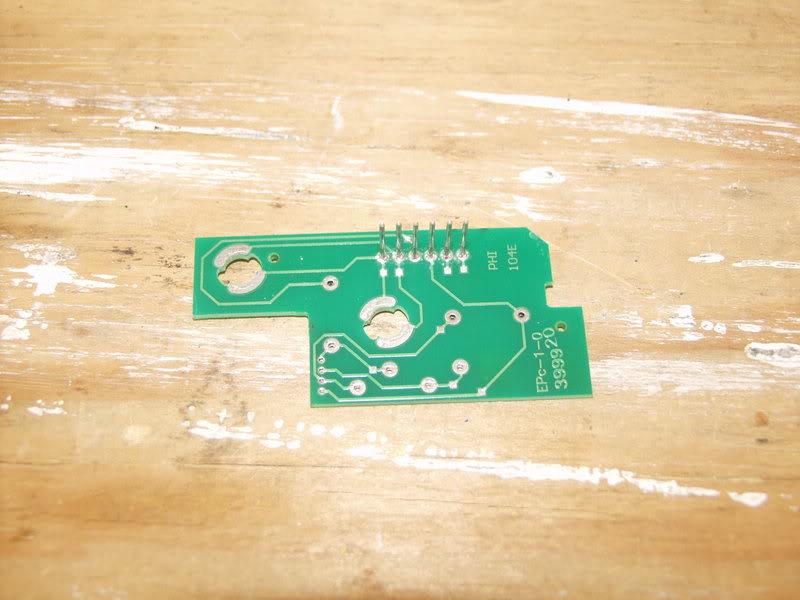
The first step is to bend the leads of the LED so that the tip of the LED is positioned at the edge of the button. I used a 5mm 8000mcd white LED and bent the leads 90* about .25� from the base of the LED. Next solder a 510 ohm resistor to the positive contact patch of the circuit board having it stick up parallel to the connector pins. The LED goes on the side opposite the connector pins.
A note on LED's. When looking at the leads coming out of the LED base you will notice a spot where the lead is a little wider. This indicates the minimum length for the lead. Cutting it shorter than this will impair the ability of the LED to dissipate heat.
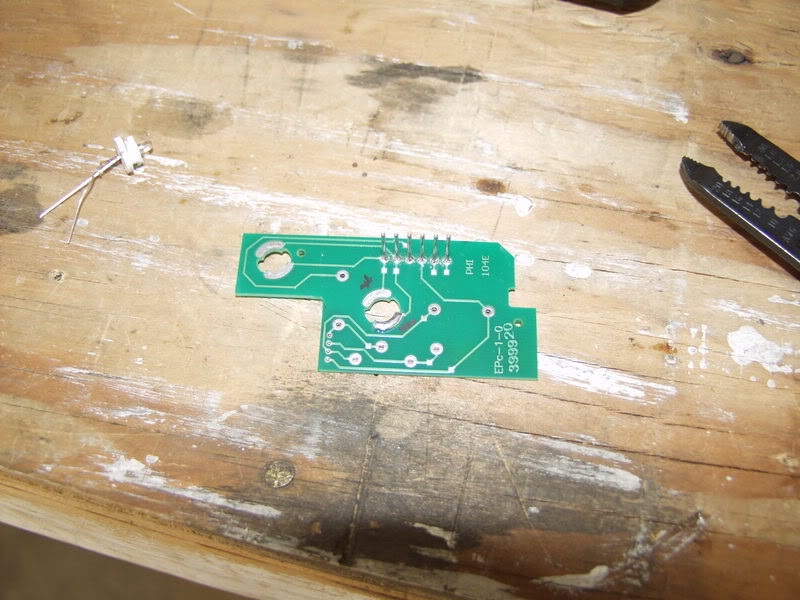
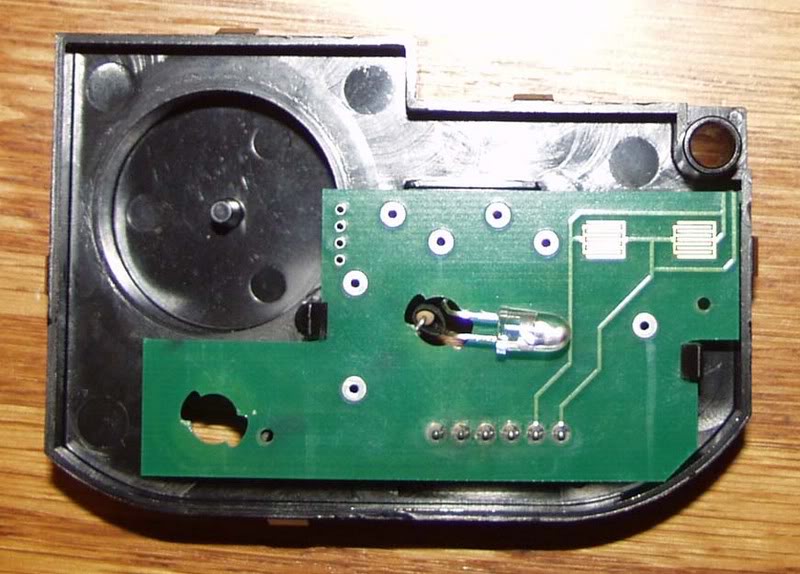
When completed the install of the LED should look similar to these pictures. The first is the connector side. The other shows the LED aiming.
Gary
Once you have opened up the housing, remove the clear plastic wave guide. With LED's installed this gets in the way.
Carefully remove the circuit board from the back half of the case. There are two plastic clips that hold it to the case.
In the following picture of the circuit board make note of where the positive and negative contacts are for the lamp. The LED will be soldered to the circuit board here.
The first step is to bend the leads of the LED so that the tip of the LED is positioned at the edge of the button. I used a 5mm 8000mcd white LED and bent the leads 90* about .25� from the base of the LED. Next solder a 510 ohm resistor to the positive contact patch of the circuit board having it stick up parallel to the connector pins. The LED goes on the side opposite the connector pins.
A note on LED's. When looking at the leads coming out of the LED base you will notice a spot where the lead is a little wider. This indicates the minimum length for the lead. Cutting it shorter than this will impair the ability of the LED to dissipate heat.
When completed the install of the LED should look similar to these pictures. The first is the connector side. The other shows the LED aiming.
Gary
04-15-2008, 02:00 AM
#12
Melting Slicks

There are some options out there for the IPC but nothing that really looks stock with a different color, at least until enough pre-orders are made for the customizable Speedhut gauges http://www.speedhut.com/15orders_el_...ber=104&bhcp=1
So we're up to FOUR pre-orders on SpeedHut?? Woohoo!! Hey, I've changed my mind on color since I placed the pre-order. (Gonna go blue LEDs and gauges now instead of red.) Do you know what I need to do to change it with them? Or should I just place another pre-order and cancel the other one when they call me to begin production? I think I can afford the $1...
 04-15-2008, 02:07 AM
#13
Le Mans Master
Thread Starter
Member Since: May 2006
Location: DuBois PA
Posts: 5,987
Likes: 0
Received 18 Likes
on
16 Posts
St. Jude Donor '11-'12-'13-'14-'15
Hey Vaughn! I'd be more then happy to ship the stuff to you if the vendors won't OR charge too much! You could order everything now and have the Navy ship it free! 
Hmmm I don't know, I would imagine once they go into production you would confirm your choice and make changes then... I've kinda been itching to try and plead to Speedhut's owner on getting these pushed through, maybe I can use that as an excuse?
Tim
Hmmm I don't know, I would imagine once they go into production you would confirm your choice and make changes then... I've kinda been itching to try and plead to Speedhut's owner on getting these pushed through, maybe I can use that as an excuse?
Tim
04-21-2008, 11:21 PM
#14
Racer

Member Since: Apr 2008
Location: Raleigh NC
Posts: 280
Likes: 0
Received 0 Likes
on
0 Posts
Ok so heres the story, im new to the CF but ive been looking at it for quite some time now. The CF has helped me with doing the HID lights and now this led mod . So ive already done the floorwells(white), cargo area(white), both door switches(blue), and the auto shifter(blue). Im planning to do the DIC and HUD in blue leds and that should be no problem. Im using the neo-wedges from oznium, execpt in the HUD because there the type a's, so im ordering them from autoillumination. But ok heres the real question im going to be using the neo-wedges out of the base for the hvac and the radio, ive already looked at the diagrams for the positive and neg. on the circuit boards so i know which is which, but since im using the neo-wedges, does anyone know how to tell which are the pos. and neg. leads on the leds??
BTW: My mom doesnt trust me in knowing how to solder the leds in, and she doesnt trust her skills in soldering either :o. But im pretty sure i can talk her into letting me do it. But JUST i case is there anyone in the nc area that would be able to do this for me??? Id rather do it myself but if i cant, id like someone to do it because i think, this mod is one of the BEST mods u can do .
.
Thanks in advance,
Corey
. So ive already done the floorwells(white), cargo area(white), both door switches(blue), and the auto shifter(blue). Im planning to do the DIC and HUD in blue leds and that should be no problem. Im using the neo-wedges from oznium, execpt in the HUD because there the type a's, so im ordering them from autoillumination. But ok heres the real question im going to be using the neo-wedges out of the base for the hvac and the radio, ive already looked at the diagrams for the positive and neg. on the circuit boards so i know which is which, but since im using the neo-wedges, does anyone know how to tell which are the pos. and neg. leads on the leds?? BTW: My mom doesnt trust me in knowing how to solder the leds in, and she doesnt trust her skills in soldering either :o. But im pretty sure i can talk her into letting me do it. But JUST i case is there anyone in the nc area that would be able to do this for me??? Id rather do it myself but if i cant, id like someone to do it because i think, this mod is one of the BEST mods u can do
.Thanks in advance,
Corey


 04-22-2008, 02:56 AM
#17
Le Mans Master
Thread Starter
Member Since: May 2006
Location: DuBois PA
Posts: 5,987
Likes: 0
Received 18 Likes
on
16 Posts
St. Jude Donor '11-'12-'13-'14-'15
Corey,
The easiest way to identify your pos and neg leads are with a 9 volt battery. After you liberate your NEO just touch the wire ends to the contacts on a battery, if it doesn't light up reverse it and then mark your pos lead with a sharpie;

Tell your mom not to worry! Just use no more then a 35 watt iron and don't let it sit on the board too long. A solder sucker will make it much easier to clean out the contact holes after you remove the stock bulbs! 
If you do get stuck PM me, I did unionlandlord's Radio and HVAC for him and they turned out pretty good.
Tim
The easiest way to identify your pos and neg leads are with a 9 volt battery. After you liberate your NEO just touch the wire ends to the contacts on a battery, if it doesn't light up reverse it and then mark your pos lead with a sharpie;
Tell your mom not to worry!
Just use no more then a 35 watt iron and don't let it sit on the board too long. A solder sucker will make it much easier to clean out the contact holes after you remove the stock bulbs! If you do get stuck PM me, I did unionlandlord's Radio and HVAC for him and they turned out pretty good.
Tim
Ok so heres the story, im new to the CF but ive been looking at it for quite some time now. The CF has helped me with doing the HID lights and now this led mod. So ive already done the floorwells(white), cargo area(white), both door switches(blue), and the auto shifter(blue). Im planning to do the DIC and HUD in blue leds and that should be no problem. Im using the neo-wedges from oznium, execpt in the HUD because there the type a's, so im ordering them from autoillumination. But ok heres the real question im going to be using the neo-wedges out of the base for the hvac and the radio, ive already looked at the diagrams for the positive and neg. on the circuit boards so i know which is which, but since im using the neo-wedges, does anyone know how to tell which are the pos. and neg. leads on the leds??
BTW: My mom doesnt trust me in knowing how to solder the leds in, and she doesnt trust her skills in soldering either :o. But im pretty sure i can talk her into letting me do it. But JUST i case is there anyone in the nc area that would be able to do this for me??? Id rather do it myself but if i cant, id like someone to do it because i think, this mod is one of the BEST mods u can do.
Thanks in advance,
Corey
. So ive already done the floorwells(white), cargo area(white), both door switches(blue), and the auto shifter(blue). Im planning to do the DIC and HUD in blue leds and that should be no problem. Im using the neo-wedges from oznium, execpt in the HUD because there the type a's, so im ordering them from autoillumination. But ok heres the real question im going to be using the neo-wedges out of the base for the hvac and the radio, ive already looked at the diagrams for the positive and neg. on the circuit boards so i know which is which, but since im using the neo-wedges, does anyone know how to tell which are the pos. and neg. leads on the leds?? BTW: My mom doesnt trust me in knowing how to solder the leds in, and she doesnt trust her skills in soldering either :o. But im pretty sure i can talk her into letting me do it. But JUST i case is there anyone in the nc area that would be able to do this for me??? Id rather do it myself but if i cant, id like someone to do it because i think, this mod is one of the BEST mods u can do
.Thanks in advance,
Corey
04-22-2008, 08:14 AM
#18

For the HVAC all positives go toward the top of the board.
It is easier to work with two people, one to heat the solder pads and another to push the new LEDs in as it is heated. that way you don't have to clean out the holes completely and place the LED first. Also one person can concentrate on heating and the other on getting the new LED straight. The other issue is that it is a two sided board. I didn't clean much solder off because I didn't want to worry about not having enough solder on the top side.
Wasn't this going to be a simple NEO wedge post?
04-22-2008, 04:43 PM
#19
Racer
Member Since: Apr 2008
Location: Raleigh NC
Posts: 280
Likes: 0
Received 0 Likes
on
0 Posts
Thanks tstar,
Well I was right, i talked my mom into letting me do it. I just ordered the lights and they should be here on thursday, and hopefully by thursday night i will have a complete blue led interior .
So thanks to everyone in this thread and the first thread
I cant wait till i get it done
Well I was right, i talked my mom into letting me do it.
I just ordered the lights and they should be here on thursday, and hopefully by thursday night i will have a complete blue led interior . So thanks to everyone in this thread and the first thread
I cant wait till i get it done
04-23-2008, 03:20 AM
#20
Le Mans Master
Thread Starter
Member Since: May 2006
Location: DuBois PA
Posts: 5,987
Likes: 0
Received 18 Likes
on
16 Posts
St. Jude Donor '11-'12-'13-'14-'15
For the HVAC all positives go toward the top of the board.
It is easier to work with two people, one to heat the solder pads and another to push the new LEDs in as it is heated. that way you don't have to clean out the holes completely and place the LED first. Also one person can concentrate on heating and the other on getting the new LED straight. The other issue is that it is a two sided board. I didn't clean much solder off because I didn't want to worry about not having enough solder on the top side.
Wasn't this going to be a simple NEO wedge post?
It is easier to work with two people, one to heat the solder pads and another to push the new LEDs in as it is heated. that way you don't have to clean out the holes completely and place the LED first. Also one person can concentrate on heating and the other on getting the new LED straight. The other issue is that it is a two sided board. I didn't clean much solder off because I didn't want to worry about not having enough solder on the top side.
Wasn't this going to be a simple NEO wedge post?
) Thread! But hey, as long as it stays managable and doesn't get 50 pages long...I haven't started working on the custom Thread yet... Then again I haven't done TOO much customizing, a ton of experimenting though!

I actually use one of my stained glass mojo irons to remove the bulbs, the tip hits both pads at the same time. Then I use a solder sucker to clean out the holes. It would be nice to have someone helping as long as their breath didn't stink!
Did you catch that link on totally removing the Radio board?????
Tim
The following users liked this post:
RandyK1 (01-01-2018)

