
How to fix your hazard flasher/turn signal problem
 09-23-2007, 07:58 PM
#1
Having trouble with your turn signals? Sometimes they work, sometimes they don't? Mine was doing that too, at first I could mess with the emergency flasher button and the turn signals would work. Then I had to move it more and more. Finally, they quit working all together. So I finally took the time to replace it. I documented the whole method here:
(Redacted due to link goes to spam now)
This is using the 'easy' method where you can do it through the radio hole.
Save the wave!
Doc
(Redacted due to link goes to spam now)
This is using the 'easy' method where you can do it through the radio hole.
Save the wave!
Doc
Last edited by DebRedZR1; 11-14-2021 at 12:36 PM. Reason: new web link

The following 3 users liked this post by docohm:

Popular Reply
10-03-2009, 05:37 PM
Instructor


A friend from this forum stopped by today with the intermittent turn signal problem. A few years back I posted that one could drill a small hole and squirt electrical cleaner inside. We tried this trick and, so far, so good. The whole process takes 10 minutes - much easier than a switch replacement.
This is what the flasher looks like when taken apart.

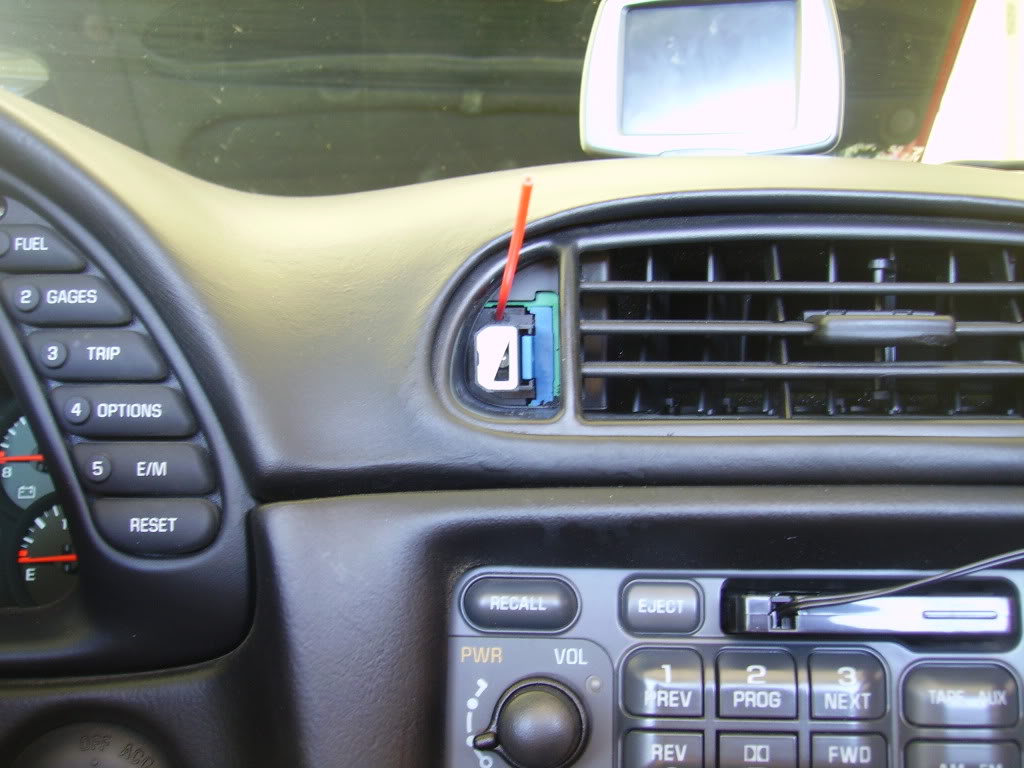
Here are the best drill locations.
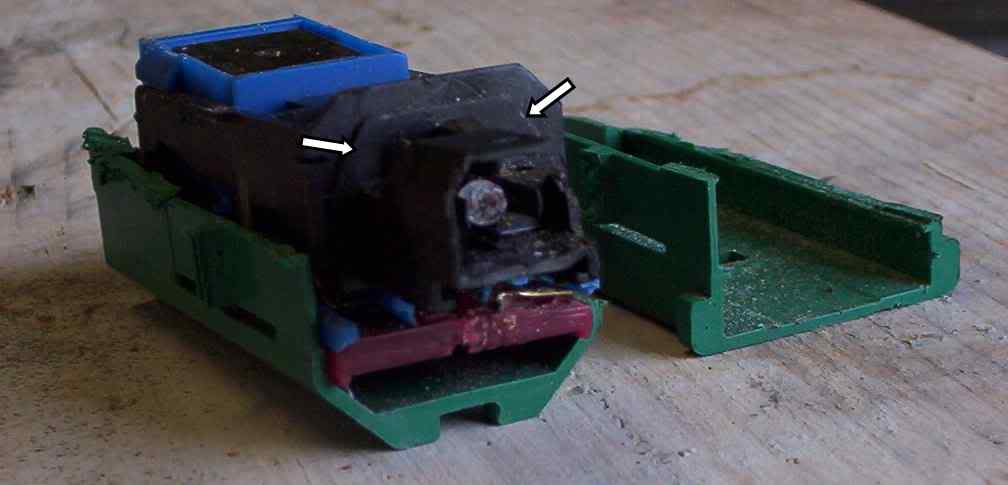
Just pop off the flasher button and use a dremel and small drill bit to create a hole large enough to accept the straw from the electrical cleaner. (Practice the hole on a scrap first. The bit is smaller than I first thought.) I only drilled one hole. Put the straw in and hooked up the spray can. A quick squirt, work the flasher, a few more squirts, then work the flasher again.
This is what the flasher looks like when taken apart.
Here are the best drill locations.
Just pop off the flasher button and use a dremel and small drill bit to create a hole large enough to accept the straw from the electrical cleaner. (Practice the hole on a scrap first. The bit is smaller than I first thought.) I only drilled one hole. Put the straw in and hooked up the spray can. A quick squirt, work the flasher, a few more squirts, then work the flasher again.
12-27-2007, 09:41 PM
#3
I've been using the hazard switch to bring back the turn signals on occasion (yes, I know the switch must be bad and should be replaced,post #24) and yesterday did the same thing. This a.m. , no power. A jump got me going all day but I noticed the flasher was running on restart. I must have hit it again for a turn and not turned it off. Through the day no problems with several restarts. The codes above were displayed. Do you think the battery went down because of the flasher left on?
Btw, I've also recently been getting the three way warning......ABS, Active Handling and Traction Control. You think it's related?
I also posted this on the $3600 electrical post but thought I might get a good respose here! Thanks!!
Btw, I've also recently been getting the three way warning......ABS, Active Handling and Traction Control. You think it's related?
I also posted this on the $3600 electrical post but thought I might get a good respose here! Thanks!!
12-27-2007, 11:05 PM
#4
I'm not sure I understand your problem, you think the flasher was running all night and you didn't notice? Don't you think you'd notice if all four lights were blinking when you got out of the car? OR if you left the turn signal on those go off when you turn off the key. What codes were displayed? you said 'the codes above were displayed' but I don't see a list of any codes. From the ABS, AH & TC warnings you've been getting it sounds like you've got some other problem.
I didn't have any codes or problems at all after changing mine out....
Good luck... DocOhm
I didn't have any codes or problems at all after changing mine out....
Good luck... DocOhm
12-28-2007, 10:28 AM
#5
they go off after turning the engine off and then on again. The codes were 1214 and loss of commounication from both sides DTC.
Yes, I think the flasher circuit was on all night but was not working as it too along with the turn signals has been intermitent. Thanks for you input.
Yes, I think the flasher circuit was on all night but was not working as it too along with the turn signals has been intermitent. Thanks for you input.
12-30-2007, 05:42 PM
#6
Knock on wood, the ABS/TC/ AH warnings have not come back and the turn signals are working every time since the jump. I'm hopeful the flasher circuit is cured.
I do, however, still have the 1214 code current.
I do, however, still have the 1214 code current.
Last edited by wwwFLA; 12-30-2007 at 05:44 PM.
02-21-2008, 02:58 PM
#7
Advanced


Had similar experience. Bumping the flasher to wake up the signals but flasher didn't blink either unless button was held in. Then later after I'd left, flashers started flashing. Got lucky. Someone called me to say they were blinking.Battery weak, but not quite dead yet. Didn't get any codes.
 02-22-2008, 08:47 AM
#10
Melting Slicks

I recommend you buy a flasher assembly from a supporting vendor, Corvette Enhancements. They sell the small flasher/cable assembly that takes 15 minutes to install and bi-passes the OEM flasher which is prone to go bad again. The assembly sold by Corvette enhancements sells for about $50 and is a terrific product/upgrade.
The following users liked this post:
Gianna66 (01-02-2022)
02-22-2008, 11:13 AM
#11
Le Mans Master

I recommend you buy a flasher assembly from a supporting vendor, Corvette Enhancements. They sell the small flasher/cable assembly that takes 15 minutes to install and bi-passes the OEM flasher which is prone to go bad again. The assembly sold by Corvette enhancements sells for about $50 and is a terrific product/upgrade.
 It won't do anything to fix the hazard flashers, but it's a quick fix for the turn signals.
The following users liked this post:
Gianna66 (10-22-2023)
02-22-2008, 11:38 AM
#12
Tech Contributor


Member Since: Dec 1999
Location: Anthony TX
Posts: 32,736
Received 2,180 Likes
on
1,583 Posts
CI 6,7,8,9,11 Vet
St. Jude Donor '08

I have completely dissected a bad hazard switch and WOW! There very complex inside, There are 5-6 sliding switch contacts, an integrated circuit IC Chip some diodes and a bunch of small springs and some lighting circuits and bulbs.
I believe the contacts get tarnished and or loose some of their tension over time cause of heat and vibration. The contacts did look dirty. There would be NO way to easily repair that switch!
If you still have your old switch, it's a VERY good donor for electrical test pins. The Male pins in the switch base can be removed (busted out of the plastic base) and used to test female pins in female connectors.
In a lot of C5 electrical gremlins the problem is cause buy poor contact in the electrical connectors. If you insert that male pin in a female pin,,,there should be a firm grip on the male pin. A very good example of where the female pins fail the most is in the wheel speed sensor connectors. When mine was bad, the male pin would literally fall out when the female connector was turned up side down.
Without testing the female pin tension,,,,you can end up chasing your tail and replacing a LOT of expensive parts.
BC
There very complex inside, There are 5-6 sliding switch contacts, an integrated circuit IC Chip some diodes and a bunch of small springs and some lighting circuits and bulbs. I believe the contacts get tarnished and or loose some of their tension over time cause of heat and vibration. The contacts did look dirty. There would be NO way to easily repair that switch!
If you still have your old switch, it's a VERY good donor for electrical test pins. The Male pins in the switch base can be removed (busted out of the plastic base) and used to test female pins in female connectors.
In a lot of C5 electrical gremlins the problem is cause buy poor contact in the electrical connectors. If you insert that male pin in a female pin,,,there should be a firm grip on the male pin. A very good example of where the female pins fail the most is in the wheel speed sensor connectors. When mine was bad, the male pin would literally fall out when the female connector was turned up side down.
Without testing the female pin tension,,,,you can end up chasing your tail and replacing a LOT of expensive parts.
BC
The following 3 users liked this post by Bill Curlee:
02-22-2008, 11:55 PM
#13
Racer
Member Since: Nov 2006
Location: Tampa Bay Area, U.S.A. (Zombie Nation)
Posts: 488
Likes: 0
Received 3 Likes
on
3 Posts

<<I believe the contacts get tarnished...>>
My turn signals went dead and resumed working for a while by punching the hazard switch a time or two. I noticed that the more I exercised the hazard switch the longer the signals worked before crapping out. After they died one day about 6 months ago I decided to exercise the hazard switch about a hundred times and see what happened. The signals are still working perfectly as of today.
My turn signals went dead and resumed working for a while by punching the hazard switch a time or two. I noticed that the more I exercised the hazard switch the longer the signals worked before crapping out. After they died one day about 6 months ago I decided to exercise the hazard switch about a hundred times and see what happened. The signals are still working perfectly as of today.
The following users liked this post:
ArmchairArchitect (07-30-2019)
02-23-2008, 10:23 AM
#14
Tech Contributor
Member Since: Dec 1999
Location: Anthony TX
Posts: 32,736
Received 2,180 Likes
on
1,583 Posts
CI 6,7,8,9,11 Vet
St. Jude Donor '08
<<I believe the contacts get tarnished...>>
My turn signals went dead and resumed working for a while by punching the hazard switch a time or two. I noticed that the more I exercised the hazard switch the longer the signals worked before crapping out. After they died one day about 6 months ago I decided to exercise the hazard switch about a hundred times and see what happened. The signals are still working perfectly as of today.
My turn signals went dead and resumed working for a while by punching the hazard switch a time or two. I noticed that the more I exercised the hazard switch the longer the signals worked before crapping out. After they died one day about 6 months ago I decided to exercise the hazard switch about a hundred times and see what happened. The signals are still working perfectly as of today.
YEP!
I use my hazard switch quite a bit. I hate tail gaters! Especially when they tail gate a car that can stop in two times less distance than the one their driving!It's still the original switch and works very well.
BC
The following users liked this post:
El original (06-01-2017)
10-18-2008, 04:23 PM
#15
Excellent post! Should be a sticky !!
Took me about a hour including cleaning all the dash parts before reassembly! One more thing that might help someone out with large hands like myself. Hemostats help get the old one out and positioning the new one,and slide it in place.
Took me about a hour including cleaning all the dash parts before reassembly! One more thing that might help someone out with large hands like myself. Hemostats help get the old one out and positioning the new one,and slide it in place.
The following users liked this post:
Blueleader (06-03-2018)
07-14-2009, 08:23 PM
#16

I too have been "working" the 4-way hazard flasher switch for years. Sometimes the blinkers will work, sometimes not. Two comments:
1. Note that if the switch is IN/ON (but the 4-way flashers aren't flashing cuz of the switch problem) and you move the indicator stalk to indicate a turn (and of course the blinker doesn't blink) it will tun OFF that brake light, so if one taps the brakes, it will look like one is indicating a turn in the opposite direction! Keeps the drivers around you confused - not necessarily a good thing.
2. I know from experience <sigh> that the 4-way flasher switch will run battery down if left in the IN/ON position.... WITHOUT the 4-way flashers flashing.
The following users liked this post:
Blueleader (06-03-2018)
10-03-2009, 05:37 PM
#17
Instructor
A friend from this forum stopped by today with the intermittent turn signal problem. A few years back I posted that one could drill a small hole and squirt electrical cleaner inside. We tried this trick and, so far, so good. The whole process takes 10 minutes - much easier than a switch replacement.
This is what the flasher looks like when taken apart.
Attachment 48157892
Here are the best drill locations.
Attachment 48157893
Just pop off the flasher button and use a dremel and small drill bit to create a hole large enough to accept the straw from the electrical cleaner. (Practice the hole on a scrap first. The bit is smaller than I first thought.) I only drilled one hole. Put the straw in and hooked up the spray can. A quick squirt, work the flasher, a few more squirts, then work the flasher again.
Attachment 48157894
Last edited by FL_Dave; 10-11-2012 at 02:58 PM. Reason: scrambled images
The following 6 users liked this post by FL_Dave:
ArmchairArchitect (08-06-2018),
El original (06-01-2017),
Gianna66 (10-22-2023),
RCS (05-26-2022),
Sam Handwich (12-08-2023),
and 1 others liked this post.
10-03-2009, 08:00 PM
#18
Le Mans Master
Member Since: Nov 2003
Location: Tampa Fl
Posts: 7,971
Received 234 Likes
on
168 Posts
St. Jude Donor '12-'13-'14
It was my car, and this is what I posted on another thread today.
well we tried a little fix on my car today, and it may have worked.
Dave removed the cover to the hazard switch, Drilled a hole the diameter of the little red tube that comes with electrical connection cleaner into the hazard switch. Then sprayed cleaner on the contacts. He cycled the switched 30-50 plus times to rub the contact points, and my flashers worked.
worked the 2 dozen or so times i used the binkers on the way home.
I cycled the flasher switch maybe another 30 times on the way home.
I use my car a couple times a month, so im not sure if it's a true fix, but so far so good. I think it's important to cycle the flasher switch ALOT to clean the contacts. It didnt hurt to try, and it really took 10 minutes. Im not a good gauge because I dont use my car enough, but it seemed to so something.
Thanks dave it was good seeing you again
The following users liked this post:
ArmchairArchitect (08-04-2019)
04-29-2010, 03:37 PM
#19

Hello, I have been dealing with this problem for several years and have determined a pattern. Mine acts up when the temps are up, it is quite humid and I use the air conditioning. Never fails in the winter. I can prevent it most of the time by directing the air only to the floor. Inconvenient, but works. I can also fix by directing heat to the upper vent. This seems to dry it out. I think this says there is a problem of humidity in the switch from the air conditioning vent. I am going to try this idea of injecting cleaner, but would like anyone who has actually had the dash apart to comment and let me know if there is the possibility that the vent could have a hole in it or any room to insulate the vent or switch better.
The following 2 users liked this post by Stealth94:
9d8vet (05-14-2019),
ArmchairArchitect (07-30-2019)
04-29-2010, 03:56 PM
#20
Hello, I have been dealing with this problem for several years and have determined a pattern. Mine acts up when the temps are up, it is quite humid and I use the air conditioning. Never fails in the winter. I can prevent it most of the time by directing the air only to the floor. Inconvenient, but works. I can also fix by directing heat to the upper vent. This seems to dry it out. I think this says there is a problem of humidity in the switch from the air conditioning vent. I am going to try this idea of injecting cleaner, but would like anyone who has actually had the dash apart to comment and let me know if there is the possibility that the vent could have a hole in it or any room to insulate the vent or switch better.
DocOhm

