
Headlight gear fix (highly pictorialized)
 07-25-2007, 10:01 PM
#1
Team Owner


Thread Starter
After the recent fun I had upgrading Mrs. Patches' A4 drivetrain, I was coincidentally in the garage one evening when Mrs. Patches pulled in and proceeded to lower her extended headlight modules. During said process of lowering the headlights, the driver's motor gear assembly was heard to emit a horrendous rat-a-tat-a-tat of a machine-gun cacophony that announced the arrival of the headlight gear malfunction known all too well to these forums. This was a rather disparaging occurrence considering the tender age (mileage) of this particular C5 which was still a bit south of the 5-digit mark.
All disconcertions put aside, I set about ordering a couple of repair kits, one for the existing ailing driver's gear and one for the when-it-rains-it-pours failure of the passenger-side headlight I predict is shortly to follow. I decided to only change the broken driver's side so as not to totally shoot the weekend to Hades and because I just wasn't in the mood.
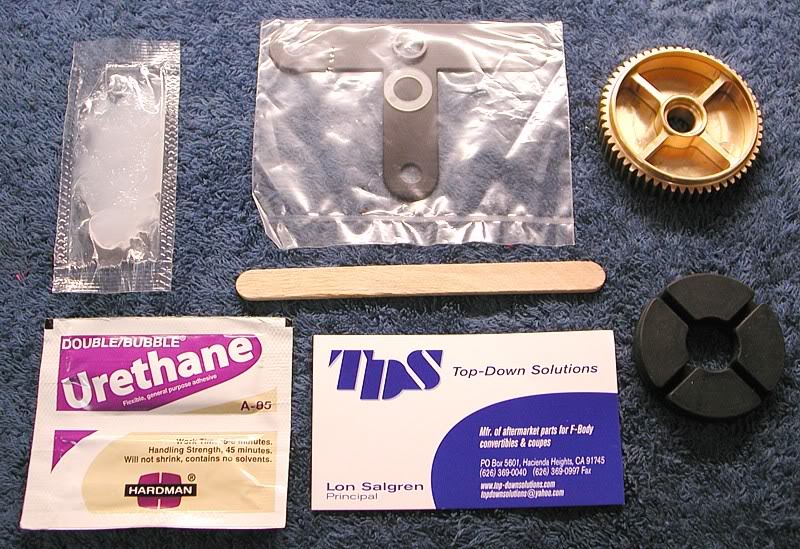
I ordered and received the latest kits from Top Down Solutions which is essentially the same kit sold by another vendor and contains the same reinforcement T-bracket and started the repair (with a couple of modifications to the included instructions).
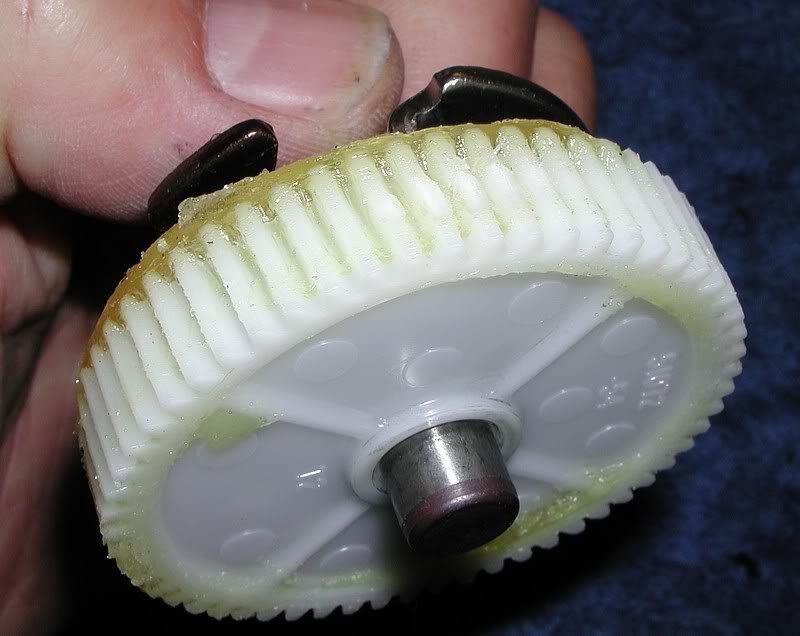
The kit contents. Top left-clockwise: Silicone lubricant, T-bracket with rubber bushing and plastic washer, brass gear, rubber gear insert, adhesive mixing stick and Urethane two-part, quick-cure adhesive.
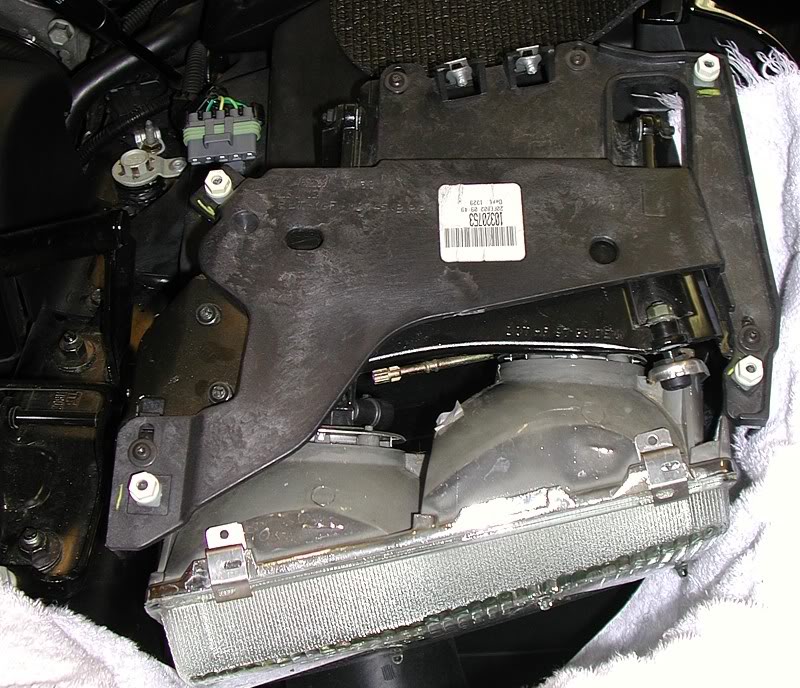
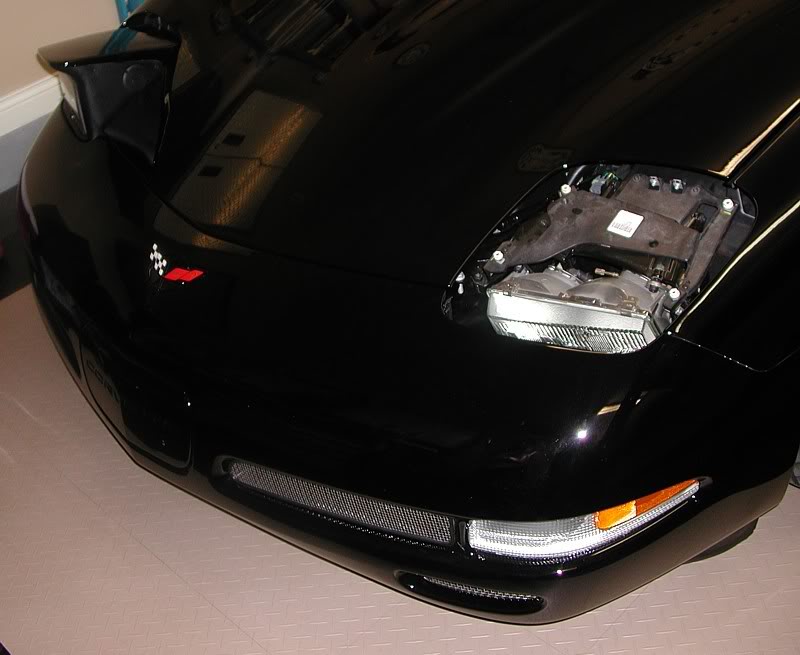
I raised the hood and layed out protective mats and towels. Here's the headlight I'm about to tear into. Then I raised the headlights by turning the stalk all the way and then backing it off one click to turn the headlights off but leave them up. I then disconnected the negative terminal on the battery.
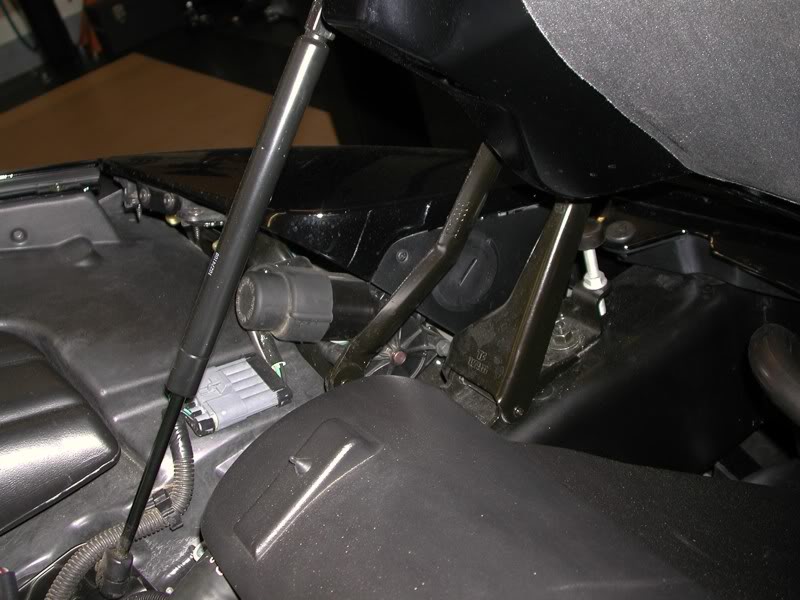
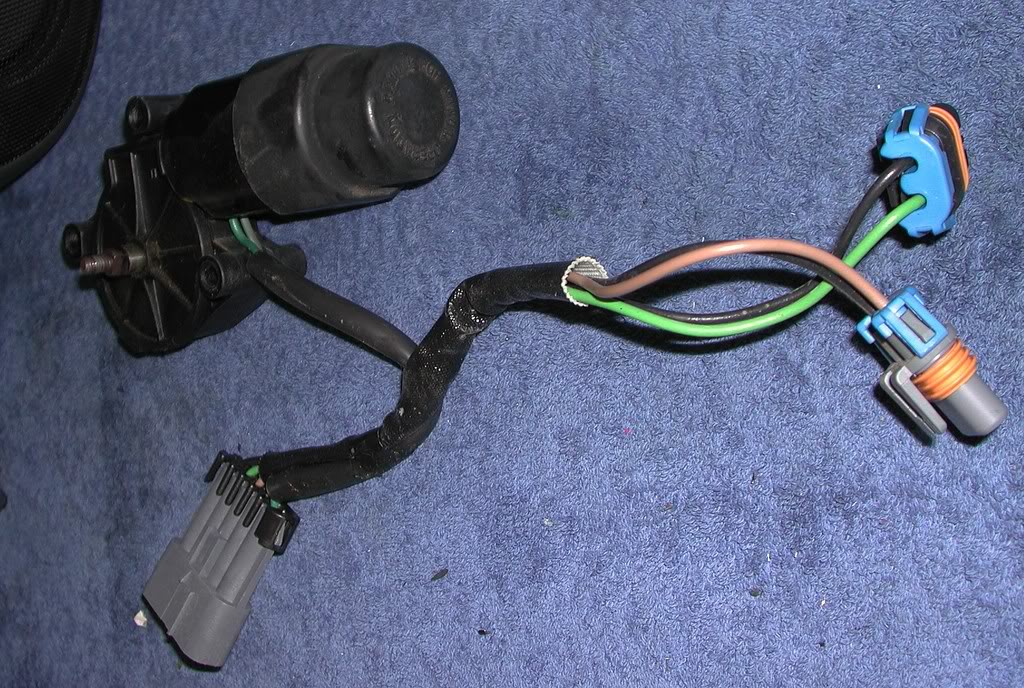
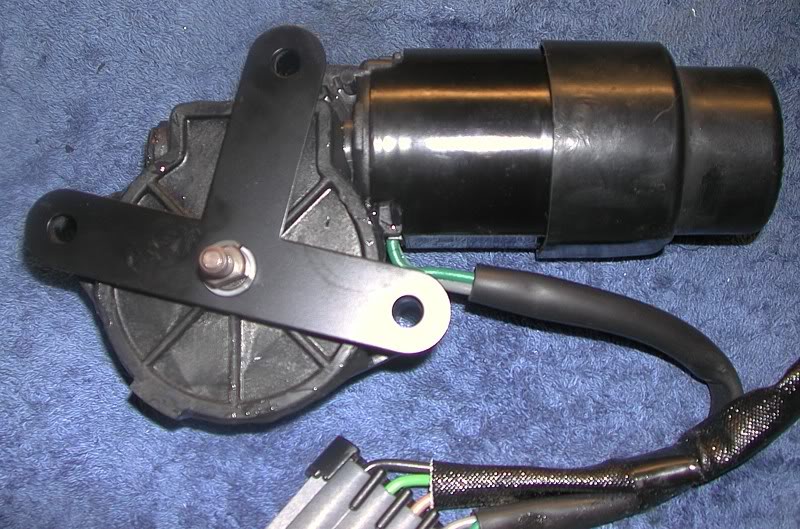
A closeup of the gearmotor assembly.

I unscrewed the three Phillips screws from the plastic shroud . . .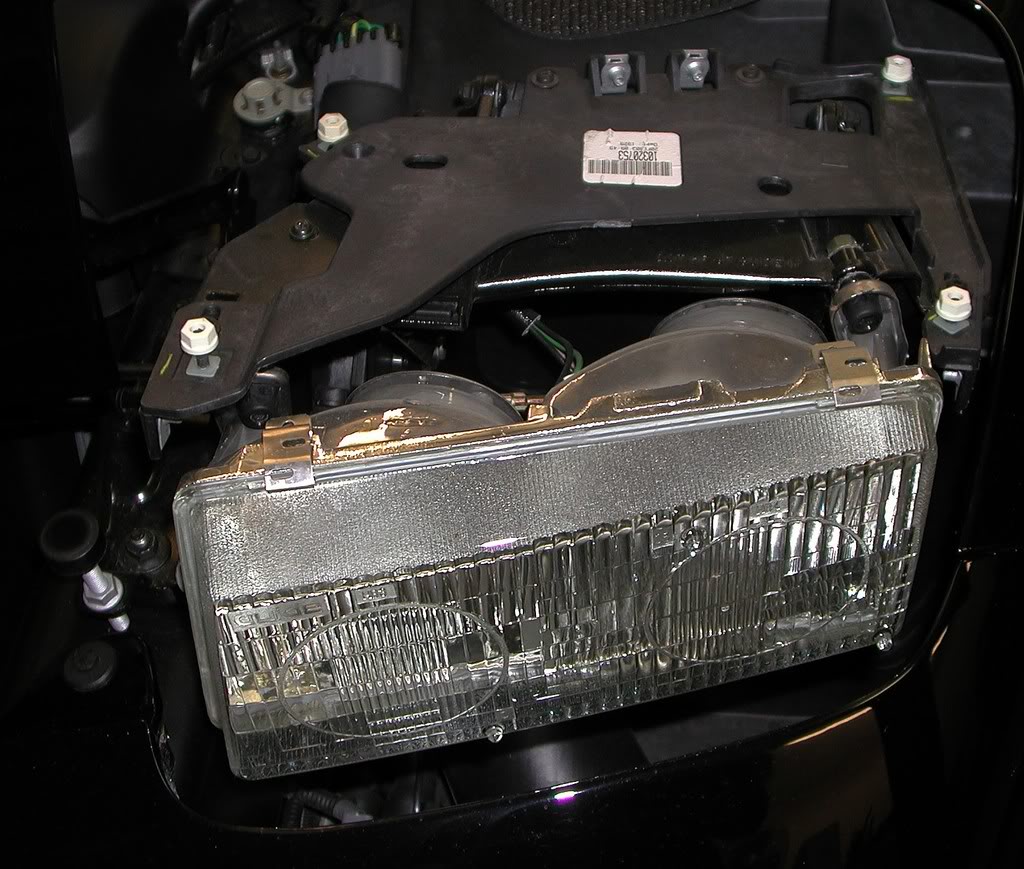
. . . and the four Torx screws from the painted headlight cover and removed them.
A rear view of the gearmotor and one of the mounting bolts.
First, I disconnected the main headlight connector . . .
. . . and then the two connectors behind the high and low-beam bulbs.
Front view of the gearmotor. Here you see the three mounting bolts. There are nuts on each bolt that need to be removed. There is also a nut on the other end of the center shaft you see that goes through the offending gear we're looking to replace. I used a gear wrench and a box-end wrench to unbolt these and was very careful not to drop the nuts as it's a tight fit for my hands in there. Removing the center nut allowed me to slip the linkage arm off the gear shaft and that immediately caused the headlight to freefall/pivot so I was careful in easing it down as I removed the gearmotor.
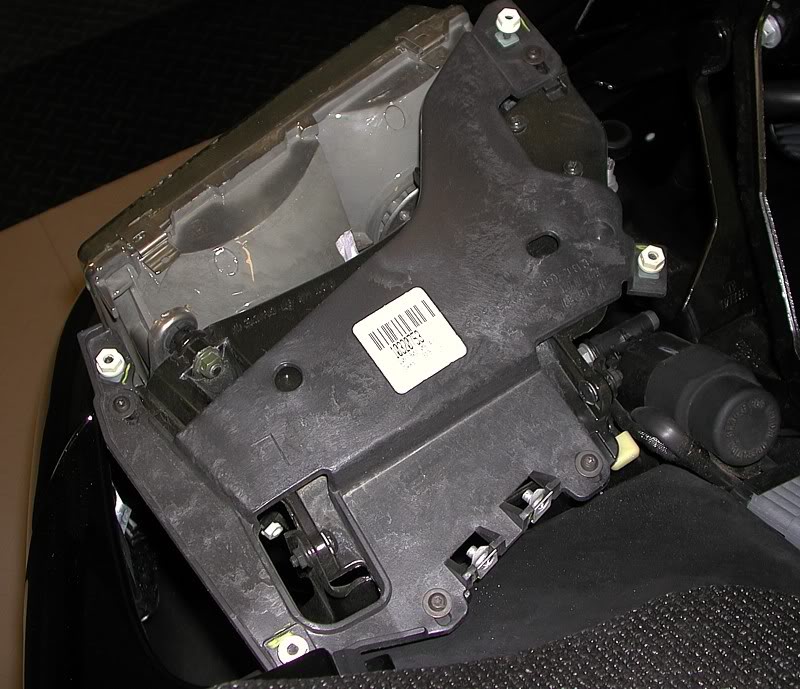
The instructions indicated that the headlight assembly should be loosened and slid forward to allow removal of the gearmotor but I found I could remove it without doing that. Here's the extracted component.
And here is the free-hanging headlight assembly.
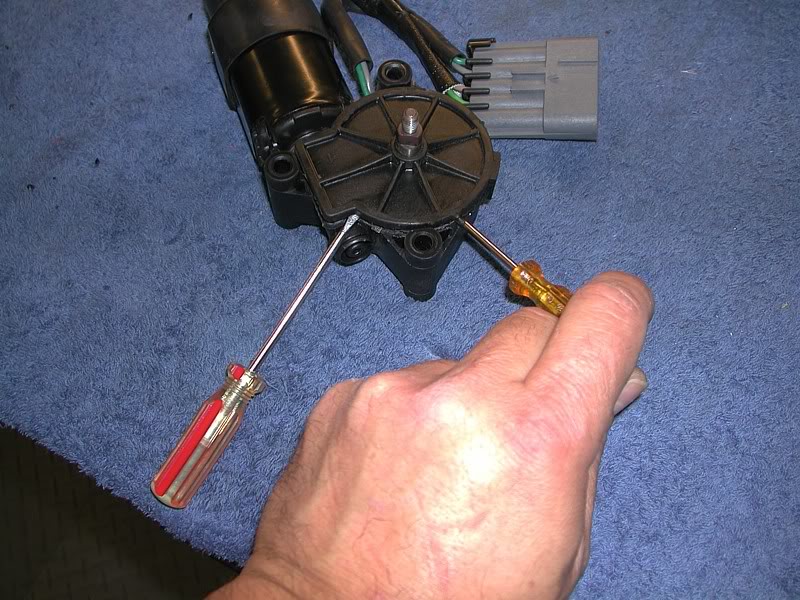
The next step is to use two small screwdrivers to pop the gear cover off. The cover appears to be ultrasonically welded or glued.
I was careful and slowly worked my way around the cover until it popped off in one piece.
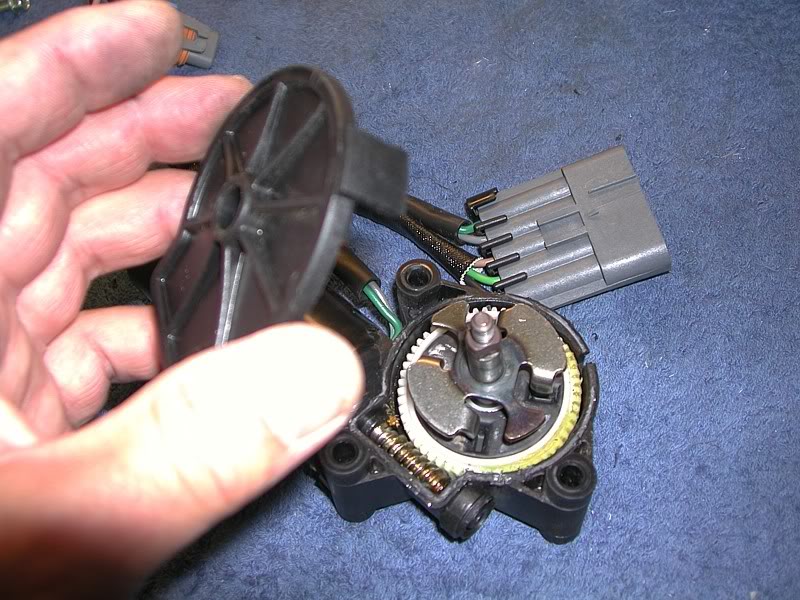
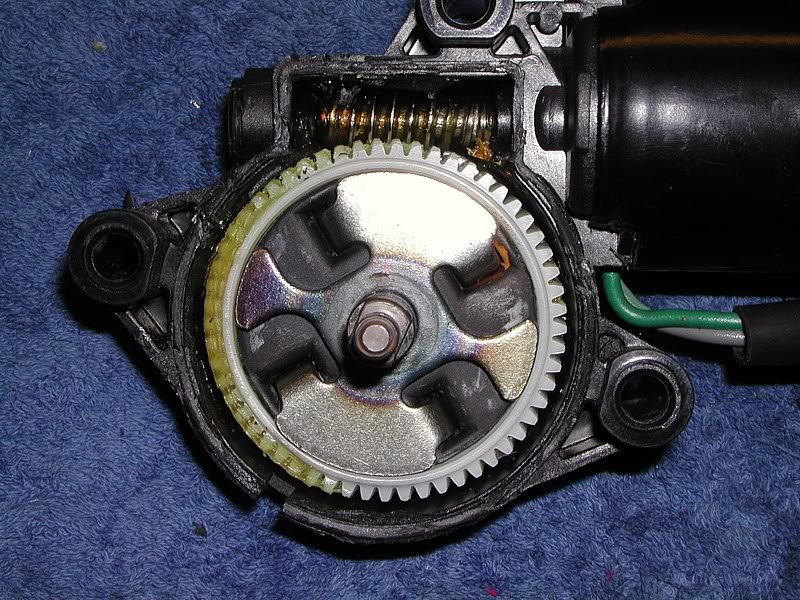
The exposed gear shows no obvious sign of damage - yet.
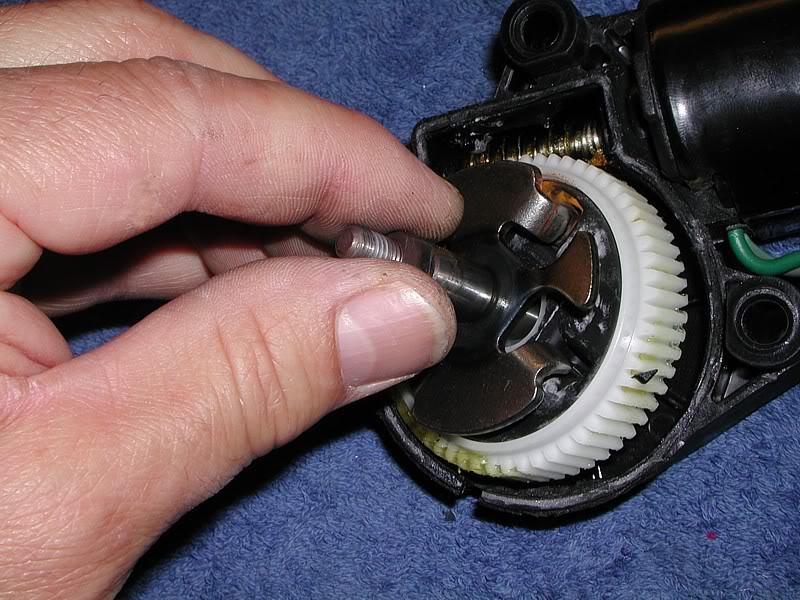
I removed the gear and shaft.
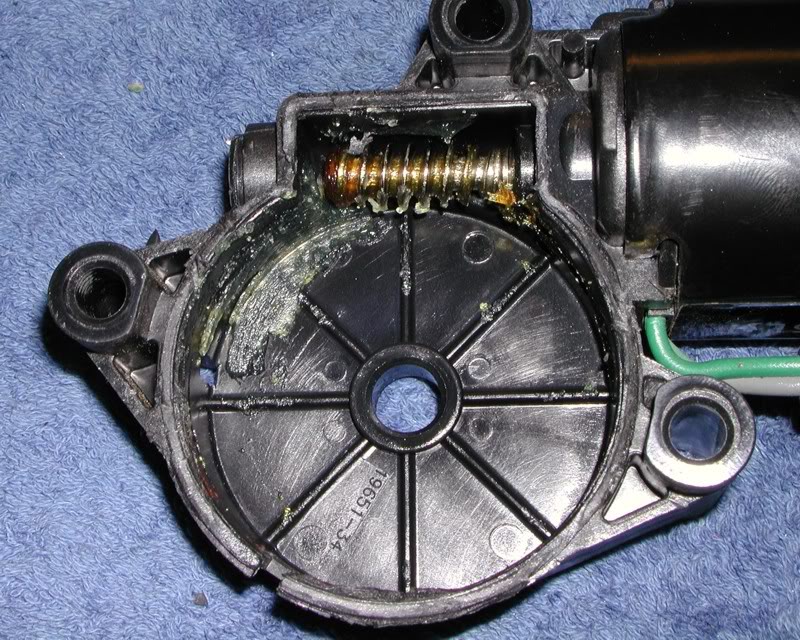
Here's the exposed gear case. Note that the worm is metal.
Finally we can see signs of damage to the gear on the teeth at the bottom of the picture. Doesn't seem like much, but there's not a whole lot of engagement to begin with.
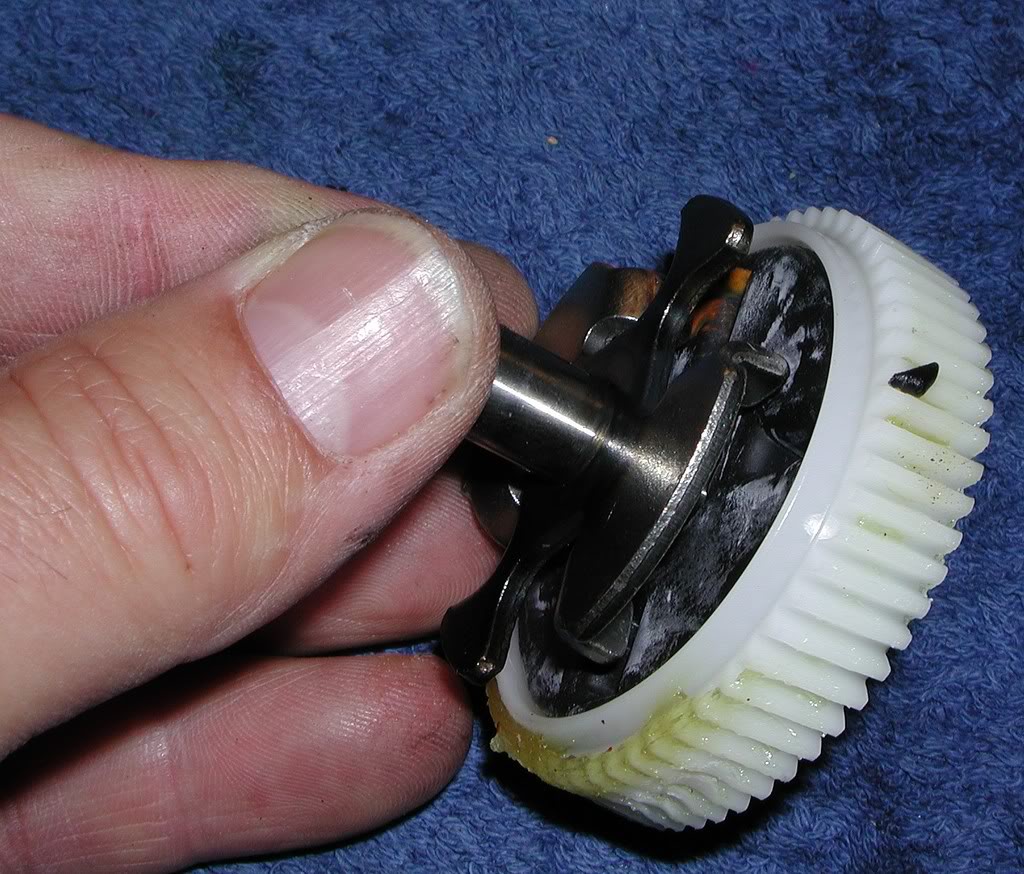
The damaged teeth are at the top in this pic.
I cleaned up the gear case, installed the rubber insert into the brass gear, lubed up the gear, shaft and worm with the silicone grease, slid the gear and plastic washer onto the shaft and then the gear and shaft into the case. Then I prepared for the adhesive application.
The instructions warn you to work fast when gluing the cover back on because there is only about a 5-6 minute working time once the two-part urethane is mixed. They aren't kidding either. It's important that both surfaces have adhesive applied to them and that it is a contiguous ring all the way around the edge of the case to ensure the case is watertight.
I clamped the cover snugly to maintain pressure while the adhesive cured overnight. I used the remaining adhesive to form a bead around the outside of the case/cover interface.
The next morning, I removed the clamps and checked for a good bond. Then I slid the T-bracket onto the shaft with the larger end of the rubber bushing towards to cover to retain it. The T-bracket was added to the kit after reports of cover separation due to adhesive failures caused by axial load of the gear shaft. The bracket helps to keep the cover in place. I also slipped a metal washer between each bracket arm and the cover to take up the space in between - this was one of my additions to the procedure.
Next, I reinstalled the gearmotor and reassembled the headlight in the reverse order of disassembly, making sure to slide the linkage onto the gear shaft in the proper orientation. Incidentally, the headlight position was out of synch with the passenger side because I installed the gear shaft in a different position than where it was before I removed it (it was about halfway up). Not a problem because I simply manually rotated the motor worm using the **** on the end of the motor until the headlight was in the fully raised position. Finally, I reconnected the battery, tested the headlight raising/lowering action and confirmed it was working properly.
All fixed with only a modicum of fuss.
All disconcertions put aside, I set about ordering a couple of repair kits, one for the existing ailing driver's gear and one for the when-it-rains-it-pours failure of the passenger-side headlight I predict is shortly to follow. I decided to only change the broken driver's side so as not to totally shoot the weekend to Hades and because I just wasn't in the mood.
I ordered and received the latest kits from Top Down Solutions which is essentially the same kit sold by another vendor and contains the same reinforcement T-bracket and started the repair (with a couple of modifications to the included instructions).
The kit contents. Top left-clockwise: Silicone lubricant, T-bracket with rubber bushing and plastic washer, brass gear, rubber gear insert, adhesive mixing stick and Urethane two-part, quick-cure adhesive.
I raised the hood and layed out protective mats and towels. Here's the headlight I'm about to tear into. Then I raised the headlights by turning the stalk all the way and then backing it off one click to turn the headlights off but leave them up. I then disconnected the negative terminal on the battery.
A closeup of the gearmotor assembly.
I unscrewed the three Phillips screws from the plastic shroud . . .
. . . and the four Torx screws from the painted headlight cover and removed them.
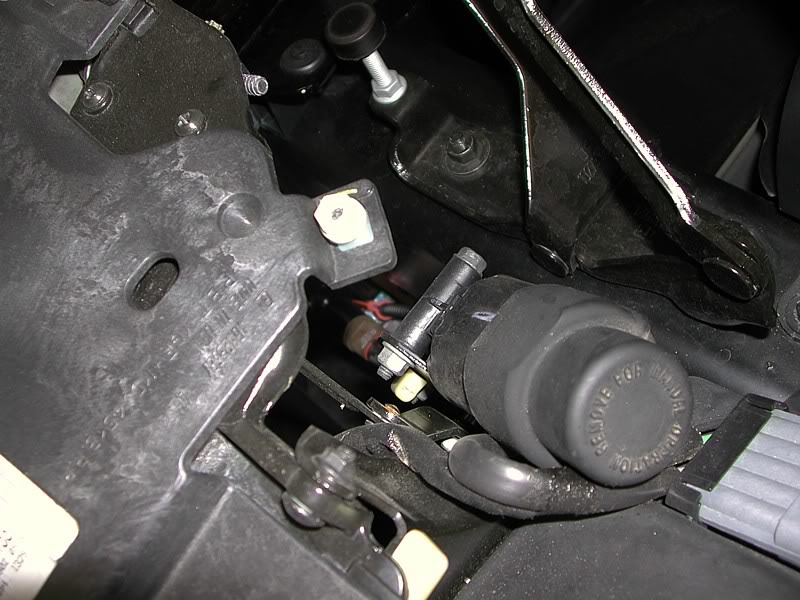
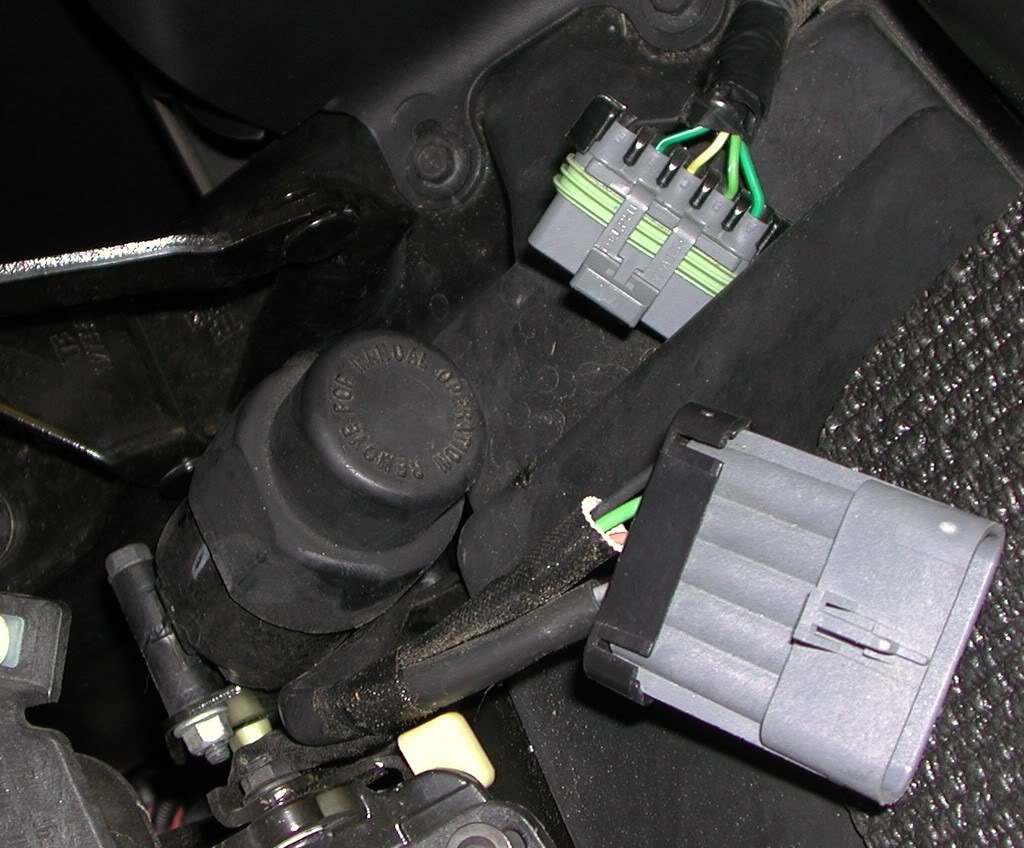
A rear view of the gearmotor and one of the mounting bolts.
First, I disconnected the main headlight connector . . .
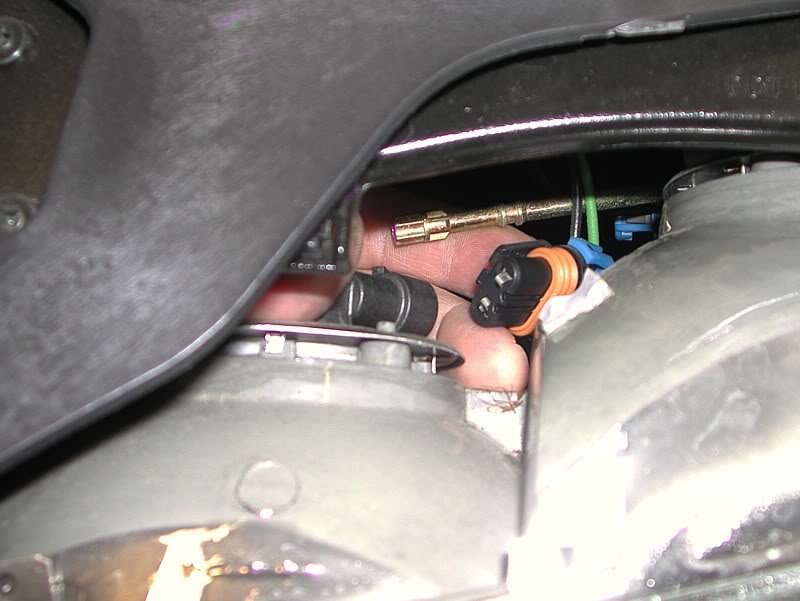
. . . and then the two connectors behind the high and low-beam bulbs.
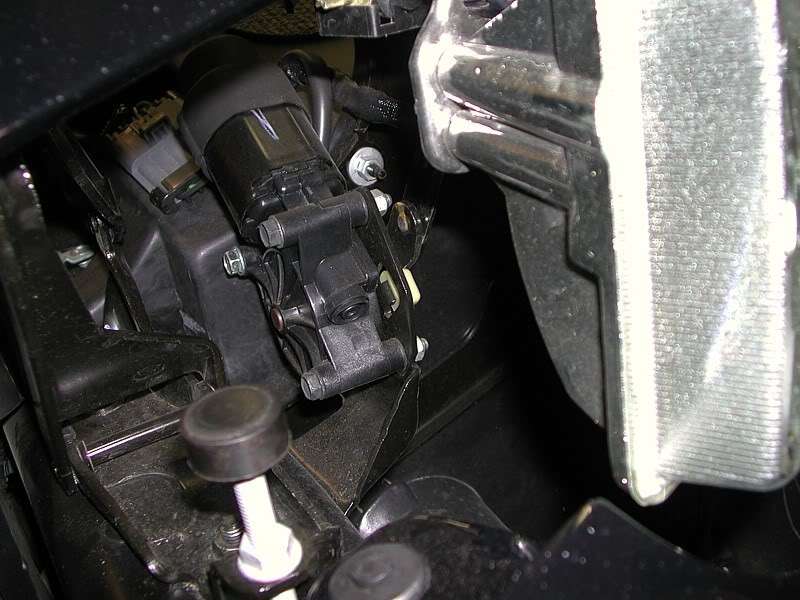
Front view of the gearmotor. Here you see the three mounting bolts. There are nuts on each bolt that need to be removed. There is also a nut on the other end of the center shaft you see that goes through the offending gear we're looking to replace. I used a gear wrench and a box-end wrench to unbolt these and was very careful not to drop the nuts as it's a tight fit for my hands in there. Removing the center nut allowed me to slip the linkage arm off the gear shaft and that immediately caused the headlight to freefall/pivot so I was careful in easing it down as I removed the gearmotor.
The instructions indicated that the headlight assembly should be loosened and slid forward to allow removal of the gearmotor but I found I could remove it without doing that. Here's the extracted component.
And here is the free-hanging headlight assembly.
The next step is to use two small screwdrivers to pop the gear cover off. The cover appears to be ultrasonically welded or glued.
I was careful and slowly worked my way around the cover until it popped off in one piece.
The exposed gear shows no obvious sign of damage - yet.
I removed the gear and shaft.
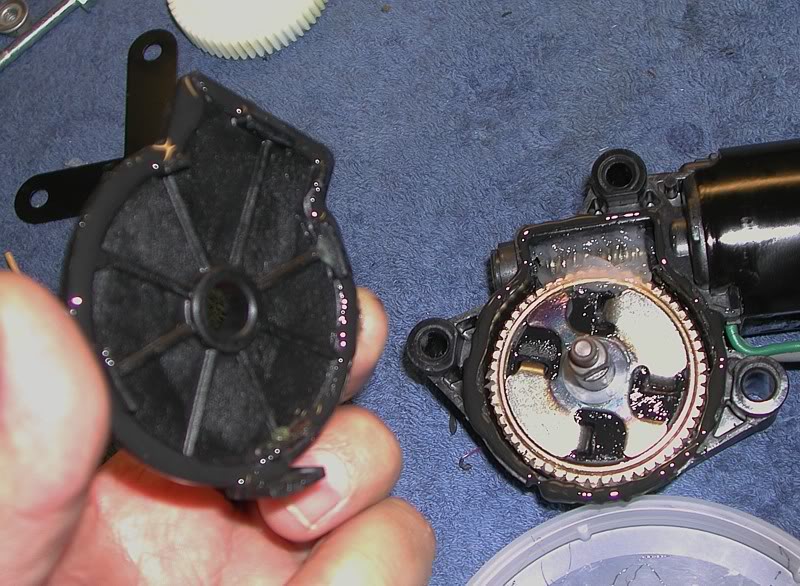
Here's the exposed gear case. Note that the worm is metal.
Finally we can see signs of damage to the gear on the teeth at the bottom of the picture. Doesn't seem like much, but there's not a whole lot of engagement to begin with.
The damaged teeth are at the top in this pic.
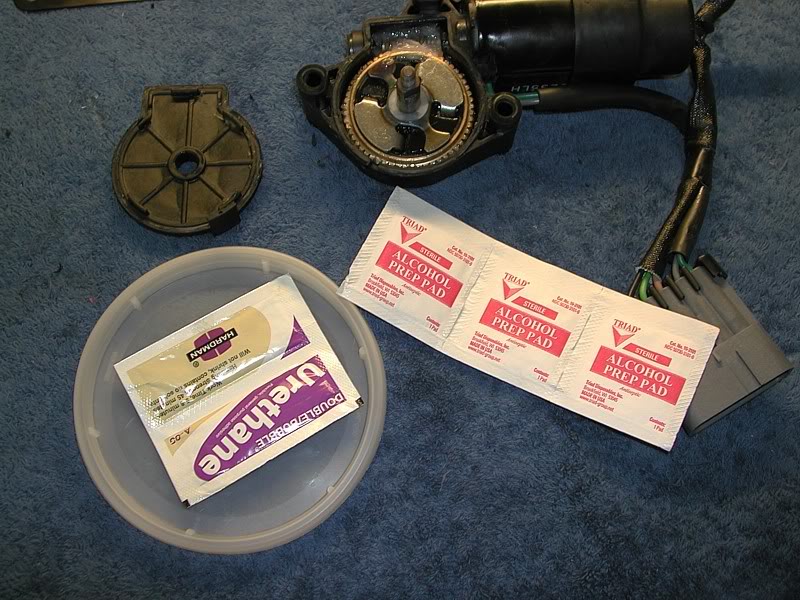
I cleaned up the gear case, installed the rubber insert into the brass gear, lubed up the gear, shaft and worm with the silicone grease, slid the gear and plastic washer onto the shaft and then the gear and shaft into the case. Then I prepared for the adhesive application.
The instructions warn you to work fast when gluing the cover back on because there is only about a 5-6 minute working time once the two-part urethane is mixed. They aren't kidding either. It's important that both surfaces have adhesive applied to them and that it is a contiguous ring all the way around the edge of the case to ensure the case is watertight.
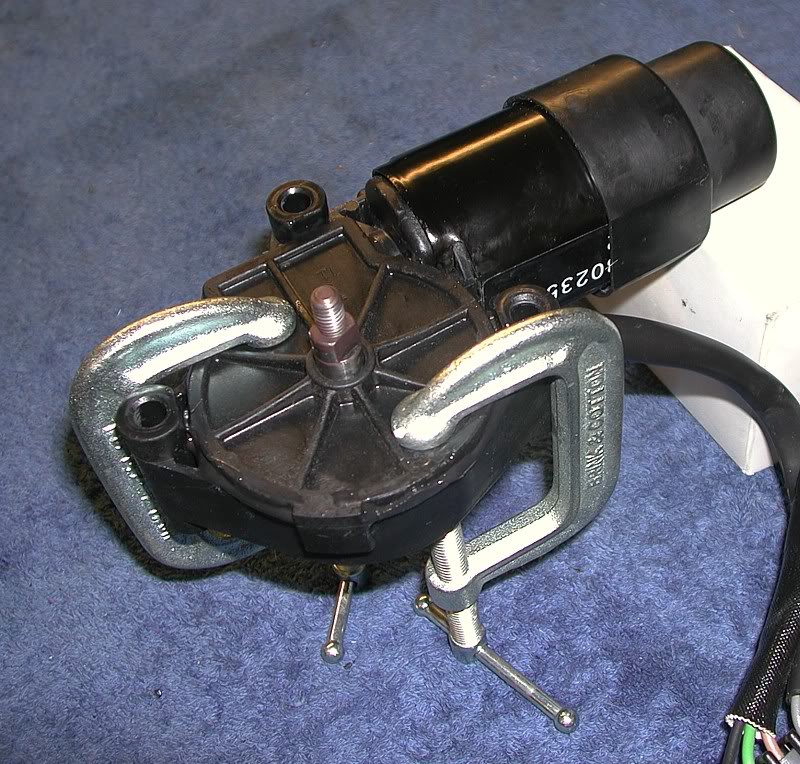
I clamped the cover snugly to maintain pressure while the adhesive cured overnight. I used the remaining adhesive to form a bead around the outside of the case/cover interface.
The next morning, I removed the clamps and checked for a good bond. Then I slid the T-bracket onto the shaft with the larger end of the rubber bushing towards to cover to retain it. The T-bracket was added to the kit after reports of cover separation due to adhesive failures caused by axial load of the gear shaft. The bracket helps to keep the cover in place. I also slipped a metal washer between each bracket arm and the cover to take up the space in between - this was one of my additions to the procedure.
Next, I reinstalled the gearmotor and reassembled the headlight in the reverse order of disassembly, making sure to slide the linkage onto the gear shaft in the proper orientation. Incidentally, the headlight position was out of synch with the passenger side because I installed the gear shaft in a different position than where it was before I removed it (it was about halfway up). Not a problem because I simply manually rotated the motor worm using the **** on the end of the motor until the headlight was in the fully raised position. Finally, I reconnected the battery, tested the headlight raising/lowering action and confirmed it was working properly.
All fixed with only a modicum of fuss.
Last edited by Patches; 07-26-2007 at 08:46 PM.

The following 17 users liked this post by Patches:
ArmchairArchitect (09-19-2017),
AtkRWC (01-15-2022),
black match box (12-21-2015),
C5YJ (07-27-2018),
CPO Rob (09-19-2017),
and 12 others liked this post.
The following users liked this post:
Nogee (02-17-2021)

 Awesome write up and something I have done on my drivers side
 07-25-2007, 11:40 PM
#6
Melting Slicks


Funny, it must happen in waves. I replaced my driver side headlight gear just two days ago. 
Got mine from Rodney Dickman and you're right, they're exactly the same kit. Took about an hour to take it out, 45 minutes to repair, and about an hour to put it all back and test. Not all that bad as repairs go.
Glad to see yours went as well as mine. Photos are great, I just have trouble stopping m work, taking photos, and starting again. That trip to the fridge always distracts me somehow and I forget what I was working on,,,,,
07-25-2007, 11:51 PM
#7
Team Owner


Patches,
another amazing thread. You have great attention to detail and amazing patience when posting these. When reading one of your "how to's" I feel like I can tackle any job.
I have posted a link to your shifter installation instructions countless times. I don't have a headlight gear problem but bookmarked this thread in case I do.
You are truly a great asset to the Corvette community.
Thank you
another amazing thread.
You have great attention to detail and amazing patience when posting these. When reading one of your "how to's" I feel like I can tackle any job. I have posted a link to your shifter installation instructions countless times. I don't have a headlight gear problem but bookmarked this thread in case I do.
You are truly a great asset to the Corvette community.
Thank you
07-25-2007, 11:54 PM
#8
Administrator
Member Since: Mar 2001
Location: In a parallel universe. Currently own 2014 Stingray Coupe.
Posts: 342,700
Received 19,225 Likes
on
13,932 Posts
C7 of the Year - Modified Finalist 2021
MO Events Coordinator
St. Jude Co-Organizer
St. Jude Donor '03-'04-'05-'06-'07-'08-'09-'10-'11-'12-'13-'14-'15-'16-'17-'18-'19-
'20-'21-'22-'23-'24
NCM Sinkhole Donor
CI 5, 8 & 11 Veteran


Awesome writeup Patches. Going to keep this one on file for future reference.
07-25-2007, 11:55 PM
#9
Le Mans Master

Great write-up as always. I have my two sets of Rodney Dickman Gears just been waiting for a free weekend.
BTW - Did you notice any additional motor noise after switching to metal gears?
BTW - Did you notice any additional motor noise after switching to metal gears?
 07-26-2007, 12:33 AM
#12
Team Owner
XLNT write up plus pictures!
Gets an A++++++ in my book! This is a keeper!
Thanks,Matt
Gets an A++++++ in my book! This is a keeper!
Thanks,Matt
 07-26-2007, 12:59 AM
#14
Drifting


Member Since: Feb 1999
Location: Marietta GA
Posts: 1,804
Likes: 0
Received 0 Likes
on
0 Posts
St. Jude Donor '04-'05-'06-'08-'09

Once again Patches shares his know how with us lesser mortals..LOL
I just know I will have to do this sooner or later and now I know how.
Thanks Ed
I just know I will have to do this sooner or later and now I know how.
Thanks Ed
07-26-2007, 01:41 AM
#15
Tech Contributor
Member Since: Dec 2003
Location: Horncastle Lincolnshire, England
Posts: 19,384
Likes: 0
Received 79 Likes
on
61 Posts
2023 C5 of the Year Finalist - Unmodified
Great write up Patches. Thanks for taking the time to put it together. I'll drop that one into the archive.
Thats one job that figures in my future. I had one motor gear replaced under warranty and since fitted the heavier T85 headlights. I have 2 gear kits from Rodney waiting to go in. The write up will come in really useful.
Thats one job that figures in my future. I had one motor gear replaced under warranty and since fitted the heavier T85 headlights. I have 2 gear kits from Rodney waiting to go in. The write up will come in really useful.

 07-26-2007, 08:22 AM
#18
Melting Slicks
The new gears are as quiet as the old. Nothing to hear except the little bump whne the light gets to its full open/closed position.