Complete writeup w/pics Pioneer AVIC D2 w/aftermarket speakers and amp in a 2005 C6
#1
Team Owner


Thread Starter
Complete writeup w/pics on removing Bose system and installing a Pioneer AVIC D2
w/aftermarket speakers and amp in a 2005 C6 w/OnStar
w/aftermarket speakers and amp in a 2005 C6 w/OnStar
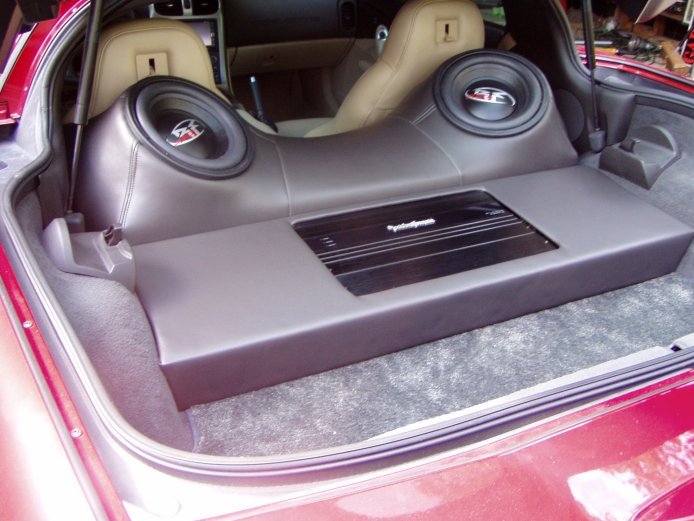
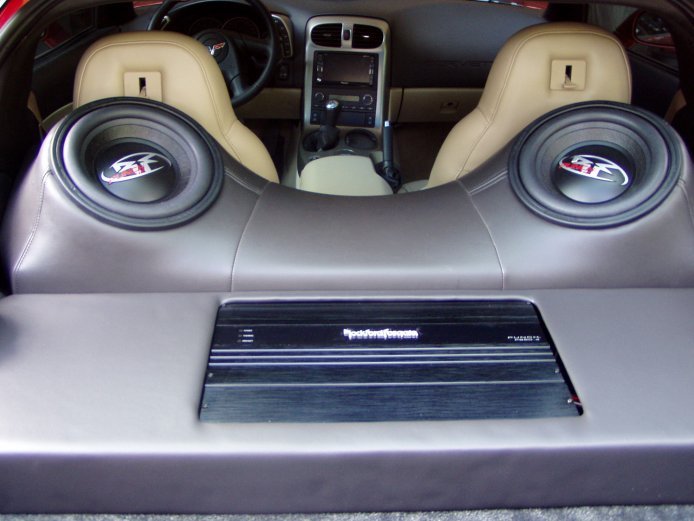
This is a write-up on how I totally removed the bose system, amp, speakers, HU, everything, and installed a Pioneer AVIC D2 and Pioneer GEX-P920XM XM receiver with Image Dynamics CSX62, 6.5" separate system in the doors and two Fosgate RFP3810 10" subs in the rear in a custom built fiberglass enclosure and amprack all running off a Fosgate P850.4 amp.
Ok, I won't bore you with the little things that you already know, like how to remove the console trim or door panels and such since there are a dozen threads on them and I know you will just scroll past it anyway. Therefore, I will start with the doors….
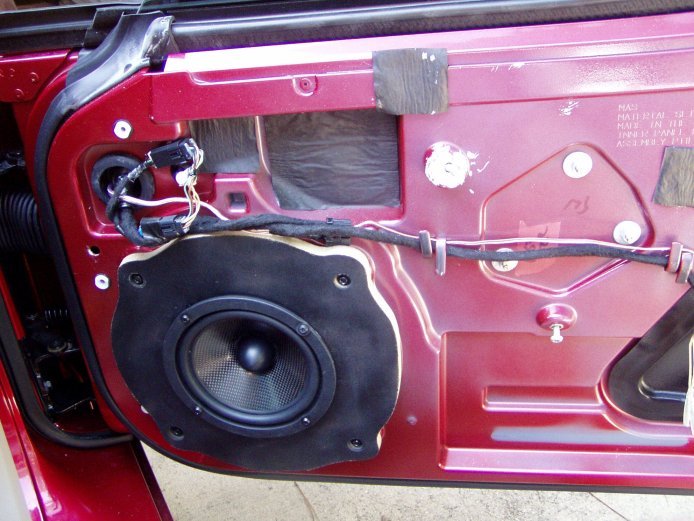
I removed the 10" woofer-like-things and traced the shape of it out on 1/2" MDF. I then traced the 6.5" mounting hole in the center and commenced to cuttin' like a ****. I then painted the baffles black, mounted the 6.5" mid and attached it to the door.
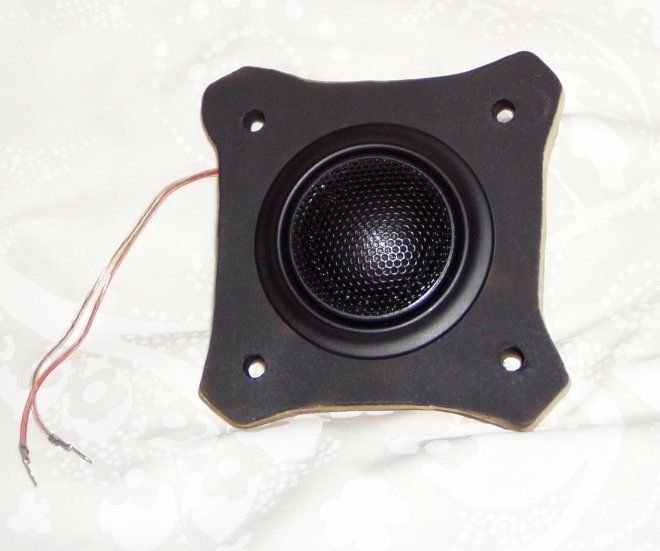
I did the same thing for the twiddler thingy-ma-bobs in the door panels. Again using 1/2" MDF I traced the shape of the twiddler and the mounting hole for the new ID tweeter, painted them black and mounted them back onto the door panel.
I ran 14-gauge speaker wire for the mids and 16-gauge speaker wire for the tweets from the front to the back of the car. For the driver side door speakers I ran the speaker wire, along with the RCA cables, down the driver side sill area. For the passenger side door I ran the speaker wire under the dash and down the console tunnel to the rear since I used the passenger side sill area to run the 4-gauge power and ground wires for the amp. I separated the speaker wire and power wire runs because it isn't good mojo to run signal wires and power wires in the same path since it can introduce noise into the system.
That's my story anyway and I'm sticking to it.
In order to run wire into the doors you have to remove a black plastic cover. Behind it is a nice large cavity to run your wires through the rubber boot to the inside of the door.
I used a "step bit" and drilled a 1/2" hole in it, put a rubber grommet on it and ran my speaker wires through it into the door. It is really quite simple to do. I didn't get a picture of this but since this is a living document I will try to remember to get one some day if I happen to pull the sill trim panels off again.
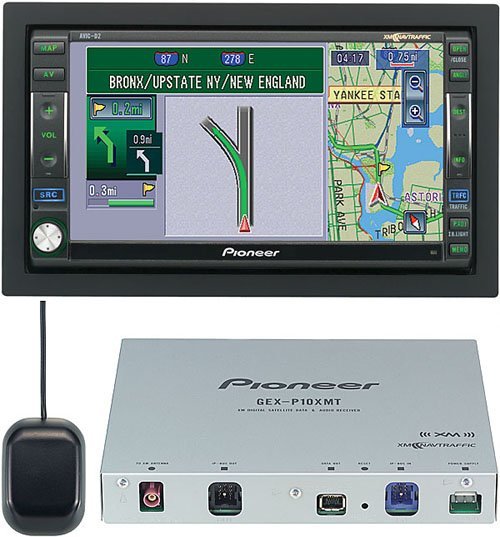
I removed the stock Delco 6-disk in-dash CD changer HU with XM that went with the Blose system and replaced it with the Pioneer AVIC D2 DVD/NAV setup.
I needed a mounting kit to install the AVIC D2. It is the double-din Metra kit #95-3304.
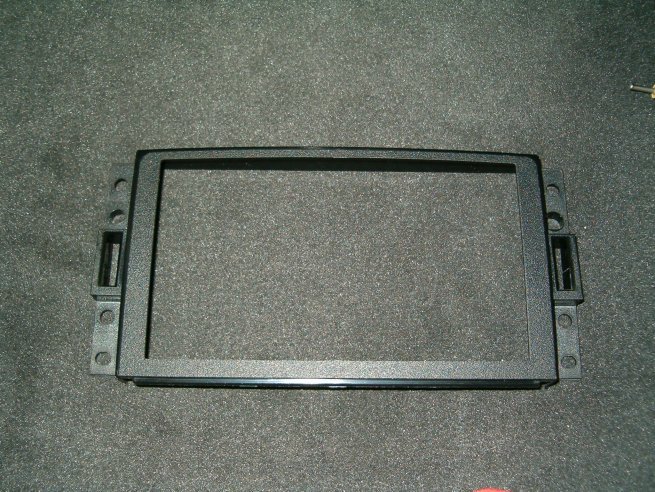
You can pick one up here:
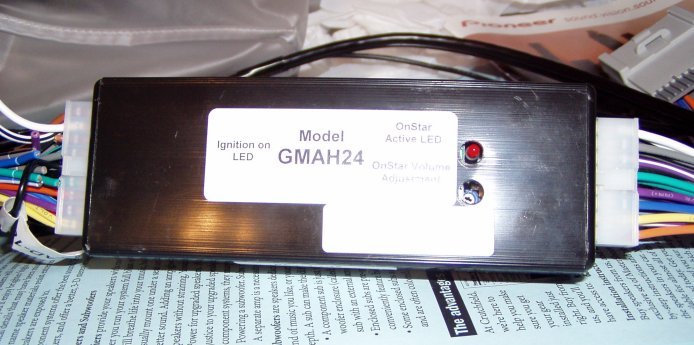
Since I removed the Bose amp and all, I need to use this data bus module from Peripheral. It is model #GMAH24. This unit retains my OnStar system as well as keep the cars ECM from thinking any shenanigans are going on…like…installing some rowdy aftermarket stereo system or some such nonsense.
It looks like this and you can get one at the same place I linked to the mounting kit.
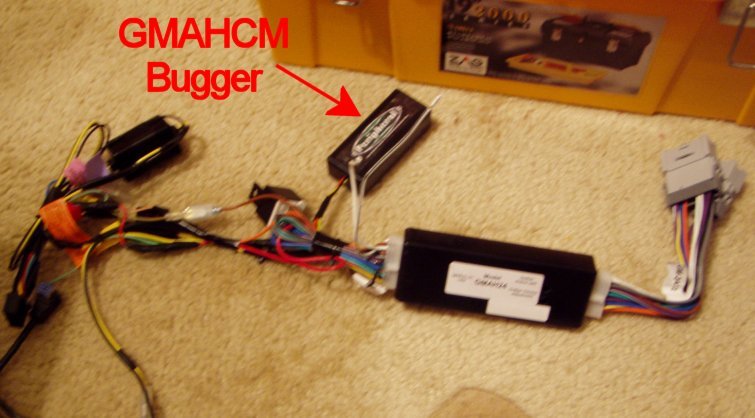
Oh, and I needed one of these little buggers too! It is the GMAHCM also made by Peripheral and it keeps the cars interior "chimes"….chiming. Without it I wouldn't know if I had my seatbelt on or not.
And now for something completely different.

Ok, now remember when I said I removed the Bose system…completely? And because of that I need that doohickey to retain my OnStar? Well, I also need to run some speaker wire to a separate speaker to hear the OnStar "voices" and phone through since I no longer have a Bose amp and speakers to do this for me, and even though the voices in my head provide far better conversations, they can't replace the OnStar voices. So….what to do? Well, there are some wire outputs on that GMAH24 whatchadinkle that are meant to go to speakers. So what I did was I removed the center channel from the dash.
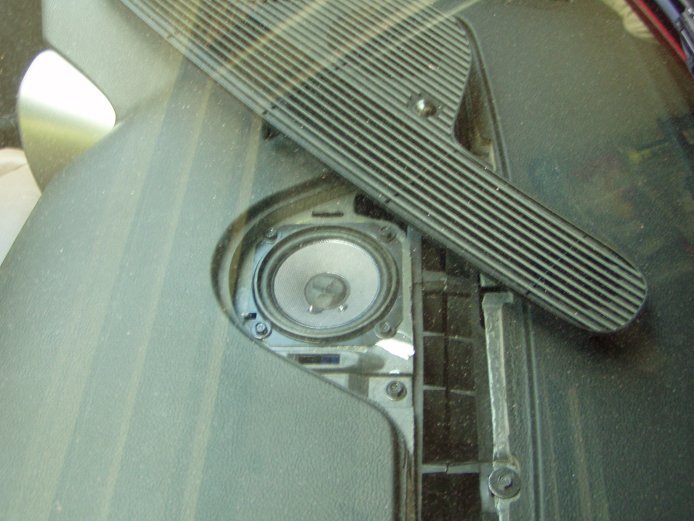
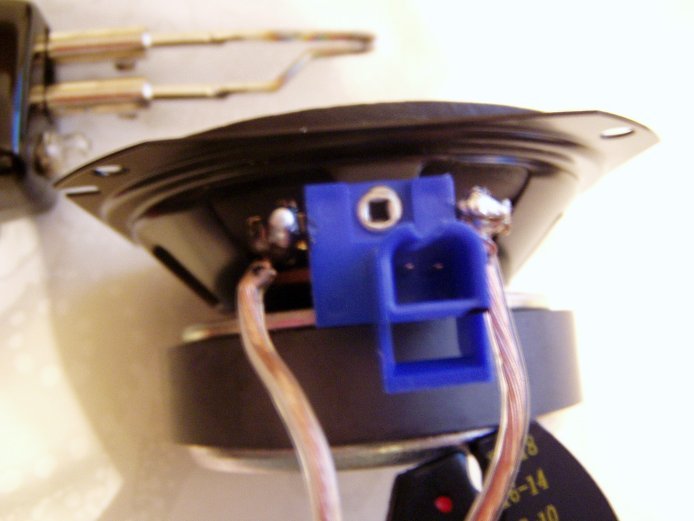
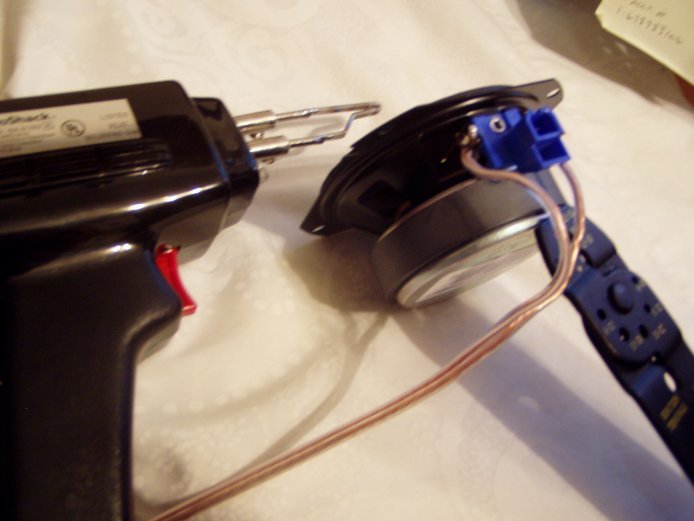
I then unplugged the Bose connector and soldered the positive and negative speaker leads to the terminals on the crappy Bose paper speaker. I figured, why not? It will only be playing a voice through it so it doesn't have to be a great speaker. Besides, there is no such thing as a "stereo" voice, so mono will be just fine.
I then ran the speaker wire through the dash and hooked it to the speaker output on the GMAH24 dojigger and VOILA! I now have OnStar through the center dash speaker! This is how it looks.
Now, since I removed the stock Bose system the factory XM receiver is useless. So I installed the Pioneer GEX-P920XM XM receiver in the empty well that was left behind when I removed the Bose amp. It's the perfect spot for this gizmo.
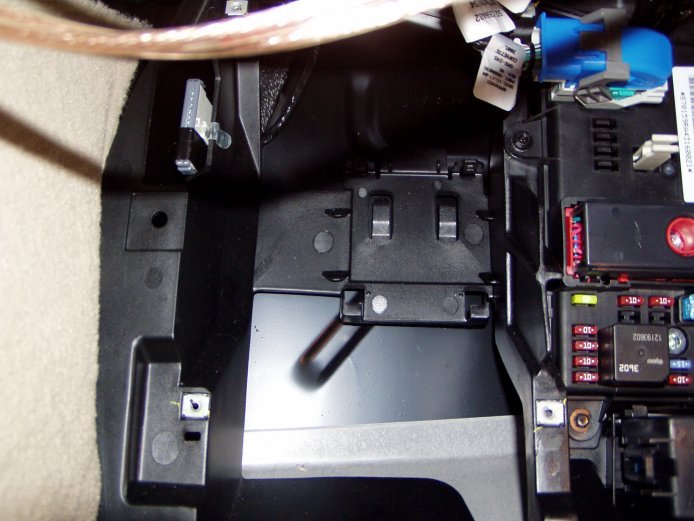
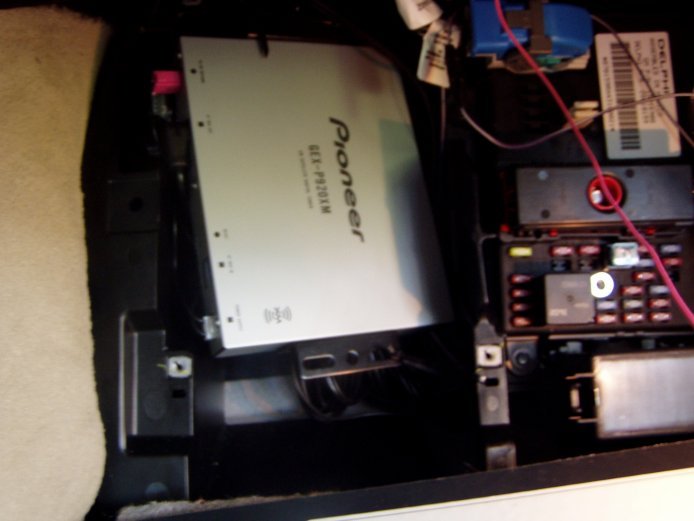
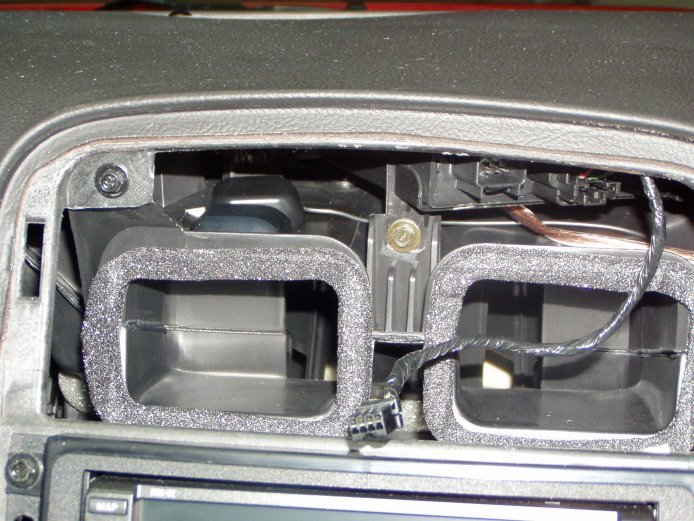
I then ran the wires and new XM antenna up to the new HU and mounted the XM antenna next to the AVIC D2's GPS antenna on top of the vent ducts. Seems to work just fine too! Both the GPS and XM antennas are each about the size of a quarter so they fit perfectly on the vent. Also the antenna wires are run in separate directions to avoid interference.
Here are a couple of pics of it.

I need to run grab a drink sooooo…watch teh funny till I get back
(Continued next post)
Last edited by _Nomad_; 02-23-2016 at 02:39 AM. Reason: NEW PICS!
#2
Team Owner


Thread Starter
Mmmmm….sweet tea!
Ok, now in order for the NAV unit to accurately place you on the map, it uses a GPS antenna, A VSS (Vehicle Speed Sensor) wire tap, and a Reverse Gear wire tap.
The VSS wire tells the NAV unit how far and fast you are moving forward and the Reverse Gear wire tells the NAV unit how far you have moved backwards. Together with the GPS antenna it can calculate accurately where the heck you are and display YOU on the map….kinda creepy and cool at the same time. Your car now KNOWS where you are!
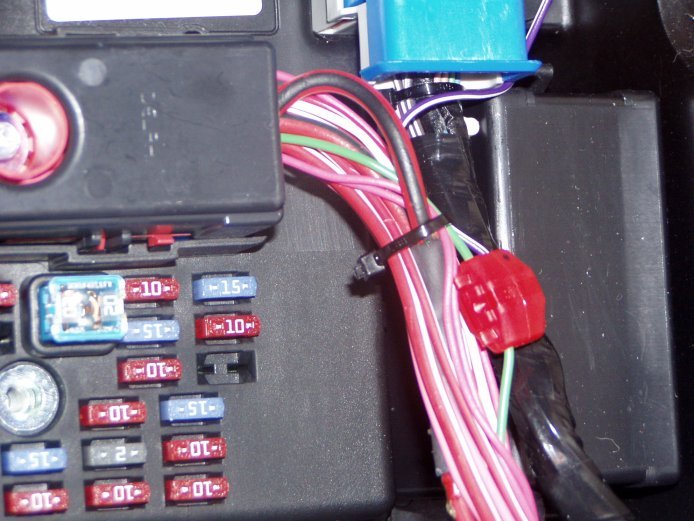
The Reverse Gear wire that you need to tap in to is located in the wire bundle at the BCM, which is found in the passenger side floorboard right next to the fuse box. It is the light green wire, there is only one so it isn't hard to find, unless of course, you're color blind. In which case this picture won't be much help to you. But for those of us who are not color spectrum impaired, it looks like this.
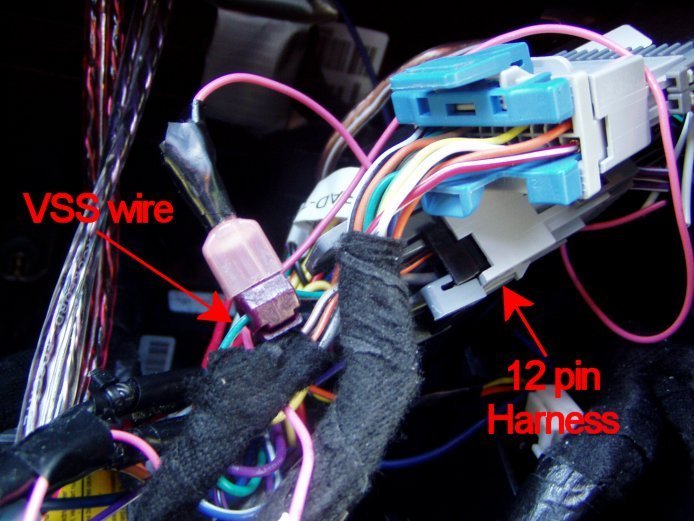
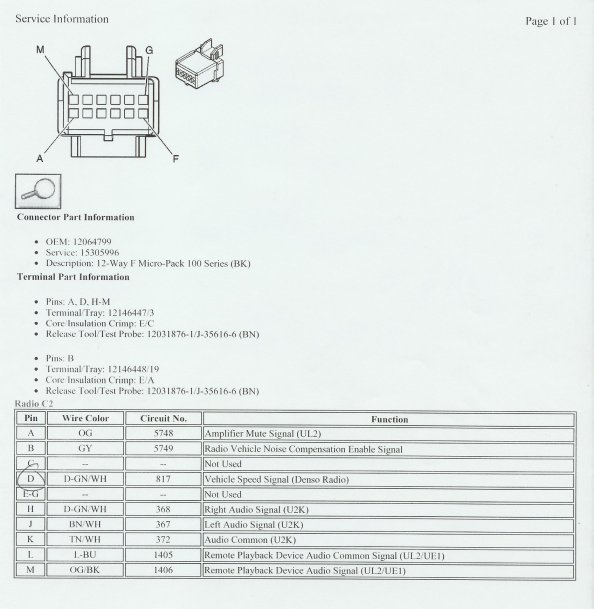
Since this car had the Bose stereo, the VSS wire is located in the black 12 pin wiring harness that goes into the back of the stereo. It is the dark green wire with a white stripe. Located at pin D. There is a second dark green wire with white stripe at pin H but that is the right audio signal wire so it is dead now. This is the wire you will need to tap.
(Note: Non-Bose systems do NOT have this wire here. If you do not have the Bose stereo you will have to go to either the instrument cluster bundle or the ECM to find the VSS wire. However it would be easier to go the instrument cluster. The VSS wire is located at pin 6 on the instrument cluster plug. Again, it is a dark green wire with white stripe.)
To further help you follow my description of the 12 pin connector going to the Bose stereo, here is a scan I made of the wiring diagram of the 12 pin connector that goes to the Bose stereo and the location of the VSS wire.
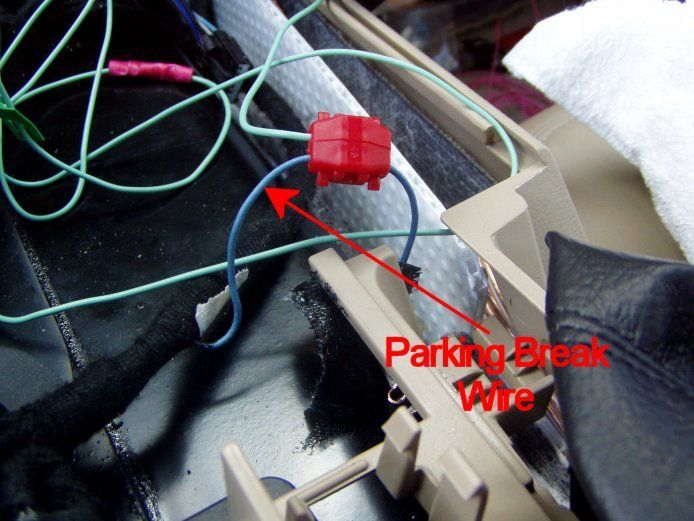
The parking break wire has to be tapped into the power wire that goes to the parking break switch. This is done for safety reason so you don't kill yourself and everyone else by fiddling with the NAV map while driving…and…cuz…"they" say so. Of course grounding that wire will bypass the safety feature but you didn't hear that from me…ok?
The wire you need is this light blue wire coming from the parking break to the main harness that goes to all the plugins and switches in the console.
(Disclaimer: By law I must tell you to tap in here or the parking break wire police will smote me on the head with a shillelagh and call me names, which ordinarily I don't mind as long as they are pretty women who spend all of my money and diminish my self esteem.)
Note: Keep a look out for this bugger! It's the dreaded ground loop…avoid it at all cost!

Now comes the making of the foundation board made of 3/4" MDF that I used to mount the sub enclosure to. It will also be used as an amprack. I simply measured and cut the contours of the rear hatch area. Here is a pic of it after carpeting and test fitting the amp and stuff and junk.
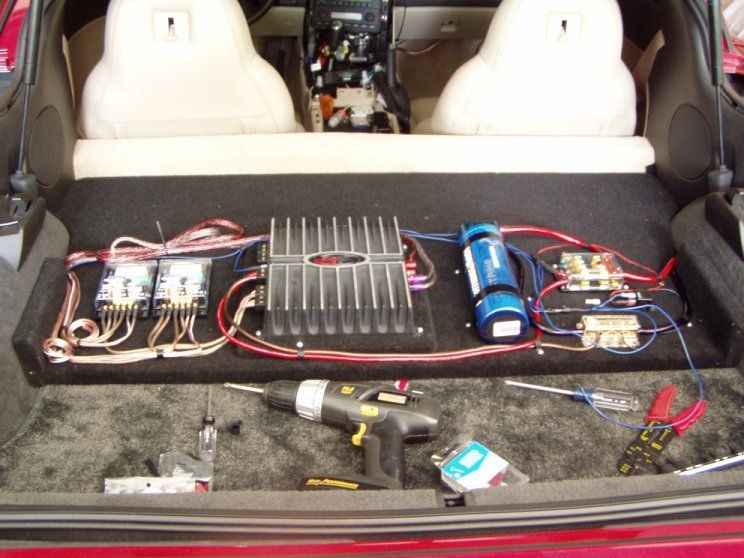
I then covered it in carpet, laid it down in the back and started building the frame of the sub enclosure that would eventually mount to it.
Here is the sub enclosure framed up and ready for fleece. This will be a fiberglass enclosure.
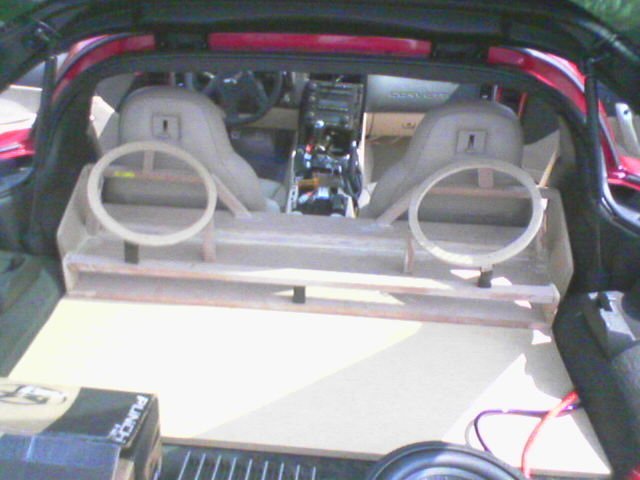
Here is the sub enclosure finished and sanded…and sanded…and sanded…
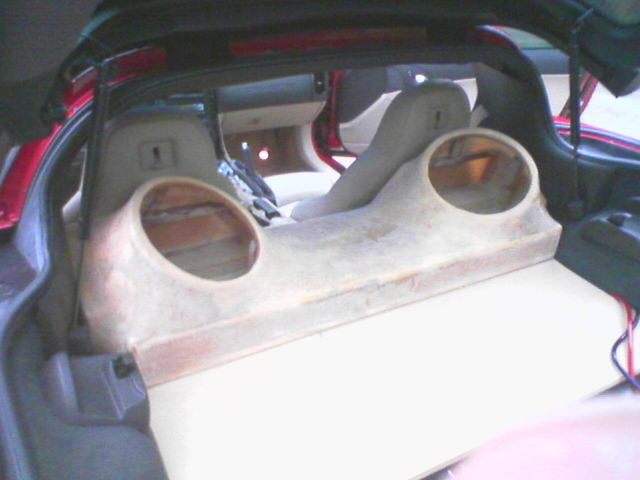
You can see where I am going with the amp rack here. I made a cover for the amp and stuff and junk and slapped it on giving the amp and cap the 'ole flush mount look.
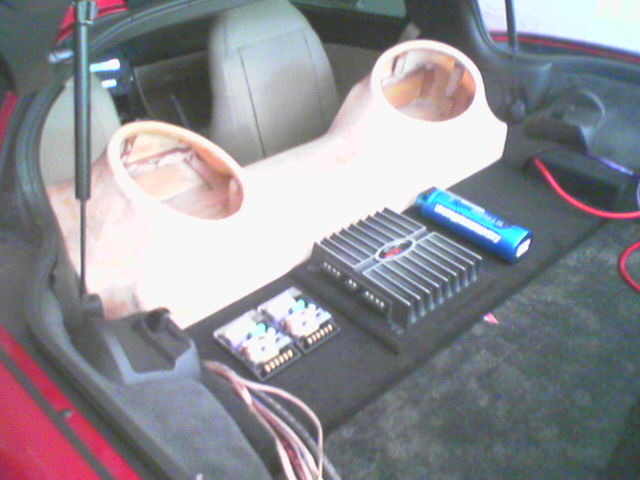
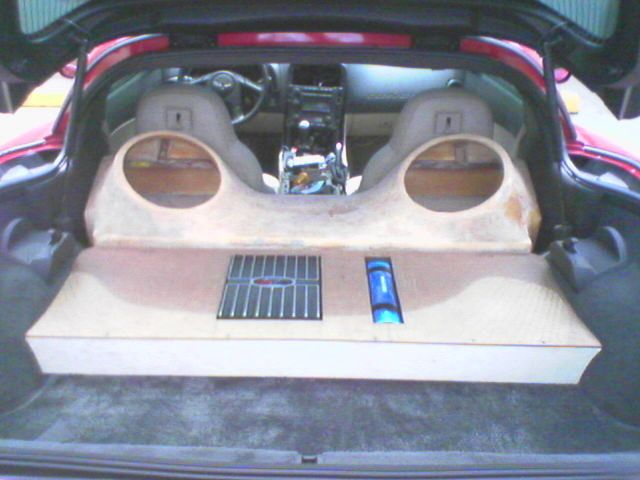
(Note: I have since replaced that amp and deep-sixed the cap. The new amp is a Fosgate P850.4 as seen below)
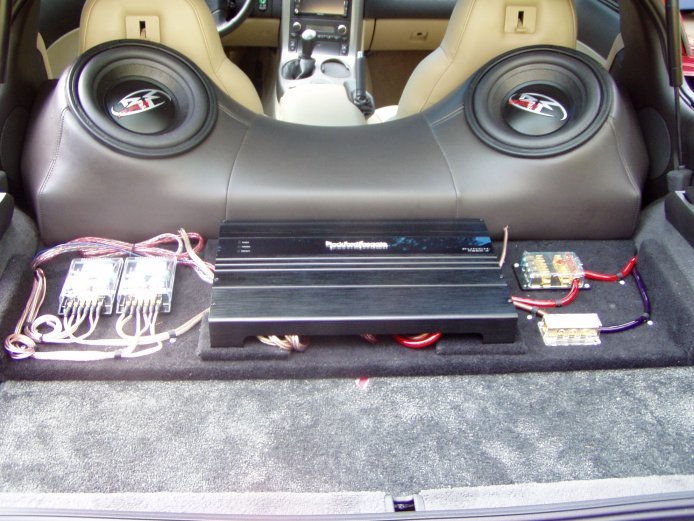
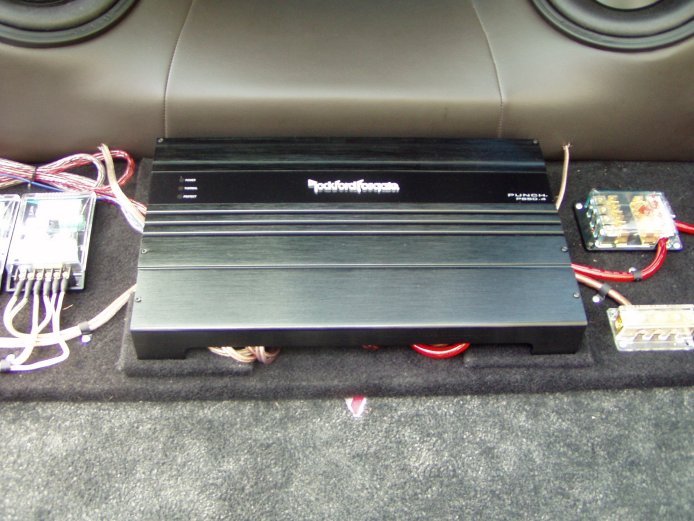
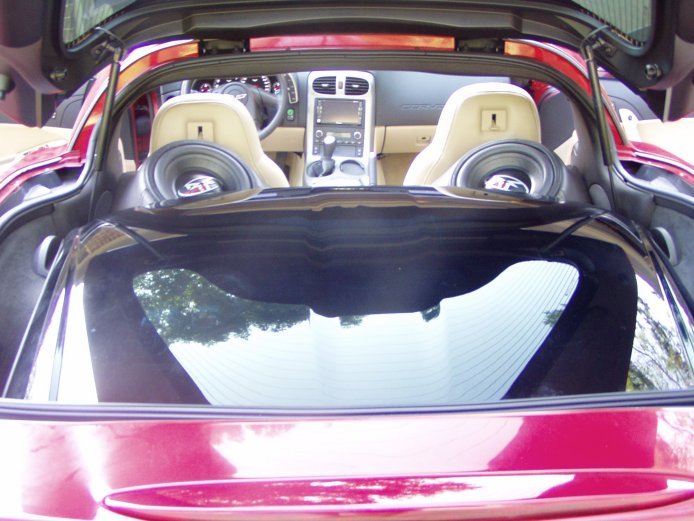
Now here are some pics of the finished product after having the sub enclosure and amprack lid covered in "midnight black" vinyl. This vinyl is a GM design so it matches the interior very well. Oh, and yes, the targa top fits in the back just fine.
Here is how it looks now after I installed the new amp.
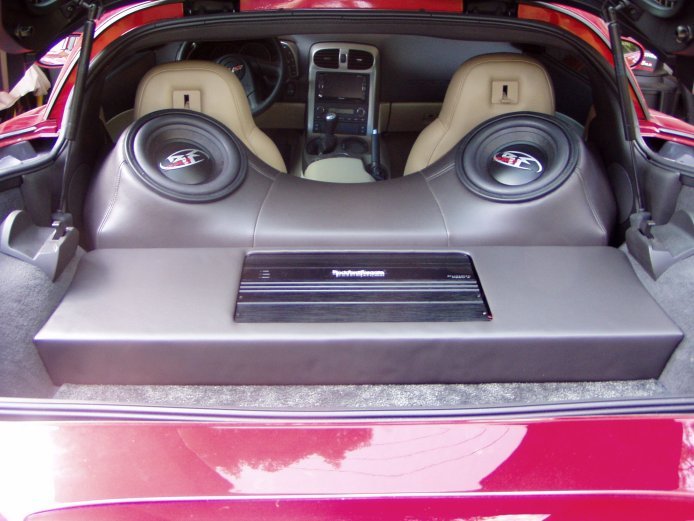
Here is the targa top stowed in the back with no obstructions. It kinda looks like a smiling frog doesn't it?
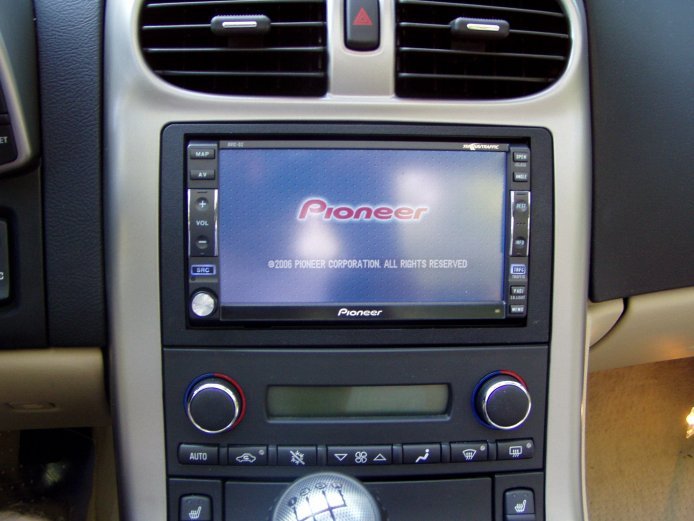
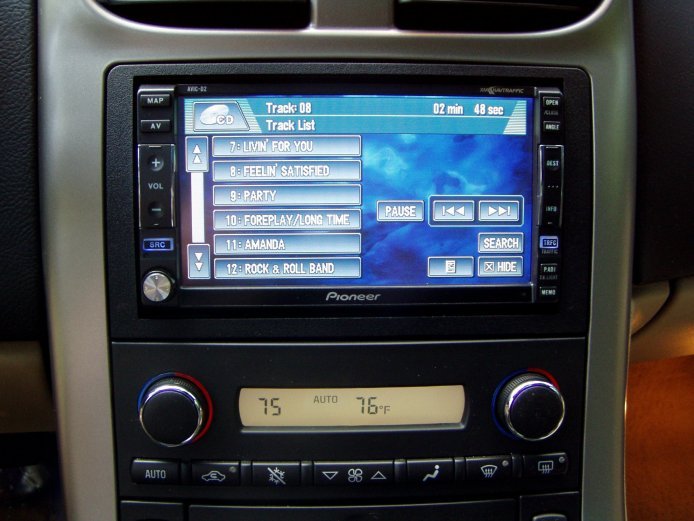
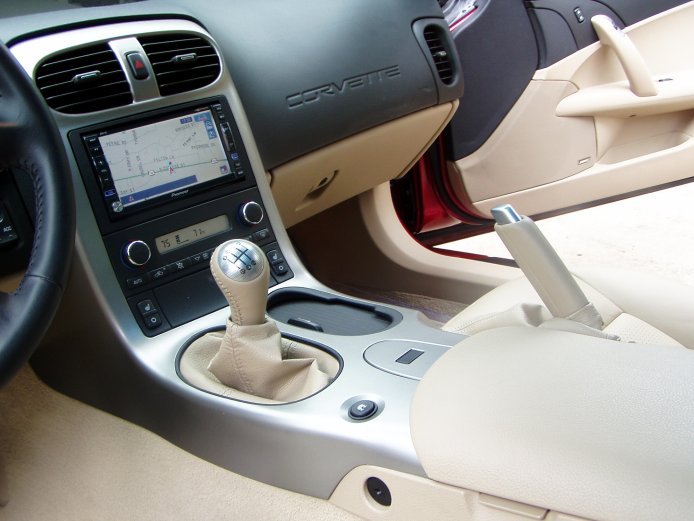
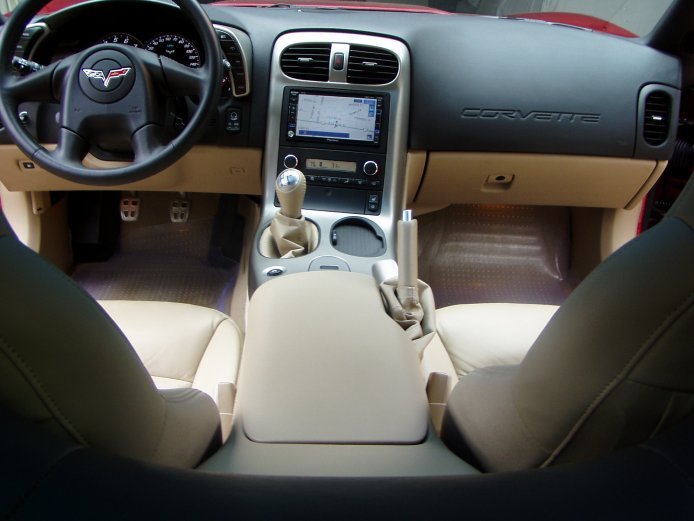
Now, if you do everything I mentioned above, and a lot that I didn't, then you too can have a Pioneer AVIC D2 in your C6 Corvette that looks like this…TADA!


Ok, now in order for the NAV unit to accurately place you on the map, it uses a GPS antenna, A VSS (Vehicle Speed Sensor) wire tap, and a Reverse Gear wire tap.
The VSS wire tells the NAV unit how far and fast you are moving forward and the Reverse Gear wire tells the NAV unit how far you have moved backwards. Together with the GPS antenna it can calculate accurately where the heck you are and display YOU on the map….kinda creepy and cool at the same time. Your car now KNOWS where you are!

The Reverse Gear wire that you need to tap in to is located in the wire bundle at the BCM, which is found in the passenger side floorboard right next to the fuse box. It is the light green wire, there is only one so it isn't hard to find, unless of course, you're color blind. In which case this picture won't be much help to you. But for those of us who are not color spectrum impaired, it looks like this.

Since this car had the Bose stereo, the VSS wire is located in the black 12 pin wiring harness that goes into the back of the stereo. It is the dark green wire with a white stripe. Located at pin D. There is a second dark green wire with white stripe at pin H but that is the right audio signal wire so it is dead now. This is the wire you will need to tap.

(Note: Non-Bose systems do NOT have this wire here. If you do not have the Bose stereo you will have to go to either the instrument cluster bundle or the ECM to find the VSS wire. However it would be easier to go the instrument cluster. The VSS wire is located at pin 6 on the instrument cluster plug. Again, it is a dark green wire with white stripe.)
To further help you follow my description of the 12 pin connector going to the Bose stereo, here is a scan I made of the wiring diagram of the 12 pin connector that goes to the Bose stereo and the location of the VSS wire.

The parking break wire has to be tapped into the power wire that goes to the parking break switch. This is done for safety reason so you don't kill yourself and everyone else by fiddling with the NAV map while driving…and…cuz…"they" say so. Of course grounding that wire will bypass the safety feature but you didn't hear that from me…ok?
The wire you need is this light blue wire coming from the parking break to the main harness that goes to all the plugins and switches in the console.

(Disclaimer: By law I must tell you to tap in here or the parking break wire police will smote me on the head with a shillelagh and call me names, which ordinarily I don't mind as long as they are pretty women who spend all of my money and diminish my self esteem.)
Note: Keep a look out for this bugger! It's the dreaded ground loop…avoid it at all cost!

Now comes the making of the foundation board made of 3/4" MDF that I used to mount the sub enclosure to. It will also be used as an amprack. I simply measured and cut the contours of the rear hatch area. Here is a pic of it after carpeting and test fitting the amp and stuff and junk.

I then covered it in carpet, laid it down in the back and started building the frame of the sub enclosure that would eventually mount to it.
Here is the sub enclosure framed up and ready for fleece. This will be a fiberglass enclosure.

Here is the sub enclosure finished and sanded…and sanded…and sanded…

You can see where I am going with the amp rack here. I made a cover for the amp and stuff and junk and slapped it on giving the amp and cap the 'ole flush mount look.


(Note: I have since replaced that amp and deep-sixed the cap. The new amp is a Fosgate P850.4 as seen below)


Now here are some pics of the finished product after having the sub enclosure and amprack lid covered in "midnight black" vinyl. This vinyl is a GM design so it matches the interior very well. Oh, and yes, the targa top fits in the back just fine.
Here is how it looks now after I installed the new amp.


Here is the targa top stowed in the back with no obstructions. It kinda looks like a smiling frog doesn't it?

Now, if you do everything I mentioned above, and a lot that I didn't, then you too can have a Pioneer AVIC D2 in your C6 Corvette that looks like this…TADA!


Last edited by _Nomad_; 03-01-2016 at 01:32 AM. Reason: NEW PICS!
#5
Team Owner


Thread Starter
Originally Posted by BlackMark
This is the exact nav unit I am planning to install in my C6.Thanks for taking the time to document every step with outstanding pictures!This will make it a whole lot easier.


#6
Supporting Tuner
Sweet install 


#9
Team Owner


Thread Starter
Originally Posted by TheKomoman
Nice install and write-up Nomad! 

How's it sound?


How's it sound?

I'm glad you guys like the writeup and I hope it helps some folks so they don't have to do all of the research I did. This is the first writeup of a 2005 C6 with Bose, without stock nav where EVERYTHING was replaced yet retained OnStar and XM. The cool thing is that every year C6 with Bose should have the VSS in the same place. Not to mention the reverse gear and parking break wires. So all C6 owners should get something useful from this...maybe...I hope.

#11
Team Owner


Thread Starter
Originally Posted by Buddy A
It's very helpful. I'm going to start mine in a few weeks and these write ups will give me the courage to attempt it on my own.


#14
Looks very nice. You might want to coat the back of those MDF baffles with some resin or paint. If that MDF gets wet it will crumble. I learned that the hard way. Stitching on that sub enclosure looks very nice.
Shane
Shane
#15
Very very nice. My girlfriend is thinking about getting me that same Nav unit for our 2 year anniversary. How do you like it? Anything that yuo are not happy about? Any reasons to go with something different? Thanks.
#17
Team Owner


Thread Starter
Originally Posted by rjward
Very very nice. My girlfriend is thinking about getting me that same Nav unit for our 2 year anniversary. How do you like it? Anything that yuo are not happy about? Any reasons to go with something different? Thanks.
It's also a very user friendly unit, you will enjoy it.

#18
Team Owner


Thread Starter
I just updated the write-up with some new pics of the finished product after installing a new amp and a bit more info on the VSS wire location for you C6 owners that don't have Bose.
#19
Burning Brakes


Member Since: Dec 2004
Location: Penn Valley California
Posts: 1,075
Likes: 0
Received 3 Likes
on
3 Posts

My AVIC-D2 should arrive tomorrow and I am a C6 non-Bose owner.I'll look forward to the update pictures on where to tap into the VSS without going to the BCM.Is Peripheral GMCO still the interface to use for the non-Bose?


