
Rusty OEM rotors...my little project to attack this subject>>>
 07-04-2005, 07:35 AM
#1
Melting Slicks

Thread Starter

Call it what you want but from day one I have been bothered by the rusty appearance of the Z51 rotors...yes they are cast iron but these rotors just rust more than many others... my Lotus Elise rotors barely rust and in fact look new after 2000+ miles. So I looked at options and decided to see if the cheap route might work (local powder coating place wanted $125 per rotor! so that fell off the option list). Here is what I did>>>
First the materials list
1 gal Oxysolve from Eastwood.com
blue loc tite
paint brush and '0' steel wool
13/16" socket drive
Acetone
bucket

You need to remove each brake caliper assembly therefore remove the two 13/16" (or 21mm) bolts holding on the caliper bracket

When reinstalling the bracket will need the blue loc tite for the bolts.
Now this is what you will start with...pre treatment rotors front and rear>>>


After removing the caliper brackets remove each rotor and soak/brush in the Oxisolve (place about 1/2 gal in the bucket). Also using the brush (with a catch container under each hub assembly) brush on Oxisolve several times...work heavier rust with steel wool


Takes about 15 minutes soaking for each rotor and then place on newspaper and dry off. Next using the Acetone with steel wool and paper towls (not too much...don't want the to have dripping clean off coating in holes and vanes) clean off brake pad contact surfaces (area will remain a dull greyish appearance and the little remaining on the contact surface with quickly burnish off on first brake application. On rear rotors make sure you do the emergency brake shoe contact areas inside the rotor.
Any way here is the post treatment appearance and every bit of the rust (inside vanes of rotors, holes etc) is gone. All the surfaces now are coated with zinc phosphate... quoting from the product label (and fully backed by Eastwood folks) OxiSolv is designed as a one step process to remove rust. At the same time it leaves a zinc phosphate coating which not only inhibits further rusting but also provides excellent primer adhesion.


After first drive here the pad contact areas starting to burnish up a bit>>>

Long term...don't know since I just did this on Saturday, but I do know that the process removed a lot of rust from the rotors and IMO looks a hell of a lot better Total time: 1 hr per rotor (couple beers thrown in to boot)
Michael
First the materials list
1 gal Oxysolve from Eastwood.com
blue loc tite
paint brush and '0' steel wool
13/16" socket drive
Acetone
bucket
You need to remove each brake caliper assembly therefore remove the two 13/16" (or 21mm) bolts holding on the caliper bracket
When reinstalling the bracket will need the blue loc tite for the bolts.
Now this is what you will start with...pre treatment rotors front and rear>>>
After removing the caliper brackets remove each rotor and soak/brush in the Oxisolve (place about 1/2 gal in the bucket). Also using the brush (with a catch container under each hub assembly) brush on Oxisolve several times...work heavier rust with steel wool
Takes about 15 minutes soaking for each rotor and then place on newspaper and dry off. Next using the Acetone with steel wool and paper towls (not too much...don't want the to have dripping clean off coating in holes and vanes) clean off brake pad contact surfaces (area will remain a dull greyish appearance and the little remaining on the contact surface with quickly burnish off on first brake application. On rear rotors make sure you do the emergency brake shoe contact areas inside the rotor.
Any way here is the post treatment appearance and every bit of the rust (inside vanes of rotors, holes etc) is gone. All the surfaces now are coated with zinc phosphate... quoting from the product label (and fully backed by Eastwood folks) OxiSolv is designed as a one step process to remove rust. At the same time it leaves a zinc phosphate coating which not only inhibits further rusting but also provides excellent primer adhesion.
After first drive here the pad contact areas starting to burnish up a bit>>>
Long term...don't know since I just did this on Saturday, but I do know that the process removed a lot of rust from the rotors and IMO looks a hell of a lot better Total time: 1 hr per rotor (couple beers thrown in to boot)
Michael
Last edited by C6FirstVette; 07-04-2005 at 07:38 AM.


 07-04-2005, 09:30 AM
#4
Drifting

Member Since: May 2005
Location: Ft. Liquordale Florida
Posts: 1,254
Likes: 0
Received 0 Likes
on
0 Posts
Wouldn't the contact surfaces just re-rust after the pads have rubbed off the coating?
I do understand that this would prevent to REST of the rotor from rusting...
Nice job...
Rick
I do understand that this would prevent to REST of the rotor from rusting...
Nice job...
Rick
07-04-2005, 10:48 AM
#5
Safety Car


Member Since: Jul 2001
Location: Spicewood, Texas, USA TX-Texas
Posts: 4,456
Likes: 0
Received 3 Likes
on
3 Posts

Originally Posted by SickRick
Wouldn't the contact surfaces just re-rust after the pads have rubbed off the coating?
I do understand that this would prevent to REST of the rotor from rusting...
I do understand that this would prevent to REST of the rotor from rusting...
 07-04-2005, 08:47 PM
#7
Racer


Excellent post. I appreciate the top looking down photo on the rotor to see how the calipers are attached. I'm painting the calipers in a couple of weeks and this was very helpful. You saved me some time and surprise. Let us know how the treatment holds up. Thanks!
 07-05-2005, 06:19 PM
#9
Melting Slicks
Thread Starter
Thanks all...guess I better post torque numbers now...did a cross link post over on DC forum and one member got a little 'aggressive'...anyway I torqued to 120 lbs (mr aggressive says 125 lbs and MUST replace bolts each time you remove...assume he will explain the logic to that).
Michael
Michael
07-05-2005, 07:36 PM
#10
Safety Car
Member Since: Jul 2001
Location: Spicewood, Texas, USA TX-Texas
Posts: 4,456
Likes: 0
Received 3 Likes
on
3 Posts
Originally Posted by C6FirstVette
Thanks all...guess I better post torque numbers now...did a cross link post over on DC forum and one member got a little 'aggressive'...anyway I torqued to 120 lbs (mr aggressive says 125 lbs and MUST replace bolts each time you remove...assume he will explain the logic to that).
Michael
Michael
 07-05-2005, 07:42 PM
#11
Excellent post but ya got me dizzy when I looked into that bucket picture! Please let us know if it keeps the rust stains from occurring on the rims after washing the rotors during a car wash.
Thanks!
Thanks!
 03-19-2011, 08:05 PM
#13
Race Director

I don't think the zinc phosphate wash will hold up over the long term. It's meant more as a surface prep prior to painting and to keep rust off parts over a short timeframe.
If you wanted to try something that might, after doing the cleanup you could mask off the braking surfaces and try a cold galvanizing spray paint. I'm not sure if it would hold up to the heat, though as I've never used it except on galvanized radiators at work. I also don't see why you couldn't use hi-heat spray paint.
If you wanted to try something that might, after doing the cleanup you could mask off the braking surfaces and try a cold galvanizing spray paint. I'm not sure if it would hold up to the heat, though as I've never used it except on galvanized radiators at work. I also don't see why you couldn't use hi-heat spray paint.
03-19-2011, 08:53 PM
#14
Melting Slicks
The caliper bracket bolts (front and rear) are 129 ft-lbs. The caliper slide pins are 23 ft-lbs, and the manual does not indicate one time use only on either one.
DJ
DJ
03-19-2011, 09:04 PM
#15
Moderator


Member Since: Dec 2002
Location: Lakewood Ranch, FL
Posts: 40,066
Received 3,579 Likes
on
1,619 Posts

Wow! a 5 year old thread 
 03-19-2011, 11:36 PM
#17
Go Canes!

Drove me nuts also. I just painted mine black. Drive for 5 mins and whatever excess paint I got on the rotors rubbed off. It has been 6 months now and still looks good!

03-20-2011, 10:44 PM
#18
Melting Slicks
I sandblasted mine, acid etching primer, silver 2 stage paint, clear.
[IMG]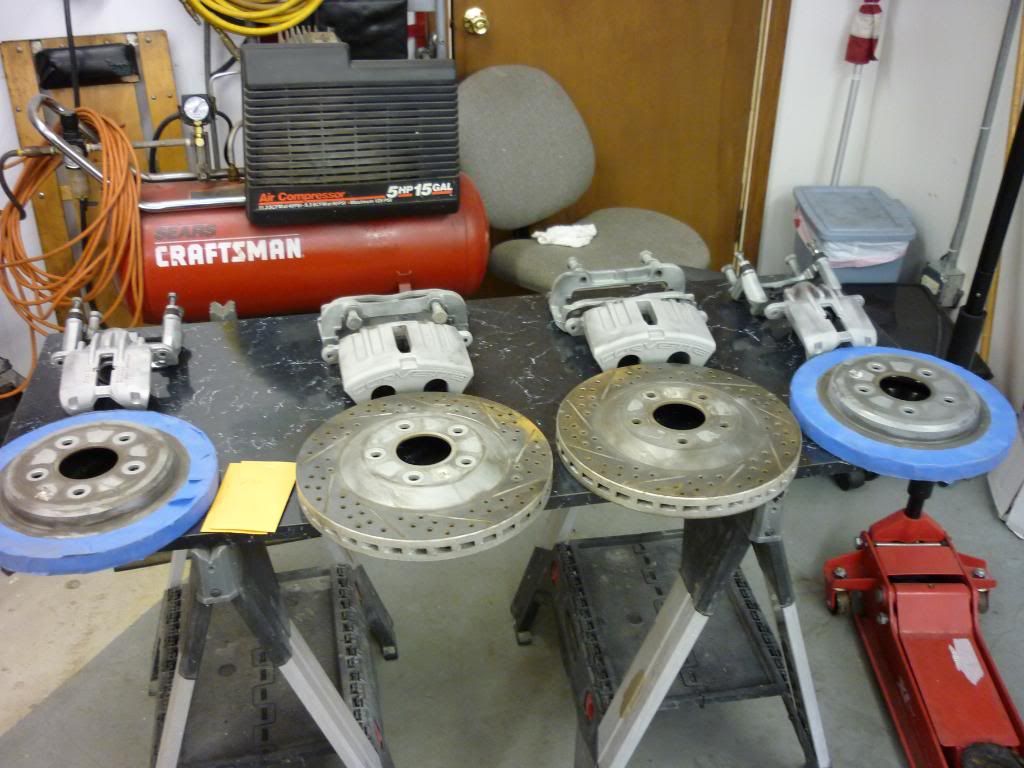 [/IMG]
[IMG] [/IMG]
[IMG]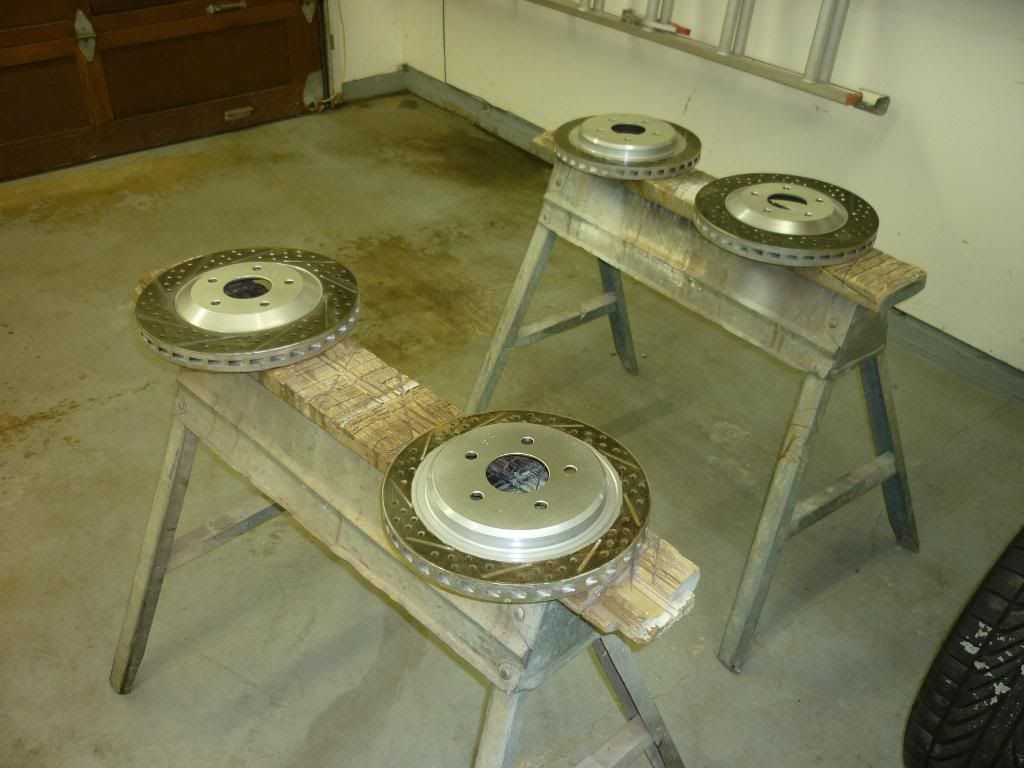 [/IMG]
[IMG] [/IMG]
[IMG]
[/IMG][IMG]
[/IMG][IMG]
[/IMG][IMG]
[/IMG]
 03-21-2011, 07:11 AM
#20
Safety Car

And you are correct, they are not torque to yield like head bolts, they are fine to re-use.